-
![]()
Daisy
Daisy is the Senior editor of the writing team for EaseUS. She has been working in EaseUS for over ten years, starting from a technical writer to a team leader of the content group. As a professional author for over 10 years, she writes a lot to help people overcome their tech troubles.…Read full bio -
Jane is an experienced editor for EaseUS focused on tech blog writing. Familiar with all kinds of video editing and screen recording software on the market, she specializes in composing posts about recording and editing videos. All the topics she chooses …Read full bio
-
![]()
Melissa Lee
Melissa Lee is an experienced technical blog writing editor. She knows the information about screen recording software on the market, and is also familiar with data cloning and data backup software. She is expert in writing posts about these products, aiming at providing users with effective solutions.…Read full bio -
Jean is recognized as one of the most professional writers in EaseUS. She has kept improving her writing skills over the past 10 years and helped millions of her readers solve their tech problems on PC, Mac, and iOS devices.…Read full bio
-
![]()
Jerry
Jerry is a fan of science and technology, aiming to make readers' tech life easy and enjoyable. He loves exploring new technologies and writing technical how-to tips. All the topics he chooses aim to offer users more instructive information.…Read full bio -
Larissa has rich experience in writing technical articles. After joining EaseUS, she frantically learned about data recovery, disk partitioning, data backup, screen recorder, disk clone, and other related knowledge. Now she is able to master the relevant content proficiently and write effective step-by-step guides on various computer issues.…Read full bio
-
![]()
Rel
Rel has always maintained a strong curiosity about the computer field and is committed to the research of the most efficient and practical computer problem solutions.…Read full bio -
![]()
Gemma
Gemma is member of EaseUS team and has been committed to creating valuable content in fields about file recovery, partition management, and data backup etc. for many years. She loves to help users solve various types of computer related issues.…Read full bio
Page Table of Contents
Jane Zhou
Updated on Apr 19, 2024
0 Views |
0 min read
Adding voice-overs to your work during a Google Slides presentation makes it more enjoyable. Ideally, voiceovers are narrations of you speaking while reading through the scripts of your slide. They seek to attract the listeners' attention and boost concentration. Are you eager to learn how to do a voiceover on Google Slides?
You should look no further because this guide has everything you need to know about this concept. We'll describe every stage in detail and ensure you understand everything at the end. Also, you'll learn about an excellent audio recorder you can use to record voiceovers and your Google Slide screen for sharing purposes.
Detailed Steps to Do Voiceover on Google Slides
Google Slides doesn't have built-in voiceovers by default. Therefore, you'll need to manually add them to your presentation by uploading audio files from Google Drive. This section will discuss how to do voiceover on Google Slides in three stages as follows:
- Prepare a Script and Slides
- Record Voiceover.
- Add Audio Files to Google Slides.
Read on as we discuss each stage in detail.
Stage 1. Prepare a Script and Slides
In this stage, you'll first need to write a script on paper or in a Word document to use for reference when doing the voiceover. For clarity purposes, your script should easily indicate where to place each bit of text. You can mark paragraphs as "Slide 1," "Slide 2," "Slide 3," etc. This enables you to know the time to pause in your audio recording.
Additionally, each slide requires a separate audio file. Therefore, consider placing a digital script at the bottom of your screen (in the speaker notes section). Once you've finished preparing a script and slides, you can move to stage 2, which entails recording a voiceover.
Stage 2. Record Voiceover
After creating the slides, you'll need to record a voiceover for each of them using a voice recorder. Here, the most recommended third-party tool to use is EaseUS RecExperts. It has an audio recording feature for recording sound from your microphone or computer.
With its AI-powered noise reduction feature, RecExperts immensely minimizes noise in your audio recordings. You're therefore guaranteed high-quality audio recordings. You can also adjust recording settings based on preference. The tool is, therefore, essential for doing voiceovers for Google Slides. You can download a trial version of the software on your computer to record voice without background noise.
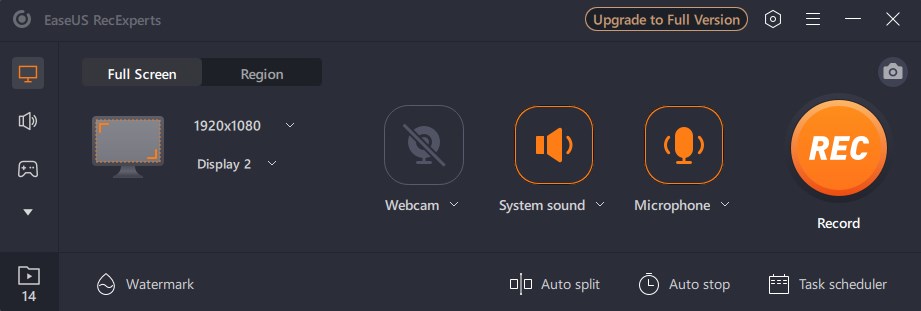
Step 1. Run EaseUS RecExperts, and click Record audio on the left panel. Next, choose the audio source you want to record, like System sound or microphone.
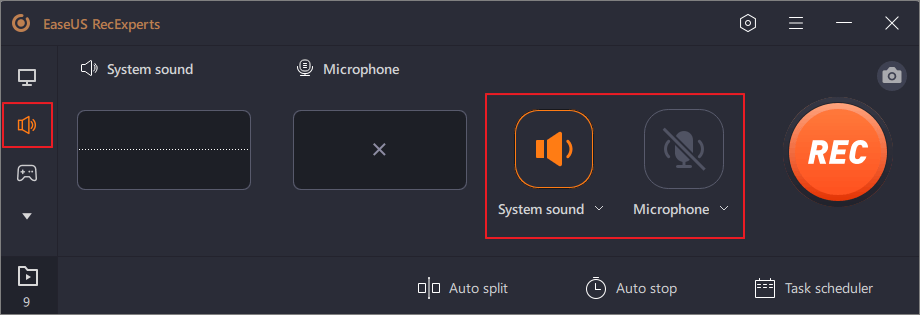
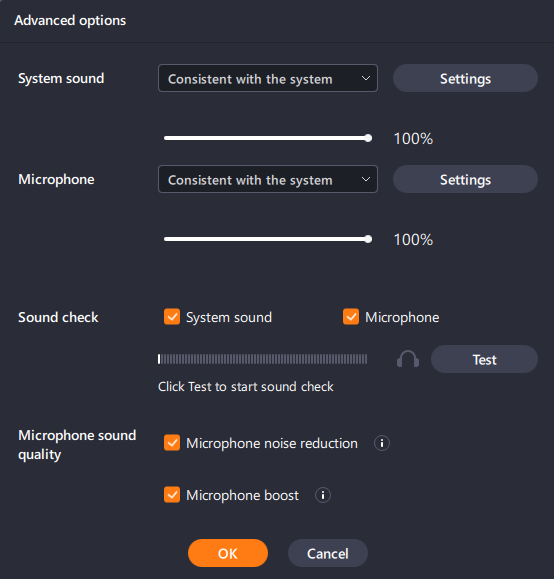
Step 2. Click the down-arrow icon next to System Sound or Microphone, choose the Advanced options, and tick the Microphone boost and Microphone noise reduction options. Moreover, you can also adjust the volume.
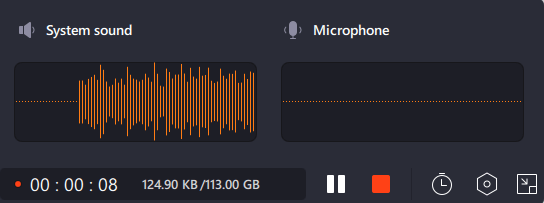
Step 3. Once done, click REC to start your audio recording.
Stage 3. Add Audio Files to Google Slides
Once you've recorded the audio for your presentation, the next step entails adding them to your Google Slides. First, you'll need to save your audio files in MP3 or WAV formats for easy uploading to Google Slides. Next, follow the steps below to add audio files to your Google Slides.
Step 1. Open Google Drive, then click on the "New" button. In the dropdown that displays, click on "File Upload."

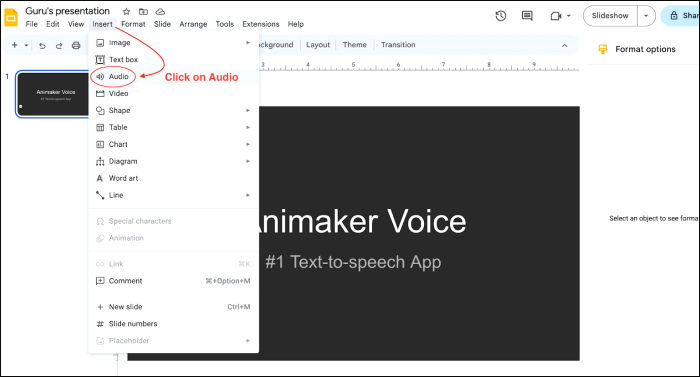
Step 2. Next, launch Google Slide and navigate where you want to attach the audio file. Go to the top menu and click on "Insert." Once the dropdown shows up, click on "Audio."
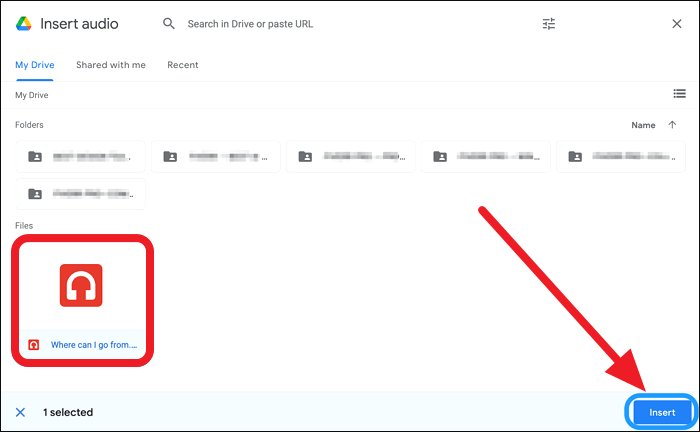
Step 3. Once the next window displays, click the "My Drive" tab and select the audio file you want to attach to your Google Slides. Next, click on the "Insert" button.
Step 4. After inserting the audio file, the next step is customizing the voiceover. You can achieve this using the audio playback widget and speaker icon displayed.
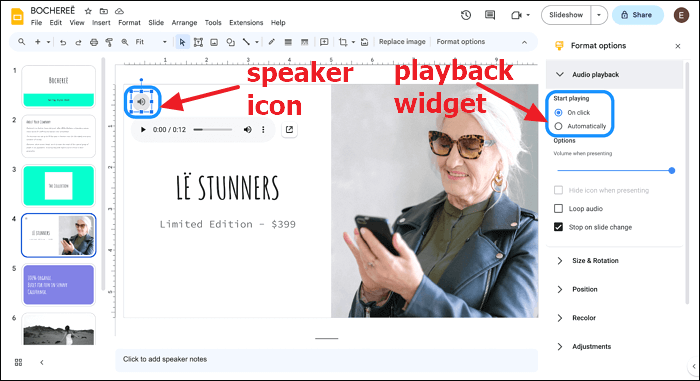
Clicking the speaker icon allows you to play the audio during the presentation. The audio playback widget allows you to adjust the volume of your audio. That's it! You've now added voiceovers to your Google Slides presentation.
Bonus Tip: How to Record Google Slides for Sharing
Apart from just adding audio to your Google Slides, you may want to share it with your audience for reference. How can you do that? To easily record Google Slides for sharing, you can use a screen recorder like EaseUS RecExperts.
In addition to allowing you to record voiceovers for your Google Slides, as we've seen previously, RecExperts is also an efficient tool for capturing high-quality videos from your computer's screen. This tool will allow you to record your Google Slides presentation and store the data on your device. You can then share the recordings whenever you wish.
The main recording features of EaseUS RecExperts include:
- Offers all-around screen recording support, including selected regions, full-screen, multi-screen, etc
- Allows you to perform webcam recording for your presentations
- Perform screen capture on specific sections of your screen
- Record video games in 4K UHD quality
- Add a watermark to your screen recordings
To start recording Google Slides using EaseUS RecExperts today, ensure you download and install it on your computer. The steps to get started with this software are very straightforward.
Final Words
This article has described how to do a voiceover on Google Slides. In summary, the first stage entails preparing scripts and slides, while the second stage is about recording the voiceover using a third-party tool. In the last stage, you'll need to add audio files to Google Slides by uploading them to Google Drive.
To make your voiceover recording seamless, the most recommended third-party tool to use is EaseUS RecExperts. Also, if you want to record your Google Slides screen for sharing purposes, RecExperts is your best bet. It allows you to conveniently record any section of your screen. Ensure you download and install EaseUS RecExperts on your computer today.
How to Do Voiceover on Google Slides FAQs
Below are commonly asked questions about how to do a voiceover on Google Slides.
1. How Do You Record Yourself Presenting on Google Slides?
You can accomplish that using screen recording software. One of the best third-party tools you can try out is EaseUS RecExperts. This tool allows you to record selected sections of your screen and then store the recordings on your computer. It also allows you to screen capture and record recordings using your webcam. Once you complete making your recordings, you can share them with anyone.
2. How Do You Do Audio on Google Slides?
You'll first need to record audio for your scripts using a recording software like EaseUS RecExperts. After that, you must upload the audio files to Google Drive before inserting them on Google Slides. Below are the detailed steps:
Step 1. Open Google Drive, then click on the New button. In the dropdown that displays, click on File Upload.
Step 2. Next, launch Google Slide and navigate where you want to attach the audio file. Go to the top menu and click on Insert. Once the dropdown shows up, click on Audio.
Step 3. When the next window displays, click the My Drive tab and select the audio file you want to attach to your Google Slides. Next, click on the Insert button. This will insert audio into your Google Slides.
3. How Do You Add Voice to Text in Google Slides?
If you've already recorded audio for your scripts, you can add voice to text in Google Slides using the following steps.
Step 1. Open Google Slide and go to the location where you want to add the voiceover.
Step 2. Next, click on the Insert option at the top.
Step 3. Select Audio from the dropdown displayed.
Step 4. When the next window displays, select your audio file under the My Drive tab, then click the Insert button. This will now add the voiceover to your Google Slides.
EaseUS RecExperts

One-click to capture anything on screen!
No Time Limit, No watermark
Start Recording