-
![]()
Daisy
Daisy is the Senior editor of the writing team for EaseUS. She has been working in EaseUS for over ten years, starting from a technical writer to a team leader of the content group. As a professional author for over 10 years, she writes a lot to help people overcome their tech troubles.…Read full bio -
Jane is an experienced editor for EaseUS focused on tech blog writing. Familiar with all kinds of video editing and screen recording software on the market, she specializes in composing posts about recording and editing videos. All the topics she chooses …Read full bio
-
![]()
Alin
Alin is an experienced technical blog writing editor. She knows the information about screen recording software on the market, and is also familiar with data cloning and data backup software. She is expert in writing posts about these products, aiming at providing users with effective solutions.…Read full bio -
Jean is recognized as one of the most professional writers in EaseUS. She has kept improving her writing skills over the past 10 years and helped millions of her readers solve their tech problems on PC, Mac, and iOS devices.…Read full bio
-
![]()
Jerry
Jerry is a fan of science and technology, aiming to make readers' tech life easy and enjoyable. He loves exploring new technologies and writing technical how-to tips. All the topics he chooses aim to offer users more instructive information.…Read full bio -
![]()
Rel
Rel has always maintained a strong curiosity about the computer field and is committed to the research of the most efficient and practical computer problem solutions.…Read full bio -
![]()
Gemma
Gemma is member of EaseUS team and has been committed to creating valuable content in fields about file recovery, partition management, and data backup etc. for many years. She loves to help users solve various types of computer related issues.…Read full bio -
![]()
Shelly
"I hope my articles can help solve your technical problems. If you are interested in other articles, you can check the articles at the bottom of this page. Similarly, you can also check my Twitter to get additional help."…Read full bio
Page Table of Contents
0 Views |
0 min read
If you are good at playing Valorant Gameplay and want to demonstrate your skills on YouTube or other social platforms to get more followers, it's a nice choice to use a best Valorant recorder. However, recording Valorant gameplay without FPS drop is not as easy as you think. Given that, this post comes in handy.
On this page, we will talk about some great Valorant clipping software, and walk you through how to record Valorant gameplay without lag effortlessly. Now, let's dive into it!
How to Record Valorant Gameplay on PC using EaseUS RecExperts
EaseUS RecExperts ranks top of our Valorant clip recorder list. Coming with a friendly user interface, it makes recording games super easy for anyone, including novices. Besides, it supports GPU acceleration technology, helping you record almost any 2D/3D gameplays (Minecraft, Fortnite, LOL...) without no FPS drop, even on a low-end PC. While recording, you can enable the webcam and narration function to add webcam overlay and audio to your recordings, making them stand out.
Once the Valorant recording is done, you can choose to edit the video with simple tools, like trimming, adding opening credits, etc. And then, you can export the Valorant clips in your desired format without hassle.
Check out the amazing functions of the EaseUS game recorder:
Adjustable FPS: This software allows you to adjust the FPS up to 60, and that will make sure you can record common gameplays on your computer without lag.
No screen or time limit: You can select to record any area on your screen or record multiple screens. Moreover, it lets you screen record for as long as your disk space permits.
Various output formats: Before recording, you can go to Settings to select your desired output formats. It supports more than 10 formats, including MP4, AVI, MKV, MOV, etc.
Auto-stop & auto-stop: When it reaches a set time, duration, or file size, the recordings will be split into multiple files for later use.
How to Screen Record Valorant Gameplay on PC without FPS Drop:
Step 1. Launch EaseUS game recorder and click the Menu icon to open Settings.
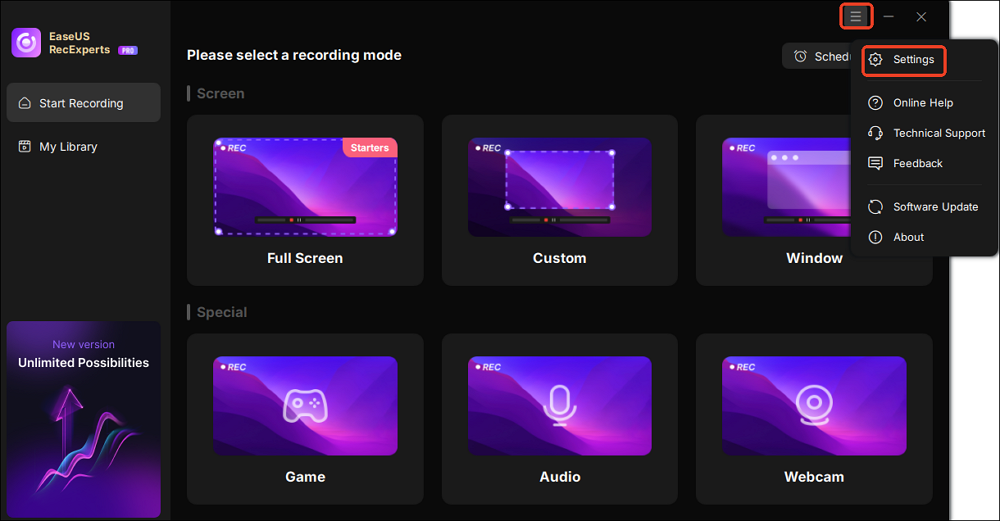
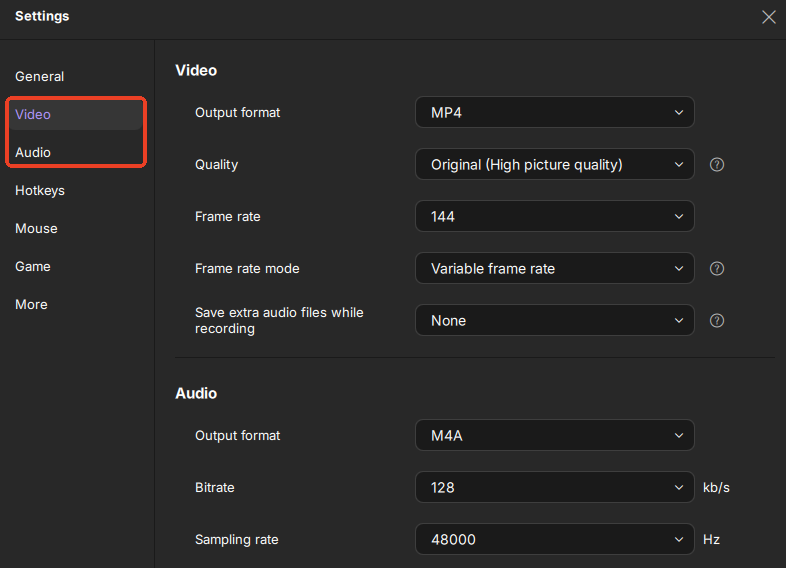
Step 2. Then click on Video and Audio to adjust the frame rate (from 1 to 144), video quality, format, bitrate, etc.
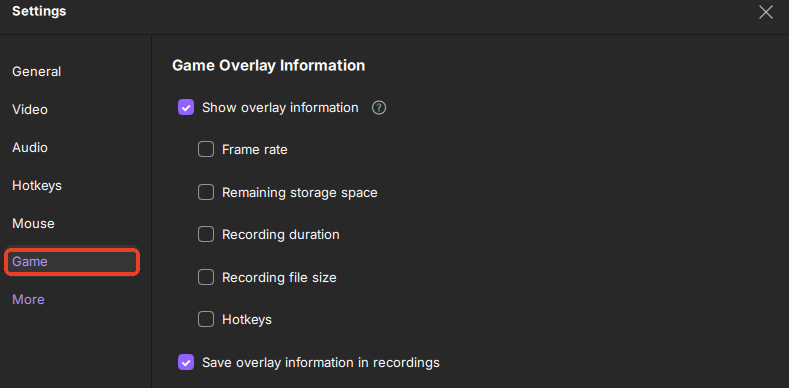
In addition, you can click on the Game tab to change some game overlay options.
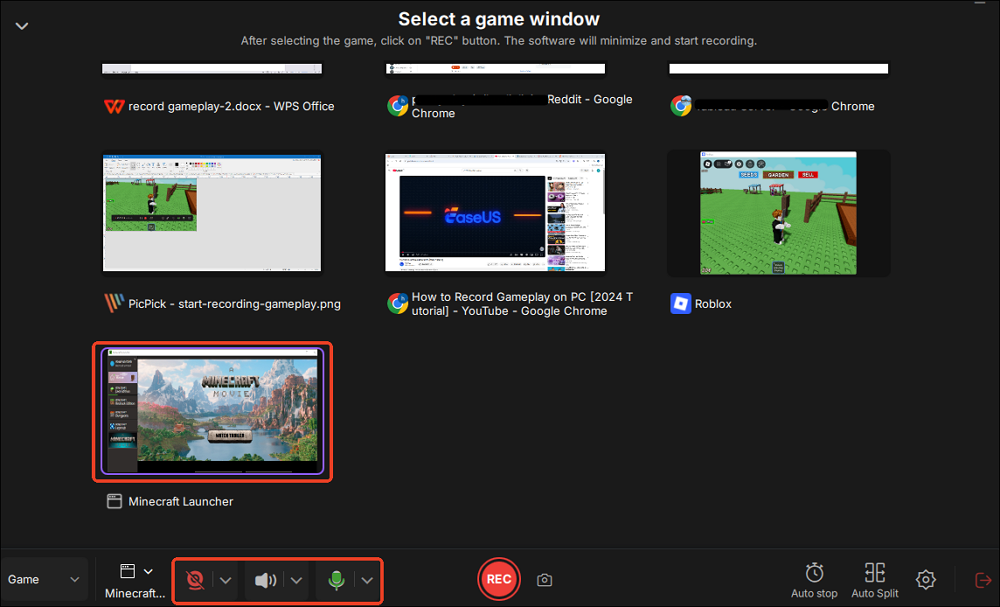
Step 3. Return to the main interface and click the Game mode. Select the game window to capture the desired gameplay, and choose the webcam or audio source if needed. Finally, click REC to begin recording your game.
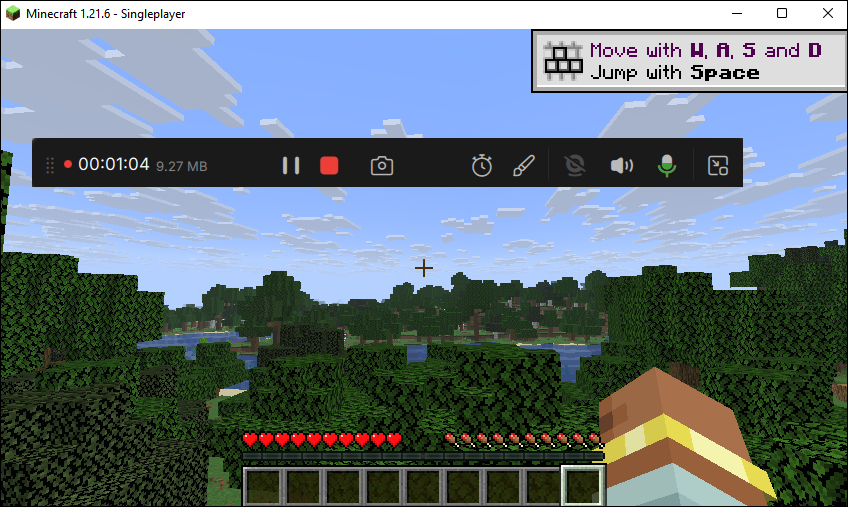
Step 4. A small bar will display the recording time. You can take screenshots during the recording or set a specific stop time by clicking the clock icon on the toolbar.
Step 5. Once complete, you can view and edit the recorded footage using the built-in video player and editor.
How to Record Valorant Clips on Low-End PC with OBS Studio
OBS Studio is a nice option if you want to find an open-source and Valorant clips recorder for low-end PC.
As a cross-platform clipping software for gaming, it can run perfectly on Windows PC, Mac, and Linux computers. To record Valorant games, you need to launch this freeware, select the recording area, and click the Record button. Actually, recording is just a part of its functions. More than that, it also can help you start live streaming to other platforms while you play it.
Here's how to record Valorant Gameplay with OBS on a Low-end PC:
Step 1. Launch OBS Studio, and click "Settings" in the lower right corner to adjust the output format and quality. Here select the video bitrate, encoder, audio bitrate, output resolution, and the saving path for the recorded files.
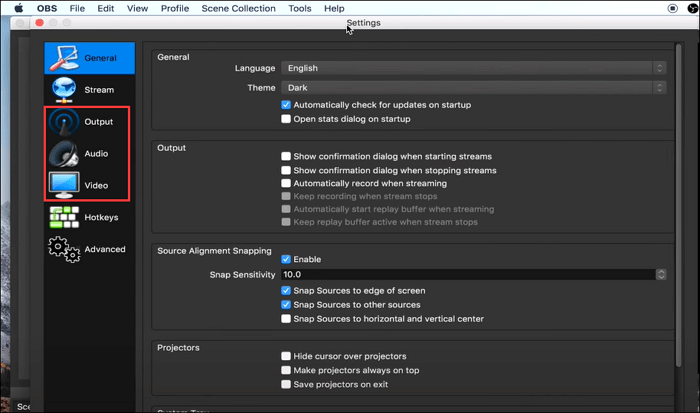
Step 2. Then go back to the main interface, and click on the "Screen" button in the lower-left corner of the screen. Hit the "+" icon to add Game Capture and Audio Output Capture.
Step 3. Open Valorant and return to OBS to start recording. Click on the Game Capture option > Capture Specific Window > Valorant.exe. Once all settings are done, you can click "Start Recording" to capture your Valorant gameplay.
How to Capture Valorant Game on Laptop using Fraps
The last way to record Valorant gameplay is to use Fraps. It is a well-known game recorder for Windows users, helping create amazing game videos easily. While recording, the FPS you are getting will show in the corner of your screen to have an intuitive experience. Plus, the screen snapshot function is also available here, which can help you catch your highlights and share them with others later.
Most importantly, this professional game recorder can capture audio and video up to 7680 x 4800 with a custom frame rate from 1 to 120 frames per second.
Step-by-step tutorial to screen record Valorant Gameplay:
Step 1. Download and install Fraps on your PC, then open it and the Valorant gameplay, including location, hotkeys, etc.
Step 2. Before recording, you need to click on the "Movies" option to set the hotkeys, FPS, audio source, and many others.
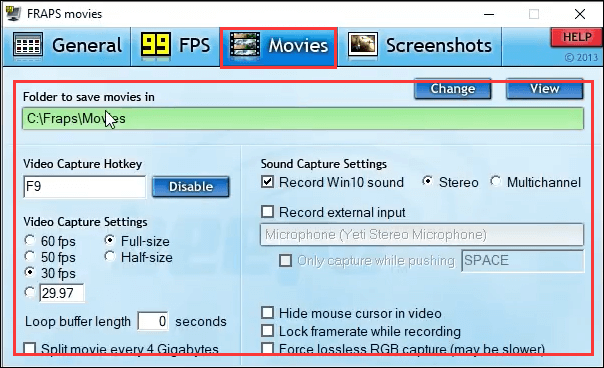
Step 3. Once you have adjusted all recording settings, all you need to do is to start the recording task by pressing the capture hotkey.
The Bottom Line
On this page, you can learn 3 professional Valorant clipping software, which will assist you in recording Valorant games with no FPS drop. If you want a simple yet no lag screen recorder, EaseUS RecExperts is what you need! It performs perfectly in capturing gameplay and streaming videos in original quality. Moreover, there is no time limit on your recording. So, just try it now, and it will never disappoint you!
EaseUS RecExperts

One-click to capture anything on screen!
No Time Limit, No watermark
Start Recording
