-
![]()
Daisy
Daisy is the Senior editor of the writing team for EaseUS. She has been working in EaseUS for over ten years, starting from a technical writer to a team leader of the content group. As a professional author for over 10 years, she writes a lot to help people overcome their tech troubles.…Read full bio -
Jane is an experienced editor for EaseUS focused on tech blog writing. Familiar with all kinds of video editing and screen recording software on the market, she specializes in composing posts about recording and editing videos. All the topics she chooses …Read full bio
-
![]()
Alin
Alin is an experienced technical blog writing editor. She knows the information about screen recording software on the market, and is also familiar with data cloning and data backup software. She is expert in writing posts about these products, aiming at providing users with effective solutions.…Read full bio -
Jean is recognized as one of the most professional writers in EaseUS. She has kept improving her writing skills over the past 10 years and helped millions of her readers solve their tech problems on PC, Mac, and iOS devices.…Read full bio
-
![]()
Jerry
Jerry is a fan of science and technology, aiming to make readers' tech life easy and enjoyable. He loves exploring new technologies and writing technical how-to tips. All the topics he chooses aim to offer users more instructive information.…Read full bio -
![]()
Rel
Rel has always maintained a strong curiosity about the computer field and is committed to the research of the most efficient and practical computer problem solutions.…Read full bio -
![]()
Gemma
Gemma is member of EaseUS team and has been committed to creating valuable content in fields about file recovery, partition management, and data backup etc. for many years. She loves to help users solve various types of computer related issues.…Read full bio -
![]()
Shelly
"I hope my articles can help solve your technical problems. If you are interested in other articles, you can check the articles at the bottom of this page. Similarly, you can also check my Twitter to get additional help."…Read full bio
Page Table of Contents
Jean
Updated on Jun 09, 2026
0 Views |
0 min read
According to user feedback, the option Insert Voice is available with Microsoft Word 2007, and many educators utilize this feature to give students accurate feedback by voice commenting on their tasks. However, as MS Word 2007 jumps out of the picture, more and more seek ways to record voice on Microsoft Word 2010 because the Insert Voice is inaccessible to Word 2010 and later users.
Please learn how to record voice on Microsoft Word 2010 with third-party recording and transcription tools for Word, Online speech recognition, or Windows Speech Recognition if needed.
Please share it on your social media if this post helps you!
Record & Transcribe Voice on Microsoft Word 2010 via Screen Recorders🔥
As many educators embrace the Insert Voice feature to add voice to text in MS Word 2007, learners also seek ways to enhance their understanding and evaluation by transcribing their teachers' recordings.
Since the recording and transcription feature is unavailable in MS Word 2010, how to record voice on Microsoft Word 2010? Based on our assessment, Microsoft Word 2010, 2013, or 2016 users might have no resources but need to utilize reliable screen recorders like EaseUS RecExperts to record and transcribe audio in Microsoft Word.
As stated earlier, EaseUS RecExperts is good at recording voice and/or audio via system sound or a microphone. In addition, its AI Assistant feature of this versatile tool can transcribe Microsoft Word voice to texts or transcribe Zoom meetings or audio, including captured or imported ones.
Major features of EaseUS RecExperts:
- Record MS Word, Excel, or live PowerPoint Presentations with a screen and sound by webcam and micro.
- Offer the full-screen recording, selected region recording, schedule recording, and auto-stop and auto-split options.
- Release audio/video-to-text transcription, audio/video file import, audio extraction from videos, microphone noise reduction, etc.
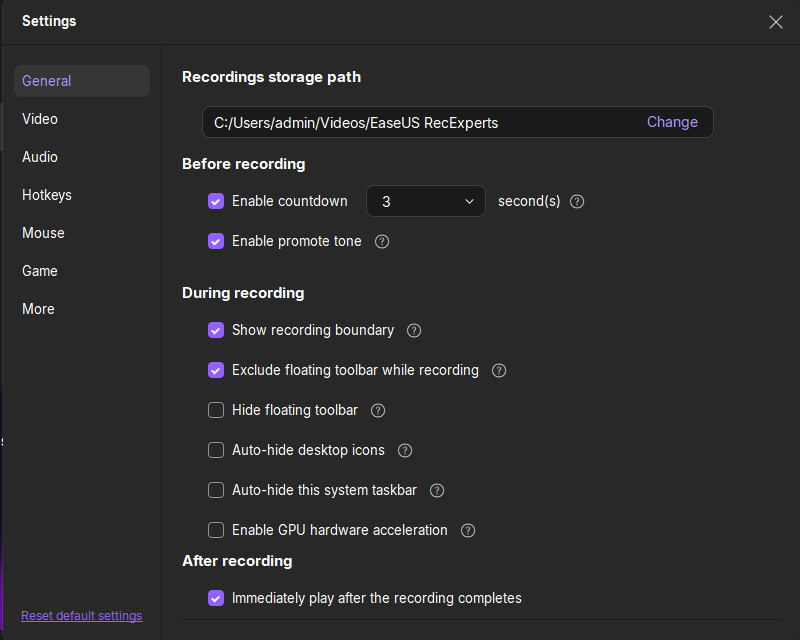
Step 1. Launch EaseUS RecExperts and adjust your recording settings.
Before you start recording, you can customize your settings by clicking the Menu icon (three horizontal lines) in the top-right corner and selecting Settings. From there, you can change the save location, video format, frame rate, audio format, and other preferences. All changes will be saved automatically.
Step 2. Choose a recording mode based on your needs.
On the main interface, you'll see several recording options: Full Screen, Custom, Window, Game, Audio, and Webcam. Simply click the one that matches what you want to record.

Step 3. Set up your webcam and audio sources.
In the toolbar, you can turn the Webcam, Speaker, and Microphone on or off by clicking their icons. If multiple devices are connected, click the small arrow next to each icon to choose your preferred input source.

Step 4. Start and control the screen recording.
Click the red REC button to begin recording. A floating toolbar will appear on your screen, where you can pause the recording using the pause icon or stop it by clicking the red square icon.
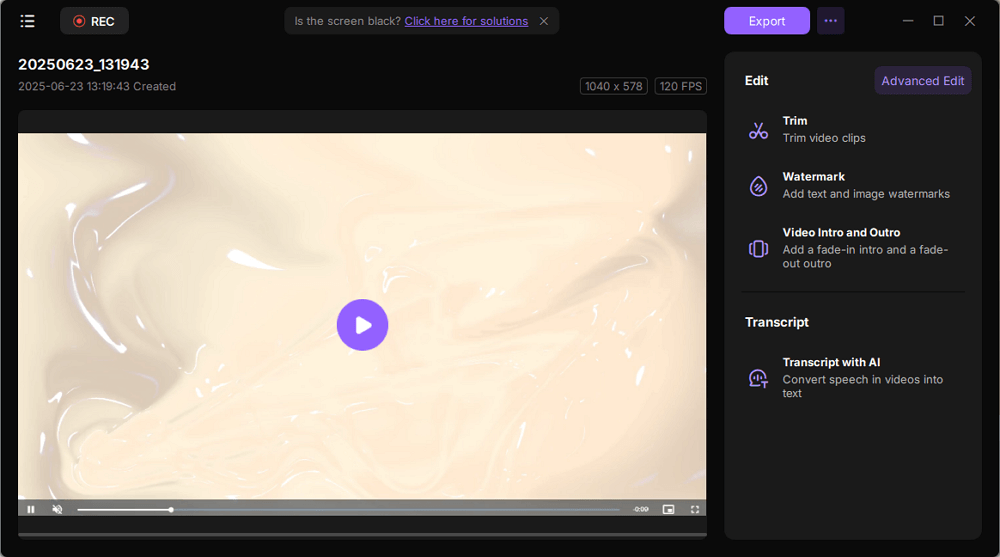
Step 5. Preview, edit, and manage your recordings.
Once you stop recording, you'll be taken to the preview window. Here, you can watch your video, trim it, add watermarks, transcribe audio to text, and organize your recordings. To record again with the same settings, just click the REC button in the top-left corner.
Please share it on your social media if this post helps you!
Record Voice on MS Word 2010 via Microsoft's Online Speech Recognition
How to record voice on Microsoft Word 2010 programs? The Online speech recognition feature is another feasible way. But before that, please ensure you've turned on Online speech recognition. Let's show how to turn on speech-to-text and use it.
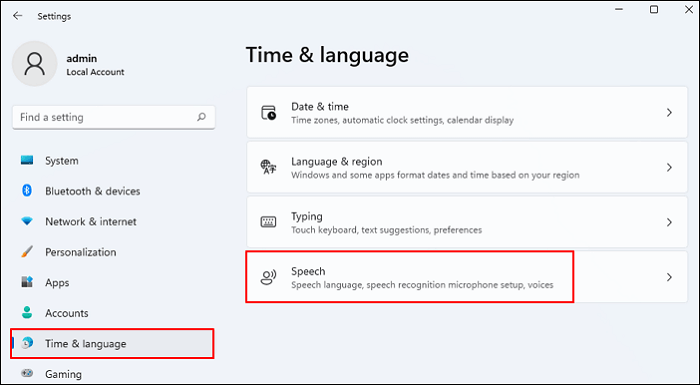
Step 1. Please press Win + I to open Windows Settings > select Time & language > choose Speech.
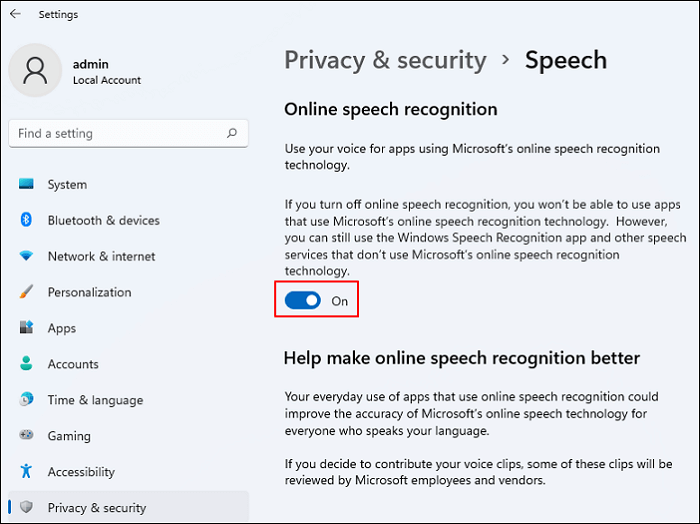
Step 2. Scroll down until you find Speech privacy settings > click it > turn On Online speech recognition.
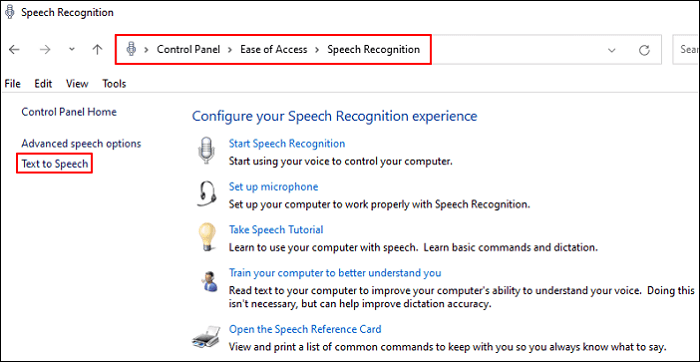
You can also go to Control Panel > Ease of Access > Speech Recognition > select Text to Speech to confirm whether use the voice and voice speed that your PC automatically matches.
Step 3. Open the MS Word 2010 file you want to talk to text in Word > press Win + H to open it > click the micro to use dictation. After detecting your words, this feature will automatically dictate your voice in Word.
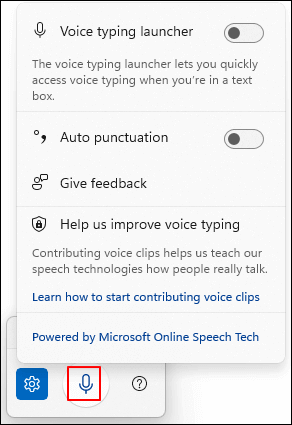
If necessary, you can click the Settings icon or click on the question mark to learn more about this feature, use voice typing to talk instead of type on your PC.
Record Voice on MS Word 2010 using Windows Speech Recognition
Besides Online speech recognition, how to record voice on Microsoft Word 2010? Here comes Windows Speech Recognition (WSR), which is also feasible. WSR enables you to manage your PC using your voice alone, without needing a keyboard or mouse.
Notes:
- On Windows 11 22H2 and later, voice access starting will replace Windows Speech Recognition (WSR) in September 2024.
- WSR is only available in English (United States, United Kingdom, Canada, India, and Australia), French, German, Japanese, Spanish, and Mandarin (Chinese Simplified and Chinese Traditional).
Please refer to the following steps to record voice on MS Word 2010 via WSR.
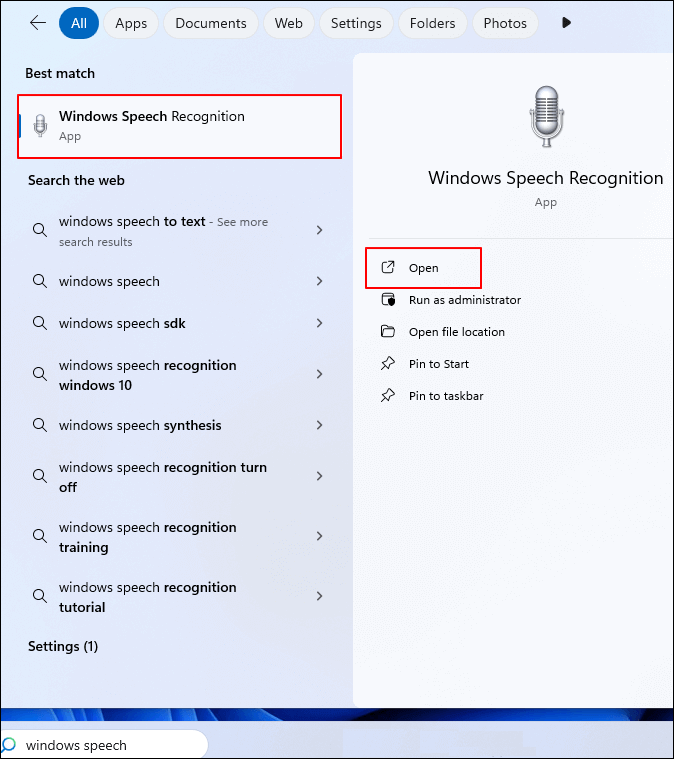
Step 1. Type Windows Speech Recognition in the search bar > Open it.
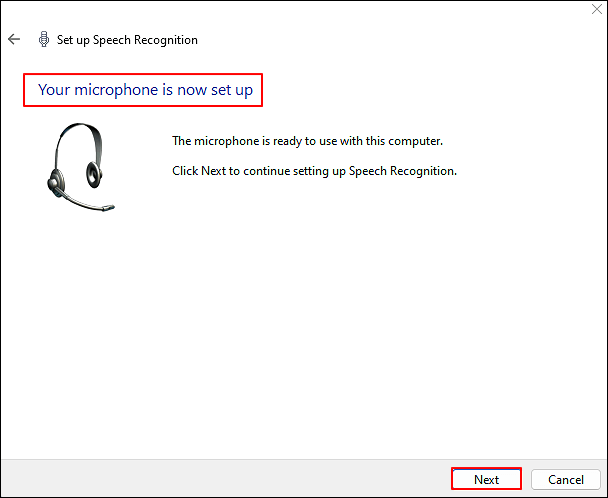
Step 2. Please follow the on-screen instructions to Set up Speech Recognition > click Next > set up your microphone > Adjust the volume of your microphone> until Your microphone is now set up > click Next.
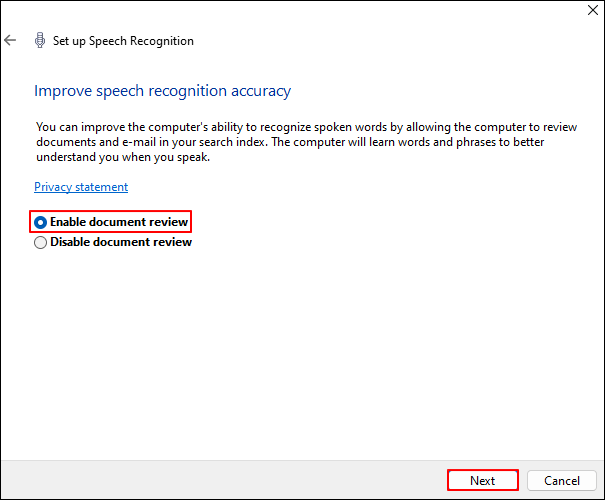
Step 3. To improve speech recognition accuracy, Enable document review > click Next.
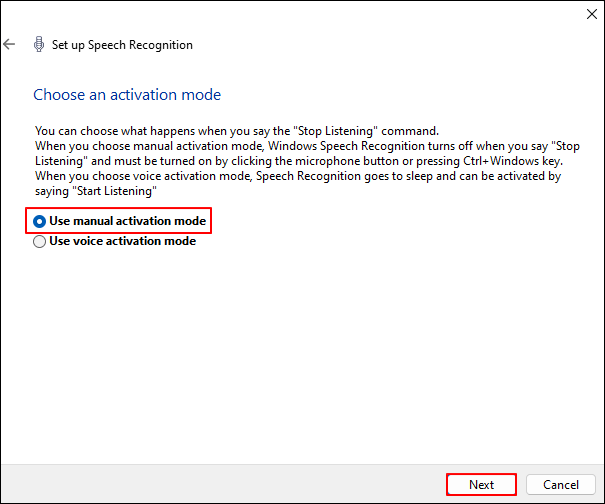
Step 4. When it comes to Choose an activation mode, you'd better select Use manual activation mode > click Next. You can uncheck Run Speech Recognition at startup.
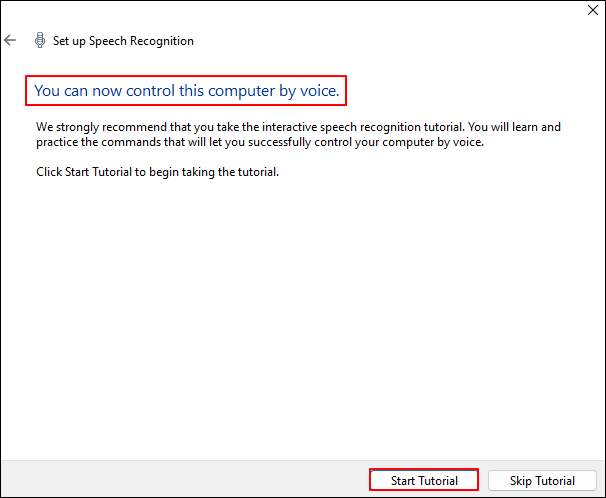
Step 5. After seeing You can now control this computer by voice > select Start Tutorial.
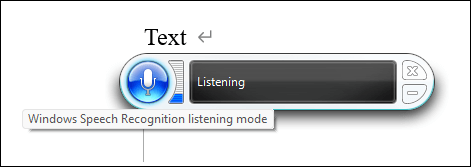
Step 6. Open your targeted MS Word 2010 document > click the microphone icon to talk to text Word.
Please share it on your social media if this post helps you!
Dictate Your Documents in Word for Microsoft 365
Although some users claim they can record voice on Microsoft 2010 and dictate MS Word 2010 documents, voice or audio can only be transcribed directly in Microsoft 365 using the dictation feature. In other words, this feature is only accessible to Microsoft 365 subscribers.
Provided by Microsoft 365, dictation enables you to use speech-to-text to create content in Microsoft 365 using a micro and stable internet connection. It's a quick and efficient way to organize your thoughts, write drafts or outlines, and take notes.
Notes:
- Microsoft 365 is not the same as Microsoft 2010. Microsoft 365 provides the most recent version of Office. Previous versions of Office include 2013, 2010, 2007, and 2003.
- Microsoft 365 offers two subscription plans: Microsoft 365 Family, $99.99/year, and Microsoft 365 Personal, $69.99/year.
Please refer to the following steps to dictate MS Word voice to texts.
Step 1. Please open a new or existing file > click Home > Dictate after signing into Microsoft 365 on a mic-enabled device.
Step 2. Wait for the Dictate button to turn on > begin listening.

Step 3. Please speak to see dictation texts appearing on your screen.
Conclusion
Wondering how to record voice on Microsoft Word 2010 without the Insert Voice feature? As you can see, EaseUS RecExperts, Online speech recognition, and Windows Speech Recognition can record and transcribe audio in Microsoft Word 2010 and later. Nevertheless, when it comes to features and ease of use, EaseUS RecExperts outperforms another two built-in features.
If you intend to dictate your documents in Word for Microsoft 365, you'd better pay for it to become a Microsoft 365 subscriber.
FAQs about Audio/Voice Recording
This section lists several relevant tips about audio and voice recording. Please check them out below.
1. Can Microsoft OneNote transcribe audio to text?
Yes, it can. You can record straight in OneNote while taking notes on the canvas. During recording, OneNote will automatically transcribe your audio in the background without showing off the script. Nevertheless, you will see the transcripts once you've saved and transcribed the recording.
2. How to add and record audio in PowerPoint?
Please refer to the corresponding steps to add and record audio in live PowerPoint presentations.
Steps to add audio in PPT:
Step 1. Open the PPT you want to add audio > click Insert > select Media > Audio.
Step 2. Select the Audio on My PC option between Audio on My PC and Record Audio > add your selected audio in the Insert Audio dialog box > click Insert.
Steps to record audio in PPT:
Step 1. After opening your targeted PowerPoint > click Insert > Media > Audio > select Record Audio between Audio on My PC and Record Audio.
Step 2. Designate a file name for your audio > click Record > start speaking.
Step 3. To review your recording, click the Play button.
3. Can Excel record your voice?
Yes, it can. To use a text-to-speech command, select a cell, a range of cells, or an entire worksheet, and click the Speak Cells button on the Quick Access toolbar. Alternatively, you can click Speak Cells without selecting any cells. Your Microsoft Excel application will automatically widen the selection to include surrounding cells with values.
Please share it on your social media if this post helps you!