-
![]()
Daisy
Daisy is the Senior editor of the writing team for EaseUS. She has been working in EaseUS for over ten years, starting from a technical writer to a team leader of the content group. As a professional author for over 10 years, she writes a lot to help people overcome their tech troubles.…Read full bio -
Jane is an experienced editor for EaseUS focused on tech blog writing. Familiar with all kinds of video editing and screen recording software on the market, she specializes in composing posts about recording and editing videos. All the topics she chooses …Read full bio
-
![]()
Melissa Lee
Melissa Lee is an experienced technical blog writing editor. She knows the information about screen recording software on the market, and is also familiar with data cloning and data backup software. She is expert in writing posts about these products, aiming at providing users with effective solutions.…Read full bio -
Jean is recognized as one of the most professional writers in EaseUS. She has kept improving her writing skills over the past 10 years and helped millions of her readers solve their tech problems on PC, Mac, and iOS devices.…Read full bio
-
![]()
Jerry
Jerry is a fan of science and technology, aiming to make readers' tech life easy and enjoyable. He loves exploring new technologies and writing technical how-to tips. All the topics he chooses aim to offer users more instructive information.…Read full bio -
![]()
Rel
Rel has always maintained a strong curiosity about the computer field and is committed to the research of the most efficient and practical computer problem solutions.…Read full bio -
![]()
Gemma
Gemma is member of EaseUS team and has been committed to creating valuable content in fields about file recovery, partition management, and data backup etc. for many years. She loves to help users solve various types of computer related issues.…Read full bio -
![]()
Shelly
"I hope my articles can help solve your technical problems. If you are interested in other articles, you can check the articles at the bottom of this page. Similarly, you can also check my Twitter to get additional help."…Read full bio
Page Table of Contents
Melissa Lee
Updated on Mar 12, 2025
0 Views |
0 min read
⭐Methods Quick Navigation:
- A Mac Screen Recorder: Using a robust third-party tool for screen recording Mac with internal audio is the most straightforward way. It lets you easily record internal audio Mac.
- QuickTime Player: QuickTime is preinstalled on Mac Ventura and can capture only the microphone sound alone. Configuring it with a sound plugin like iShowU Audio Capture and Soundflower helps capture system audio Mac.
- Audacity: Audacity is designed for recording audio only on Mac, Windows, and Linux. Its advanced sound settings let users capture internal/external audio and offer multiple audio effects to add to audio recordings.
It is easy to record external sounds like a microphone on macOS Ventura. But how to record internal audio Mac Ventura? This guide offers 3 free screen recorder with sound Mac. Let's get started.
Record Internal Audio Mac Ventura with EaseUS Screen Recorder
The first tool we give you is EaseUS RecExperts, and we list it as No.1 for a reason. With simple clicks, this outstanding Mac screen recorder lets users capture internal audio and record sound from a microphone or other external devices.
Moreover, this internal audio recorder lets you adjust the format, bitrate, sample rate, and much more before recording so you can control the quality of your recordings. Once the recording is done, you can extract audio from the video with the built-in editing tools.
Main Features:
- Record computer audio in the same quality as the original.
- Capture screen, audio, and webcam simultaneously or separately.
- Record streaming videos, gameplay, online meetings, lessons, etc.
- Clip video and save audio from YouTube, Peacock, WhatsApp, and other platforms.
Now, you can download this tool using the button below.
Download EaseUS Screen Recorder
Download EaseUS Screen Recorder
Trustpilot Rating 4.7
Check the steps of recording internal audio macOS Ventura with EaseUS RecExperts.
Step 1. Launch EaseUS RecExperts on your computer, and click "Audio" (looks like a speaker) on the left side of the main interface.
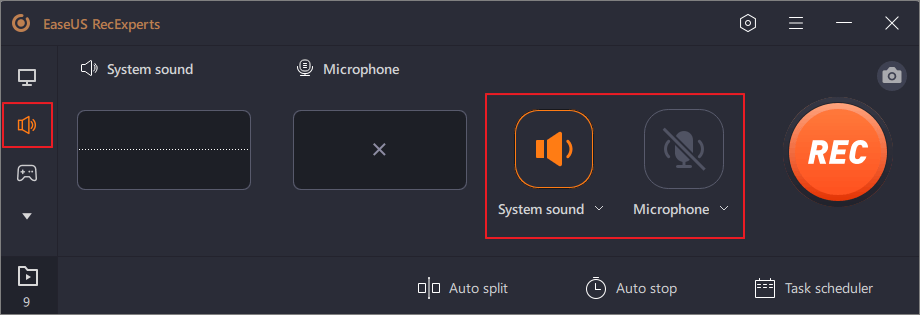
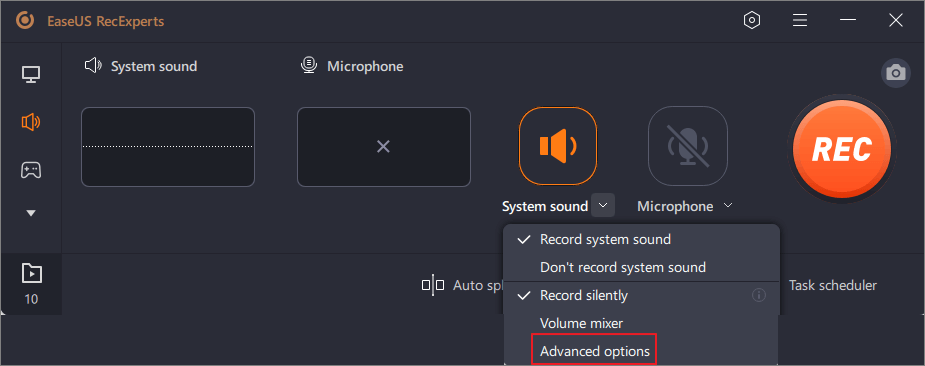
Step 2. To record the internal audio, you need to select the "System sound" option on the next window. You can adjust the volume by clicking on "System sound" > "Advanced options".
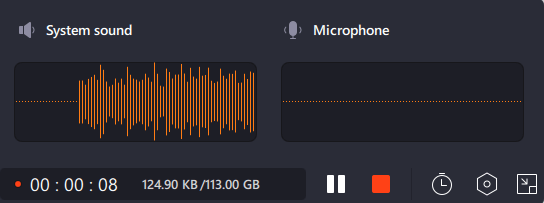
Step 3. Next, click on the red "REC" button to begin your recording. While recording, you can pause or stop the recording by clicking on the according buttons.
Step 4. Once done, you can find the recordings in the pop-up recording list window.

Share the post to help more people!
Capture System Audio Mac with QuickTime and Add-ons
There is an inbuilt program on your Mac that can be used to record the internal audio on your Mac. And it is called QuickTime Player. As a media player, it can not only play multimedia files but also do things like recording internal audio or screen recording on Mac with a few clicks.
QuickTime alone can capture the screen with external sound only. To record the internal sound on Mac, configure a sound capture plugin before; then, use QuickTime to capture system audio.
Let's see how to record internal audio Mac Ventura using QuickTime and plugin.
Step 1. Download and install one Mac audio output device for your MacOS Ventura. Many Mac audio capture plugins are in the market, including "iShowU Audio Capture", "Soundflower", and "Black Hole". All of them are free to use or try.
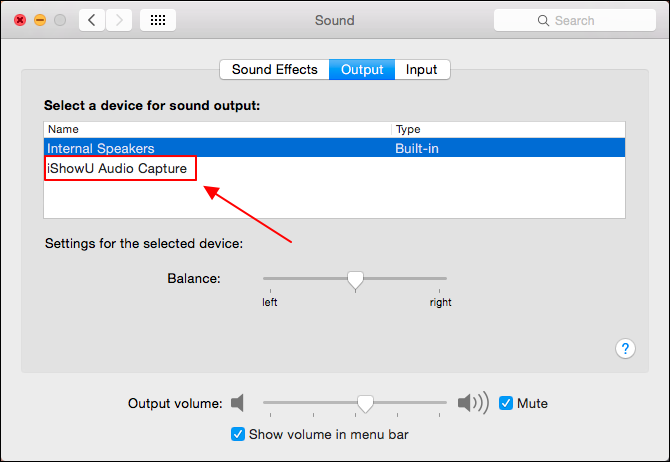
Step 2. When the installation is finished, click "System Preferences" on your Mac, click "Sound" > "Output", and select iShowU Audio Capture, Soundflower (2ch), or BlackHole 2inch from the list.
Step 3. Search for "QuickTime Player" on your Mac and open it.
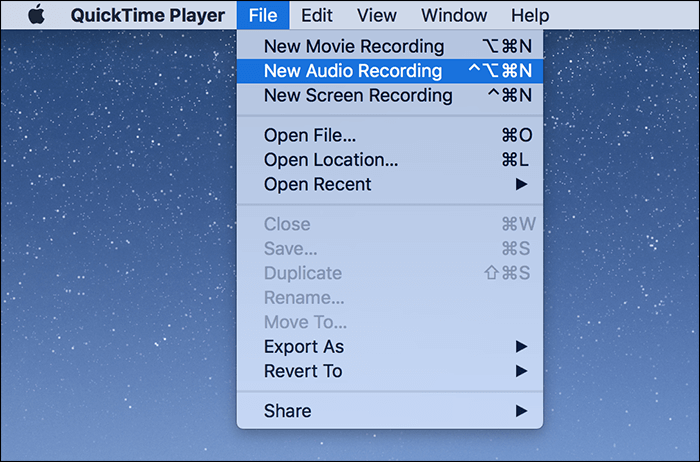
Step 4. Then, click "File" at the top menu bar and select "New Audio Recording".
Step 5. Click the down-arrow icon next to the record button and choose a source.
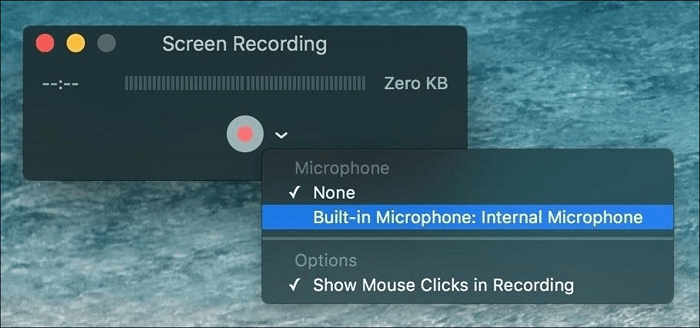
Step 6. Hit the record button to start recording. When you finish, click the "Stop Recording" button.
Step 7. After recording, you can play the audio and save it to your desired place.
Share the post to help more people!
Free Record Internal Audio with Audacity Mac Ventura
Audacity is a free internal and streaming audio recorder with basic editing features. It lets you record both system audio and microphone sound. Before recording, you can customize the settings to improve the recorded audio. After recording, you can edit the recorded files by cutting, copying, pasting, etc.
Moreover, it allows you to export your high-quality recordings in many different file formats so you can play them on other devices even if they have different restriction standards regarding file format.
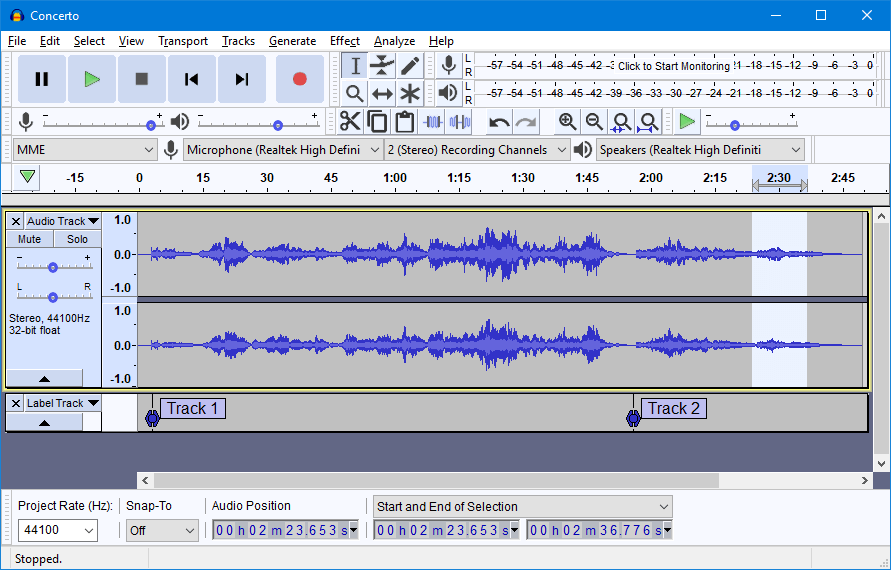
Step 1. Open System Preferences and click "Sound" > "Output" to set Soundflower (2ch) as the audio source.
Step 2. Go to Audacity Preferences and choose Soundflower (2ch) as the recording device. Once done, you can play the audio inside any app on your Mac.
Step 3. Open Audacity and click the "Record" button to start recording. Hit the button again to stop recording.
Troubleshoot: Can't Record Audio in macOS Ventura?
If you find the microphone not recording in Mac Ventura, you may not grant permission to the mic. You may follow the steps to solve your problem and start again.
Step 1. Quit the app you were using to record audio.
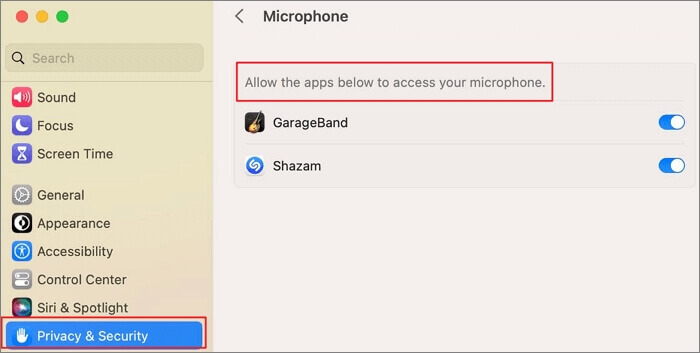
Step 2. Go to "Apple menu" > "System Settings" and click on "Privacy & Security".
Step 3. Click "Microphone" to continue.
Step 4. Turn on the options for each app that needs access to the built-in mic or an external USB mic.
Step 5. Open the audio recording app and try to record again.
- Note:
- If, unfortunately, you're using an external mic to record audio and it's still not working, check with the manufacturer of your device for software updates.
Conclusion
In this article, we showed you the changes related to audio recording in macOS Ventura and gave you three feasible ways to record internal audio Mac Ventura. It's better to read all the information about them before choosing.
EaseUS RecExperts is most recommended among all the recorders as it can be used to record the screen, internal audio, mic sound, webcam, and gameplay on your Mac computer. Download it by clicking the button below.
Download EaseUS Screen Recorder
Download EaseUS Screen Recorder
Trustpilot Rating 4.7
FAQs about Recording Internal Audio Mac Ventura
Check the frequently asked questions and their answers together now!
1. How do I record internal audio on my Mac with Big Sur?
You need to follow the steps below to adjust settings and record.
Step 1. Go to the Apple menu and System Preferences, then click "Security & Privacy".
Step 2. Click "Microphone" in the "Privacy" pane.
Step 3. Select the app that needs access to the built-in mic, an external USB mic, etc.
Step 4. Open the app and try to record audio.
2. Can QuickTime Player record internal audio?
Yes, if you have installed Soundflower, just click "File" and choose "New Audio Recording" to start recording internal audio.
3. How do I record internal and external audio on Mac?
We suggest you download and use EaseUS RecExperts to record internal and external audio on Mac, the newest macOS Ventura supported.
EaseUS RecExperts

One-click to capture anything on screen!
No Time Limit, No watermark
Start Recording