-
![]()
Daisy
Daisy is the Senior editor of the writing team for EaseUS. She has been working in EaseUS for over ten years, starting from a technical writer to a team leader of the content group. As a professional author for over 10 years, she writes a lot to help people overcome their tech troubles.…Read full bio -
Jane is an experienced editor for EaseUS focused on tech blog writing. Familiar with all kinds of video editing and screen recording software on the market, she specializes in composing posts about recording and editing videos. All the topics she chooses …Read full bio
-
![]()
Alin
Alin is an experienced technical blog writing editor. She knows the information about screen recording software on the market, and is also familiar with data cloning and data backup software. She is expert in writing posts about these products, aiming at providing users with effective solutions.…Read full bio -
Jean is recognized as one of the most professional writers in EaseUS. She has kept improving her writing skills over the past 10 years and helped millions of her readers solve their tech problems on PC, Mac, and iOS devices.…Read full bio
-
![]()
Jerry
Jerry is a fan of science and technology, aiming to make readers' tech life easy and enjoyable. He loves exploring new technologies and writing technical how-to tips. All the topics he chooses aim to offer users more instructive information.…Read full bio -
![]()
Rel
Rel has always maintained a strong curiosity about the computer field and is committed to the research of the most efficient and practical computer problem solutions.…Read full bio -
![]()
Gemma
Gemma is member of EaseUS team and has been committed to creating valuable content in fields about file recovery, partition management, and data backup etc. for many years. She loves to help users solve various types of computer related issues.…Read full bio -
![]()
Shelly
"I hope my articles can help solve your technical problems. If you are interested in other articles, you can check the articles at the bottom of this page. Similarly, you can also check my Twitter to get additional help."…Read full bio
Page Table of Contents
Jean
Updated on Jun 09, 2026
0 Views |
0 min read
Ever tried to record calls or capture streaming music, only to realize your recording has no sound? Why is recording audio from computer harder than it seems?
Many users have found that modern systems (Windows 11/10 and macOS Ventura onward) block direct system audio capture by default. But don't worry - there are plenty of real-world user testimonials on Reddit, Quora, and Microsoft's official support website demonstrating practical methods for clear computer audio recording. Let's delve into them.
Challenges and User Pain Points in Capturing Computer Audio
Recording PC sound is not simple due to different restrictions. Below are the most common challenges people report when trying to record internal audio on Mac, Windows, and Linux.
- · System Restrictions: macOS typically blocks internal audio capture by default for privacy reasons, requiring extra configuration or virtual drivers.
- · Limited Built-in Options: Default tools like Mac QuickTime or Windows Voice Recorder not working when trying to capture internal sound - only record microphone input.
- · Software Complexity: Advanced tools such as OBS or Audacity demand manual setup and audio routing, which frustrates beginners.
- · Quality Issues: Many recordings suffer from background noise, low volume, or audio-video desynchronization.
- · DRM Protection: Streaming services encrypt audio to prevent copying, making capture streaming audio difficult or impossible.
- · Privacy & Legal Concerns: Users worry about whether recording meetings, calls, or copyrighted audio is legally safe.
These pain points define exactly what our solutions must address. The main issue users face when searching for "record computer audio" is that their system doesn't support recording internal audio. This system limitation often frustrates users. Based on feedback from Reddit and technical forums, here are the common causes and solutions.
Share this guide about recording sound from computers with others.

How to Record System Audio on Windows PC Without Limitations
Many users trying to record internal audio on Windows 10/11 (such as YouTube videos, music, games, or online meetings) encounter the some frustrating issue, like audio from apps or browsers is completely missing in the recording, or recorder apps show messages like "No input device detected" or "Cannot capture system sound."
As one Reddit user described, "I tried recording my computer sound using the default Voice Recorder, but it only picks up my mic. There's no Stereo Mix option anywhere in my sound settings." This issue is extremely common and stems from how Windows manages audio input devices at the system level.
- · Stereo Mix is hidden or disabled: Some laptops have this feature disabled by default, and it won't display even if the sound card supports it.
- · Driver issues: Using Microsoft's generic drivers can cause Stereo Mix to be missing; some branded computers (such as Dell and HP) may block this feature in their drivers.
- · Privacy restrictions: Windows 10/11 blocks recording access from some applications by default; you need to manually enable it in settings.
Solution 1. Use Professional Computer Audio Recorder
EaseUS RecExperts offers one of the easiest and most reliable solutions for users who don't want to tinker with system drivers or hidden settings. It can record audio from gameplay, streaming video, online meetings, etc.
Features:
- Can record system audio and microphone simultaneously or separately on Windows and Mac.
- Works even when the Stereo Mix device is disabled or missing.
- Compatible with all major sound cards (Realtek, Intel, AMD, etc.).
- Schedule recording to automatically start and stop recording sound
- Supports MP3, WAV, AAC, and WMA export formats.
Detailed steps on how to record computer audio on Windows and Mac with EaseUS Screen Recorder:
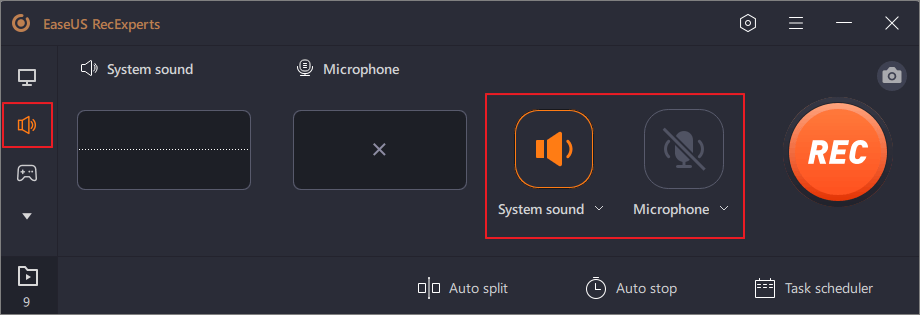
Step 1. Launch EaseUS RecExperts and select the Audio recording mode from the main interface. This mode is designed specifically for capturing voice recordings, narration, or podcasts without screen footage.

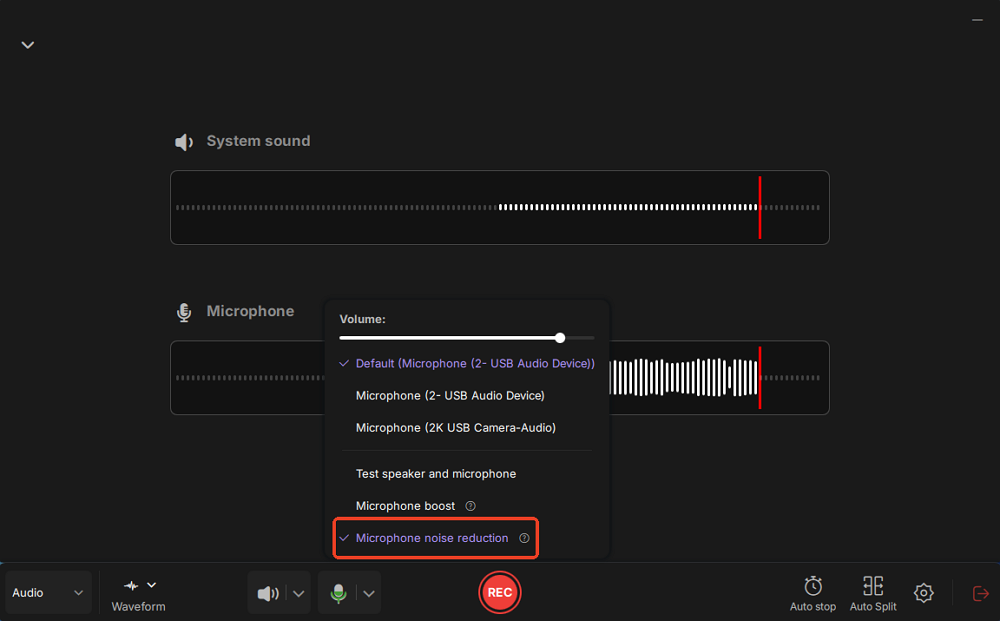
Step 2. Make sure the Microphone icon is toggled on. Then, click the down arrow next to the mic icon to open additional settings. From here, check the option for Microphone noise reduction to automatically filter out background sounds such as keyboard clicks, fan noise, or ambient chatter.
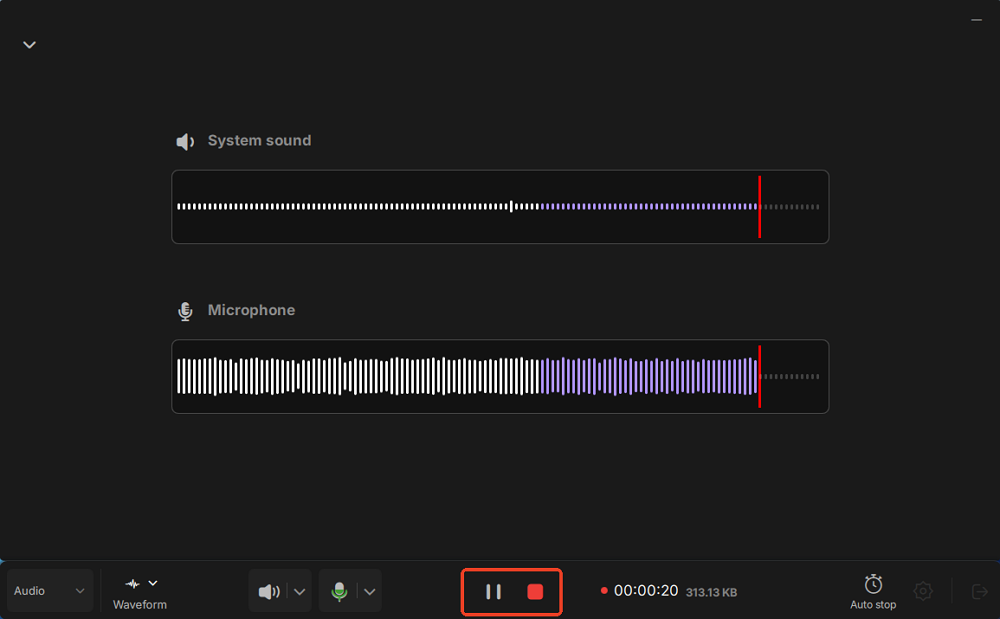
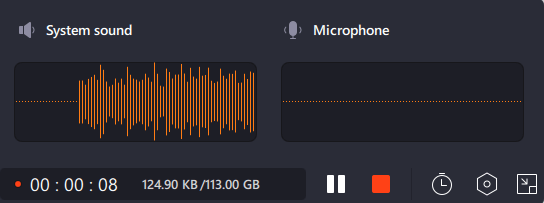
Step 3. Click the red REC button and wait for the 3-second countdown. Once the session starts, you can pause, resume, or stop the recording at any time using the floating toolbar, ideal for recording in multiple takes or reducing interruptions.
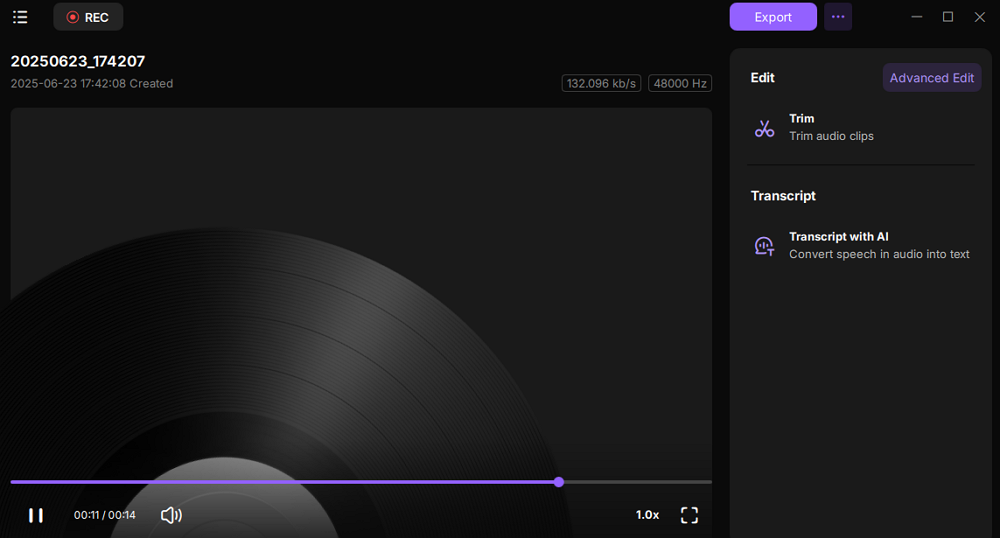
Step 4. When the recording ends, you'll be taken to the preview window, where you can play back, trim, and manage your audio file. This is useful for reviewing your voice clarity or making basic edits before saving or exporting the recording.
Share this guide about recording sound from computers with others.
Solution 2: Open-Source Software for Computer Audio Recording
"WASAPI loopback in Audacity works like magic - no virtual cables or drivers needed." -r/audacity
Audacity remains the go-to free and open-source audio recorder for pure internal audio and mic capture. It can record system playback via the WASAPI loopback interface - even when Stereo Mix isn't available. It also includes built-in editing functions like trim, noise reduction, normalize, and mixdown to enhance your audio recording.
How to set up Audacity to capture internal audio on Windows:
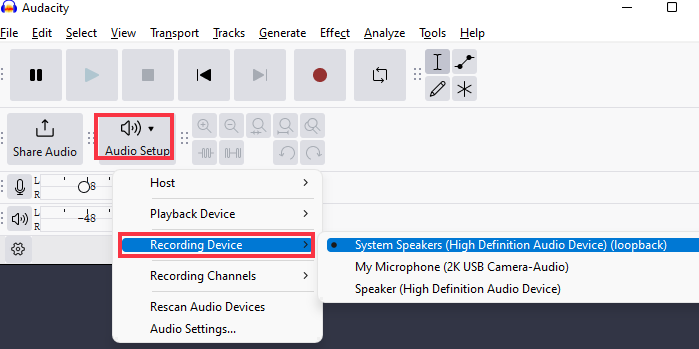
Step 1. Launch Audacity and set the Audio Host to Windows WASAPI.
Step 2. Set Recording Device to your playback device (e.g., "Speakers (loopback)" or "Headphones").
Step 3. Click the red Record button and start playback.
Step 4. When finished, stop recording and export your file as an MP3 or WAV file.
Mac QuickTime Can Only Record Microphone Audio - Fixed
Unlike Windows, macOS enforces strict system-level audio limitations for privacy and security reasons. Apple intentionally restricts this to prevent unauthorized capture of private communications or DRM-protected audio. Even Apple's QuickTime Player can only access microphone input, not speaker output. If you want to record system sound on a Mac for personal use, you need to use virtual audio drivers (e.g., BlackHole or Soundflower) or a third-party app to manually route system sound.
Solution 1. Install Virtual Audio Driver
BlackHole and Soundflower create a virtual sound card on Macs, allowing desktop audio to be rerouted and recorded by apps like QuickTime, OBS, or Audacity. If you have some technical experience, try this method to capture system audio on a Mac.
Step 1. Download and launch BlackHole.
Step 2. Open Audio MIDI Setup and click + to create Multi-Output Device. Add your main output device and BlackHole 2ch.
Step 3. Set this multi-output device as the default in System Settings > Sound > Output.
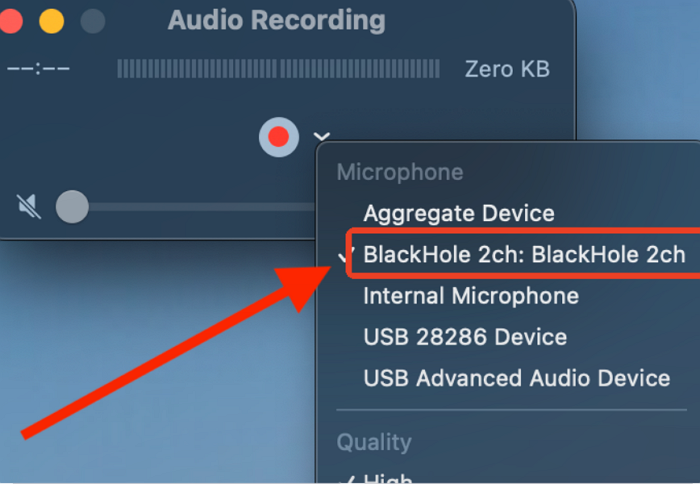
Step 4. In your recording software, select BlackHole 2ch as the input device. Then, start recording.
Share this guide about recording sound from computers with others.
Solution 2. EaseUS RecExperts for Mac to Record Internal Audio
If you don't want to mess with virtual drivers or manual routing, an all-in-one recorder like EaseUS RecExperts Mac is the easiest solution. It's built-in system audio driver automatically handles internal sound - no extra configuration required.
It can record system audio and microphone audio simultaneously, or capture internal audio only - best for capturing audio from YouTube, Spotify, Zoom, etc. It works seamlessly on macOS Monterey, Ventura, and Sonoma, including M1/M2/M3/M4 chips.
Step 1. Launch EaseUS RecExperts and choose "Audio" form the interface. Select "System sound" and "Microphone" together.
Step 2. Clcik on the "REC" button to start recording audio. The recording will start after a three-second countdown. To stop recording, click on the red square icon.
Step 3. After that, you will be led to the recording list window, where you can listen to or edit the audio recording freely.

Solution 3. Create an Aggregate Device to Capture Multiple Audio
While browsing the posts, one user mentioned that it's possible to capture computer audio on a Mac by creating an Aggregate Device. I tested it on two MacBook Airs with Apple M1 Chip Sequoia 15.1 and M2 Sequoia 15.6.1, respectively. It was indeed a success! However, there were some minor flaws:
- Cannot record system audio alone, only record desktop audio and external sounds simultaneously.
- The recorded computer sound is very low.
Step 1. Open the Audio MIDI Setup application and click the + button in the bottom left corner.
Step 2. Choose Create Aggregate Device and configure the relevant input/output devices in the left sidebar.

Step 3. Open the QuickTime Player recording taskbar, click Options, and select Aggregate Device as the source.
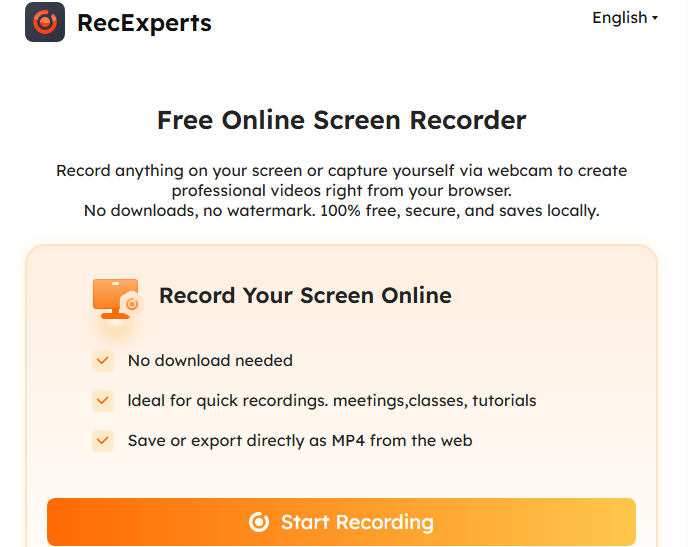
How to Record Computer Audio Online Free
If you prefer recording sound from a computer without any software or extra add-ons, use an online screen recording tool instead. You can perform some basic audio recording tasks with simple clicks.
EaseUS Online Screen Recorder is free and available in Chrome, Firefox, Edge, Safari, and Opera to record audio from a computer online, including system sound and microphone audio.
Share this guide about recording sound from computers with others.
Computer Streaming Audio Recording Failure & Legal Solution
Many users want to record audio from streaming services like Apple Music, Spotify, and Disney+, but these platforms use DRM and HDCP to block recording or result in black screen. Normal tools can't access the encrypted audio stream directly. They hope for a solution that allows recording system audio while respecting copyright and ensuring legal use.
For personal and fair-use purposes, a method tested and proven effective by users on Reddit and other forums is available.
Disable Hardware Acceleration in Browser
Turning off hardware acceleration can help capture streaming audio by disabling certain GPU-based protections (such as HDCP) that prevent recording tools from accessing the system's audio output. By forcing the browser to use software rendering instead, the recorder can properly detect and capture the playback sound.
❗Note: Some users report that this method isn't always practical and may affect video playback smoothness.
Steps on how to disable it:
Step 1. Go to Chrome's Settings > System and find the Use graphics acceleration when available option.
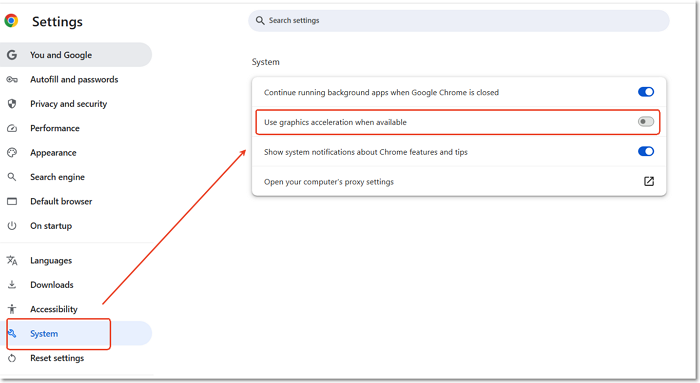
Step 2. Disable it and restart Chrome. Then, log in to the streaming service where you want to capture audio.
Step 3. Launch your computer's recording software, such as OBS, and then start recording.
Of course, if you prefer a more straightforward and more reliable solution, please use a professional third-party streaming audio recorder like EaseUS RecExperts.
Troubleshooting – Overcoming Common Audio Recording Challenges
Even with the right tools, recording computer audio can be tricky. Users often encounter issues ranging from no sound to poor quality.
|
Issue |
Symptoms |
Causes |
Solutions |
|
No Audio Captured |
Silent recording or only microphone captured |
Incorrect input device selected, or system drivers (e.g., Stereo Mix) disabled/missing |
|
|
Poor Sound Quality or Distortion |
Muffled audio, background noise, fluctuating volume, or distortion |
Wrong sample rate/bit depth, or interference between audio sources |
|
|
Latency or Audio-Video Sync Issues |
Audio lags behind video |
High processing delay, especially with virtual audio drivers or game streams |
|
|
System and Microphone Mixing Problems |
One source overpowers the other, or audio dropouts occur |
Poor input/output routing or unbalanced levels |
|
|
Privacy and Legal Concerns |
Recording calls, meetings, or copyrighted content may violate laws |
Legal and ethical considerations |
|
Share this guide about recording sound from computers with others.
Conclusion
To record computer audio efficiently, choose a method based on your needs. For high-quality results, use a professional external microphone, minimize background noise, and select a suitable recorder. EaseUS RecExperts is ideal for capturing both internal and external sound without background noise.