-
![]()
Daisy
Daisy is the Senior editor of the writing team for EaseUS. She has been working in EaseUS for over ten years, starting from a technical writer to a team leader of the content group. As a professional author for over 10 years, she writes a lot to help people overcome their tech troubles.…Read full bio -
Jane is an experienced editor for EaseUS focused on tech blog writing. Familiar with all kinds of video editing and screen recording software on the market, she specializes in composing posts about recording and editing videos. All the topics she chooses …Read full bio
-
![]()
Alin
Alin is an experienced technical blog writing editor. She knows the information about screen recording software on the market, and is also familiar with data cloning and data backup software. She is expert in writing posts about these products, aiming at providing users with effective solutions.…Read full bio -
Jean is recognized as one of the most professional writers in EaseUS. She has kept improving her writing skills over the past 10 years and helped millions of her readers solve their tech problems on PC, Mac, and iOS devices.…Read full bio
-
![]()
Jerry
Jerry is a fan of science and technology, aiming to make readers' tech life easy and enjoyable. He loves exploring new technologies and writing technical how-to tips. All the topics he chooses aim to offer users more instructive information.…Read full bio -
![]()
Rel
Rel has always maintained a strong curiosity about the computer field and is committed to the research of the most efficient and practical computer problem solutions.…Read full bio -
![]()
Gemma
Gemma is member of EaseUS team and has been committed to creating valuable content in fields about file recovery, partition management, and data backup etc. for many years. She loves to help users solve various types of computer related issues.…Read full bio -
![]()
Shelly
"I hope my articles can help solve your technical problems. If you are interested in other articles, you can check the articles at the bottom of this page. Similarly, you can also check my Twitter to get additional help."…Read full bio
Page Table of Contents
Jane Zhou
Updated on Jun 09, 2026
0 Views |
0 min read
Quick Navigation:
- How to Record Audio on Garageband (Detailed Tutorial)
- How to Record Audio with Garageband Alternatives
- Final Words
- How to Record Audio on Garageband FAQs
Sometimes, people want to record their favorite audio tracks on Mac/iPhone to stream over the internet, send via emails, or add to podcasts. So whether you need to record your own voice, any audio with the microphone, or a piece of instrumental music, Garageband is the ultimate solution for Mac users. It has changed the ways people were accustomed to creating and playing music. Plus, you can export these recordings in the desired formats.
However, a step-by-step tutorial is required to record audio on Garageband, from setting it up correctly to recording your first audio. Let's walk into this guide to not only recording with Garageband but also with other efficient audio recording software for Mac!
How to Record Audio on Garageband (Detailed Tutorial)
Since all Macs are equipped with Garageband, you can make songs from scratch and create combinations. Besides simple voice and audio recording with filters, it lets you edit, mix, and share audio tracks. Even it is possible to record the voice with in-built mics on iPhone/Mac or an external microphone to achieve better sound quality.
The software provides you with two sets of controls, i.e., Fun View and Studio View. The first one allows you to change the sound of your recorded tracks, while the latter offers features to improve your recordings. Now, let's dive deep into the details of how to record audio with Garageband:
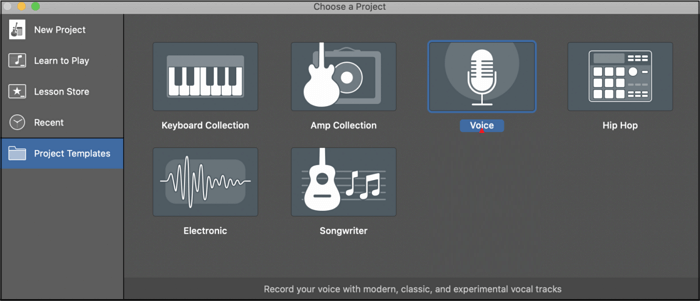
Step 1. The first step is to launch Garageband on your Mac and go straight to "Project Templates" from the left-hand side column. Now, it's time to select the "Voice" tab from the available options. You will see a new project with multiple windows opened. It is good to close extra windows to focus on the editing timeline.
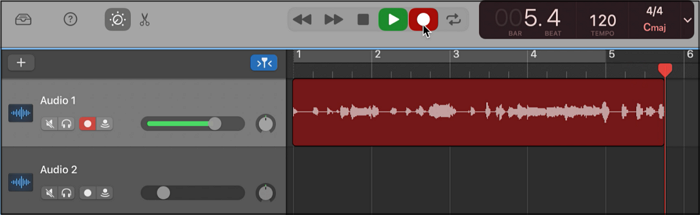
Step 2. Next, you need to click the red "Record" icon from the secondary menu to start recording. Wait for the whole time of the clip and hit the red icon again to stop recording. You can also play the audio track with the playback controls or the green "Play" icon.
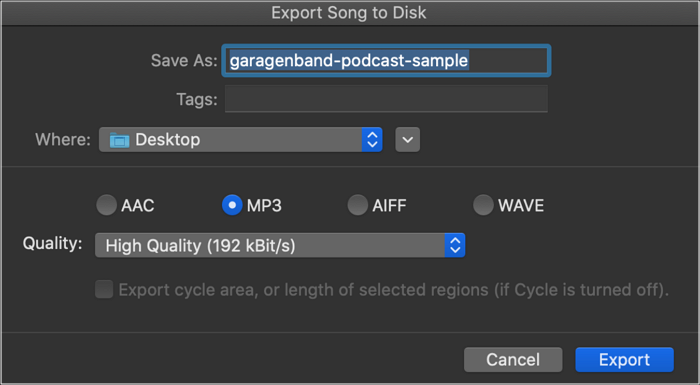
Step 3. Editing is possible in this step, such as rearranging the clips if many, trimming for lengthy clips, etc. Once done, click "Share"> "Export Song to Disk" to rename the file and select the destination folder from the "Where" tab. Finally, choose "Quality > "Format" and hit the "Export" button to record your first audio on Garageband successfully.
How to Record Audio with Garageband Alternatives
People may also be looking for other Garageband alternatives to get improved audio quality and an extensive range of features without any cost. If so, here are the top 2 free choices to record voice on Mac, including EaseUS RecExperts and Audacity:
#1. Record Audio on Mac using EaseUS RecExperts for Mac
EaseUS RecExperts stands out as a leading Mac screen recorder in the recording industry since it offers multiple unique features to help you record screen and audio. However, you can only record the system audio, microphone sound, or both. Changing the volume as desired is all in your control. Even you can go for recording screen/video without audio.
More so, this voice recorder with cancellation enables you to adjust the output file parameters, like format, quality, bitrate, sampling rate, etc. You can schedule the video/audio tasks by entering the recordings' start and end time. Last but not least, it is possible to play files via a built-in media player, trim lengthy recordings, and perform other functions.
Features
- Allow you to record audio in the chosen format
- Keep a record of the audio files in a specific folder
- Let you extract audio from video files
- Help you change the playback speed easily
- Offer hotkeys to start, stop, pause, and resume
Once you have installed this software, you can follow the below steps to record audio on Mac:
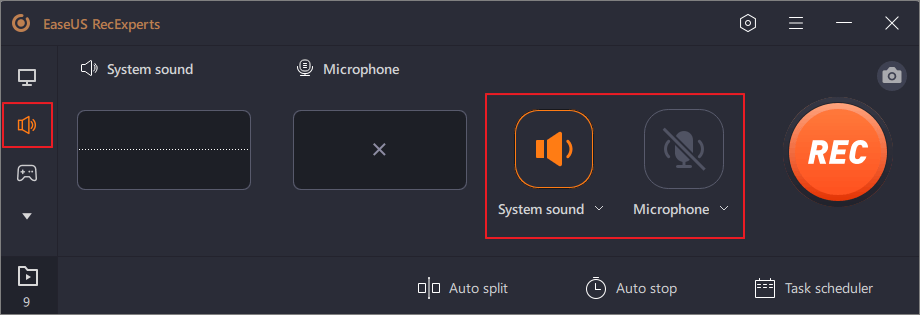
Step 1. Launch EaseUS RecExperts and choose "Audio" (looks like a speaker) from the left side of the interface. Select the sound source by clicking on the speaker sign (the system sound) or the mic sign (the microphone). Or, you can record them both at the same time.
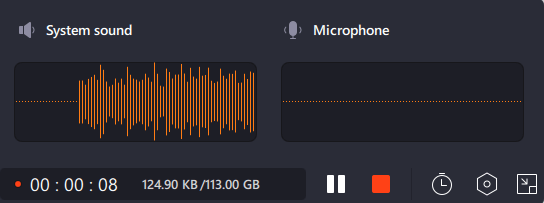
Step 2. Hit "REC" button to start recording audio. To finish it, you just click on the red square icon to stop the recording.
Step 3. After that, the recording list window will pop up automatically. You can listen to or edit the recording with built-in tools.

#2. Record Audio on Mac using Audacity
Audacity is another credible and comprehensive software that helps you effortlessly record audio tracks. You can adjust the audio settings and select the recording device, channel, and playback device from Audio Setup. Supporting multiple presets, it lets you export your audio file in the desired format is not tricky. Plus, you can save files in the form of a project.
Furthermore, it assists you in using the playback feature and editing files in its editing studio. You can split, silence, or trim audio with its Remove Special feature. It allows you to mute, unmute, align, sort, resample, or remove the tracks. Even you can share the recordings directly on social platforms.
Here is the detailed procedure on how to record audio on Garageband alternative, Audacity!
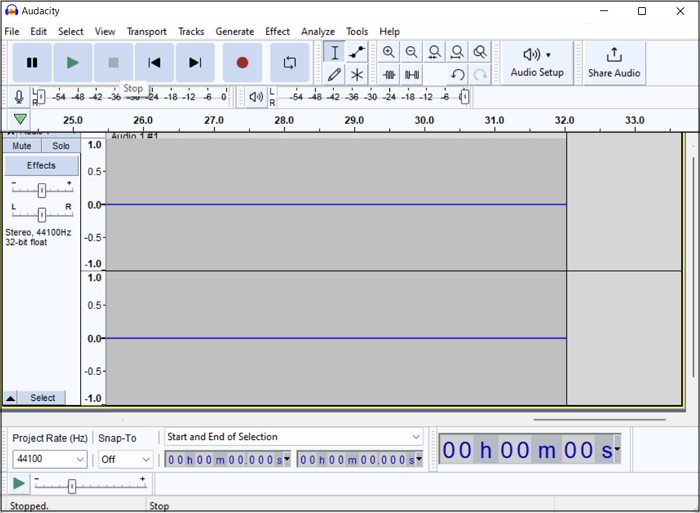
Step 1. Once you have launched the program on your system, head to the "Record/Record Track" icon from the icons menu. You can also set the playback channel, recording device, or channel, from the "Audio Setup" option.
![]()
Step 2. The recording begins automatically, and you can pause or resume if required. After it gets completed, press the "Stop" icon. Now, you can play to check the audio file and edit it as desired, like trim, silence, duplicate, add filters, etc.
Step 3. The final step is about clicking "File" from the top menu, choosing "Export," and then "Export as WAV" or any other desired format. Here, you can rename the file, adjust the settings, and hit the "Save" tab. You are all done!
Final Words
It's elementary and quick to record audio on Garageband with the in-built microphones on your iPhone or Mac. But you can use an audio interface or an external microphone to enhance sound quality, thus achieving an advanced audio recording experience. Though sticking to external equipment is better for quality, you won't find it cost-friendly.
As a result, you need to compromise on quality. In contrast, some free-to-use recommendations are available, like Audacity and EaseUS RecExperts. However, the latter helps you efficiently record audio, edit, and playback.
How to Record Audio on Garageband FAQs
Below are the brief answers to the frequently asked questions about recording audio on Garageband:
1. How do I hear myself while recording on Garageband?
You can hear yourself while recording on Garageband by turning on the input monitoring button for an audio track. For this purpose, you need to open Smart Controls or the track header. It is possible to turn them off whenever necessary. But if you are still unable to hear, open the Preferences in Garageband and adjust the input and output settings correctly.
2. How to record audio on Garageband without a microphone?
It's a great thing that you can effortlessly record audio on Garageband without an external microphone. The in-built mics on Mac and iPhone are enough to help you record live audio, voice, or music. Plus, there is no particular procedure because the devices will use the mics automatically. You only need to check once if the audio input is the built-in microphone.
3. Can Garageband record internal audio?
Yes, it is possible to record computer or internal audio in Garageband but with Telestream Screenflow Editor. Open Screenflow and click New Recording > Configure Recording once it's loaded. Also, checkmark the box saying Record Computer Audio.
Next, choose Audio/Midi and head toward settings Input Device and Output Device from Screenflow. Select Telestream Audio Capture of Output Device from the Preferences window in Garageband. Start recording with Screenflow now!