-
![]()
Daisy
Daisy is the Senior editor of the writing team for EaseUS. She has been working in EaseUS for over ten years, starting from a technical writer to a team leader of the content group. As a professional author for over 10 years, she writes a lot to help people overcome their tech troubles.…Read full bio -
Jane is an experienced editor for EaseUS focused on tech blog writing. Familiar with all kinds of video editing and screen recording software on the market, she specializes in composing posts about recording and editing videos. All the topics she chooses …Read full bio
-
![]()
Alin
Alin is an experienced technical blog writing editor. She knows the information about screen recording software on the market, and is also familiar with data cloning and data backup software. She is expert in writing posts about these products, aiming at providing users with effective solutions.…Read full bio -
Jean is recognized as one of the most professional writers in EaseUS. She has kept improving her writing skills over the past 10 years and helped millions of her readers solve their tech problems on PC, Mac, and iOS devices.…Read full bio
-
![]()
Jerry
Jerry is a fan of science and technology, aiming to make readers' tech life easy and enjoyable. He loves exploring new technologies and writing technical how-to tips. All the topics he chooses aim to offer users more instructive information.…Read full bio -
![]()
Rel
Rel has always maintained a strong curiosity about the computer field and is committed to the research of the most efficient and practical computer problem solutions.…Read full bio -
![]()
Gemma
Gemma is member of EaseUS team and has been committed to creating valuable content in fields about file recovery, partition management, and data backup etc. for many years. She loves to help users solve various types of computer related issues.…Read full bio -
![]()
Shelly
"I hope my articles can help solve your technical problems. If you are interested in other articles, you can check the articles at the bottom of this page. Similarly, you can also check my Twitter to get additional help."…Read full bio
Page Table of Contents
0 Views |
0 min read
PAGE CONTENT:
Sometimes, you need to record Zoom meetings or PowerPoint presentations for work, study, and content creation. Do you know how to record PowerPoint presentation with audio and video exactly? Whether using a MacBook or Windows PC, check this tutorial for six simple methods to how to video record yourself presenting a PowerPoint.
Quick Answer: How to Record on PowerPoint on Mac and Windows
To record a PowerPoint with your face and voice, use PowerPoint's built-in recording function or third-party PowerPoint screen recorders. Both options have their usages and limitations. Let's have a quick overview.
1️⃣The internal recording feature is available in Microsoft 365, Office 2016-2021, and even macOS PowerPoint. It lets you record a presentation with your face, audio, and screen for free without installing anything. However, it may be inconvenient to some extent. For example, narration is recorded separately for each slide. Once you move to the following slideshow, you cannot go back to the previous one to add extra narration.
2️⃣ Some free presentation recording software lets you record video on PowerPoint in Mac and Windows. For example, EaseUS RecExperts lets you quickly screen record PowerPoint, Google Slides, Keynote, and more platforms. The streamlined design helps capture the webcam, internal/internal audio, and screen activities with simple clicks. Also, draw on videos in real-time with highlight keystrokes and mouse actions.
Share this post to help more people!
How to Video Record Yourself Presenting a PowerPoint with Built-in Recorder
Steps to record PPT with audio and video using the integrated recorder vary depending on the running PowerPoint versions. Let's divide this part into three groups: Office 2016-2021, Microsoft 365, and macOS PowerPoint.
Part 1. How to Record a PowerPoint Presentation on Mac
There is a macOS version of Microsoft PowerPoint and it has a feature for screen recording PowerPoint Mac. So, how to record PowerPoint presentation with audio and video Mac? Check the notices before you start recording.
💡Notes:
- Convert a .ppt file format PowerPoint to .pptx before recording, or you may encounter problems such as missing or unplayable recordings. Open the file in PowerPoint; in the toolbar, click File > Save As... > File Format > select PowerPoint Presentation (.pptx) > Save.
- You'd better create a voiceover in the PowerPoint desktop application to enjoy a stable and complete recording experience.
- Your device needs to run macOS 13.0 or later to use Microsoft PowerPoint for Mac.
- It is suggested that the PowerPoint for Mac be updated to the latest version. Previous versions of PowerPoint for Mac may not support exporting video with narration.
Now, let's see how to add voiceover to PowerPoint on Mac.
Step 1. Open the PowerPoint PPT on your Mac and locate the slide you want to record.
Step 2. In the top toolbar, select Slide Show > Record Slide Show.

Step 3. You will enter the PowerPoint recording interface. Turn on the camera feed and microphone if needed.

Step 4. Click on the red record button to start recording.

During the session, you can:
- Use pause and resume to move to the next slide.
- Use the laser pointer, pen, highlighter, or eraser to mark up your recording.
Step 5. Click on the red record button again to stop recording.
Step 6. To export your presentation as a video, go to File > Export. Save the video in MP4 or MOV format.
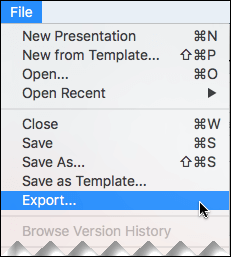
💡Note: If you have subscribed to Microsoft 365, you can also use the new recording functions. Go to Recording > Cameo > Camera to personalize your camera feed.
Share this post to help more people!
Part 2. How to Record on PowerPoint as Video in Microsoft 365
PowerPoint offers a brand-new recording feature in 2022 for its Microsoft 365 subscribers. This upgrade makes it easier to record PowerPoint with camera and audio and save the presentation as a video.
See how to record yourself presenting a PowerPoint with face, voice, and video on Microsoft 365.
Step 1. Open the PowerPoint PPT and locate the slide you want to record. Select Record in the upper-right corner (next to Present in Teams).
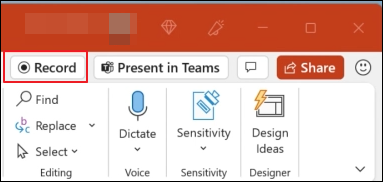
Step 2. You will enter the PowerPoint recording interface in full-screen mode. Adjust these settings if needed:
- Turn on the camera and microphone

- Select Camera mode to Blur Background. This will record video with blurred background.
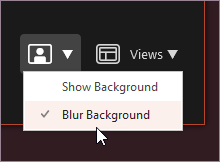
- Click Views to select a Teleprompter, Presenter View, or Slide View.
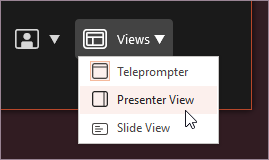
Step 3. Then, click the RECORD button to initiate the session.

You can use built-in tools like a laser pointer, pen, highlighter, or eraser to make up your PowerPoint recording.
![]()
💡Note: No narration is recorded during slide transitions, so pause during the transition and then continue speaking.
Step 4. Click STOP to finish recording, click REPLAY to preview the recording, or click RETAKE to start over.
Step 5. Click Export > Export Video > View and share video. This will save your recording as an MP4 file, and you can view it on OneDrive.

Part 3. How to Record a Presentation on PowerPoint 2016/2019/2021
The way to record PowerPoint in 2016/2019/2021 would be more traditional than that of Microsoft 365.
See how to record PowerPoint with audio and video on Microsoft Office 2016, 2019, and 2021.
Step 1. Open the presentation PPT you want to record with PowerPoint. Navigate to Record or Slide Show on the top toolbar.
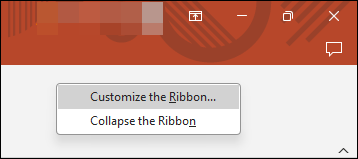
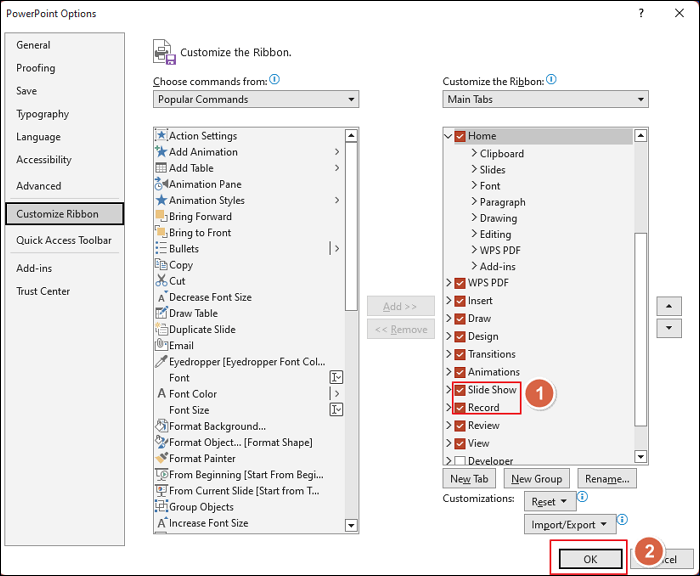
💡Note: If you cannot find the record options from the toolbar, right-click on the blank area and select Customize the Ribbon..., check Slide Show and Record boxes, and click OK to add them to the taskbar.
Step 2. Click Record and select From Current Slide… or From Beginning… from the list.

Step 3. You will enter the PowerPoint recording interface in full-screen mode.
- Adjust the camera and microphone settings first.
- Then, click the RECORD button to initiate the session.
- You can use the built-in tools to take notes and switch slides during the process.
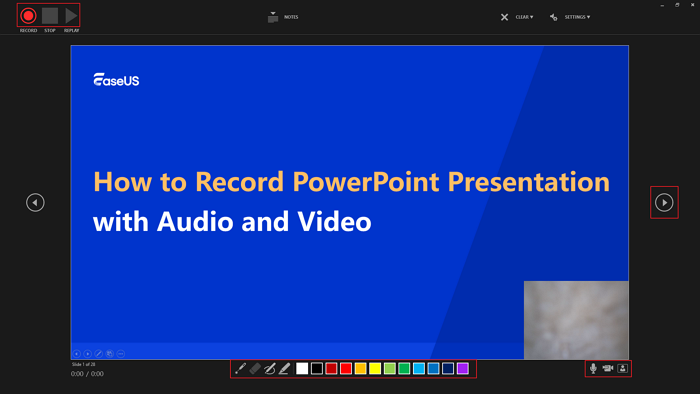
Step 4. To end the recording task, click STOP. Click REPLAY to preview the recording. Click X to close the window.
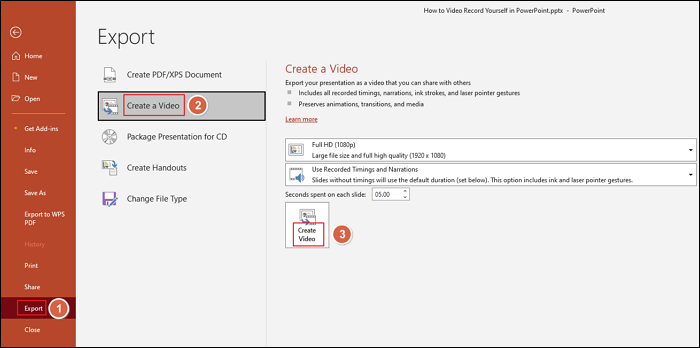
Step 5. Navigate to File > Export > Create a Video > Create Video to save your PPT presentation as a MP4 file.
Best Way to Record PowerPoint Presentation with Audio and Video
In the previous part, we discussed how to record on PowerPoint with its built-in recorder of Windows and Mac versions. It can meet your basic requirements for a presentation due. However, there are some challenges you cannot ignore.
Here is a general conclusion of the limitations of PowerPoint's built-in recording feature:
- Narrations are not recorded if you transit between slides. To ensure recording continuity, pause your narration during every slide transition.
- Narration is recorded separately for each slide. You cannot go back to a slide to add extra narration. The previous narrations will be overwritten.
- You cannot screen capture any other programs or windows except the PPT. Or the PowerPoint recording will be closed immediately.
- The location of the camera feed is fixed and cannot be moved.
- You can save the recording file in MP4 and MOV (Mac only).
If you want to improve these aspects and enjoy a smoother recording experience, use a free third-party presentation recorder like EaseUS RecExperts.
It deals with the screen, game, and webcam on Mac and Windows. With these improved functions, you can easily record PowerPoint with audio for free. Apart from PowerPoint, you can also record Google Slides, YouTube, Zoom, Teams, and everything you need.
More AI-empowered functions like video recording with virtual background, audio extractor from videos, and audio-to-speech converter will make your presentation recording more intelligent.
Steps to capture the screen for PowerPoint slideshow on Mac or PC with EaseUS RecExperts:
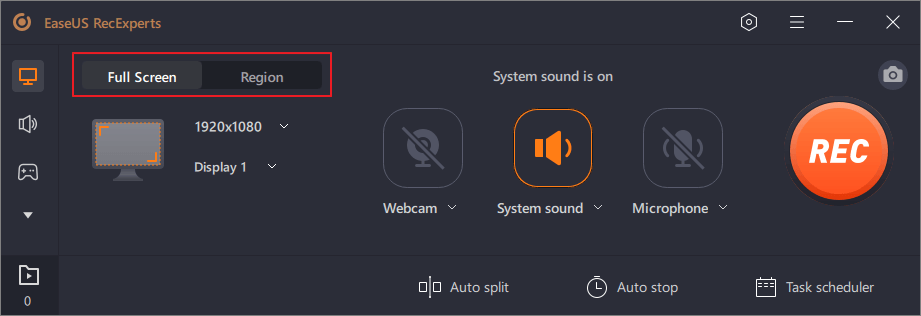
Step 1. Launch EaseUS RecExperts. There are two modes for screen recording. Choose "Full Screen", this tool will capture the whole screen; choose "Region", you will need to select the recording area manually.
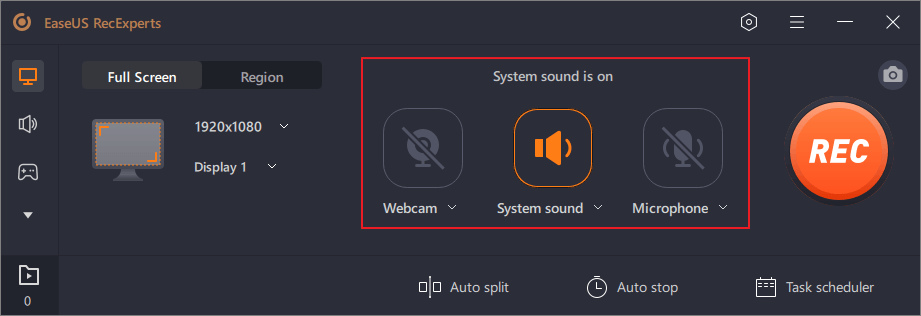
Step 2. After that, you can choose to record the webcam, system sound, or microphone as you like. Of course, you can turn them off if you only need to record the silent screen.
Step 3. Then, you can click the red "REC" button to start recording. Now you will see a menu bar on your screen. If you want to pause the recording, click on the white "Pause" button; to end the recording, click on the red "Stop" button.
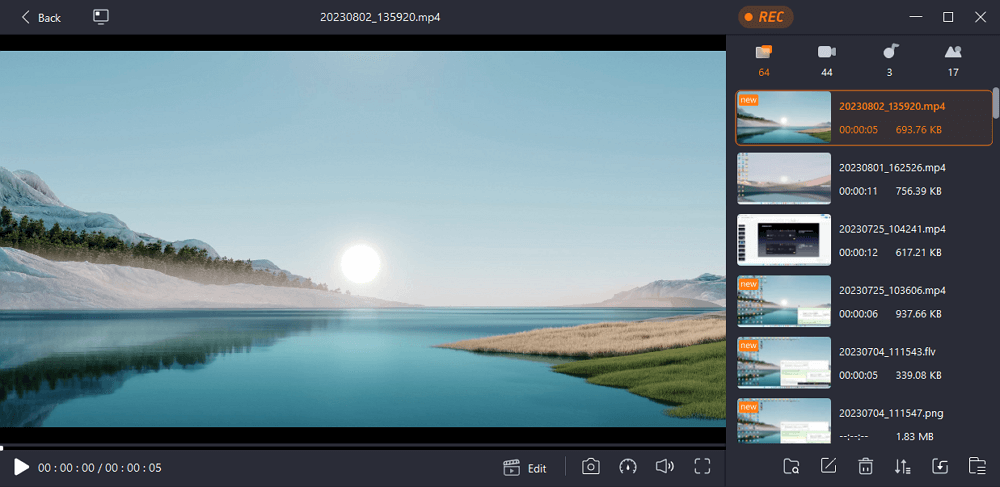
Step 4. After recording, you will be led to the recording list interface. Here you can view or edit your recordings easily.
Other Options to Record Yourself Presenting a PowerPoint
Besides the two recorders shown in the above part, there are more options for trying different functions when capturing PowerPoint presentations with audio and screen.
Option 1. OBS Studio to Video Record PowerPoint Presentation
Compatibility: Windows/Mac/Linux
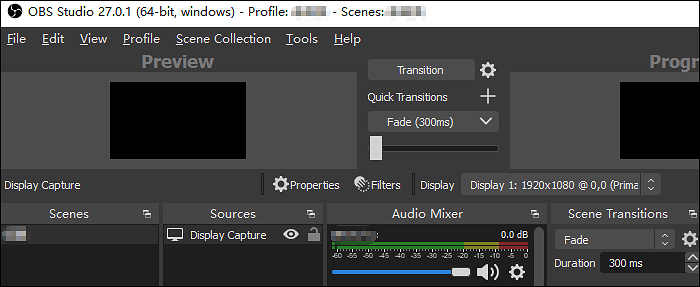
OBS Studio is famous for its screen and audio recording functions on different operating systems. As a powerful open-source recorder, it supports live streaming, and you can extend its functionality as well.
Meanwhile, this tool allows& capturing and mixing high-quality audio. For you to capture PowerPoint slides with screen and audio, it's easy to apply the related functions in OBS Studio.
Pros:
- Powerful configuration option
- Able to work as an intuitive audio mixer
- Easily record screen with audio on Mac
Cons:
- Frequent updates
- High learning curve
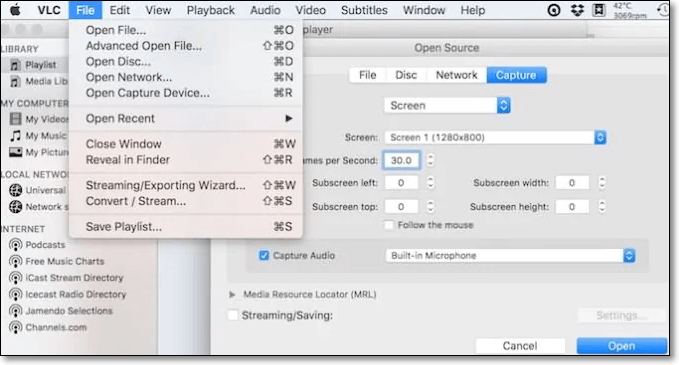
Option 2. VLC to Capture PowerPoint Presentation with Audio
Compatibility: Windows/Mac
VLC offers more powerful features than just playing videos. This application is professional because it supports nearly all next-generation codecs like HEVC, MPEG-4, MPEG-2, and so on. As open-source software, it supports adding plugins to enrich its functionality.
To record PowerPoint presentation with audio and video Mac, you need sound equipment to capture your voice. You can record whatever you like when the software and hardware are prepared.
Pros:
- Its interface is straightforward and friendly
- Support keyboard commands
- Allow a wide range of encodings
Cons:
- Don't support burning CDs
- Lack some editing functions for audio
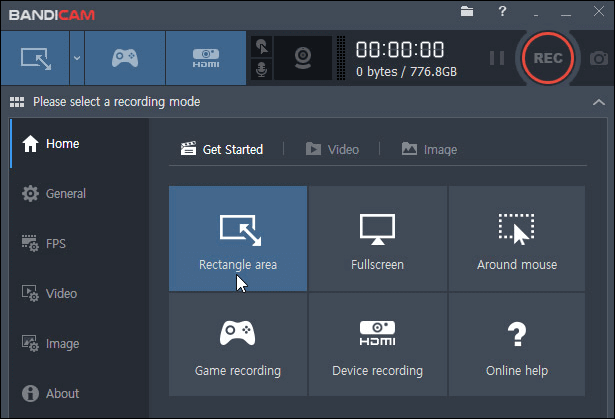
Option 3. Bandicam to Video Record PowerPoint Slides Presentation
Compatibility: Windows
It is an easy-to-use screen recorder. You can choose any part of your screen as the recording area. It allows you to record the webinar, gameplay, online lectures, and Skype calls. Also, Bandicam allows adding a webcam overlay to the screen so that you can easily record yourself presenting a PowerPoint, like making reaction videos, tutorial videos, etc.
Pros:
- Support real-time drawing to explain the content in slides
- Add special effects while recording PowerPoint presentation
Cons:
- The file directories are confusing
- Sometimes the audio quality is not stable
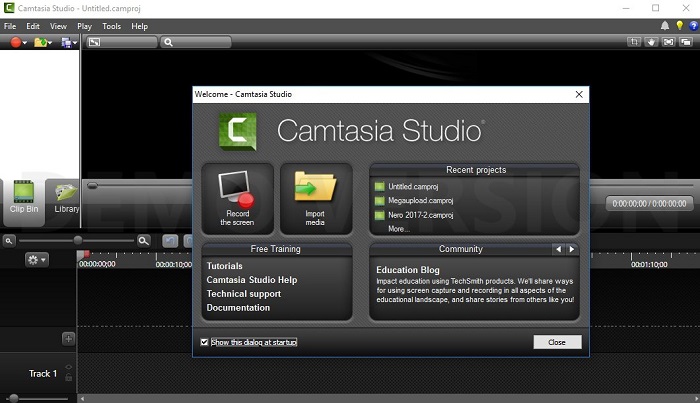
Option 4. Camtasia to Record Slideshow PowerPoint
Compatibility: Windows/Mac
This software offers features that help record videos to teach, train, and explain concepts. After several updates, it becomes capable of adjusting your audio tracks so that you can obtain consistent sound levels in every video project.
You can use the Theme in Camtasia to add a logo or a representative image to your recordings, which makes your videos impressive and protects your intellectual property. Try to apply those effects to your PowerPoint presentations!
Pros:
- Advanced editing features
- Possibility of organizing media
- Various output formats
Cons:
- Limited cross-compatibility with different versions
- Lack some editing functions for video capturing
Conclusion
This post mentioned six useful recorders that allow you to record PowerPoint presentation with audio and video on Windows and Mac. Among those tools, EaseUS RecExperts is regarded as the most versatile one with its rich features. Download it and have a try!
EaseUS RecExperts

One-click to capture anything on screen!
No Time Limit, No watermark
Start Recording


