-
![]()
Daisy
Daisy is the Senior editor of the writing team for EaseUS. She has been working in EaseUS for over ten years, starting from a technical writer to a team leader of the content group. As a professional author for over 10 years, she writes a lot to help people overcome their tech troubles.…Read full bio -
Jane is an experienced editor for EaseUS focused on tech blog writing. Familiar with all kinds of video editing and screen recording software on the market, she specializes in composing posts about recording and editing videos. All the topics she chooses …Read full bio
-
![]()
Alin
Alin is an experienced technical blog writing editor. She knows the information about screen recording software on the market, and is also familiar with data cloning and data backup software. She is expert in writing posts about these products, aiming at providing users with effective solutions.…Read full bio -
Jean is recognized as one of the most professional writers in EaseUS. She has kept improving her writing skills over the past 10 years and helped millions of her readers solve their tech problems on PC, Mac, and iOS devices.…Read full bio
-
![]()
Jerry
Jerry is a fan of science and technology, aiming to make readers' tech life easy and enjoyable. He loves exploring new technologies and writing technical how-to tips. All the topics he chooses aim to offer users more instructive information.…Read full bio -
![]()
Rel
Rel has always maintained a strong curiosity about the computer field and is committed to the research of the most efficient and practical computer problem solutions.…Read full bio -
![]()
Gemma
Gemma is member of EaseUS team and has been committed to creating valuable content in fields about file recovery, partition management, and data backup etc. for many years. She loves to help users solve various types of computer related issues.…Read full bio -
![]()
Shelly
"I hope my articles can help solve your technical problems. If you are interested in other articles, you can check the articles at the bottom of this page. Similarly, you can also check my Twitter to get additional help."…Read full bio
Page Table of Contents
Jean
Updated on Jun 09, 2026
0 Views |
0 min read
Recording a presentation today often means more than just capturing slides. Many users want to record the screen, their voice, and their face at the same time for online classes, remote work, tutorials, or demos. Adding narration in Google Slides, meetings, and other scenarios not only enhances audience engagement but also conveys ideas efficiently. So, users are more inclined to record presentations with their faces and audio.
In this guide, we'll explain how to record a presentation with audio, video, and face in PowerPoint, Google Slides, and other video narration forms on computers and mobile devices.
|
Solution |
Supported OS |
Screen |
Audio |
Face |
Notes |
|
Windows, macOS |
✅ |
✅ |
✅ |
Records screen, voice, and face at the same time; suitable for presentations, tutorials, and demos |
|
|
Windows, macOS (Desktop) |
✅ |
✅ |
✅ |
Built-in option for PowerPoint users; works only inside the desktop app |
|
|
Windows, macOS, or ChromeOS |
✅ |
✅ |
✅ |
Google Slides offers a native presentation recording feature for Workspace accounts only |
|
|
Windows, macOS, iOS, Android |
✅ (Screen Share) |
✅ |
⚠️ Limited |
Face cam depends on layout; recording requires host permission |
|
|
iOS, Android |
✅ |
✅ |
❌ |
Can record screen and mic, but no built-in face cam overlay |
Share this guide if you find it helpful!

PowerPoint Recording with Face via the Built-in Recorder
PowerPoint provides a native recording feature for its Windows and Mac desktop users to record audio, video, and face slide by slide. The steps and settings are very different on both operating systems. Here is a detailed breakdown.
#1. Record PowerPoint Presentation with Audio and Video on Windows Laptop and PC
If you want to record yourself talking in Microsoft PowerPoint, an inbuilt screen recorder is provided. You can record PowerPoint presentations with audio and video through its Record Slide Show or Screen Recording feature.
Before learning how to record on PowerPoint, pay attention to the following tips:
➤ You need to have a license for Microsoft Office to use PowerPoint.
➤ Check if the webcam and microphone are pre-placed well before recording.
➤ A new recording is saved on each slide separately. So, you should cover everything on one slide and not go back, otherwise the new recording will replace the previous one.
➤ Microsoft PowerPoint only records the PPT area, not supporting full-screen recording.
➤ The saved videos are very large. Make sure your computer has enough space.
After reading the perquisites, let's see how to record a PowerPoint presentation with your face.
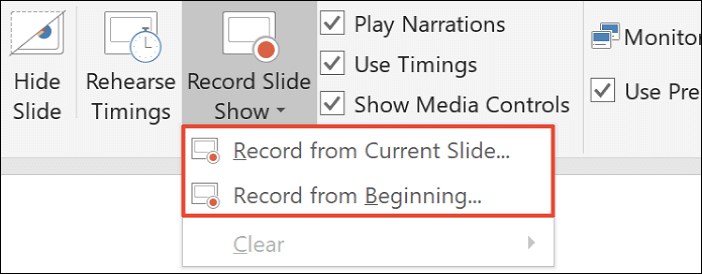
Step 1. On the toolbar, tap Record Slide Show or Screen Recording.
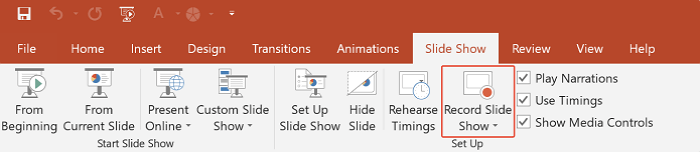
Step 2. Click Record. Then, you can select Record from Current Slide… or Record from Beginning….
Step 3. You have entered the recording screen. In the bottom right corner, turn on the microphone and webcam.
Step 4. Click Record in the upper left corner. It starts recording the PPT on yourself with audio. Click the arrow to move to the next slide, and use the pen to write notes on the slide if needed.

Step 5. To stop recording in PPT, click Stop.
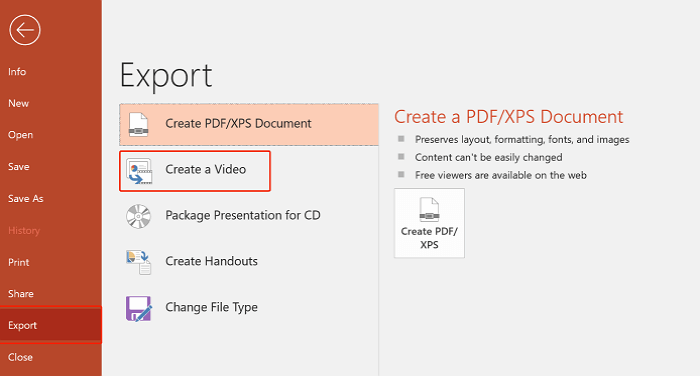
Step 6. To save a PowerPoint as a video, go to Files > Export > Create a Video in the upper left corner. The recording file will be saved in MP4 format.
#2. How to Record a PowerPoint Presentation with Your Face on Mac
Since there is not a Mac version of MS PowerPoint, users may ask what is the best way to record a presentation for Mac? One way is to use QuickTime Player, which lets users record sound from the microphone (your own voice).
Although Mac has a default presentation recorder, it cannot capture internal sound. If you want to record screen on Mac with audio, you need to download and install an extra add-on extension: Soundflower.
Step 1. Open the Soundflower download page. Then, download and install Soundflower on your Mac.
Step 2. Launch Soundflower and go to System Preferences > Volume. Click the Gear icon at the bottom-left panel. Tap Create a Mult-Output Device > Built-in Output > Soundflower (2ch).
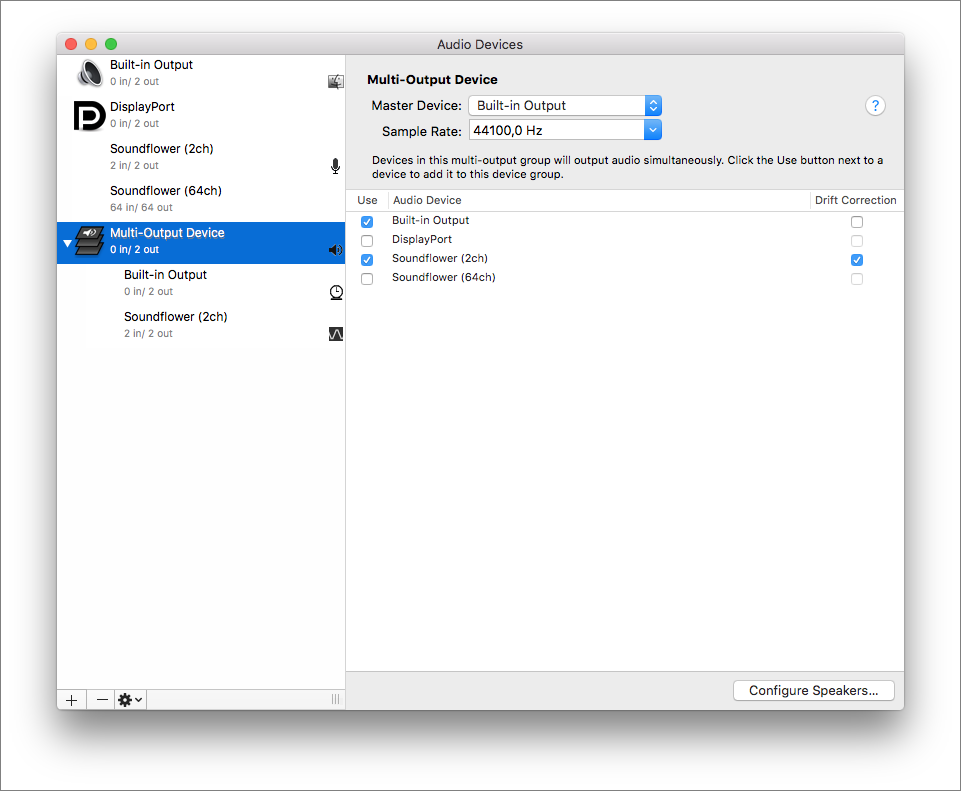
Step 3. Click the Gear button again and click Use This Device for Sound Output.
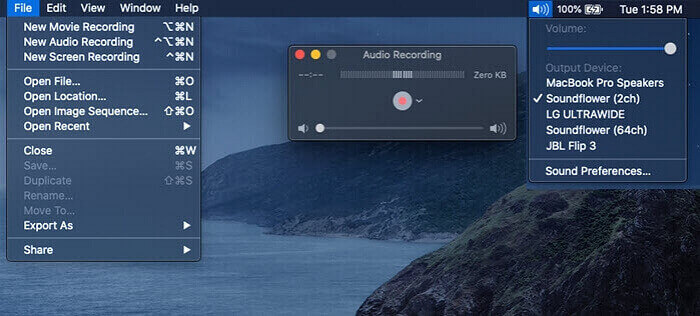
Step 4. Open QuickTime Player, navigate to File > New Screen Recording, tap the down-arrow icon next to the record button, and choose Soundflower (2ch) as the microphone device.
Step 5. Now, open the presentation PPT and locate the slide you want to record.
Step 6. Click Record to start recording slide about yourself.
Step 7. To stop recording in PPT, the Stop button.
- Notes:
-
Since QuickTime only lets users capture mic sound, you need an extra virtual audio like driver like BlackHole screen recording to capture the internal sound.
For an easier option, use EaseUS RecExperts for Mac instead, which helps you record system audio and microphone at the same time on Mac.
Share this guide if you find it helpful!
How to Video Record Yourself Presenting on Windows and Mac Perfectly
A professional screen recorder like EaseUS RecExperts would be the best way to record PPT with video without limitations. It helps you record yourself presenting a PowerPoint, Google Slides, Keynotes, Zoom, and others including your face and audio. No extra settings or host permissions needed.
👉Key features:
- Record Google Slides, MS PowerPoint, Zoom meetings, and other presentations with face, audio, and video using a webcam and microphone.
- Record a presentation about me, self-presenting videos, and a slide about yourself without a time limit, lag, or watermark.
- Record full screen, part of the screen, and any region of the screen on a computer.
- Save a PowerPoint presentation as a high-quality video. The AI-empowered function can naturally reduce noise.
- Support both Windows and Mac computers. One click to record audio from all parties on a MacBook.
Now, let's see how to record a presentation with your face.
Step 1. Launch EaseUS RecExperts and choose a screen recording mode from the main interface. You can select Full Screen to capture the entire display or Custom to record a specific area on your screen.

Step 2. Toggle on the Webcam, and click the small arrow next to the camera icon to select your preferred device. You can also enable Speaker or Microphone if audio is needed in your recording.

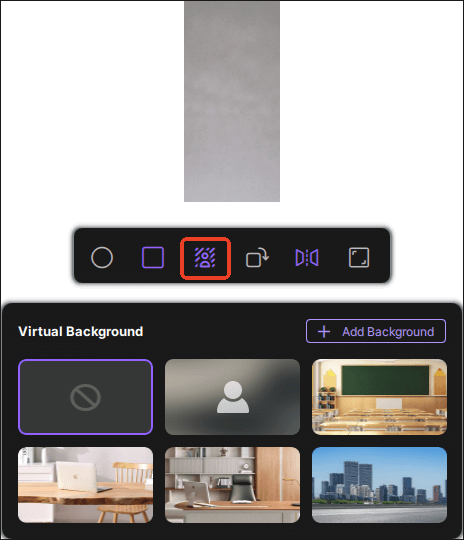
Step 3. In the webcam preview window, you can customize your camera feed. Options include changing the shape of the webcam overlay, rotating or mirroring the view, adjusting the resolution, and even adding a virtual background for a more professional look.
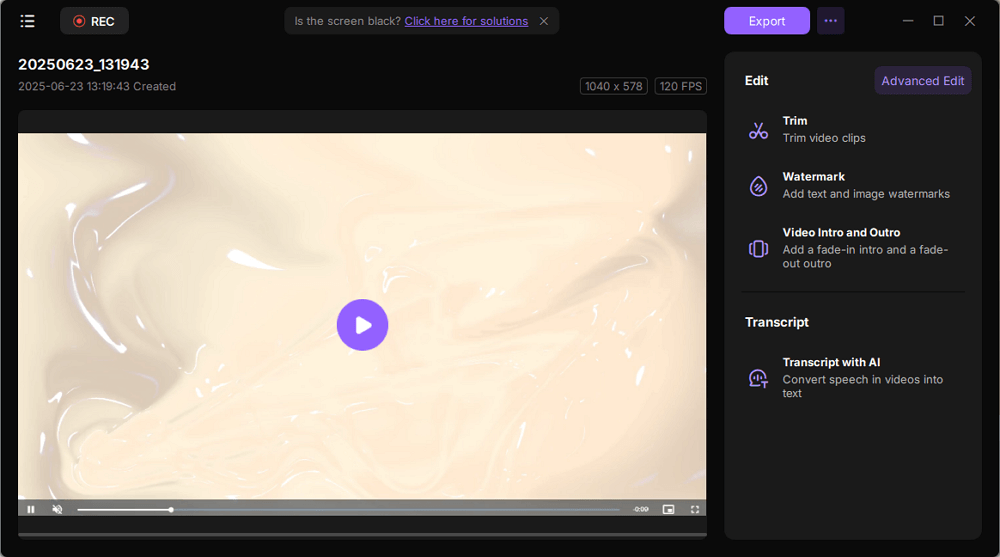
Step 4. Click the red REC button to start recording. During the recording, use the white Pause button to pause or the red Stop button to finish and save your video.
Step 5. After recording, you'll be taken to the preview window where you can trim, edit, and manage your recording files.
Share this guide if you find it helpful!
How to Record Presentation on Google Slides with Face
Google Slides is another popular presentation tool that allows users to record video with face. Unlike MS, Google Slides is a cloud-based software that requires no installation or license. But there are some limitations you need to pay attention to:
➤ Each presentation can be recorded for up to 30 minutes.
➤ You need a Google account to use this function.
➤ There is a storage limit. You cannot record new videos if the Google Cloud has insufficient space.
After reading the perquisites, let's see how to record a presentation with your face Google Slides:
Step 1. Open a browser, sign into your Google account, and visit Google Slides.
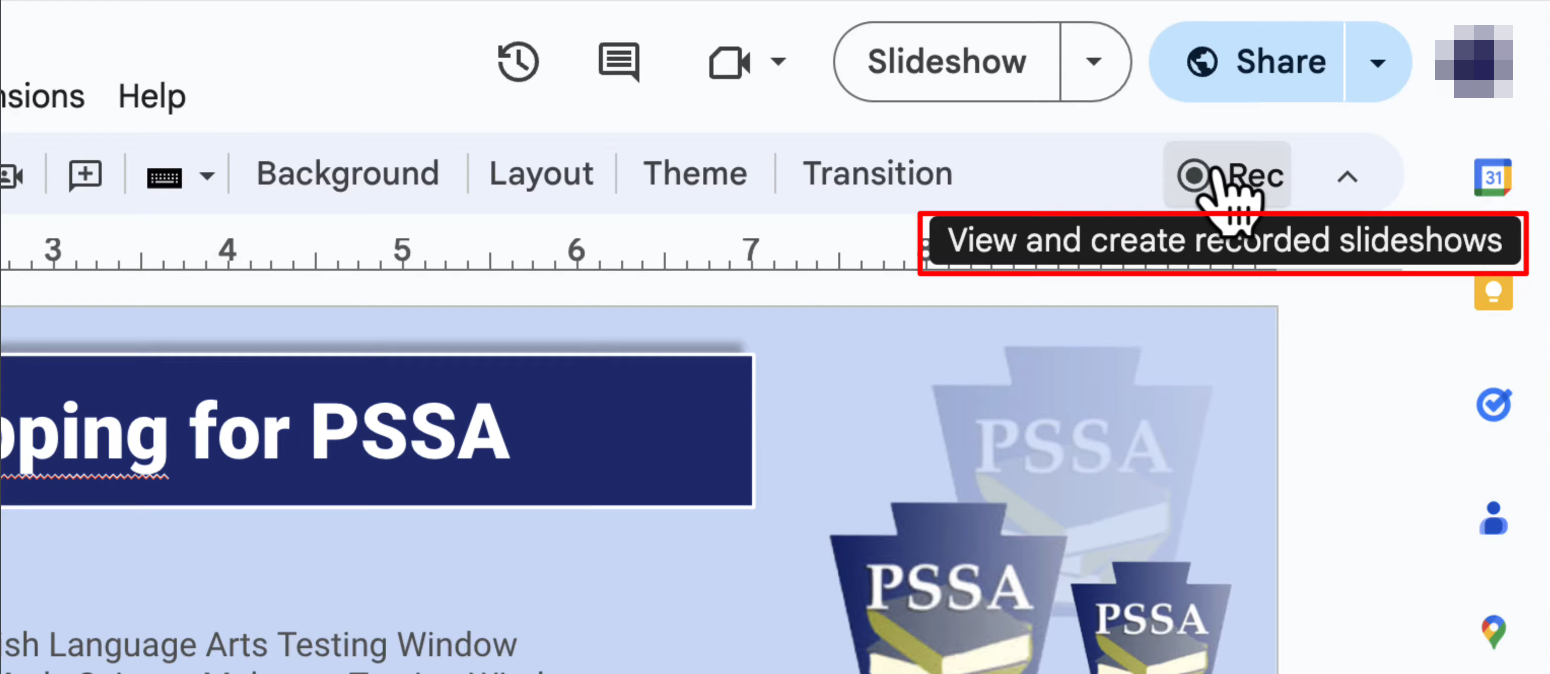
Step 2. Create or open a PPT, click the Rec button in the upper right corner, and tap Record new video.
Step 3. You will enter the screen recording interface. Press the red button to start recording.
Step 4. In the coming prompt, click Allow and toggle on Also allow tab audio to enable the camera and microphone. Now, you can record your face and voice.
Step 5. To end the recording, press the red button again. Here, you can click Re-record to start over or click Save to Drive to save the presentation as a video.
Step 6. To see the recording, go to Google Drive > My Drive folder > Slides recordings.
- Notes:
-
1. Google Slides doesn't have a native recording feature for its mobile versions. To record Google Slides on your iPhone or Android, use your devices' default screen recorder while presenting in the Google Slide app instead.
2. If your Google account doesn't have a native recording capability, use a third-party presentation recorder like EaseUS RecExerts instead.
Share this guide if you find it helpful!
How to Record Presentation on Zoom with Face
Zoom is a practical option if you want to record a presentation with slides, audio, and your face at the same time, especially for online meetings, training sessions, or remote presentations.
Instead of recording the presentation file itself, Zoom records the screen share, microphone audio, and webcam video as part of a meeting. This makes it suitable for users who already rely on Zoom for work or teaching and want a simple, all-in-one recording workflow without extra software.
🚩How to record a presentation on Zoom with your face:
Step 1. Open Zoom on your computer (Windows or macOS) and sign in to your account.
Step 2. Click New Meeting to start a meeting, even if you're the only participant.
Step 3. Turn on your camera and microphone to make sure your face and voice are captured.
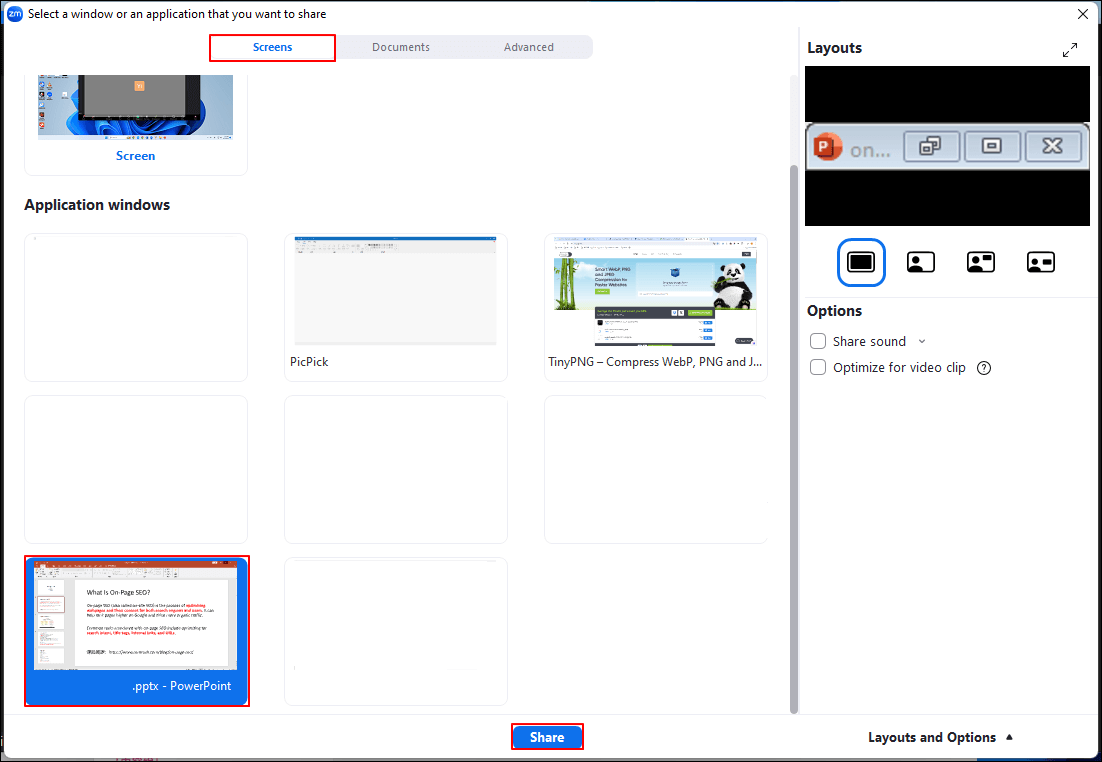
Step 4. Click Share Screen, then select your presentation window (PowerPoint, Google Slides, or a browser tab).
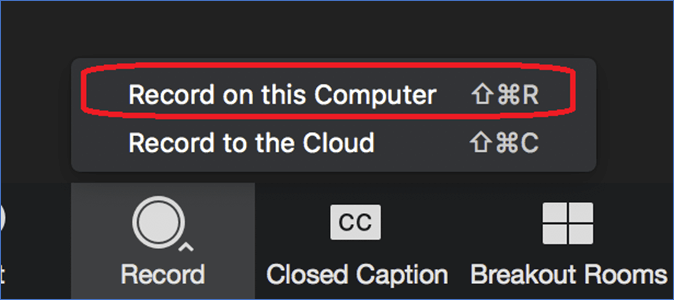
Step 5. Once screen sharing starts, click Record> Record on this Computer (or Record to the Cloud, if available).
Step 6. Present your slides as usual. Your face will appear in the recording, depending on the selected layout.
Step 7. Click Stop Recording when finished, then End Meeting. Zoom will automatically save and convert the video.
- Important Notes and Limitations
-
1. In meetings with multiple participants, only the host or users with recording permission can record.
2. Zoom controls where and how your webcam appears (gallery view, speaker view, or floating thumbnail).
3. Zoom recordings offer limited flexibility compared to dedicated screen recorders.
4. On iOS and Android, recording with face and screen simultaneously is more limited and often requires cloud recording.
Share this guide if you find it helpful!
How to Make Video Presentation with Audio on iPhone and Android
Making a video presentation with audio on mobile devices is much more straightforward than recording with face cam. Both iPhone and Android support screen recording with microphone input, which allows you to capture your slides while explaining them in real time.
This approach works well for voice-over presentations, quick walkthroughs, and situations where showing your face is not necessary.
#1. How to Record a Video Presentation with Audio on iPhone
iPhone comes with a built-in screen recorder that can capture the screen along with the microphone audio. No third-party app is required.
Step 1. Open your presentation in PowerPoint, Google Slides, or a browser.
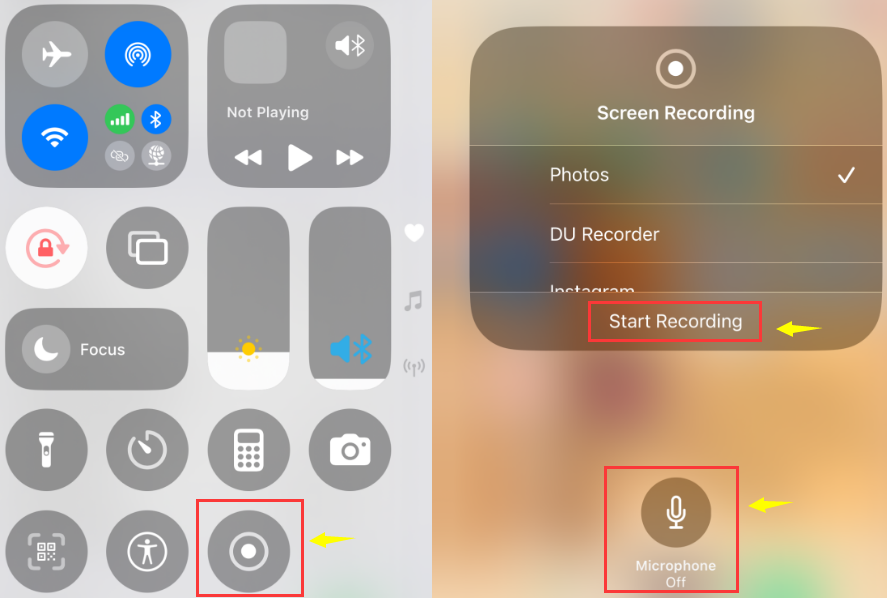
Step 2. Swipe down to open Control Center, then long-press Screen Recording.
Step 3. Turn on Microphone, then tap Start Recording.
Step 4. Present your slides while speaking.
Step 5. Stop the recording from Control Center or the status bar.
Please note that iOS does not allow recording system audio from some apps, and protected content may result in a black screen.
#2. How to Record a Video Presentation with Audio on Android
Most Android devices running Android 11 or later include a native screen recorder that supports microphone audio recording.
Step 1. Open your presentation app on your phone.
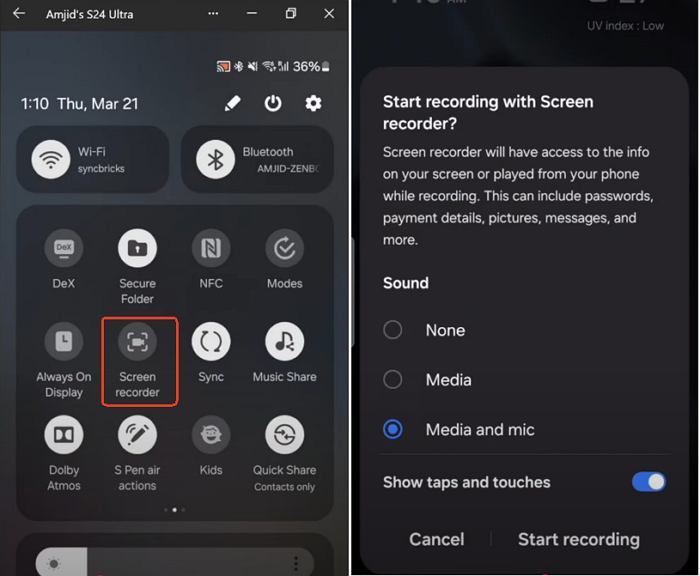
Step 2. Swipe down to access Quick Settings and tap Screen Recorder.
Step 3. Select Microphone (or Mic + System Sound, if available).
Step 4. Start recording and present your slides.
Step 5. Stop the recording when finished.
Please note that available audio options may vary by device manufacturer, and some apps restrict system audio recording.
Share this guide if you find it helpful!
Conclusion
Guess now you have known how to record a presentation with your face. To summarize, both the internal recording functions in PowerPoint and Google Slides are limited. If you want to record PowerPoint, Google Slides, Zoom, or other presentations without any limits, use EaseUS RecExperts.
It allows narrators to record their PPT with face easily. No time limit, no screen size limit, and no sophisticated steps. Download this free presentation recorder to your computer and give it a shot.
FAQs on How to Record a Presentation with Your Face
Learn more frequently asked questions on how to record presentation with face.
1. Is there a free recording app?
Yes, there is a free recording app called EaseUS RecExperts. This versatile screen recorder lets you record everything you want, including presentation, video conference, streaming video, gameplay, YouTube, and more. You can record full screen or part of screen to your liking.
2. Why can't I record my face on PowerPoint?
Recording face on PowerPoint not working can be caused by:
- The microphone not enabled. Go to Settings on PowerPoint to check if you give access to your microphone.
- Insufficient disk space. You need to free up your drive and leave more storage space.
3. How do you present yourself in PowerPoint?
To present yourself in PowerPoint, you can use the built-in recorder in MS PowerPoint. Here are the steps:
Step 1. Go to Record Slide Show or Screen Recording.
Step 2. Click Record > Record from Current Slide… or Record from Beginning….
Step 3. Click Record on the upper left corner to video record yourself presenting a PowerPoint.
Step 4. Click Stop to end recording the introduction slide about yourself.
✅Article update log
This update focuses on how to record presentations with audio, video, and face. Based on user search intent, I added two practical solutions: Zoom's built-in recording feature and mobile presentation recording methods for iPhone and Android.
I also created a comparison table covering five recording methods, placed after the introduction with anchor links for easy navigation, so readers can quickly find the solution that fits their needs.
Each method now includes detailed explanations of features, limitations, and workarounds, ensuring the article fully addresses common user scenarios. The goal is to provide a comprehensive, user-friendly guide where readers can find solutions to record presentations with audio, video, and face without searching elsewhere.
Share this guide if you find it helpful!