-
![]()
Daisy
Daisy is the Senior editor of the writing team for EaseUS. She has been working in EaseUS for over ten years, starting from a technical writer to a team leader of the content group. As a professional author for over 10 years, she writes a lot to help people overcome their tech troubles.…Read full bio -
Jane is an experienced editor for EaseUS focused on tech blog writing. Familiar with all kinds of video editing and screen recording software on the market, she specializes in composing posts about recording and editing videos. All the topics she chooses …Read full bio
-
![]()
Melissa Lee
Melissa Lee is an experienced technical blog writing editor. She knows the information about screen recording software on the market, and is also familiar with data cloning and data backup software. She is expert in writing posts about these products, aiming at providing users with effective solutions.…Read full bio -
Jean is recognized as one of the most professional writers in EaseUS. She has kept improving her writing skills over the past 10 years and helped millions of her readers solve their tech problems on PC, Mac, and iOS devices.…Read full bio
-
![]()
Jerry
Jerry is a fan of science and technology, aiming to make readers' tech life easy and enjoyable. He loves exploring new technologies and writing technical how-to tips. All the topics he chooses aim to offer users more instructive information.…Read full bio -
Larissa has rich experience in writing technical articles. After joining EaseUS, she frantically learned about data recovery, disk partitioning, data backup, screen recorder, disk clone, and other related knowledge. Now she is able to master the relevant content proficiently and write effective step-by-step guides on various computer issues.…Read full bio
-
![]()
Rel
Rel has always maintained a strong curiosity about the computer field and is committed to the research of the most efficient and practical computer problem solutions.…Read full bio -
![]()
Gemma
Gemma is member of EaseUS team and has been committed to creating valuable content in fields about file recovery, partition management, and data backup etc. for many years. She loves to help users solve various types of computer related issues.…Read full bio -
![]()
Shelly
"I hope my articles can help solve your technical problems. If you are interested in other articles, you can check the articles at the bottom of this page. Similarly, you can also check my Twitter to get additional help."…Read full bio
Page Table of Contents
0 Views |
0 min read
Does Sony Vegas have a screen recorder? This question is common among people who want to try screen recording with this tool. While Sony Vegas is more of a video editing software, it has basic screen-capturing capabilities via the "VEGAS Capture" feature. This lets content creators combine screen recordings with the powerful editing functions of Sony Vegas.
This tutorial will guide you on how to screen record using Sony Vegas or another versatile screen recorder, EaseUS RecExperts.
Part 1. How to Record Screen with Sony Vegas Pro 16/15/14/13
Sony Vegas Pro offers advanced video editing and screen capture features, which will be a good choice for creating high-quality video tutorials or gameplay. It provides an efficient integration between screen recording and editing features. This allows the user to trim, cut, and enhance the recordings after capturing.
This nullifies any need for supplementary applications, making the workflow simpler. It also has real-time rendering and preview capabilities, which enable you to glance at your recording and refine it within one interface. This is very helpful to creatives who need complete control over their recordings and edits within one platform.
Follow these steps to record your screen via Sony Vegas Pro:
Step 1. Start Sony Vegas Pro, and open the menu bar at the top. Click on "File," then click "Screen Capture."
Step 2. A new window will pop up where you can configure all the settings related to screen recording. You can choose to record either full screen or select parts. You can also choose the audio input source: microphone or system audio.
Step 3. After setting your preferences, click the Record icon to start recording.
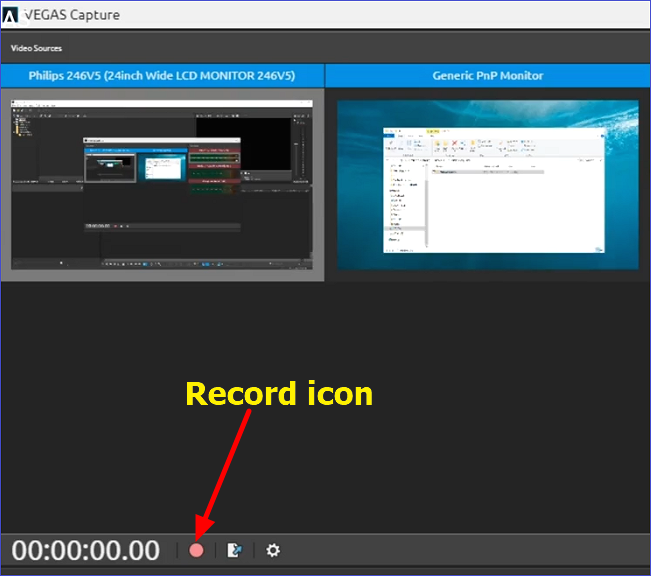
Step 4. While recording, you can pause or stop. The interface provides intuitive access to such control functions, enabling you to handle the recording flow easily as you go along.
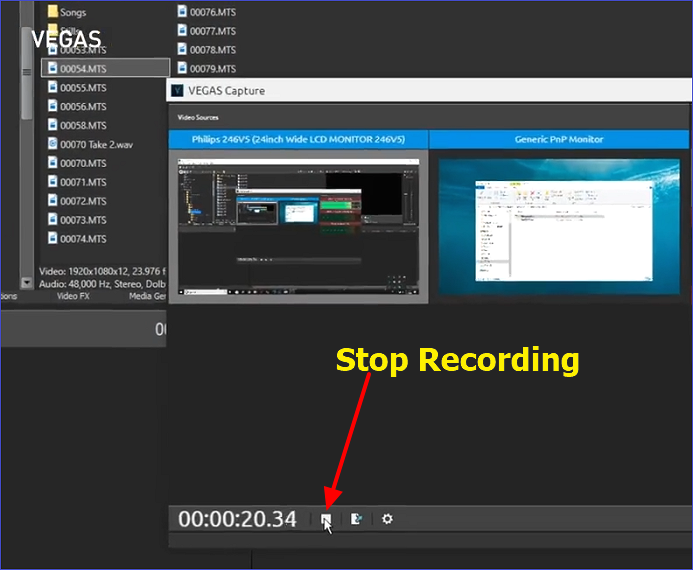
Step 5. Once done, "Export" the Sony Vegas Pro project and save it to your preferred location.
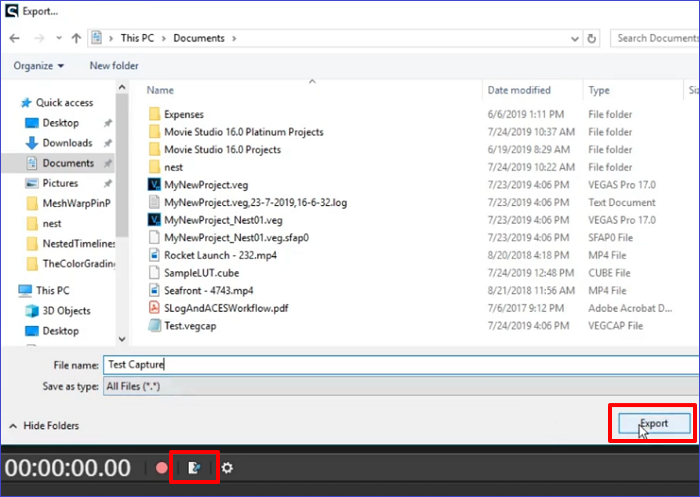
Step 6. To import a project, go to "File" and "Import." Navigate to where you saved the project and import it to the Vegas timeline. Edit the parts you don't want, and "Export" your video in the desired format. That's how to screen record using Sony Vegas.
Please share this post to help more users!
Part 2. How to Record Your Computer Screen via EaseUS RecExperts
As the best screen recorder, EaseUS RecExperts can help those needing professional video recordings of all kinds of on-screen activities. It eases out screen capture when preparing tutorials, presentations, and gameplays, among other things. In short, this third-party tool is perfect for recording video, audio, and webcams simultaneously.
Whether a professional or a beginner, it provides the user a smooth experience, wherein recording any screen is just a few clicks away. EaseUS RecExperts has recording modes like full screen, selected area, webcam, and audio. Advanced options include scheduling recordings, adding a custom watermark and mouse effects, and more.
Key Features
● Flexible recording modes: full screen, selected area, and webcam.
● System audio and microphone recording.
● It has an AI-powered noise removal feature for clear audio recordings.
● Schedule recordings to capture an on-screen event at a specific time automatically.
● Real-time editing and trimming.
● It supports adding watermarks for branding.
Do you wish for an awesome screen recording experience on your PC today? Ensure you download this tool now. The steps are very straightforward.
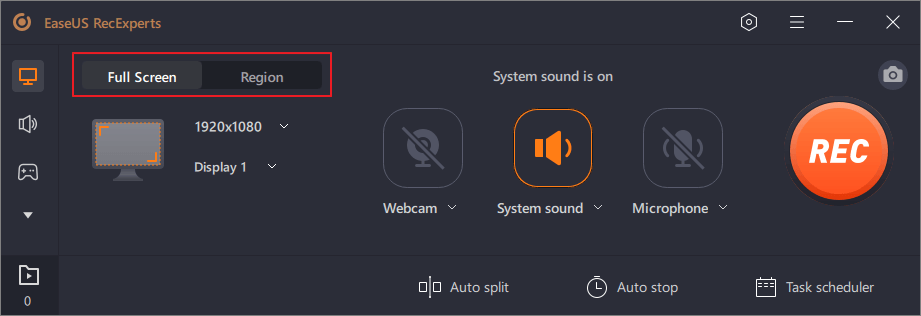
Step 1. Launch EaseUS RecExperts. There are two modes for screen recording. Choose "Full Screen", this tool will capture the whole screen; choose "Region", you will need to select the recording area manually.
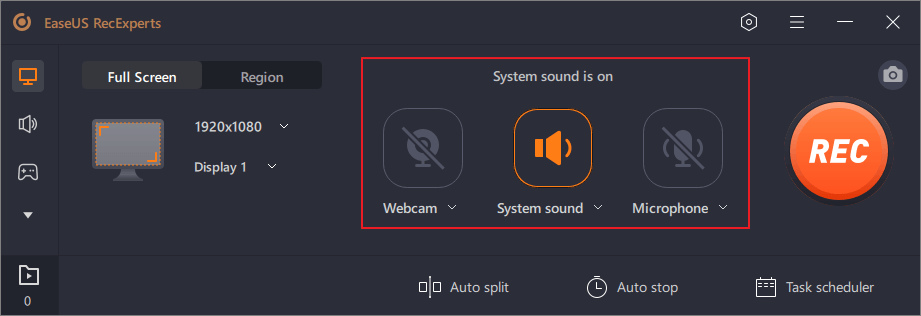
Step 2. After that, you can choose to record the webcam, system sound, or microphone as you like. Of course, you can turn them off if you only need to record the silent screen.
Step 3. Then, you can click the red "REC" button to start recording. Now you will see a menu bar on your screen. If you want to pause the recording, click on the white "Pause" button; to end the recording, click on the red "Stop" button.
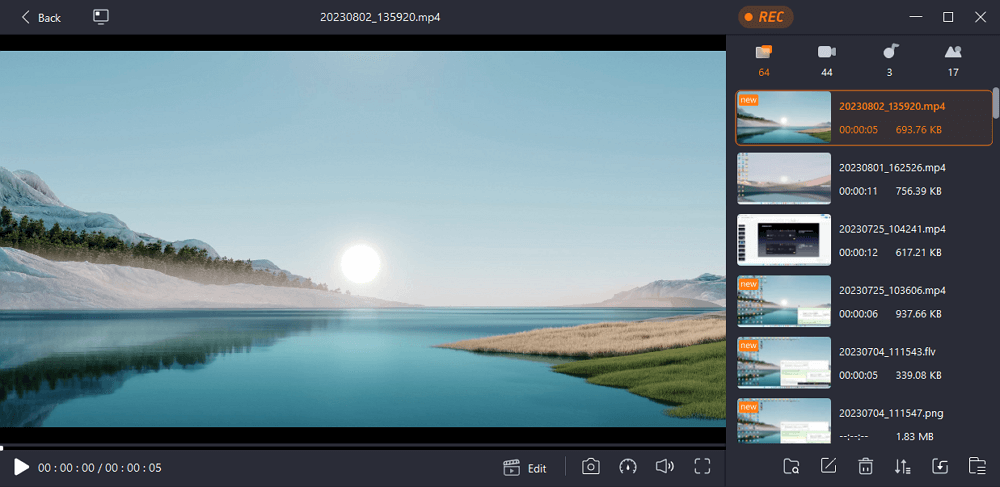
Step 4. After recording, you will be led to the recording list interface. Here you can view or edit your recordings easily.
Please share this post to help more users!
Part 3. How to Record Your Computer Screen via OBS Studio
OBS Studio is a powerful, free, open-source screen recorder that records or streams live video content. Part of its popularity is its flexibility and ability to create a high-quality output. You can record an entire screen or select parts more efficiently in tutorials, gaming, and professional presentations.
With OBS Studio, users can change video quality, frame rate, and audio settings comprehensively in settings. Follow these steps to use this tool:
Step 1. Open OBS Studio. To start, click the "+" button under the "Scenes" panel at the bottom left and give your scene a name. Click OK.
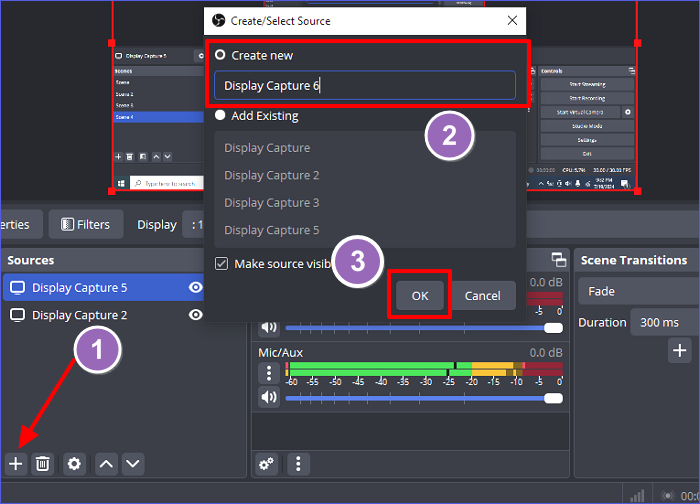
Step 2. In the "Options" section, select "Screen Capture." A pop-up window will appear, so click "OK" to confirm, and you will instantly see your screen.
Step 3. Select the part you want to record.
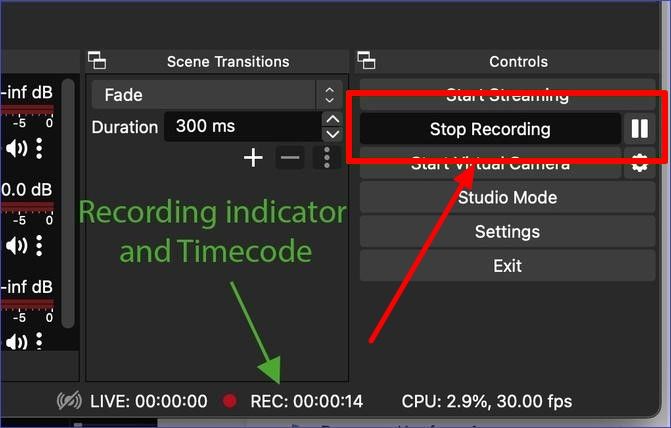
Step 4. Once set, just hit the "Start Recording" button in the lower right corner, and OBS starts recording everything on the screen according to the selected settings.
Step 5. Once done, click "Stop Recording." You can set the settings so that it automatically saves your files to a certain output folder.
Conclusion
This article answers the question, "Does Sony Vegas have a screen recorder?" and explains how to do it step by step. In addition, we've shared three different tools that offer the same benefits: Sony Vegas Pro, EaseUS RecExperts, and OBS Studio. Each tool has unique features that stand out in basic screen capture and a more advanced, customizable recording setting.
Among those, EaseUS RecExperts' simplified approach and flexibility make it an ideal option for most users. It's perfect for beginners looking to record screens without much hassle and professionals looking for sophisticated functionalities and results. Download this tool now to capture any section of your computer screen with audio.
FAQs about Sony Vegas
In this section, we answer some common questions about Sony Vegas:
1. How Do I Remove the Background from a Video in Sony Vegas?
You can remove a video's background in Sony Vegas Pro by masking it. Masking traces the subject in a video and isolates its background. Here are the steps to follow:
Step 1. Import your video and open it in Sony Vegas.
Step 2. Under the Video Event FX tab, click the option that says Mask.
Step 3. Use the pen to draw around the subject to separate it from the background. For moving subjects, create keyframes to animate the mask.
Step 4. Change mask settings to soften edges and refine the mask as needed.
2. How to Take a Screenshot on Sony Vegas?
There are essentially two ways to create a screenshot in Sony Vegas:
Using VEGAS Capture:
Step 1. From the File menu, select Screen Capture.
Step 2. Set up what screen to capture, start recording, and export the captured project.
Step 3. You can also manually import and edit a given project.
Taking a Snapshot of a Video Frame:
Step 1. Move the playhead to a frame in the video you want to capture.
Step 2. In the preview window, click the Save Snapshot to File icon to save the frame as an image.
Step 3. These options allow the user to capture video content or create still images for use in collages, GIFs, or DVD covers.
3. How Do I Cut a Clip in Sony Vegas?
To split a clip in Sony Vegas, follow these steps:
Step 1. Drag the video clip onto the timeline.
Step 2. Move the play head to the frame where you want to start the cut.
Step 3. Press S on your keyboard to cut in your selected frame. Repeat several times until you have all the cuts you need.
Step 4. Click the part you want to remove and hit Delete on your keyboard. Drag the other clips together, pulling them so no gap is left free.
Please share this post to help more users!
EaseUS RecExperts

One-click to capture anything on screen!
No Time Limit, No watermark
Start Recording