-
![]()
Daisy
Daisy is the Senior editor of the writing team for EaseUS. She has been working in EaseUS for over ten years, starting from a technical writer to a team leader of the content group. As a professional author for over 10 years, she writes a lot to help people overcome their tech troubles.…Read full bio -
Jane is an experienced editor for EaseUS focused on tech blog writing. Familiar with all kinds of video editing and screen recording software on the market, she specializes in composing posts about recording and editing videos. All the topics she chooses …Read full bio
-
![]()
Alin
Alin is an experienced technical blog writing editor. She knows the information about screen recording software on the market, and is also familiar with data cloning and data backup software. She is expert in writing posts about these products, aiming at providing users with effective solutions.…Read full bio -
Jean is recognized as one of the most professional writers in EaseUS. She has kept improving her writing skills over the past 10 years and helped millions of her readers solve their tech problems on PC, Mac, and iOS devices.…Read full bio
-
![]()
Jerry
Jerry is a fan of science and technology, aiming to make readers' tech life easy and enjoyable. He loves exploring new technologies and writing technical how-to tips. All the topics he chooses aim to offer users more instructive information.…Read full bio -
![]()
Rel
Rel has always maintained a strong curiosity about the computer field and is committed to the research of the most efficient and practical computer problem solutions.…Read full bio -
![]()
Gemma
Gemma is member of EaseUS team and has been committed to creating valuable content in fields about file recovery, partition management, and data backup etc. for many years. She loves to help users solve various types of computer related issues.…Read full bio -
![]()
Shelly
"I hope my articles can help solve your technical problems. If you are interested in other articles, you can check the articles at the bottom of this page. Similarly, you can also check my Twitter to get additional help."…Read full bio
Page Table of Contents
0 Views |
0 min read
PAGE CONTENT:
In the digital age, as remote working and online education continue to develop, GoToWebinar, the professional all-in-one webinar and virtual event software provides users with a comprehensive solution for live online seminars.
Whether you're an educator, business person or non-profit organiser conducting a webinar, recording an effective GoToWebinar session can help review and refresh the session while also sharing it for those who can't attend to access. But how to record GoToWebinar as attendee or host on Windows or Mac effectively?
This article will guide you through recording GoTo Webinar meetings using GoToWebinar's built-in features and third-party recording software like EaseUS RecExperts.
Record GoTo Webinar with EaseUS RecExperts
GoTo Webinar provides a recording function but only allows the host, co-host, or organizer to record the webinars. Therefore, to record GoToWebinar as an attendee or enhance the recording experience, you can choose a third-party screen recording tool such as EaseUS RecExperts.
EaseUS RecExperts is a powerful GoToWebinar screen recording software that allows users to record screen, audio, and webcam simultaneously during an online webinar. Whether you are a host or a participant, you can easily record GoToWebinar with this Windows and Mac screen recorder. This screen recording app has excellent flexibility and can record any screen activity, such as recording Zoom meetings or streaming videos.
Its scheduled recording feature helps you record GoToWebinar as an attendee or host automatically. More importantly, it can capture screens up to 4K/8K without a watermark or time limit. You can record multiple screens on Windows 11/10. Its built-in editing function allows users to trim, extract audio and transcript, or add notes.
The following are the reference steps for GoToWebinar screen recording via EaseUS RecExperts:
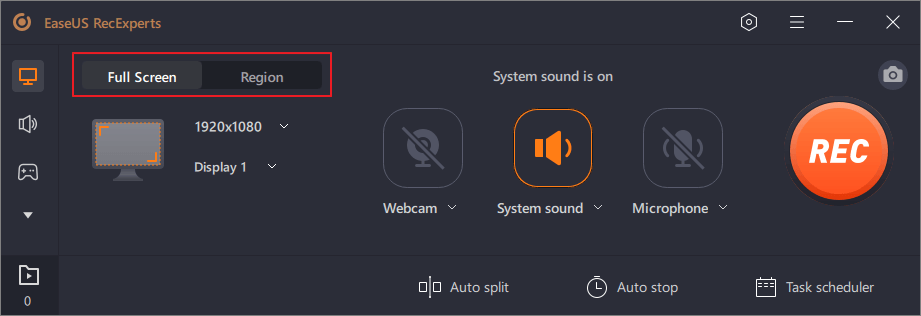
Step 1. Launch EaseUS RecExperts on your computer. Before recording, you can choose from two recording modes. To record the whole screen, choose the "Full Screen" mode; to record a part of the screen, select "Region".
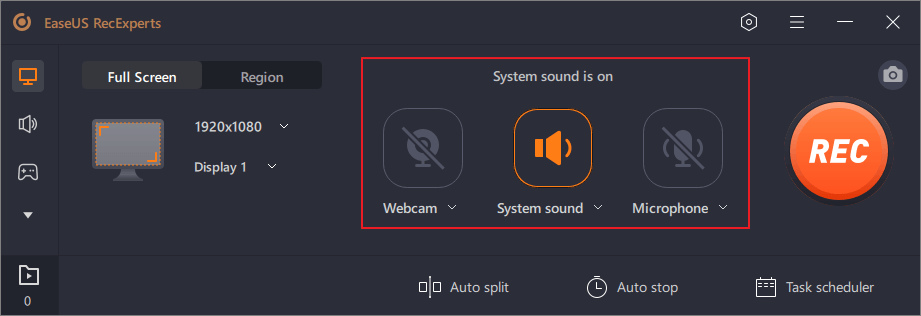
Step 2. You can also choose to record the screen with your webcam, system sound, microphone. Just click to select them. You can also set auto split, auto recording with various functions on the interface.
Step 3. Then, click on the red "REC" button to start recording. To pause the recording, click on the white double vertical bar; to end the recording, click on the red square sign. They are located on the menu bar appearing on your screen.
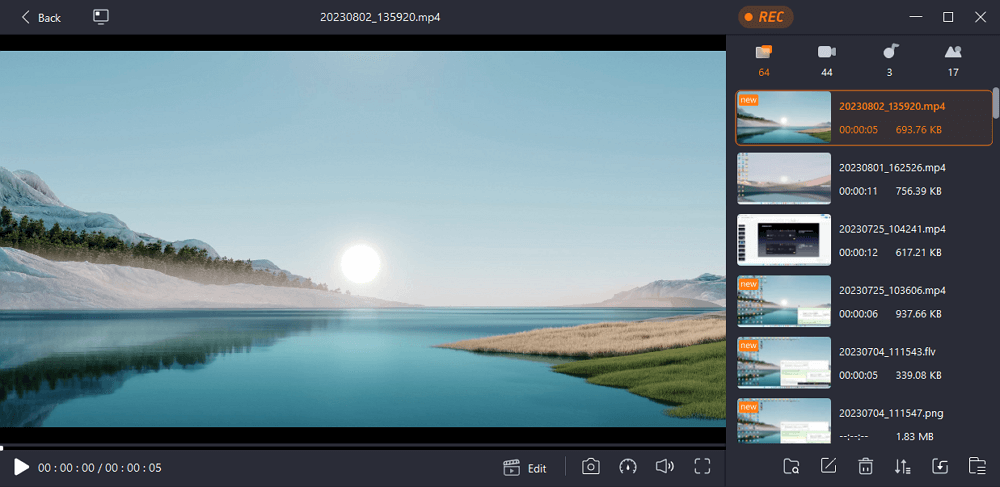
Step 4. After recording, you will be led to the recording list. Here you can view, split, extract audio, take screenshots, delete, and manage your recordings, etc. To start a new recording with previous settings, click on the "REC" button on the top of the window.
Share this article on your social media platforms.
Record Screen via GoTowebinar Recording Function
GoToWebinar's built-in recording function allows you to start recording seamlessly without installing additional software. Its intuitive interface makes it easy to set up and start recording.
Using its built-in features, you can automatically save, convert, and share your recorded webinars, and the recorded content can be accessed at any time in its video library. However, it's worth noting that only the presenter or organizer can record in GoToWebinar. Thus, as a participant, it is recommended that you use a third-party recording tool to record meetings.
Here are the instructional steps to record a GoTo Webinar:
Step 1. Install and launch GoToWebinar on your PC. Sign in to your account.
Step 2. Click on the Webinar button in the left taskbar, and join or create a webinar. You can check the Auto recording is ON. If not, please proceed to the next step.
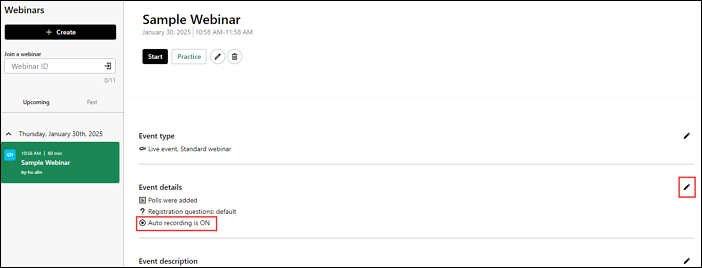
Step 3. Click the pencil icon to enter the Settings interface or directly access Webinar Dashboard, and then click the Automatically Start Recording button.

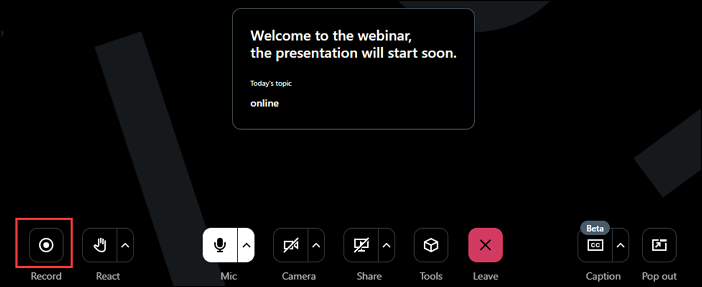
Step 4. Click on Start My Session, and then click on the Record button to record GoToWebinar on Windows or Mac. Click the Pause/Resume Recording button to control the recordings.
Step 5. When you end the session, it will automatically jump to Video Library and the recording has been saved automatically. You can check it by clicking the small bell icon in the upper right corner.
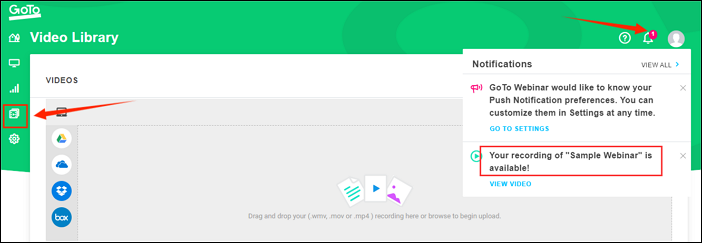
Note: You can download or share the recordings by clicking the three dots icon.
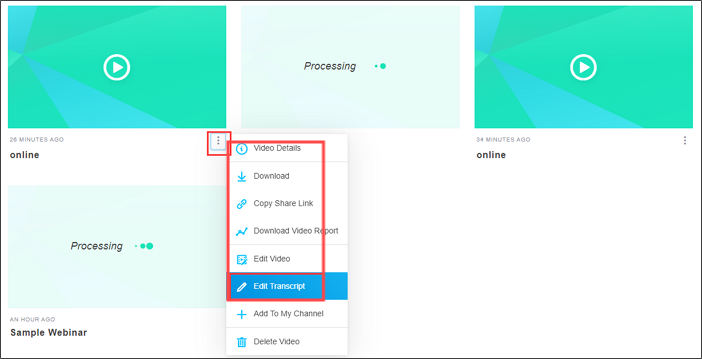
Whether you are a host or a participant, you also need to consider copyright and privacy policies when recording and sharing GoToWebinars. It is critical to ensure that you have the right to share all content and respect the privacy of all participants.
If you also want to learn how to record GoToMeeting as an attendee, please read the following article.
How to Record GoToMeeting as Attendee
This guide will show you how to record GoToMeeting as attendees. If you want to record the GoToMeetings without a time limit or a watermark, download EaseUS RecExperts to start now!

Bonus Tips: How to Get GoToWebinar Transcription
If you want to get transcription from GoToWebinar, you can use EaseUS RecExperts's AI Assistant function or GoToWebinar's Transcripts feature.
1️⃣EaseUS RecExperts's AI Assistant
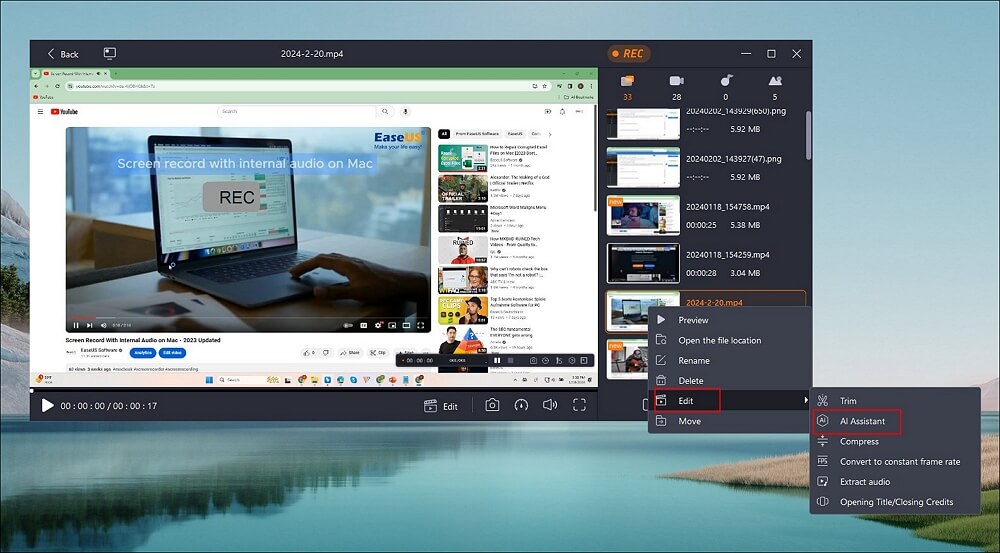
The AI Assistant feature helps you transcribe GoToWebinar into text. You can select the language and save path, and it will export to a .txt file that can be edited directly. Apart from, it also can transcribe zoom meetings, teams meeting recordings, or any other recordings.
You can go to Recordings > choose a recording > Edit > AI Assistant to get the recordings' transcriptions.
2️⃣GoToWebinar's Transcripts Feature
GoToWebinar also can generate transcripts for webinar recordings. You can enable it manually or automatically. Even though you are the attendee, you can view the transcripts and the webinar recording.
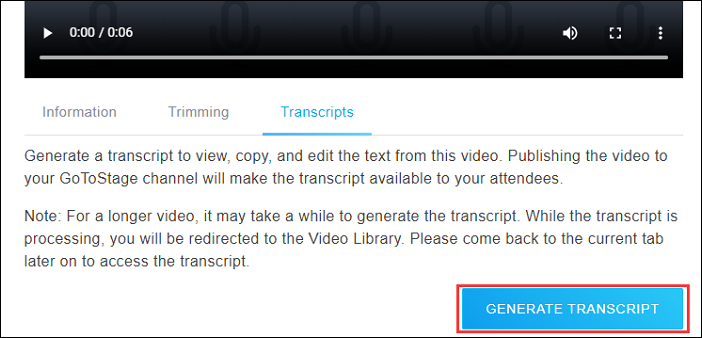
Click the three-dot icon and choose Edit Transcript. Then click the GENERATE TRANSCRIPT button to get the text. When finished, you can also search for the keywords in it.
Final Words
This comprehensive guide details how to record GoToWebinar using third-party screen recorders like EaseUS RecExperts and its built-in features. It also shows how to extract text from GoToWebinar at the end. Start practicing and choose the right tools and methods to help you record.
How to Record GoToWebinar Session FAQs
1. How to save a GoTo Webinar recording?
If you enable the GoTo Webinar recording feature during a session, your recording will be automatically saved in your account. You can check this by going to the Video Library tab. You can also go to Settings > Recording > Saving and Sharing to change the save path. If you use a third-party screen recorder, you can set the save path according to your needs.
2. How can I record a GoToWebinar as an attendee?
As an attendee, you can't record GoToWebinar with its built-in recording function. Thus, it would help if you had a high-quality recording tool like EaseUS RecExperts to record a GoToWebinar session. It can record any activity on your screen without permission.
3. How to record live GoToWebinar for viewing later?
If you are a live GoToWebinar host or organizer, you can record with its recording function directly. However, if not, you should use a professional recording utility to record live GoToWebinar for viewing later. EaseUS RecExperts is a good choice.
EaseUS RecExperts

One-click to capture anything on screen!
No Time Limit, No watermark
Start Recording