-
![]()
Daisy
Daisy is the Senior editor of the writing team for EaseUS. She has been working in EaseUS for over ten years, starting from a technical writer to a team leader of the content group. As a professional author for over 10 years, she writes a lot to help people overcome their tech troubles.…Read full bio -
Jane is an experienced editor for EaseUS focused on tech blog writing. Familiar with all kinds of video editing and screen recording software on the market, she specializes in composing posts about recording and editing videos. All the topics she chooses …Read full bio
-
![]()
Alin
Alin is an experienced technical blog writing editor. She knows the information about screen recording software on the market, and is also familiar with data cloning and data backup software. She is expert in writing posts about these products, aiming at providing users with effective solutions.…Read full bio -
Jean is recognized as one of the most professional writers in EaseUS. She has kept improving her writing skills over the past 10 years and helped millions of her readers solve their tech problems on PC, Mac, and iOS devices.…Read full bio
-
![]()
Jerry
Jerry is a fan of science and technology, aiming to make readers' tech life easy and enjoyable. He loves exploring new technologies and writing technical how-to tips. All the topics he chooses aim to offer users more instructive information.…Read full bio -
![]()
Rel
Rel has always maintained a strong curiosity about the computer field and is committed to the research of the most efficient and practical computer problem solutions.…Read full bio -
![]()
Gemma
Gemma is member of EaseUS team and has been committed to creating valuable content in fields about file recovery, partition management, and data backup etc. for many years. She loves to help users solve various types of computer related issues.…Read full bio -
![]()
Shelly
"I hope my articles can help solve your technical problems. If you are interested in other articles, you can check the articles at the bottom of this page. Similarly, you can also check my Twitter to get additional help."…Read full bio
Page Table of Contents
Alin
Updated on Jun 09, 2026
0 Views |
0 min read
VLC Media Player is a well-known and open-source media player that can play various video and audio files. More than that, VLC also functions in screen and audio capture. While playing the video, you can choose to record audio with VLC or take a snapshot of your favorite scene. Once done, it will save the recorded files on your computer directly.
However, most of you may not know how it works, especially for screenshots in VLC.So this post comes in handy. Here we will show you how to take VLC screenshots in detail on both Windows and Mac.
PAGE CONTENT:
How to Take a Screenshot on VLC Media Player
VLC Media Player, an open source media player, also allows you to screenshot a specific frame while playing, whether on Windows, macOS, or Linux computers. This section will show you three different solutions to help take snapshots with VLC Media Player.
Solution 1: Screenshot in VLC with Hotkeys
VLC Media Player offers shortcuts for taking screenshots. So the easiest way is to use the hotkeys. To do the task, you can quickly press the specific keys to take a snapshot in VLC.
- For Windows users: Press Shift + S to grab a certain frame
- For Mac users: Press Command + ALT + S
- For Linux users: Hit the Ctrl + ALT + S keys on the keyboard
Solution 2: Capture Video Frame in VLC with Menu
Step 1. Open the VLC Media Player, and play the videos you want to screenshot.
Step 2. When you see the scene you want to capture, click "Video" in the top toolbar and select "Snapshot" from the drop-down menu.
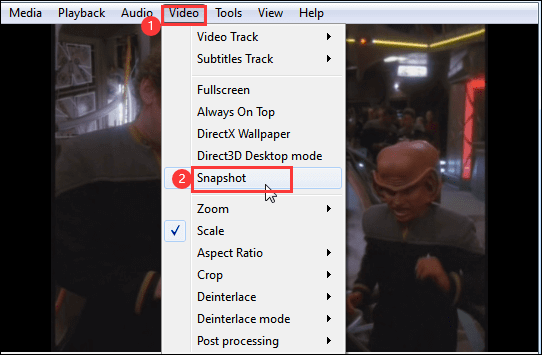
Step 3. Once done, the thumbnail and snapshot location will appear on the video.
Solution 3: Snapshot VLC with Advanced Controls
Step 1. While playing the video, you can click "View" > "Advanced Controls". Next, you will see advanced controls at the bottom.

Step 2. Click the Snapshot button with a camera icon at the bottom to screenshot the VLC frame.
![]()
How to Fix: VLC Snapshot Not Working
Sometimes, you may find it not working while taking snapshots with VLC Media Player on your computer. If you are bothered by this kind of problem, you can take a look at the following solutions:
Step 1. On the main interface of VLC, click "Tools," then select "Preferences" from the drop-down menu.
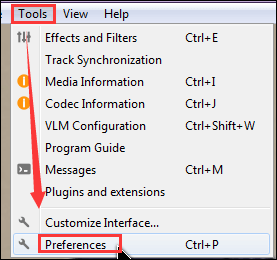
Step 2. Choose the "Input / Codecs" option in the Simple Preference window. Next, you will see a line that says Hardware-accelerated decoding in the Codecs section, and choose the "Disable" option to disable hardware acceleration.
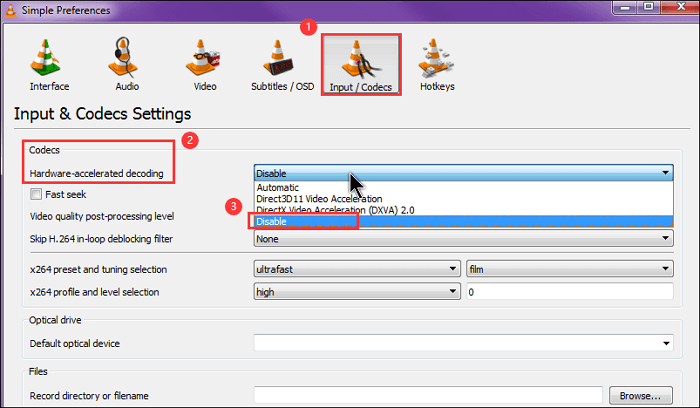
Step 3. Lastly, click the "Save" button in the lower right corner.
Besides the screenshot feature, VLC also offers a recording function. If you encounter VLC not recording video problem, you can check the guide below:
Fix VLC Not Recording Issues [9 Best Methods]
Is your VLC not recording video? This article will walk you through some foolproof and tested solutions to bypass the problem, with a great alternative to fix the issue.

Best Alternative to VLC Screenshot
Sometimes, as we mentioned above, the VLC snapshot function is not working. Or there are some other problems with taking screenshots in VLC. At that time, why not select and choose a professional snapshot tool to take screenshots on any area of your screen?
Here we want to share a powerful screencast tool called EaseUS RecExperts. With an intuitive workflow, it is easy to handle by all levels of users, especially novices. Whether taking screenshots of a full-screen or a partial screen, you always complete the task with hotkeys on your keyboard.
More stunning features of it:
- Capture screen in common image file formats
- One-click to capture screenshots from a video
- Take high resolution screenshots on Windows 10/11 or Mac
- Easily take a screenshot in Minecraft, Roblox, or other gameplay
In order to provide a great experience for you, we offer a detailed tutorial about making screencasts with ScreenShot below:
Step 1. Launch EaseUS RecExperts and get the screen ready that you want to capture. Click Custom.

Step 2. Then drag your mouse to select the area you want to capture. After that, click the Screenshot button (camera icon) on the main toolbar.
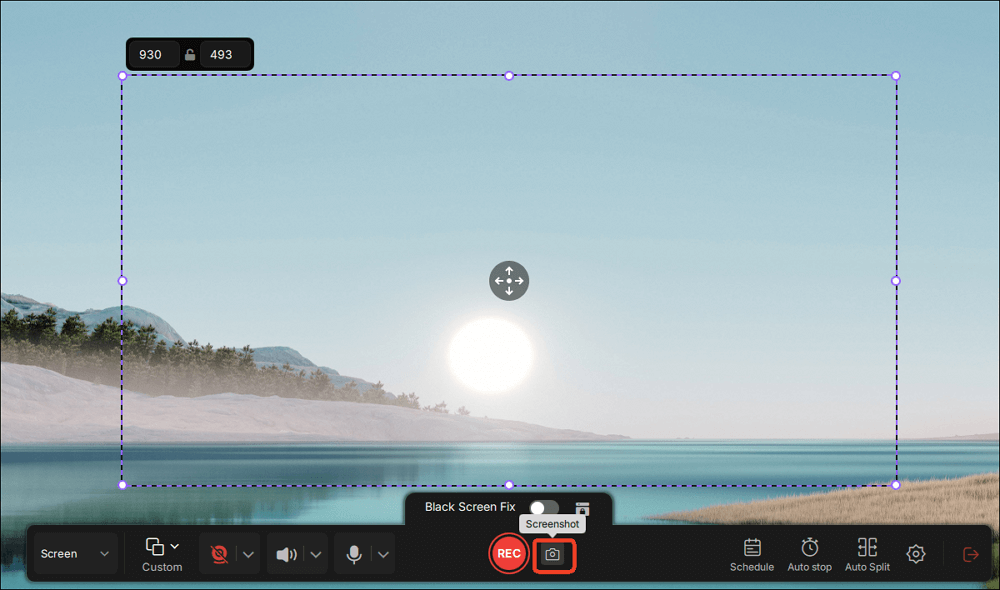
Step 3. The screenshot will be captured instantly and saved to the default folder. You can view or manage it later in My Library.
FAQs About VLC Screenshot
1. Where are VLC screenshots saved?
The video snapshot will be saved to the default Picture folder in your Windows OS, or macOS.
If you are a Windows 10 PC and C disk is your system drive, you will find all the video screenshots from C:/users/username/pictures; Or you can input "%HOMEPATH%\Pictures\" in Windows search bar to view the screenshots.
If you use a Mac computer, you will find the images on your desktop.
2. How do I take a screenshot on Windows Movie Maker?
Actually, Windows Movie Maker does not support taking screenshots from the playing videos. So if you need to take snapshots, you can use some third-party screencast tools like EaseUS RecExperts, ShareX, OBS Studio, etc.
3. Can VLC screen capture?
Yes, you can use VLC Media Player to capture your screen.
Step 1. Open VLC and click Media > Open Capture Device.
Step 2. Next, choose Desktop and the desired frame rate, then select "Stream" at the bottom.
Step 3. Browse the location to save your recordings and set a full name.
Step 4. Finally, click on "Stream," and the recording begins immediately.