-
![]()
Daisy
Daisy is the Senior editor of the writing team for EaseUS. She has been working in EaseUS for over ten years, starting from a technical writer to a team leader of the content group. As a professional author for over 10 years, she writes a lot to help people overcome their tech troubles.…Read full bio -
Jane is an experienced editor for EaseUS focused on tech blog writing. Familiar with all kinds of video editing and screen recording software on the market, she specializes in composing posts about recording and editing videos. All the topics she chooses …Read full bio
-
![]()
Alin
Alin is an experienced technical blog writing editor. She knows the information about screen recording software on the market, and is also familiar with data cloning and data backup software. She is expert in writing posts about these products, aiming at providing users with effective solutions.…Read full bio -
Jean is recognized as one of the most professional writers in EaseUS. She has kept improving her writing skills over the past 10 years and helped millions of her readers solve their tech problems on PC, Mac, and iOS devices.…Read full bio
-
![]()
Jerry
Jerry is a fan of science and technology, aiming to make readers' tech life easy and enjoyable. He loves exploring new technologies and writing technical how-to tips. All the topics he chooses aim to offer users more instructive information.…Read full bio -
![]()
Rel
Rel has always maintained a strong curiosity about the computer field and is committed to the research of the most efficient and practical computer problem solutions.…Read full bio -
![]()
Gemma
Gemma is member of EaseUS team and has been committed to creating valuable content in fields about file recovery, partition management, and data backup etc. for many years. She loves to help users solve various types of computer related issues.…Read full bio
Page Table of Contents
This guide explains what happens when you take regular screenshots, use FaceTime Live Photos, or screen record a FaceTime call on iPhone, iPad, and Mac.
Does FaceTime Notify Screenshots?
No. FaceTime does not send a notification when you take a regular screenshot during a call.
You can use your iPhone, iPad, or Mac's built-in screenshot tools to capture the FaceTime window without triggering a standard screenshot alert for the other participant.
The important exception is FaceTime Live Photos. This separate FaceTime feature captures a Live Photo during a video call. Apple states that both participants receive a notification when a FaceTime Live Photo is taken, and the photo is saved in the Photos app.
So, the difference is simple:
|
What you do during a FaceTime call |
Will the other person be notified? |
|
Take a regular screenshot |
No |
|
Take a screenshot with iPhone/iPad buttons |
No |
|
Take a screenshot with Mac shortcuts |
No |
|
Take a FaceTime Live Photo |
Yes |
|
Screen record the call |
No standard FaceTime screenshot notification |
Apple's documentation specifically describes the notification for FaceTime Live Photos, not ordinary screenshots.
Many users confuse the two because both capture an image from a FaceTime call. But a regular screenshot is simply a screen capture, while a FaceTime Live Photo is a built-in FaceTime feature with its own notification behavior.
Part 1. How to Take FaceTime Screenshots on iPhone/iPad
Taking a regular screenshot during a FaceTime call works the same way as taking a screenshot elsewhere on your iPhone or iPad.
Step 1. Start or join a FaceTime video call.
Step 2. When the moment you want to capture appears, use the appropriate screenshot shortcut:
- iPhone with Face ID: Press the side button + volume up at the same time, then quickly release them.
- iPhone with a Home button: Press the side button + Home button at the same time, then quickly release them.
- iPad without a Home button: Press the top button + either volume button at the same time.
- iPad with a Home button: Press the top button + Home button at the same time.
Apple confirms these are the current screenshot shortcuts in iOS 26 and iPadOS26.
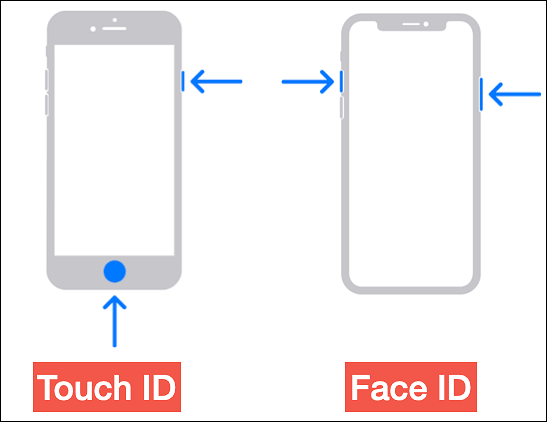
Step 3. Tap the screenshot preview to edit or share it. Your screenshots are saved in the Photos app under Collections > Media Types > Screenshots.
A regular screenshot doesn't use the FaceTime Live Photo feature, so the other participant doesn't receive the Live Photo notification.
Please share this post to help more users!

Part 2. How to Take FaceTime Screenshots on Mac
On a Mac, you can use simple hotkey shortcuts to screenshot during a FaceTime session. This solution is incorporated within the macOS operating system and does not require any third-party tools. The hotkey shortcuts offer flexibility, allowing users to screenshot the entire or a specific area.
Step 1. Open FaceTime and start a video call.
Step 2. Use one of these shortcuts:
1️⃣Press Shift + Command + 3 to capture the entire Mac screen.

2️⃣Press Shift + Command + 4 to select a specific area of the screen.

3️⃣Press Shift + Command + 4, then press the Space bar to capture a specific window.

These are standard macOS screenshot functions and do not use the FaceTime Live Photo feature.
Step 3. By default, macOS saves screenshots to the desktop. You can open the screenshot afterward to edit or share it.
Part 3. How to Record FaceTime with Audio Easily🔥
Does FaceTime notify screen recording? As mentioned earlier, it does not. Thus, how to screen record a FaceTime call with audio?
Based on our assessment, the simplest way to record FaceTime with audio on Mac is to use a professional screen recorder like EaseUS RecExperts for Mac because you cannot record internal audio on Mac PCs until you install plugins like Soundflower.
Download EaseUS Screen Recorder
Download EaseUS Screen Recorder
Trustpilot Rating 4.7
To be more precise, EaseUS RecExperts for Mac enables you to record FaceTime video with system sound and voices via a webcam and micro. After recording, the AI Assistant feature of EaseUS RecExperts for Mac can even transcribe videos to text if necessary.
Other features of EaseUS RecExperts:
- Offer full-screen recording, selected region recording, schedule recording, and auto-stop and auto-split options.
- Provide video/audio file import, video/audio editing, video/audio-to-text transcription, etc.
If you try to record FaceTime with audio using EaseUS RecExperts for Mac, you can activate the microphone noise reduction feature before screen recording. Here are the steps.
Step 1. Launch EaseUS RecExperts and adjust your recording settings.
Before you start recording, you can customize your settings by clicking the Menu icon (three horizontal lines) in the top-right corner and selecting Settings. From there, you can change the save location, video format, frame rate, audio format, and other preferences. All changes will be saved automatically.
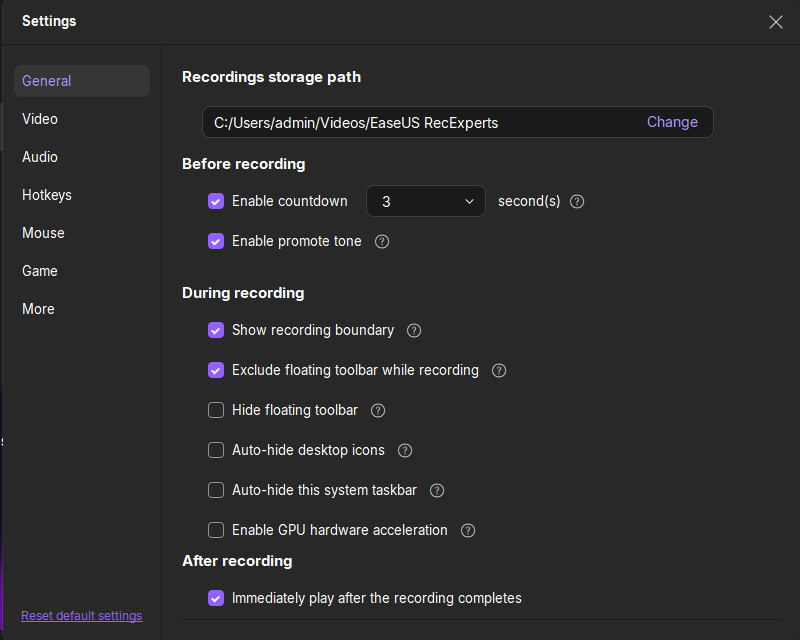
Step 2. Choose a recording mode based on your needs.
On the main interface, you'll see several recording options: Full Screen, Custom, Window, Game, Audio, and Webcam. Simply click the one that matches what you want to record.
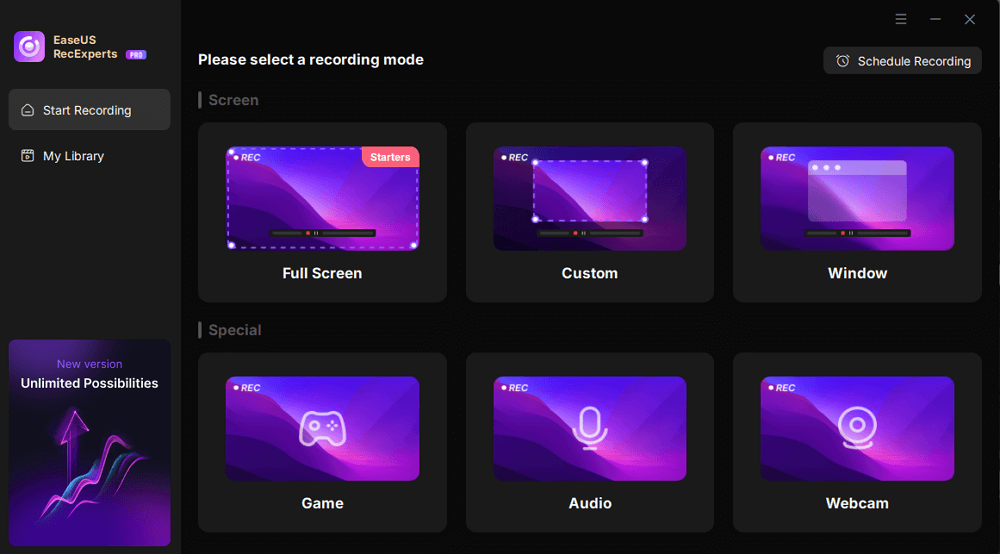
Step 3. Set up your webcam and audio sources.
In the toolbar, you can turn the Webcam, Speaker, and Microphone on or off by clicking their icons. If multiple devices are connected, click the small arrow next to each icon to choose your preferred input source.

Step 4. Start and control the screen recording.
Click the red REC button to begin recording. A floating toolbar will appear on your screen, where you can pause the recording using the pause icon or stop it by clicking the red square icon.

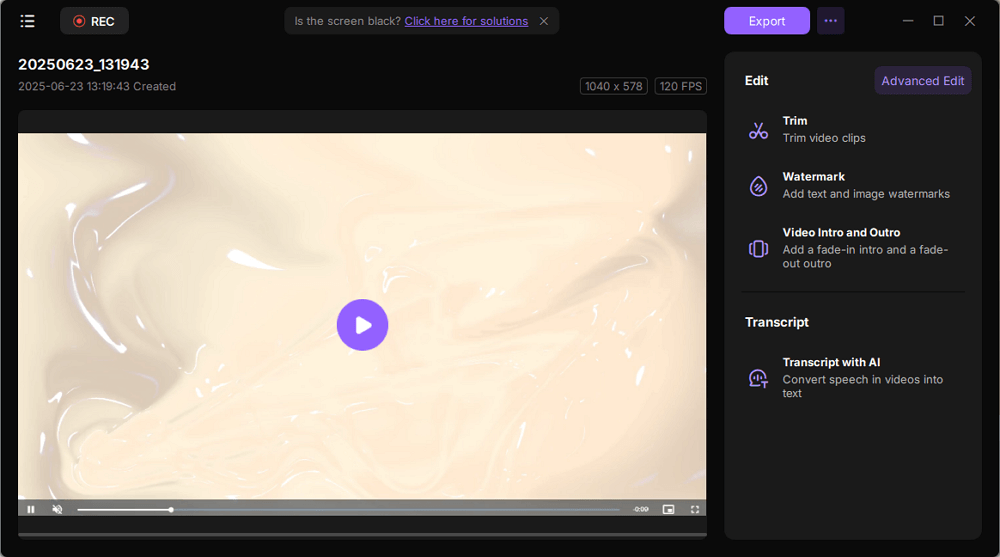
Step 5. Preview, edit, and manage your recordings.
Once you stop recording, you'll be taken to the preview window. Here, you can watch your video, trim it, add watermarks, transcribe audio to text, and organize your recordings. To record again with the same settings, just click the REC button in the top-left corner.
Please share this post to help more users!
Where Do FaceTime Screenshots Go
Where FaceTime screenshots are saved depends on the device you use.
For iPhone/iPad: Open the Photos app and go to Collections > Media Types > Screenshots. Apple saves screenshots to your photo library by default.
For Mac: Screenshots are saved to the desktop by default unless you have changed the screenshot save location. Apple's current screenshot tool also lets you choose another save location through its options.
For FaceTime Live Photos: The Live Photo is saved in the Photos app. Apple notes that you should open the Photos app at least once on Mac before taking a FaceTime Live Photo so it can be saved to your Photos library automatically.
Why Can't I Screenshot on FaceTime
If you cannot capture a FaceTime call, the problem may not be caused by FaceTime's screenshot notification behavior. Try these checks first.
1️⃣ Check your device's screenshot function
Make sure you're using the correct screenshot shortcut for your iPhone, iPad, or Mac. For example, on an iPhone with Face ID, press the side button and volume up button together.
2️⃣ Check FaceTime Live Photos settings
If you're trying to use the Take Live Photo button rather than the normal screenshot function, make sure FaceTime Live Photos is enabled.
- On iPhone/iPad, go to: Settings > Apps > FaceTime > FaceTime Live Photos
- On Mac, go to: FaceTime > Settings > FaceTime > FaceTime Live Photos
Apple requires the feature to be enabled before FaceTime Live Photos can be used, and on Mac, both participants need to have the feature set up.
3️⃣ Check whether the feature is available in your region
Apple notes that FaceTime Live Photos are not available in all countries or regions. If the Live Photo option is missing even after checking the settings, regional availability may be a factor.
4️⃣ Update your software
If FaceTime or screenshot functions behave unexpectedly, make sure your iPhone, iPad, or Mac is running a supported, up-to-date version of its operating system.
Please share this post to help more users!
Conclusion
Does FaceTime notify screenshots? No—not for regular screenshots.
If you use your iPhone, iPad, or Mac's normal screenshot function during a FaceTime call, the other participant does not receive a standard screenshot notification.
The important exception is FaceTime Live Photos. When a participant takes a FaceTime Live Photo, both participants receive a notification, and the Live Photo is saved in the Photos app. Apple documents this behavior for iPhone, iPad, and Mac.
If you want to capture a FaceTime call as a video, macOS provides built-in screen recording, but its standard recording workflow is centered on microphone audio rather than a straightforward system-audio capture. A dedicated recorder such as EaseUS RecExperts can provide more control over system sound and microphone input.
FAQs about FaceTime Screenshots & Screen Recording
1. How to enable FaceTime Live Photos?
On iPhone or iPad, go to Settings > Apps > FaceTime and turn on FaceTime Live Photos. Apple requires this setting to be enabled before you can take a Live Photo during a FaceTime call.
On Mac, open FaceTime > Settings > FaceTime and select FaceTime Live Photos. Apple notes that enabling this option also allows other participants to take Live Photos of you.
2. Why are my FaceTime Live Photos not saving?
First, make sure FaceTime Live Photos is enabled for both participants. On Mac, Apple specifically recommends checking that both people have set up FaceTime for Live Photos.
On Mac, Apple also recommends opening the Photos app at least once before taking a FaceTime Live Photo so it can be saved to your Photos library.
You can also check available storage, restart your device, and update your operating system if the feature still does not work.
3. Will someone know if I screen record FaceTime?
FaceTime does not provide a standard notification when you start a screen recording.
However, a lack of notification should not be interpreted as permission to record someone. Recording laws and consent requirements vary depending on where you live.
4. Does FaceTime notify when you screenshot a call?
No, not when you use the normal screenshot function.
The exception is FaceTime Live Photos. Apple states that both participants receive a notification when a Live Photo is taken during a FaceTime call.
5. Do FaceTime Live Photos notify both people?
Yes. Apple explicitly states that both participants receive a notification when a FaceTime Live Photo is taken.
Since many users are concerned about FaceTime, this section includes several topics, such as FaceTime screenshots and screen recordings. Please check them out below.