-
![]()
Daisy
Daisy is the Senior editor of the writing team for EaseUS. She has been working in EaseUS for over ten years, starting from a technical writer to a team leader of the content group. As a professional author for over 10 years, she writes a lot to help people overcome their tech troubles.…Read full bio -
Jane is an experienced editor for EaseUS focused on tech blog writing. Familiar with all kinds of video editing and screen recording software on the market, she specializes in composing posts about recording and editing videos. All the topics she chooses …Read full bio
-
![]()
Melissa Lee
Alin is an experienced technical blog writing editor. She knows the information about screen recording software on the market, and is also familiar with data cloning and data backup software. She is expert in writing posts about these products, aiming at providing users with effective solutions.…Read full bio -
Jean is recognized as one of the most professional writers in EaseUS. She has kept improving her writing skills over the past 10 years and helped millions of her readers solve their tech problems on PC, Mac, and iOS devices.…Read full bio
-
![]()
Jerry
Jerry is a fan of science and technology, aiming to make readers' tech life easy and enjoyable. He loves exploring new technologies and writing technical how-to tips. All the topics he chooses aim to offer users more instructive information.…Read full bio -
Larissa has rich experience in writing technical articles. After joining EaseUS, she frantically learned about data recovery, disk partitioning, data backup, screen recorder, disk clone, and other related knowledge. Now she is able to master the relevant content proficiently and write effective step-by-step guides on various computer issues.…Read full bio
-
![]()
Rel
Rel has always maintained a strong curiosity about the computer field and is committed to the research of the most efficient and practical computer problem solutions.…Read full bio -
![]()
Gemma
Gemma is member of EaseUS team and has been committed to creating valuable content in fields about file recovery, partition management, and data backup etc. for many years. She loves to help users solve various types of computer related issues.…Read full bio
Page Table of Contents
Jane Zhou
Updated on Apr 19, 2024
0 Views |
0 min read
OBS Studio is an open source screen recorder, which can run perfectly on Windows, macOS, and even Linux. As it is completely free, most of you like to use it to record videos, live streams, and various gameplays. Usually, it will perform well and export the recording in high quality.
However, sometimes, you may find that the OBS simply displays a black screen or the OBS display capture is not working, and that may seem a little frustrating. But don't worry, OBS capture not working is just a common problem, and you can fix it by checking the below methods we shared in this post. So now follow the below demonstrating tutorial to fix OBS black screen display capture.
| Workable Solutions | Step-by-step Troubleshooting |
|---|---|
| Fix 1. Run OBS As Administrator | Find the OBS Studio on your desktop...Full steps |
| Fix 2. Change Graphics Settings | Click the Windows icon on the lower left, hit the gear icon, and next...Full steps |
| Fix 3. Enable the Compatibility Mode | Right-click OBS Studio on the desktop, and click on the Properties option...Full steps |
| Fix 4. Uninstall and Reinstall OBS Studio | After downloading, launch the screen recording software...Full steps |
| Fix 5. Use OBS Alternative | Try every USB port available; Determine you\'re using USB 2.0 or 3.0...Full steps |
Fix 1. Run OBS As Administrator
Some features may be locked by Windows systems, without administrative privileges, and so does OBS. If the OBS Studio displays a black screen or its display capture is not working, just run OBS as an administrator to fix this issue.
Step 1. Find the OBS Studio on your desktop.
Step 2. Right-click on its icon, then select the "Run as administrator" option.
Step 3. Use OBS to capture your screen.
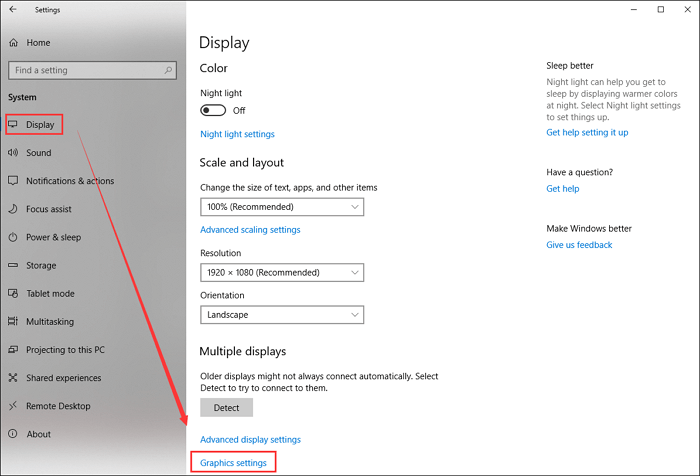
Fix 2. Change Graphics Settings
Sometimes, there are two graphics adapters on your computer. Windows has some automated algorithm to decide which adapter will be used by the app, and it may choose the wrong one. So you can set the default one by yourself.
Step 1. Click the Windows icon on the lower left, hit the gear icon, and next click "System" > "Display" > "Graphics settings".
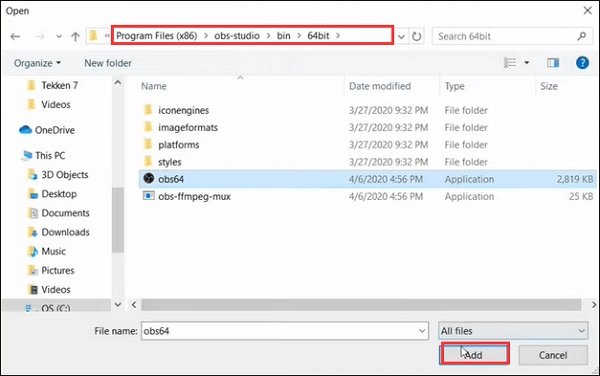
Step 2. In the next window, click "Browse" under Graphics settings.

Step 3. Click C: > Program Files (x86) > obs-studio > bin > 64bit in turn. Then choose the obs64 and click "Add" at the lower right bottom.
Step 4. Go back to the settings window, then click "Options" > "High Performance" > "Save".

Step 5. Restart the OBS Studio on your computer, then you will find that the display capture can work.
Fix 3. Enable the Compatibility Mode
If the issue occurred right after you updated the Windows operating system, then there is a chance that there might be a compatibility issue. So if this is the reason, you can enable OBS's compatibility mode to solve it.
Step 1. Right-click OBS Studio on the desktop, and click on the Properties option.
Step 2. Tick the "Run this program in compatibility mode for:" under the Compatibility Mode.

Step 3. Click on the "Apply" > "OK" buttons.
Step 4. Reboot the system to check if the OBS not working is fixed or not.
Fix 4. Uninstall and Reinstall OBS Studio
If you tried all the three methods above and still cannot solve the problem, the issue might have nothing to do with your computer but with OBS itself. Every program has its shortcomings, and OBS Studio is no exception. So here you can uninstall it and get a new one from the official website, and that may work.
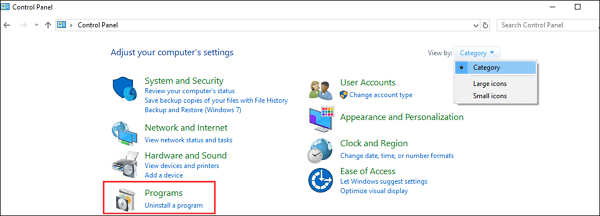
Step 1. Open the Control Panel window.
Step 2. Click "Programs" > "Uninstall a program. You can click "View by Categories" to find them quickly.
Step 3. Then click "Programs and Features" to find OBS Studio. Once you find it, right-click it to uninstall it.
Step 4. When you get rid of this software from your computer, you can move to its official website to download the latest OBS Studio for recording.
Fix 5. Use an OBS Studio Alternative - EaseUS RecExperts
If all the methods above are not working, or you think that they are too complicated, there is another easy and quick way to solve this program. That is to use a free OBS alternative.
There are lots of free OBS alternatives on the market. Given that the complex user interface of OBS Studio, we are going to share with you an easy-to-use recording alternative called EaseUS RecExperts.
As we mentioned before, this program is with an intuitive interface and workflow, and it will be easier to handle compared to OBS Studio. Like OBS Studio, this screen recording software supports capturing any area on your screen, recording audio (system sound & mic), and screencasting webcam. With its help, you are able to capture the live streams, various gameplays, online meetings, or courses, etc., without any hassle.
Moreover, better than OBS Studio, EaseUS RecExperts provides lots of editing tools, including trimming, extracting audio, etc., which means you can modify your recordings without downloading any other software. Just give it a try!
Let's dive into how to screen record with the OBS alternative:
Step 1. Launch EaseUS RecExperts on your computer. Before recording, you can choose from two recording modes. To record the whole screen, choose the "Full Screen" mode; to record a part of the screen, select "Region".

Step 2. You can also choose to record the screen with your webcam, system sound, microphone. Just click to select them. You can also set auto split, auto recording with various functions on the interface.
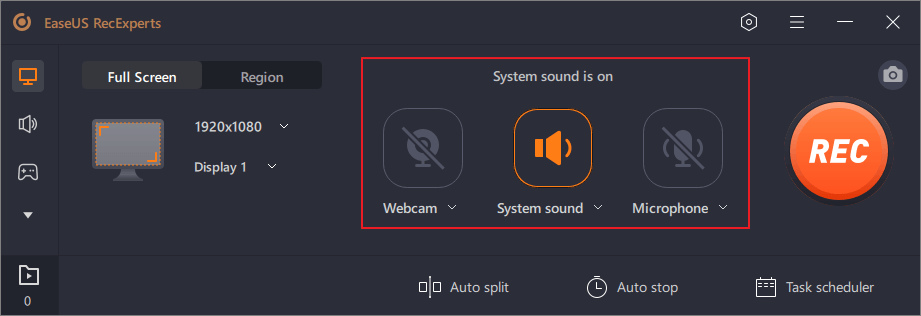
Step 3. Then, click on the red "REC" button to start recording. To pause the recording, click on the white double vertical bar; to end the recording, click on the red square sign. They are located on the menu bar appearing on your screen.
Step 4. After recording, you will be led to the recording list. Here you can view, split, extract audio, take screenshots, delete, and manage your recordings, etc. To start a new recording with previous settings, click on the "REC" button on the top of the window.

The Bottom Line
We have talked about 5 workable solutions to help you fix the problem that the OBS display capture is not working in this post, and you can choose one of them as you want. Al last, we hope these methods can assist you in solving the problems.
EaseUS RecExperts

One-click to capture anything on screen!
No Time Limit, No watermark
Start Recording