-
![]()
Daisy
Daisy is the Senior editor of the writing team for EaseUS. She has been working in EaseUS for over ten years, starting from a technical writer to a team leader of the content group. As a professional author for over 10 years, she writes a lot to help people overcome their tech troubles.…Read full bio -
Jane is an experienced editor for EaseUS focused on tech blog writing. Familiar with all kinds of video editing and screen recording software on the market, she specializes in composing posts about recording and editing videos. All the topics she chooses …Read full bio
-
![]()
Alin
Alin is an experienced technical blog writing editor. She knows the information about screen recording software on the market, and is also familiar with data cloning and data backup software. She is expert in writing posts about these products, aiming at providing users with effective solutions.…Read full bio -
Jean is recognized as one of the most professional writers in EaseUS. She has kept improving her writing skills over the past 10 years and helped millions of her readers solve their tech problems on PC, Mac, and iOS devices.…Read full bio
-
![]()
Jerry
Jerry is a fan of science and technology, aiming to make readers' tech life easy and enjoyable. He loves exploring new technologies and writing technical how-to tips. All the topics he chooses aim to offer users more instructive information.…Read full bio -
![]()
Rel
Rel has always maintained a strong curiosity about the computer field and is committed to the research of the most efficient and practical computer problem solutions.…Read full bio -
![]()
Gemma
Gemma is member of EaseUS team and has been committed to creating valuable content in fields about file recovery, partition management, and data backup etc. for many years. She loves to help users solve various types of computer related issues.…Read full bio -
![]()
Shelly
"I hope my articles can help solve your technical problems. If you are interested in other articles, you can check the articles at the bottom of this page. Similarly, you can also check my Twitter to get additional help."…Read full bio
Page Table of Contents
Jean
Updated on Jun 09, 2026
0 Views |
0 min read
Have you ever recorded a 10-minute gameplay or tutorial with OBS and ended up with a video file over 5GB? You're not alone. Many users on Reddit, YouTube, and OBS forums complain about massive recording sizes that eat up disk space quickly. If you're wondering how to make OBS recordings take less space, this guide is for you. We'll walk you through every setting that affects file size and show you the best OBS settings for low end pc and high-end devices.
Why Do My OBS Recordings Take Up So Much Space?
OBS Studio gives you full control over recording settings. However, this flexibility can result in huge video files if not optimized. File size is mainly influenced by output resolution, bitrate, frame rate, encoder, and recording format. If you're recording at high resolution (e.g. 4K), high bitrate, and lossless quality, the file size can balloon very quickly.
But don't worry. With a few simple tweaks, you can learn how to record high quality video with low size. Let's explore how.
- Read also: Best OBS Settings for Streaming on Twitch
Share this post to help more OBS users save storage space!

How to Reduce Video Size in OBS Studio [Best Settings]
Below are 7 proven ways to reduce OBS video size. Try them individually or combine for the best results.
Tips on reducing file size when recording locally. ---Reddit
1. Lower the Output Resolution
What is it? Output resolution refers to the final video dimensions, like 1920x1080 (Full HD - 1080p), 1280x720 (HD - 720p), or 4096x2160 (UHD - 4K).
Why it matters: Higher resolution = more pixels = larger file size.
Recommended values:
- For basic tutorials or webcams: 1280x720
- For YouTube gameplay: 1920x1080
🚩How to change resolution in OBS:
Step 1. Go to Settings > Video.
Step 2. Under Output (Scaled) Resolution, select your target resolution (e.g. 1280x720).
Step 3. Click Apply.
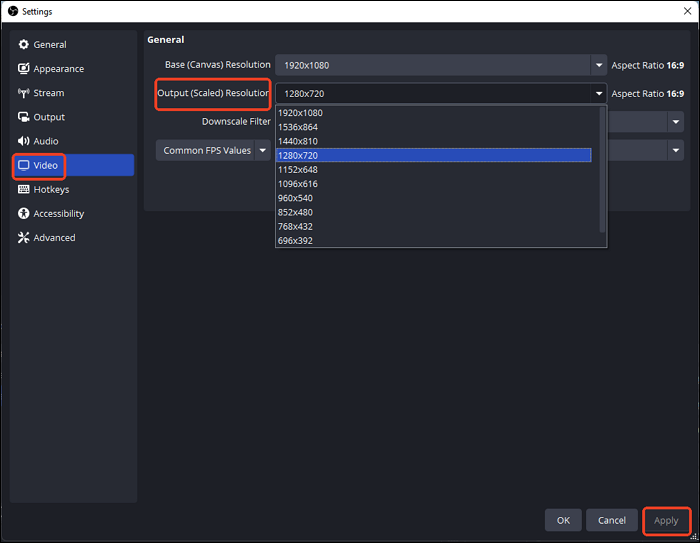
- Notice: Basic (Canvas) Resolution here refers to the working area you're recording from - basically your screen layout or game window size. This doesn not afftect file size, so keep Canvas Resolution the same as your screen size for clarity, and scale down only the Output Resolution if you want smaller files.
Share this post to help more OBS users save storage space!
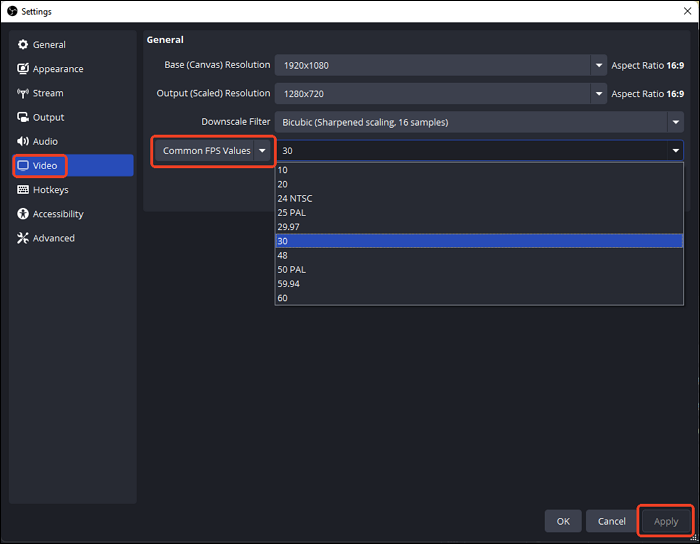
2. Reduce Frame Rate
What is it? Frame rate means how many frames per second (fps) your video captures.
Why it matters: Higher fps gives smoother video but creates larger files.
Recommended values:
- 30 fps for tutorials, meetings
- 60 fps only if your content involves fast motion (e.g., gameplay)
🚩How to change the fps value in OBS:
Step 1. Go to Settings > Video.
Step 2. Adjust Common FPS Values to 30 or 60
Step 3. Click Apply.
- Read also: Best Frame Rate for YouTube [Complete Guide]
Share this post to help more OBS users save storage space!
3. Choose a Proper Recording Format
What is it? OBS lets you save recordings in formats like MP4, MKV, FLV, MOV, TS, and M3U8.
Why it matters: Some formats offer better compatibility, compression, or stability.
Recommended values:
- MKV: Ideal for preventing data loss if OBS crashes
- MP4: More widely supported and may result in slightly smaller files due to better compression, but can become corrupted if OBS crashes
🚩How to change recording format in OBS:
Step 1. Go to Settings > Output > Recording.
Step 2. Change Recording Format to MKV or MP4 based on your needs.
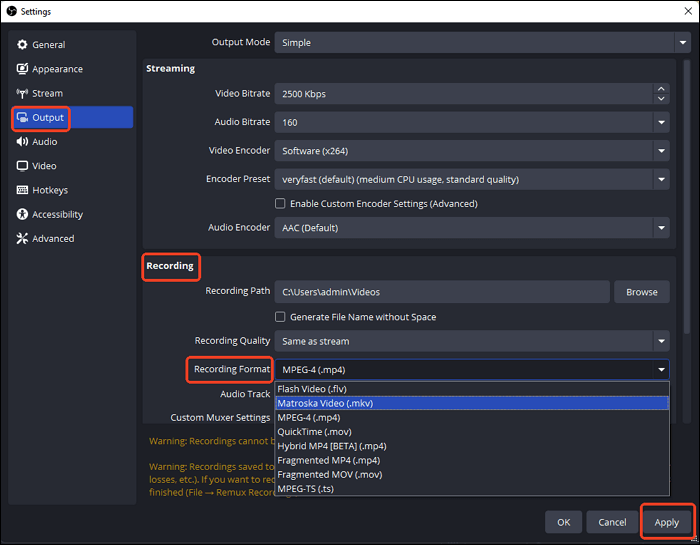
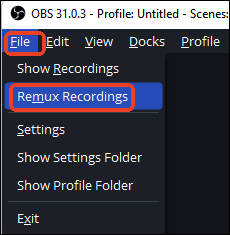
- Notice: For the best of both worlds, record in MKV and then remux to MP4 via File > Remux Recordings. This keeps your recordings safe and compatible.
Share this post to help more OBS users save storage space!
4. Change Video Encoders
What is it? OBS allows you to choose from different video encoders, which compress the video data while recording.
Why it matters: Hardware encoders (like NVENC, QuickSync, or AMF) offload encoding to your GPU or CPU's integrated graphics, resulting in smaller file sizes with less system impact compared to software encoders like x264.
Recommended values:
- NVIDIA GPU: Use NVIDIA NVENC H.264 (new)
- Intel CPU with integrated graphics: Use Intel QuickSync H.264
- AMD GPU: Use AMD AMF H.264
🚩How to change Encoders in OBS:
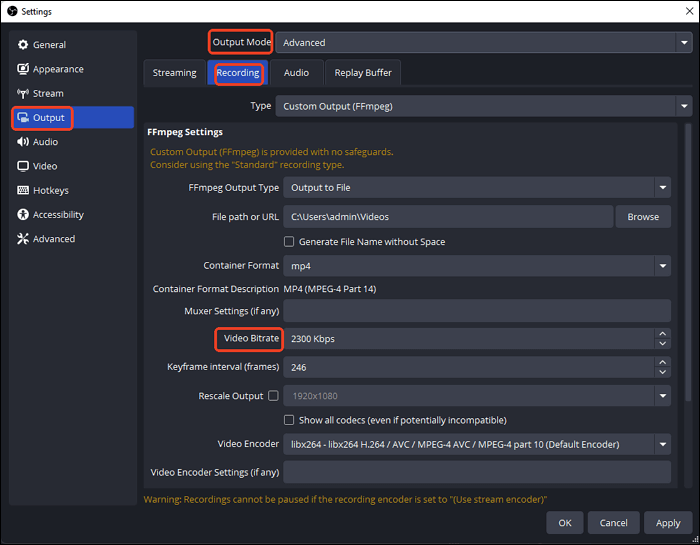
Step 1. Go to Settings > Output.
Step 2. Set Output Mode to Advanced.
Step 3. Go to the Recording tab.
Step 4. In Encoder, select NVENC (new), QuickSync, or AMF, depending on your hardware

- Notice: Hardware encoders provide excellent quality-to-size balance and are ideal for long recordings or gameplay sessions.
Share this post to help more OBS users save storage space!
5. Adjust Bitrate
What is it? Bitrate is the amount of data written per second of video (kbps or Mbps).
Why it matters: Higher bitrate = better quality but larger files.
Recommended values:
- 1080p 30fps: 5000-8000 kbps
- 720p 30fps: 2500-4000 kbps
🚩How to change video bitrate in OBS Studio:
Step 1. Go to Settings > Output.
Step 2. Set Output Mode to Advanced.
Step 3. Go to the Recording tab.
Step 4. Change the value of Video Bitrate.
Share this post to help more OBS users save storage space!
6. Compress After Recording
Compressing OBS recordings is a straightforward option to reduce the video file size.
HandBrake is a free, open-source video transcoder that compresses video files without significant quality loss. While it's not integrated inside OBS Studio, you can use HandBrake after recording in OBS to reduce video size. This is ideal if your OBS files are too large, especially when recorded in high resolution or high bitrate.
HandBrake can:
- Reduce file size by 50–70%
- Convert to MP4 (smaller than MKV)
- Re-encode using more efficient codecs (like H.265)
- Retain decent quality with adjustable settings
🚩How to use HandBrake to compress OBS recordings:
Step 1. Visit https://handbrake.fr/, download for your OS (Windows/macOS/Linux), install, and launch HandBrake.
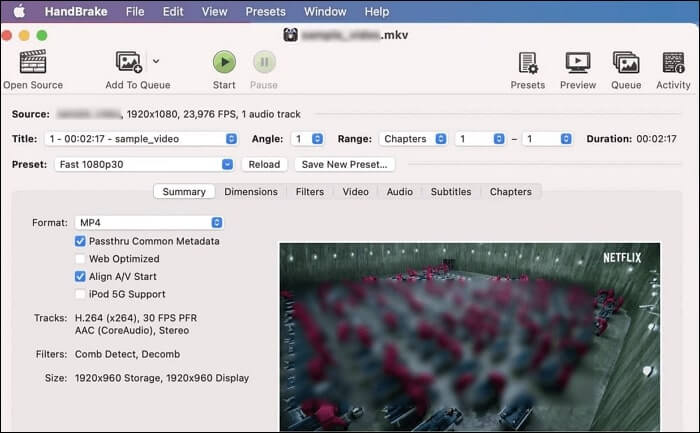
Step 2. Click File > Open Source or drag and drop the OBS video file into HandBrake. Wait for HandBrake to scan the file and display video details.
Step 3. In the Save As section at the bottom, click Browse to set a destination folder and name the output file. Set Format to MP4 (recommended for compression + compatibility).
Step 4. On the right-hand Presets panel, pick:
- Fast 1080p30 (for balance)
- Very Fast 720p30 (for maximum size reduction)
- HQ 1080p30 (H.265) (best quality/size balance using HEVC)
Step 5. Go to the Video tab:
- Video Codec: H.264 or H.265 (HEVC) - recommended
- Framerate (FPS): Same as source / 30 fps- recommended
- Constant Quality: RF 20–23 (H.264) / RF 24–28 (H.265)- recommended
Step 6. (Optional) Go to the Audio tab, choose AAC codec, and set bitrate to 128 kbps (sufficient for voiceovers/tutorials).
Step 7. Click Start Encode (green play button at top). Wait for the progress bar to finish.
Step 8. To compare results, open your output folder and compare the original OBS file vs. the compressed version:
- Check file size
- Play the video and inspect the quality
🚩Tips for Best Results
|
Scenario |
Recommended Setting |
|
YouTube uploads |
MP4, H.264, Fast 1080p30 |
|
Archiving |
MKV, H.265, HQ 1080p30 |
|
Low-end PC |
720p, H.264, Very Fast preset |
|
Voice-only content |
Audio bitrate 96–128 kbps |
Share this post to help more OBS users save storage space!
Bonus: Use OBS Alternatives That Save Space by Default
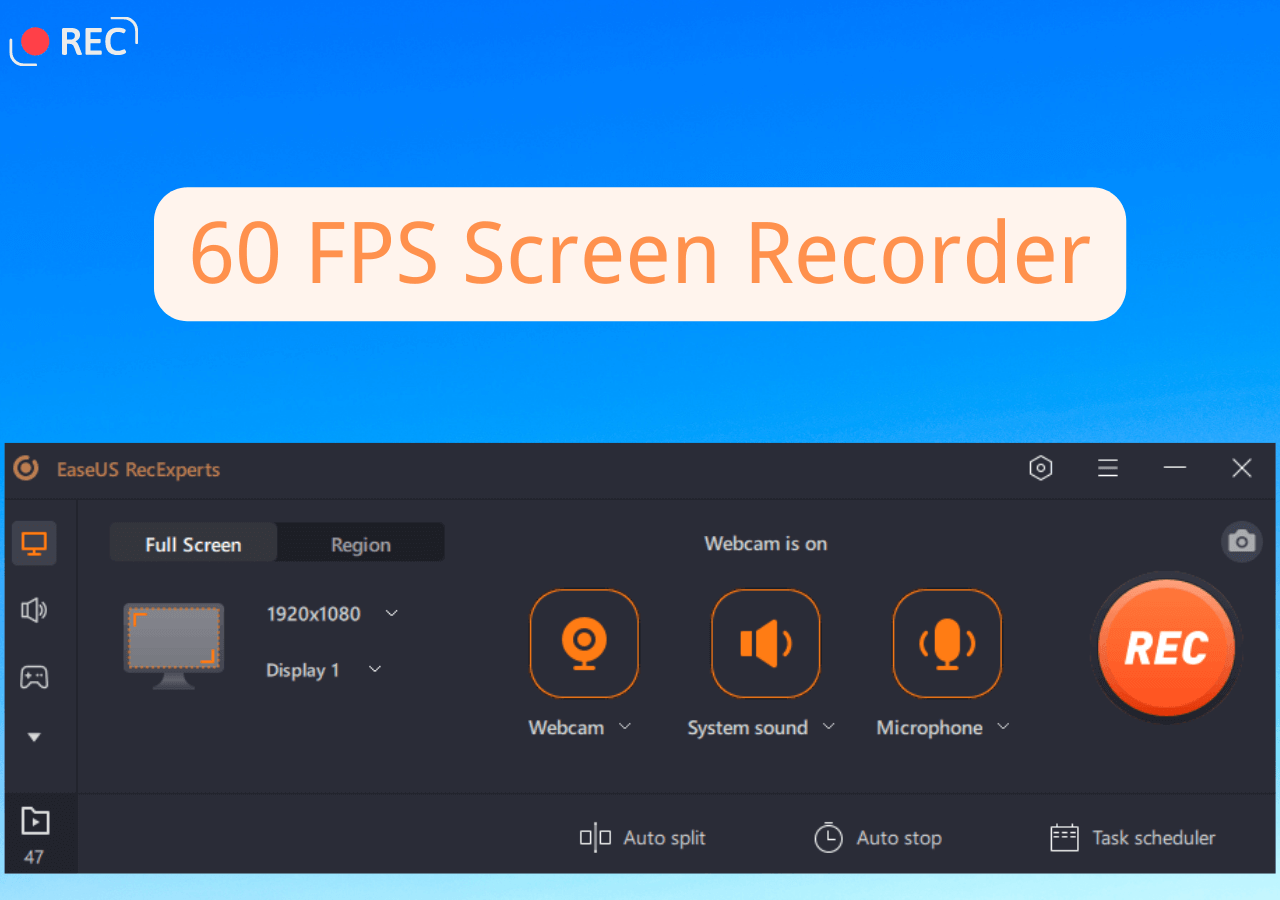
If you're tired of tweaking complex OBS settings and want a tool that just works, try EaseUS RecExperts.
Why EaseUS RecExperts?
- Auto-optimize for small file size
- Record in MP4 by default
- Offer bitrate, resolution, and codec controls in a beginner-friendly UI
- Let you compress videos after recording
Best For:
- Beginners who don't want to mess with OBS settings
- Users on low-storage PCs
- YouTubers who need quick, share-ready recordings
👉Download EaseUS RecExperts to record smaller videos without quality loss.
Share this post to help more OBS users save storage space!
Conclusion
Now, you have a general understanding about how to make OBS recordings take less space. Reducing OBS recording size doesn't mean sacrificing video quality. By adjusting settings like resolution, bitrate, and encoder, you can keep file sizes small and manageable. Here's a summary table for quick reference:
|
Setting |
Recommendation |
Size Impact |
|
Output Resolution |
1280x720 or 1920x1080 |
High |
|
Frame Rate |
30 fps |
Medium |
|
Recording Format |
MKV / MP4 |
Low |
|
Encoder |
NVENC or QuickSync |
High |
|
Bitrate |
5000-8000 kbps |
Very High |
|
Post-Compression |
HandBrake |
High |
Share this post to help more OBS users save storage space!
How to Make OBS Recordings Take Less Space FAQs
Still have questions about video size in OBS? Here's what most users ask:
1. Why is my OBS recording over 5 GB for 10 minutes?
You're likely recording in high resolution (4K), high bitrate (20,000+ kbps), or lossless quality. Lower these settings to reduce file size.
2. What's the best bitrate for recording 1080p 30fps?
A range of 5000 to 8000 kbps strikes a good balance between quality and file size.
3. Can I compress existing OBS files without quality loss?
Yes, use tools like HandBrake with settings like H.265 and medium quality to reduce size with minimal loss.
4. Does using MKV instead of MP4 reduce size?
Not directly. MKV is more stable and prevents file corruption. MP4 is better for compatibility and may slightly reduce file size due to its compression. Overall, size depends more on bitrate.
5. Is there a one-click tool to record small-size videos?
Yes! Try EaseUS RecExperts. It auto-optimizes file size, resolution, and format to save storage.
Share this post to help more OBS users save storage space!