-
![]()
Daisy
Daisy is the Senior editor of the writing team for EaseUS. She has been working in EaseUS for over ten years, starting from a technical writer to a team leader of the content group. As a professional author for over 10 years, she writes a lot to help people overcome their tech troubles.…Read full bio -
Jane is an experienced editor for EaseUS focused on tech blog writing. Familiar with all kinds of video editing and screen recording software on the market, she specializes in composing posts about recording and editing videos. All the topics she chooses …Read full bio
-
![]()
Alin
Alin is an experienced technical blog writing editor. She knows the information about screen recording software on the market, and is also familiar with data cloning and data backup software. She is expert in writing posts about these products, aiming at providing users with effective solutions.…Read full bio -
Jean is recognized as one of the most professional writers in EaseUS. She has kept improving her writing skills over the past 10 years and helped millions of her readers solve their tech problems on PC, Mac, and iOS devices.…Read full bio
-
![]()
Jerry
Jerry is a fan of science and technology, aiming to make readers' tech life easy and enjoyable. He loves exploring new technologies and writing technical how-to tips. All the topics he chooses aim to offer users more instructive information.…Read full bio -
![]()
Rel
Rel has always maintained a strong curiosity about the computer field and is committed to the research of the most efficient and practical computer problem solutions.…Read full bio -
![]()
Gemma
Gemma is member of EaseUS team and has been committed to creating valuable content in fields about file recovery, partition management, and data backup etc. for many years. She loves to help users solve various types of computer related issues.…Read full bio -
![]()
Shelly
"I hope my articles can help solve your technical problems. If you are interested in other articles, you can check the articles at the bottom of this page. Similarly, you can also check my Twitter to get additional help."…Read full bio
Page Table of Contents
Jerry
Updated on Jun 09, 2026
0 Views |
0 min read
Tired of your mouse cursor ruining clean screen recordings? Whether you're creating tutorials, presentations, or demos, a visible pointer can be a major distraction. This guide shows you how to screen record without mouse or hide cursor while recording using effective tools on Windows and Mac.
From native settings like QuickTime and Xbox Game Bar to professional solutions like EaseUS RecExperts and OBS, we've got you covered. Say goodbye to unwanted cursor movement and create polished, distraction-free videos with ease.
How to Hide the Cursor When Screen Recording on Mac
While Mac provides built-in screen recorder like QuickTime Player and the Cmd + Shift + 5 shortcut, many users find it frustrating that the mouse pointer still appears in the video.
🚩The QuickTime Reality Check: QuickTime's "Show Mouse Clicks" option only disables the click animation; it does not hide the cursor itself. To record a clean screen without the pointer, you need a professional recorder like EaseUS RecExperts.
Way 1. Use EaseUS RecExperts
If you want to screen record on Mac without a cursor in one click, EaseUS RecExperts is the most reliable workaround. Unlike QuickTime, it allows you to completely disable the mouse pointer visibility at the system level during recording.
Key Benefits:
- ✅True Cursor Hiding: Completely removes the pointer from your tutorials or demos.
- ✅Shortcut-Friendly: Start/Stop recording using customizable hotkeys so you never have to move your mouse.
- ✅High Compatibility: Works seamlessly with the latest macOS versions and Apple Silicon (M1/M2).
Here's how to record Mac screen without a cursor with RecExperts:
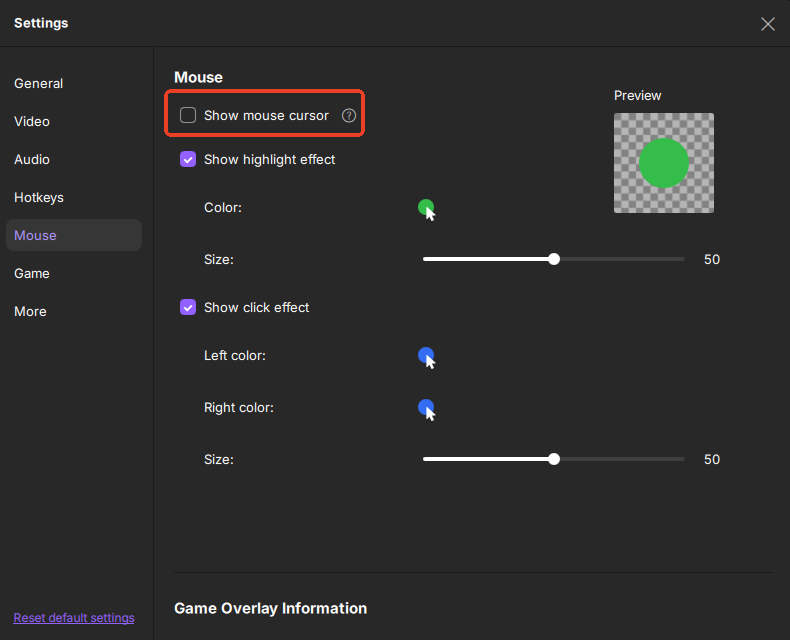
Step 1. Launch EaseUS RecExperts, and click on the Settings button that looks like a nut in the top-right-hand corner.
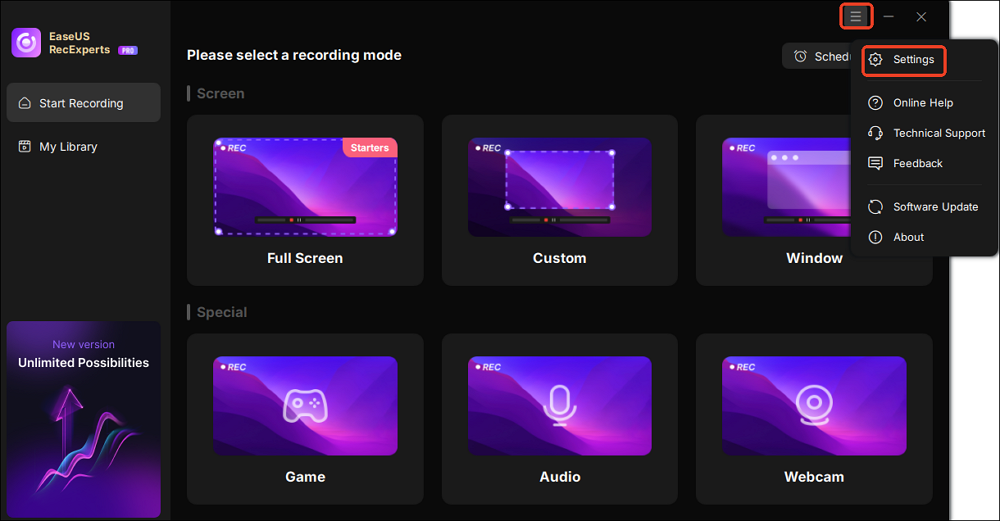
Step 2. When the Settings window pop-ups, click Mouse on the left sidebar. Next, uncheck the box Show mouse cursor.
Step 3. Go back to the main interface, choose a reording mode, set up the audio and webcam options, and click REC to start your recording.

Way 2. Native Hotkeys & Workarounds
While there is no "Hide Cursor" button in macOS, you can use these clever workarounds if you don't want to install professional software:
- Move cursor out of view: Once the recording starts, quickly move your mouse pointer to the extreme bottom-right corner of the screen. This is the simplest way to "hide" it from the viewer's attention without extra tools.
- Disable click effects: Press Command + Shift + 5, click Options, and untick Show Mouse Clicks. While this won't remove the pointer itself, it eliminates the distracting circular animations when you click.
- Use a cursor hider: Install a lightweight utility like Cursorcerer. It allows you to set a global hotkey to toggle cursor visibility. You can hide the cursor right before hitting the Record button and bring it back once you're done
How to Screen Record Without Mouse on Windows 11/10
Windows offers a built-in Windows screen recorder or basic needs, but if you need to capture your entire desktop or specific app windows without the cursor, a professional recorder is recommended.
Way 1. Xbox Game Bar
The Xbox Game Bar is a pre-installed feature in Windows 10 and 11. It allows you to disable the mouse pointer via the system settings.
🚩Here is how to screen record without a mouse on Windows 10 and 11:
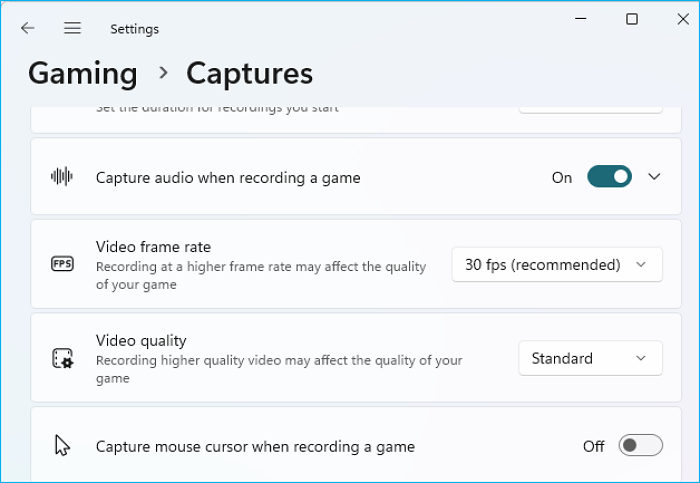
Step 1. Go to Settings > Gaming > Captures, and scroll down to untick the Capture mouse cursor when recording option.
Step 2. Also, enable the Game Mode to be On in Windows settings. Then, launch the gameplay or apps you want to record.

Step 3. Press the Xbox Game Bar shortcut: Windows + G to bring up the display.
Step 4. Click the camera icon (Capture) to start your Xbox Game Bar recording. (Or, use shortcuts Windows + Alt + G to record 30 seconds, Windows + Alt + R to do a free-time recording).
This is how to screen record without a cursor using the Xbox Game Bar. When the recording is complete, you can go to C:\Users\username\Videos\Captures to view the recording files.
Way 2. EaseUS RecExperts
To overcome the limitations of the Game Bar, EaseUS RecExperts provides a more stable and flexible experience. It can record any part of your screen, including the desktop, while keeping the cursor hidden.
Highlights: Unlike the Game Bar, EaseUS lets you record full screen, custom regions, or multiple monitors without the cursor getting in the way.
Steps to hide the cursor while recording on Windows:
Step 1. Launch EaseUS RecExperts.
Step 2. Click the Settings > Mouse, and uncheck the box Show mouse cursor.
Step 3. Select your recording mode (Full Screen or Region) and click REC.
Share this post to help more users!

How to Hide Cursor When Screen Recording OBS
OBS Studio is a powerful, free, open-source screen recorder loved by streamers and creators. It gives you full control over your recordings, including whether the mouse cursor appears on screen.
If you want to record without showing your mouse, OBS makes it simple. With just a few clicks, you can disable the cursor display for any source in your scene.
🚩Here is how to hide mouse cursor in OBS:
Step 1. Launch OBS and create or open a Scene.
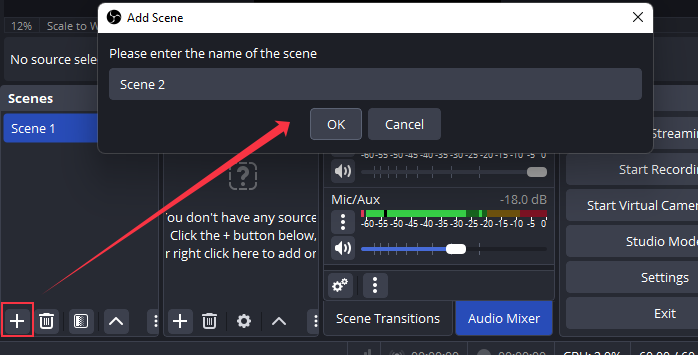
Step 2. Click the + in the Sources box, choose Display Capture, name it, and click OK.

Step 3. Right-click on Display Capture and select Properties.
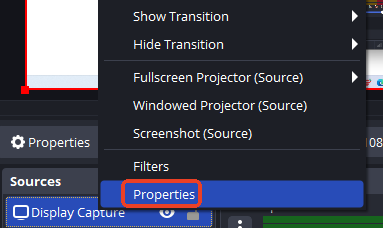
Step 4. In the Properties window of Display Capture, uncheck the box that says Capture Cursor and click OK.
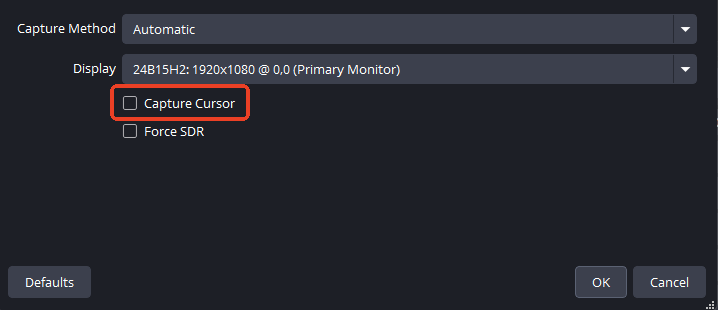
Step 5. Click Start Recording. OBS will now record your screen without the mouse pointer.
- Things to Keep in Mind:
-
1. This setting only applies to the specific source (e.g., Display Capture). If you're capturing other sources like Window Capture or Game Capture, the cursor hiding function may fail to work sometimes.For Windows 10 1909 users, you'll be force upgraded to version 2004 by the spring of 2021.
2. Cursor hiding is not retroactive. Ensure it's disabled before you begin recording.
3. You can refer to the official OBS thread about how to record the cursor.
Screen Record Without Mouse Using Chrome Extensions
Apart from using a professional screen recorder and the PC's built-in recording settings, you can also use Chrome or other browsers' extensions to hide mouse cursor while recording. Google Chrome Extensions has provided many extensions to cater to different needs when recording screens. They can help hide mouse pointers for YouTube, Hulu, or playing videos and recording.
🚩Here is how to hide mouse while recording using a Chrome extension:
Step 1. Go to Chrome Extension and search for hide mouse.
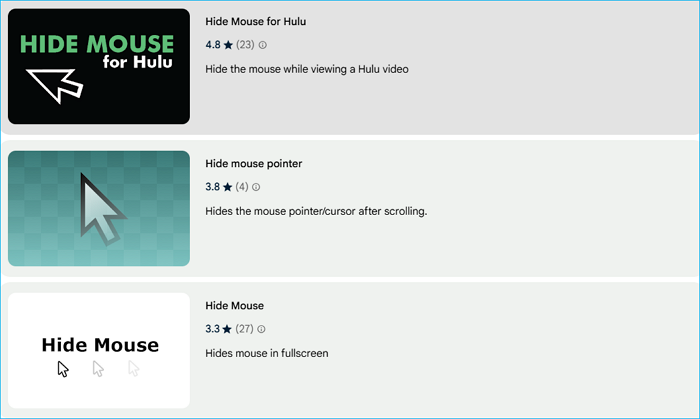
Step 2. Choose the one you want, and click Add to Chrome.

Step 3. Start recording without the mouse pointer.
To Wrap Things Up
This article elaborates on how to screen record without mouse cursor on Windows, Mac, and web browsers. You can try the method above if you want to record a video without a mouse or cursor. If you want to screen record videos with advanced functions, try the professional screen recorder, EaseUS RecExperts.
EaseUS screen recorder can help you record protected videos, trim videos, extract audio, and remove background noise when recording screen. Whatever you want on a screen recorder, you can find some on the EaseUS recorder. Download this multi-functional screen recorder and use it to help you produce videos!
FAQs on Screen Record Without Mouse Cursor
1. Why is my mouse still showing in QuickTime recordings?
QuickTime Player's recording options only include a setting to "Show Mouse Clicks." This feature adds a visual circle around the pointer when you click, but it does not hide the cursor itself. Currently, macOS does not provide a native way to hide the pointer in QuickTime.
2. Can I hide the cursor after the recording is finished?
Generally, no. The mouse cursor is "baked" into the video frames during the recording process as part of the visual data. While advanced video editors can manually overlay or mask the cursor, it is an extremely time-consuming and often messy process. The most efficient way is to use a screen recorder without cursor settings to hide it before you start recording.
3. How do I record my screen with the keyboard?
Keyboard shortcuts for Xbox Game Bar:
- Windows + G: Open Game Bar.
- Windows + Alt + B: Turn HDR on or off.
- Windows + Alt + G: Record the last 30 seconds.
- Windows + Alt + R: Start/stop recording.
Shortcut for screen recording in Mac:
- Command + Shift + 5: open up screen recording.
- Cmd + Ctrl + Esc: stop a recording.
4. How to use the Snipping Tool to hide the cursor?
Currently, you cannot hide the mouse cursor when recording with the Snipping Tool on Windows 11. The screen recording feature captures the mouse by default, and there's no built-in setting to disable it.
If you need to record without showing the cursor, consider using tools like OBS Studio (uncheck Capture Cursor) or EaseUS RecExperts, which offer full control over cursor visibility.