-
![]()
Daisy
Daisy is the Senior editor of the writing team for EaseUS. She has been working in EaseUS for over ten years, starting from a technical writer to a team leader of the content group. As a professional author for over 10 years, she writes a lot to help people overcome their tech troubles.…Read full bio -
Jane is an experienced editor for EaseUS focused on tech blog writing. Familiar with all kinds of video editing and screen recording software on the market, she specializes in composing posts about recording and editing videos. All the topics she chooses …Read full bio
-
![]()
Alin
Alin is an experienced technical blog writing editor. She knows the information about screen recording software on the market, and is also familiar with data cloning and data backup software. She is expert in writing posts about these products, aiming at providing users with effective solutions.…Read full bio -
Jean is recognized as one of the most professional writers in EaseUS. She has kept improving her writing skills over the past 10 years and helped millions of her readers solve their tech problems on PC, Mac, and iOS devices.…Read full bio
-
![]()
Jerry
Jerry is a fan of science and technology, aiming to make readers' tech life easy and enjoyable. He loves exploring new technologies and writing technical how-to tips. All the topics he chooses aim to offer users more instructive information.…Read full bio -
![]()
Rel
Rel has always maintained a strong curiosity about the computer field and is committed to the research of the most efficient and practical computer problem solutions.…Read full bio -
![]()
Gemma
Gemma is member of EaseUS team and has been committed to creating valuable content in fields about file recovery, partition management, and data backup etc. for many years. She loves to help users solve various types of computer related issues.…Read full bio -
![]()
Shelly
"I hope my articles can help solve your technical problems. If you are interested in other articles, you can check the articles at the bottom of this page. Similarly, you can also check my Twitter to get additional help."…Read full bio
Page Table of Contents
Rel
Updated on Jun 09, 2026
0 Views |
0 min read
Many users search for how to use iMovie screen recording with audio on Mac, but it's important to clarify that iMovie cannot record screen on macOS or iOS. It only supports recording video from your Mac's built-in webcam and adding voiceover tracks. If you want to capture Mac screen with audio, you'll need a dedicated screen recorder.
This guide explains iMovie's webcam recording features, its screen recording limitations, and introduces the best alternative for screen recording on Mac with internal audio.

How to Record on iMovie
iMovie is a video editing tool, not a screen recorder, on macOS, iOS, and iPadOS. Instead of capturing the Mac screen, it records video directly from the built-in (or external) webcam (usually FaceTime HD) into a project or event for editing. It is ideal for simple talking-head videos, vlogs, or educational intros, and quick internal mic-based recordings.
How to Record a Video in iMovie on Mac
If you need to record yourself playing video games, reacting, or singing, using iMovie to record video on a MacBook is a good choice. This video can then be added as a picture-in-picture or overlay track to your iMovie project, making it easy to create downloadable, editable, and shareable content.
🚩See how to record on iMovie on Mac:
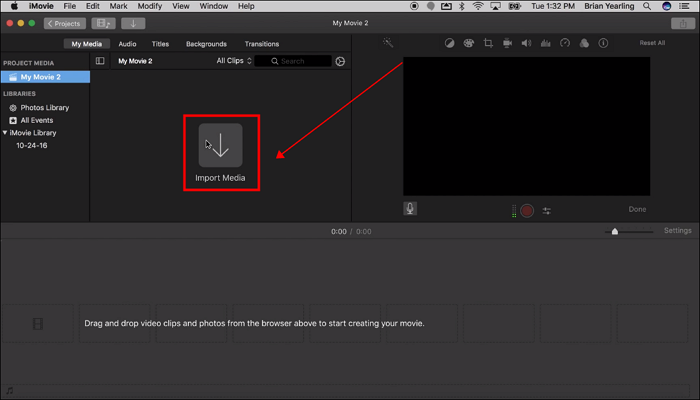
Step 1. Upload the media
- Open the iMovie app on your Mac.
- Click the Import Media button at the center.
- This will take you to a window where you can upload the required media.
Step 2. Use the in-built camera feature
- To use the in-built camera recording button, open the "cameras" option on the Mac.
- To do that, go to the cameras section and click on the red live video window to start recording immediately.
Step 3. Click the import to option
Using the in-built camera recording button, you can now import the desired video.
iMovie offers you three options for importing the video, including project media, existing events, or creating a new event.
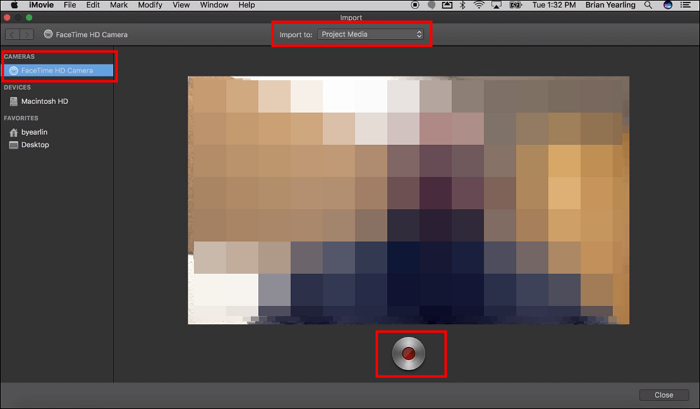
Step 4. Start recording a video
Once all the initial setup is done, the next and final step is to click on the red button that will start the live recording of the video.
Step 5. Stop The Recording
Once recorded, click on the stop button to stop the recording and make any edits if required.
You can watch the video tutorial we showed below to get the method better.

- Editor's Notes:
-
1. Recording Mac using iMovie lets you record live video feed with microphone input only (e.g., built-in mic or selected external mic).
2. To learn more details about how to use iMovie to record on Mac, refer to the Apple Support official document.
Share this post to help others in need!

How to iMovie Record Video on iPhone
If you're on the go and want to capture and edit video directly from your iPhone, iMovie makes it incredibly convenient. While iMovie doesn't record the screen itself, it allows you to record video through your iPhone camera directly within the app, then edit it on the spot.
🚩Here's how to record on iPhone using iMovie:
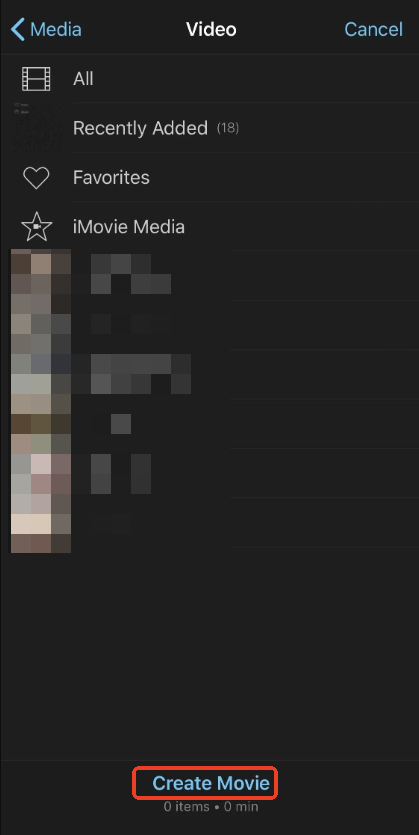
Step 1. Launch the iMovie app. If you don't have it yet, you can download it for free from the App Store.
Step 2. Tap Create Project > choose Movie. You'll be taken to a screen showing your recent media. Tap Create Movie at the bottom to enter the timeline editor.
Step 3. Once inside the project, tap the + (Add Media) button above the timeline. A menu will appear. Tap Camera to open the iPhone's camera directly from iMovie.
Step 4. Use the red Record button to start capturing footage. Tap it again to stop. You can switch between front and rear cameras as needed.
Step 5. After recording, tap Use Video to insert it into your timeline. If you're not satisfied, tap Retake to try again.
Step 6. Once added to your project, you can trim, add filters, text, music, or voiceover. When done, tap Done > Share to export or save your final video.
Share this post to help others in need!
iMovie Alternative for Record Screen with Audio
Since iMovie cannot record screen, like desktop, window, or apps, on Mac, what if you want to screen record on Mac with audio? EaseUS RecExperts for Mac is an excellent choice If you need to capture your screen on Mac, including system sound, microphone input, and even webcam overlay.
💡Comparison Table: iMovie screen recording vs EaseUS RecExperts
|
Feature |
iMovie |
EaseUS RecExperts |
|
Screen Recording |
❌ Not supported |
✅ Full screen, window, region |
|
Webcam Recording |
✅ Supported |
✅ Supported |
|
System Audio Recording |
❌ Not supported |
✅ Supported |
|
Microphone Audio |
✅ Voiceover only |
✅ Supported |
|
Video Editing Features |
✅ Advanced editing |
⚠️ Basic trimming |
|
Platform Compatibility |
macOS, iOS |
Windows, macOS |
🚩How to record screen, audio, and webcam on Mac:
Step 1. Run EaseUS RecExperts on your device and you will see two recording modes. You can choose "Full Screen"to record the whole screen or choose "Region" to select the recording area manually before recording.

Step 2. After that, you can choose to record the webcam, system sound, microphone or record none of them as you like. You can also set auto split, auto recording with various functions on the interface.
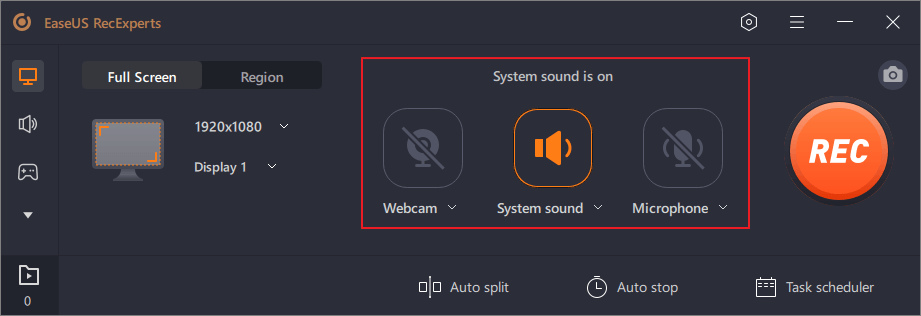
Step 3. Then, you can click the red "REC" button to start recording. Here will be a menu bar on your screen. To pause the recording, click on the white double vertical bar; to end the recording, click on the red square sign.
Step 4. After recording, you will be led to the list interface. Here you can view or edit your recordings. To start a new recording, just click on the "REC" button on the top of the interface.

- Tip
- QucikTime also lets macOS users record screen with external audio. However, you will need BlackHole screen recording to capture internal sound on Mac using Quicktime.
Share this post to help others in need!
Conclusion
While iMovie is a great tool for video editing and webcam recording, it lacks screen recording capabilities, especially for capturing system audio. For comprehensive screen recording on Mac with audio, EaseUS RecExperts offers a powerful yet user-friendly solution.
Free download EaseUS screen recorder today to unlock full screen capture with sound, webcam overlays, and easy video editing, all in one package.
FAQs
1. How do I record the screen with internal audio?
Recording a screen with internal audio involves only a few steps. It starts by searching for the screen recorder feature on your Mac. Press Command + Shift + 5 to the Screen Record interface. From there, click on Options and select Internal Microphone under the Microphone section.
Once done, now start recording by selecting the Record button.
Clicking the Stop button in the menu bar to stop the recording.
The recorded screen and audio will be saved to your desktop as a video file.
Note: The Screen Record feature is built into macOS. Hence, you will later require MacOS Mojave to access the saved recordings.
2. How do you record screen and sound on Mac QuickTime?
Recording sound and screen together can be a tricky process, but there are third-party apps to help with that. Learn how to record videos and audio on your Mac using Quicktime player here:
- Open QuickTime Player.
- Navigate to File and select New Screen Recording.
- Identify the small down arrow next to the record button. Click on that and select Internal Microphone or External Microphone as the recording source.
- Once done, click the record button to start the recording.
- To stop the recording, click the stop button in the menu bar.
- The recorded screen and audio will be saved as a QuickTime movie file.
3. Can you record in iMovie?
Yes, but only through your webcam or front/rear camera, not your screen.
In iMovie, you can record live video using your Mac's built-in FaceTime camera (on macOS) or iPhone camera (on iOS). You can also record voiceovers directly in a project. However, iMovie does not support screen recording.
4. How to stop QuickTime screen recording?
To stop a screen recording in QuickTime Player on Mac:
- Look at the top menu bar on your screen.
- Click the Stop button in the menu bar (near the clock).
- Alternatively, press Command + Control + Esc as a shortcut.
- Once stopped, QuickTime will automatically open the recording for you to review or save.
Share this post to help others in need!