-
![]()
Daisy
Daisy is the Senior editor of the writing team for EaseUS. She has been working in EaseUS for over ten years, starting from a technical writer to a team leader of the content group. As a professional author for over 10 years, she writes a lot to help people overcome their tech troubles.…Read full bio -
Jane is an experienced editor for EaseUS focused on tech blog writing. Familiar with all kinds of video editing and screen recording software on the market, she specializes in composing posts about recording and editing videos. All the topics she chooses …Read full bio
-
![]()
Alin
Alin is an experienced technical blog writing editor. She knows the information about screen recording software on the market, and is also familiar with data cloning and data backup software. She is expert in writing posts about these products, aiming at providing users with effective solutions.…Read full bio -
Jean is recognized as one of the most professional writers in EaseUS. She has kept improving her writing skills over the past 10 years and helped millions of her readers solve their tech problems on PC, Mac, and iOS devices.…Read full bio
-
![]()
Jerry
Jerry is a fan of science and technology, aiming to make readers' tech life easy and enjoyable. He loves exploring new technologies and writing technical how-to tips. All the topics he chooses aim to offer users more instructive information.…Read full bio -
![]()
Rel
Rel has always maintained a strong curiosity about the computer field and is committed to the research of the most efficient and practical computer problem solutions.…Read full bio -
![]()
Gemma
Gemma is member of EaseUS team and has been committed to creating valuable content in fields about file recovery, partition management, and data backup etc. for many years. She loves to help users solve various types of computer related issues.…Read full bio -
![]()
Shelly
"I hope my articles can help solve your technical problems. If you are interested in other articles, you can check the articles at the bottom of this page. Similarly, you can also check my Twitter to get additional help."…Read full bio
Page Table of Contents
0 Views |
0 min read
Ideal for gamers and individuals who prefer to communicate over the Internet, TeamSpeak is a handy instant live chat program that uses voice-over-Internet protocol. Want to record those great TeamSpeak moments, especially during games and meetings?
Luckily, this guide will show you how to record TeamSpeak audio on Windows, Mac, iPhone, and Android. With these methods, you can capture audio from TeamSpeak like a pro.
- How to Record TeamSpeak with EaseUS RecExperts
- How to Record TeamSpeak with Audacity
- How to Record TeamSpeak Audio with OBS
- Best TeamSpeak Recorder for iPhone and Android Users
How to Record TeamSpeak with EaseUS RecExperts
A powerful screen recorder like EaseUS RecExperts is the best option for recording TeamSpeak on Windows and Mac. It is a full-featured screen recorder that can capture the microphone and system sound at the same time, without compromising the quality. Thus, it can help you record TeamSpeak communications with ease. It facilitates a one-click recording functionality with no file size and time limit restrictions.
Moreover, this call recorder is also a premium video conference recorder to capture online meetings, including Zoom meetings, Google Meet, or some popular live-streaming videos or audio. It's ideal for handling almost all screen and recording tasks.
EaseUS RecExperts
- Record desktop audio, microphone, or both at the same time
- Record TeamSpeak in MP3, WAV, OGG, FLAC, or other formats
- Start, stop and split the recording automatically with its schedule recording feature
- Extract audio files with ease
- Offer editing tool to cut unwanted parts after recording
Detailed steps on how to record TeamSpeak with audio via EaseUS screen recorder:
Step 1. Launch EaseUS RecExperts and choose Audio mode (looks like a speaker) from the main interface.
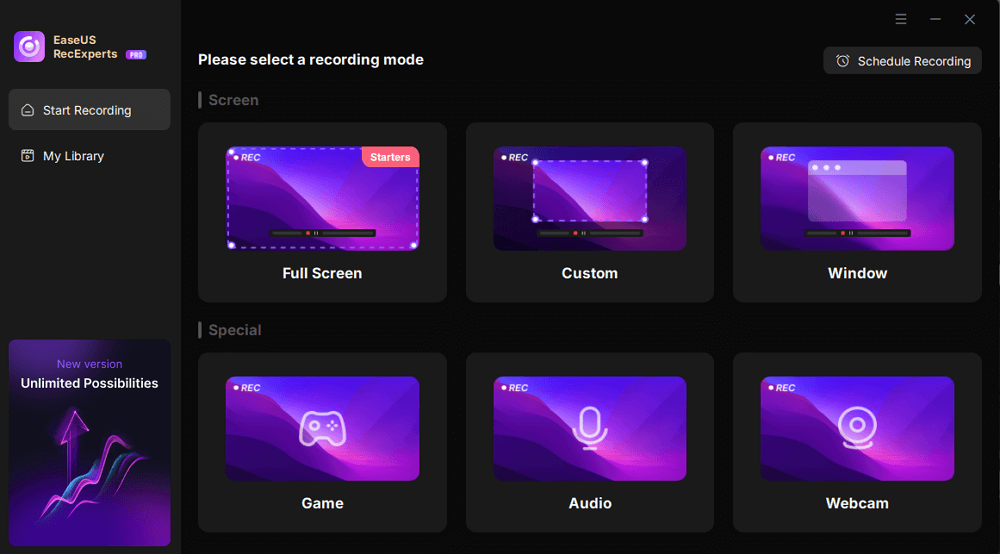
Step 2. Select the sound source by clicking on the speaker sign (the system sound) or the mic sign (the microphone). Or, you can record them both at the same time.
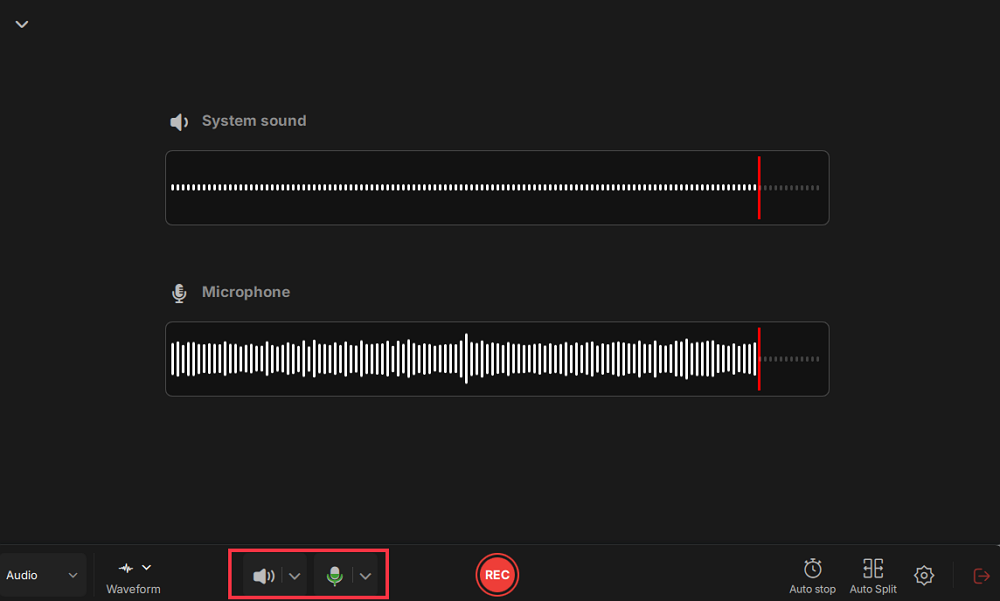
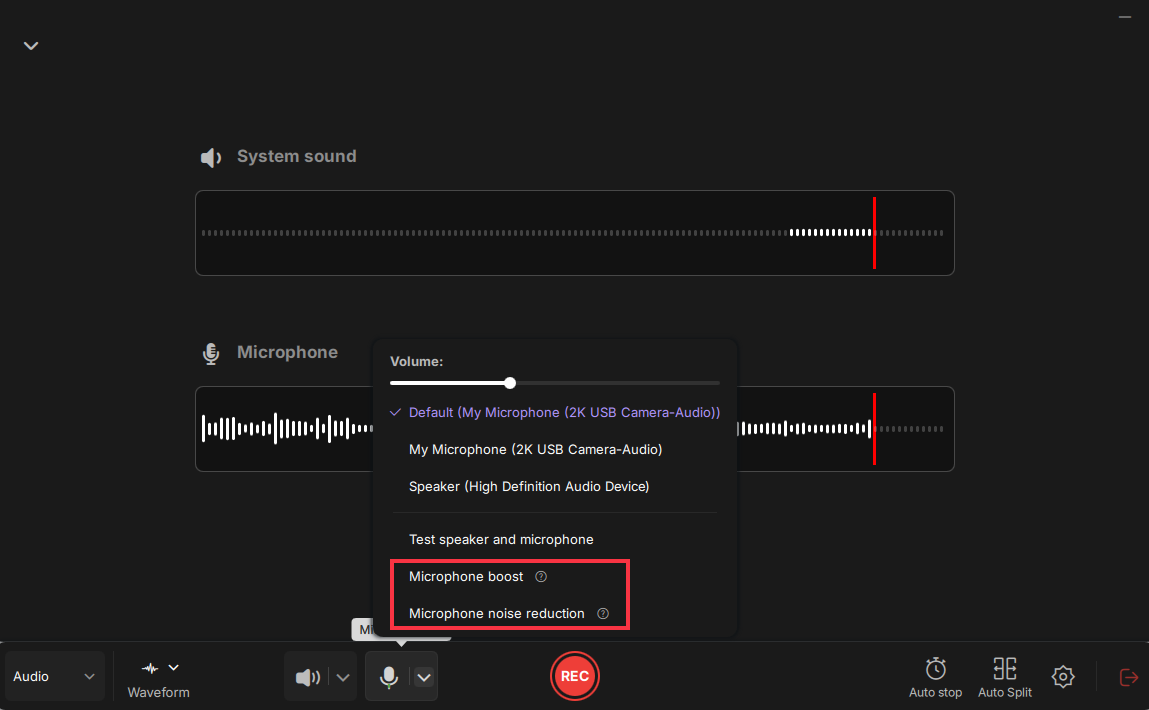
Step 3. Click the drop-down buttons next to the Speaker and Microphone to adjust the audio source settings.
- In the Speaker tab, you can adjust the volume, test the speaker and microphone, record silently, or open the volume mixer.
- In the Microphone tab, you can also enable Microphone boost and Microphone noise reduction features.
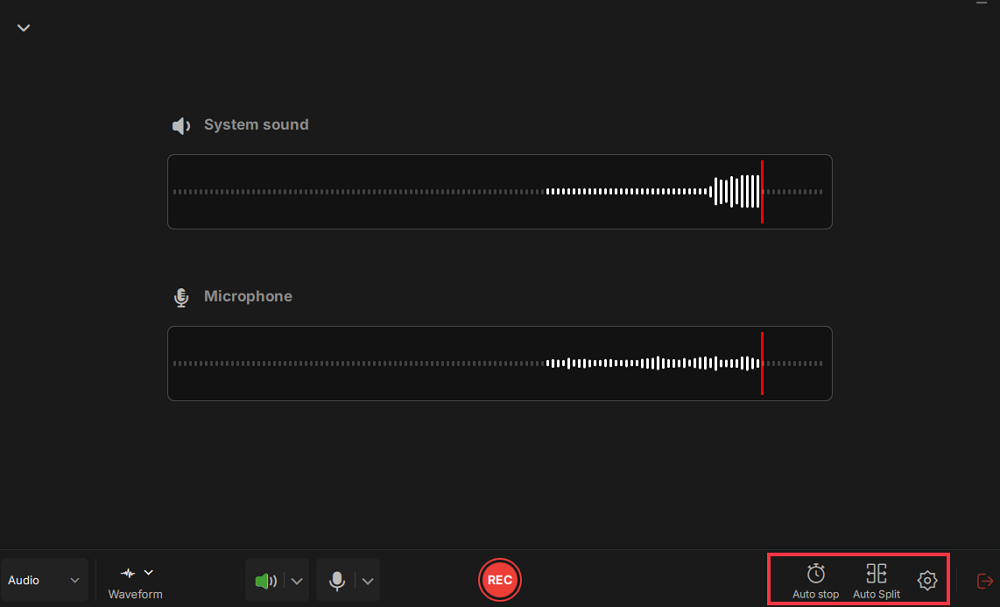
Step 4. To change the output format, bitrate, or sampling rate, you can click the Settings button in the lower right corner of the page. Of course, you can also set the automatic stop audio recording and automatic audio segmentation as needed.
Step 5. Hit the REC button to start recording audio. To finish it, just click on the red square icon to stop the recording.
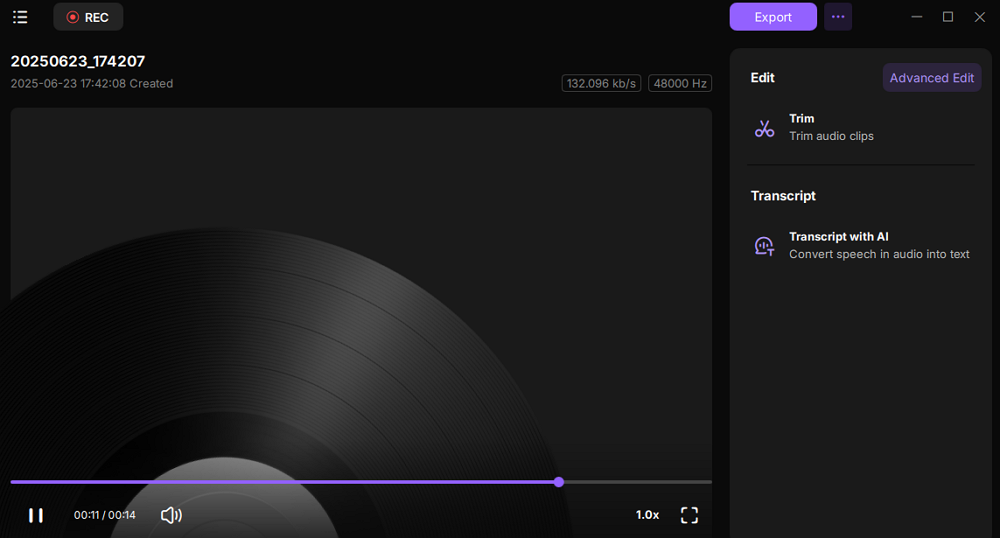
Step 6. Once finished, the audio recording will be saved automatically. You can listen to or edit the recording with built-in tools.
Share this post about recording TeamSpeak with others.
How to Record TeamSpeak with Audacity
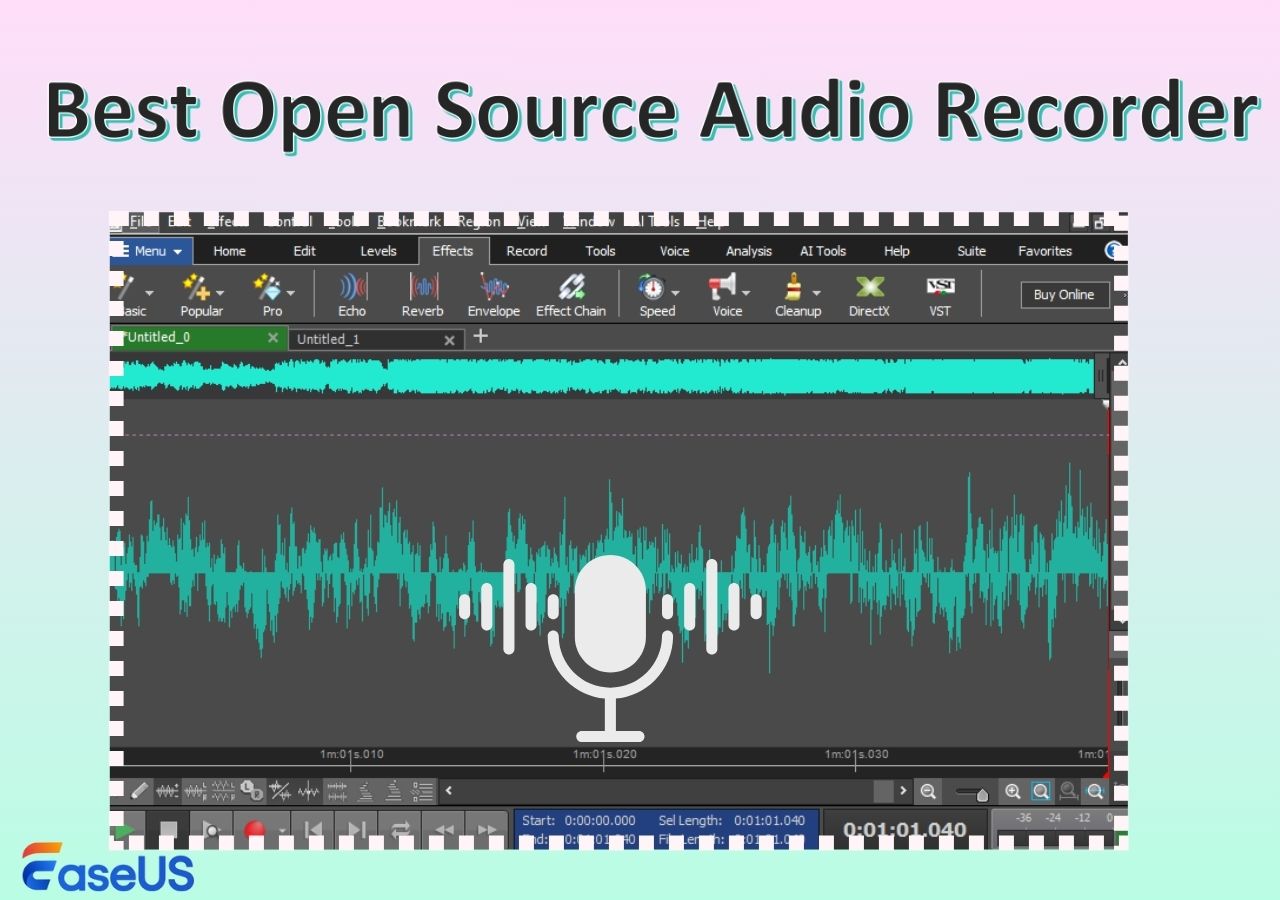
Audacity is free desktop-based recorder software that comes with tons of great features, which include recording TeamSpeak audio. It empowers users to use filters on your TeamSpeak session sound and export/import audio files.
Moreover, Audacity's developer doesn't restrict the users' capability to make changes in the recording, and that's why it's the best open-source audio recording program you can have. No matter whether you want to record TeamSpeak sound on Windows or Mac, no worries. Audacity works on both platforms.
A Step-by-Step Guide on How to Record TeamSpeak Audio with Audacity with ease:
Step 1. Install and launch the Audacity app on your computer. Click on the "Audio Steup" to choose the "Host" as "Windows WASAPI".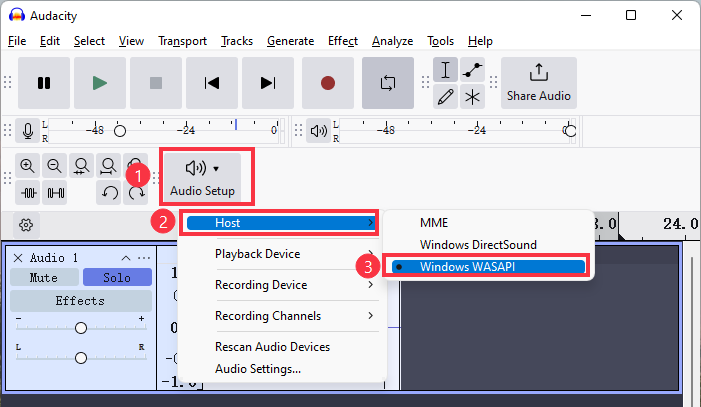
Step 2. Begin your session with the TeamSpeak. Then, tap the "Record" button on Audacity to begin recording.
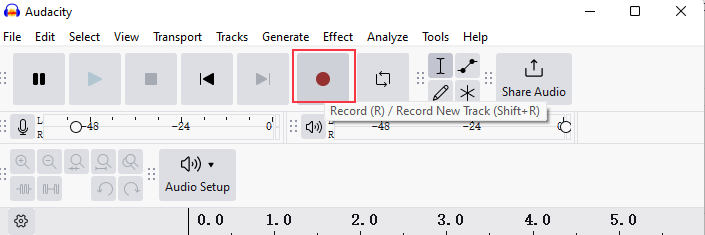
Step 3. Tap the "Stop" button once you're done with recording.
Step 4. Click the "File" > " Export Audio" or press Ctrl+Shift+E hotkeys to save the recording on your computer.
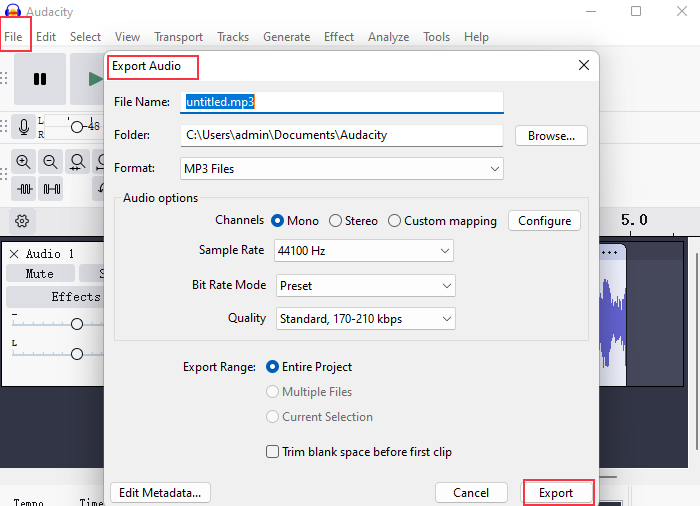
That's how Audacity helps you record your TeamSpeak communications. If you want to learn more about how to trim/cut audio in Audacity, you can read this post below:
How to Trim/Cut Audio in Audacity and Its Alternatives
When you want to cut audio into several ones, Audacity is a good choice. We will show you how to do it with Audacity.

How to Record TeamSpeak Audio with OBS
OBS Studio, as one of the open source screen recorders, provides an easy and fast way to capture audio from TeamSpeak without a time limit. Even though it's designed for recording and streaming videos, you can still record just audio from your desktop, apps, or websites, such as only capturing game audio.
Here is the guide on how to capture audio from TeamSpeak in OBS:
Step 1. Download OBS Studio on your Windows, Mac, or Linux. Then, click the "+" icon in the Scene to add the scene.
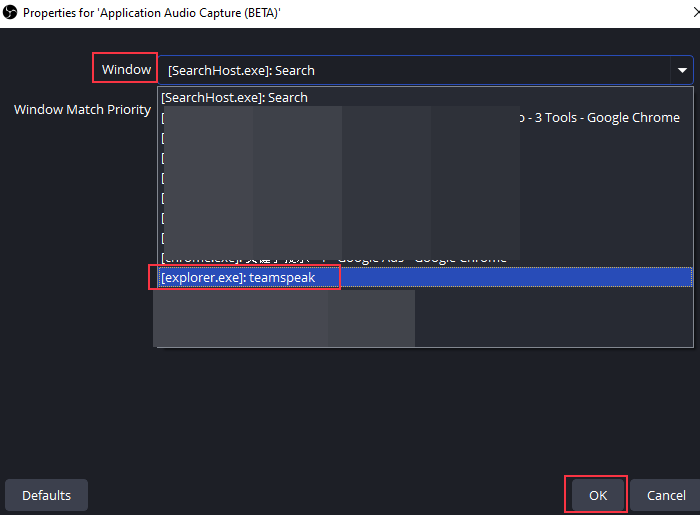
Step 2. Click the "+" icon in the Source tab and choose the Application Audio Capture as the source.
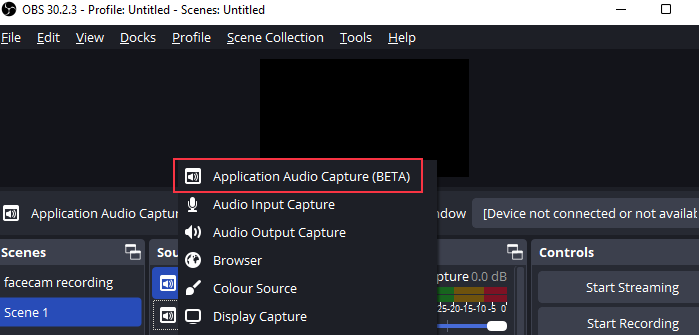
Step 3. Click OK on the pop-up page, then select TeamSpeak as the audio source in the Window option.
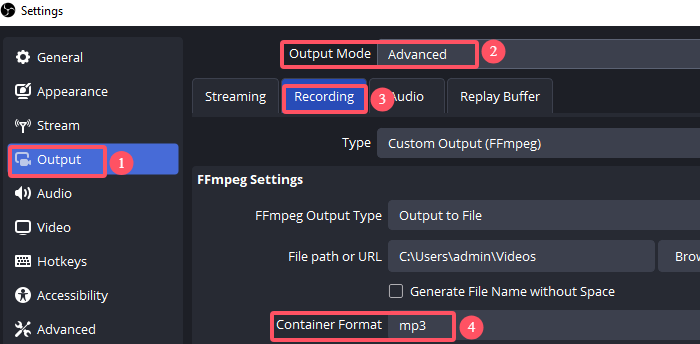
Step 4. Go to Settings > Output > Output Mode >Advanced > Recording > Container Format, and choose MP3 or other audio format as needed.
Share this post about recording TeamSpeak with others.
Best TeamSpeak Recorder for iPhone and Android Users
If you want to capture the sound from TeamSpeak on your smartphone (be it iPhone or Android), then it's indeed possible thanks to great voice recorders available out there for both Android and iOS devices. Read on to learn more!
1. Record TeamSpeak on iPhone
For iPhone, there are a lot of voice recorders available on the app store to help you record TeamSpeak. However, we recommend using the Voice Recorder - Audio Record. This app is capable of capturing the sound that comes from your iPhone with ease. It even allows you to do audio editing and playbacks on your iPhone. With the assistance of the app, you can record live game broadcasting, meetings, and TeamSpeak communications.
The app does so with codec noise reduction technology. What's more? It even comes in handy to capture any audio within 10 to 100 meters around you. Its auto-upload functionality will help you share your recordings on Dropbox.
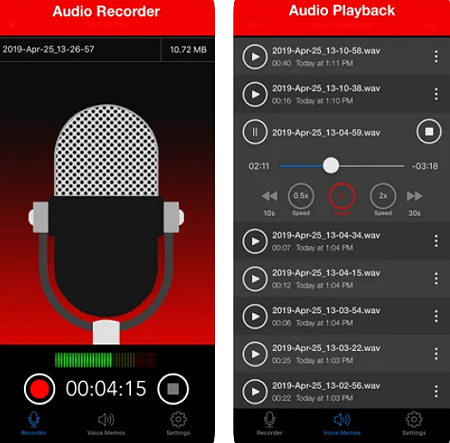
Here's how to record TeamSpeak with Voice Recorder - Audio Record:
Step 1. To commence, open the App Store app and search for the Voice Recorder - Audio Record app. Once locating it, download and install it on your iPhone.
Step 2. Once installing it successfully, run it, and begin your session with TeamSpeak. After that, tap on the "Record" button on Voice Recorder - Audio Record to commence the audio recording.
Step 3. Tap on the "Stop" button once you're done with recording. The app will save the recording on your iPhone automatically.
Step 4. That's it. If you want to listen to your recording audio, then go to the "Audio Playback">" Choose the audio">" Play."
2. Record TeamSpeak on Android
Like iPhone, there are many great voice recorders available for Android as well, such as Cube Call Recorder ACR. The app comes in very handy to record TeamSpeak communications. In fact, it will help you capture cleat TeamSpeak recordings on your Android device. Therefore, if you have already tried other apps to record VoIP calls and didn't get the result you crave, then you should give a try Cube Call Recorder ACR.
The app even has a feature that empowers users to record incoming and outgoing phone calls automatically. In fact, it has many more additional great features like starred recordings that mark important calls for easy and quick access.
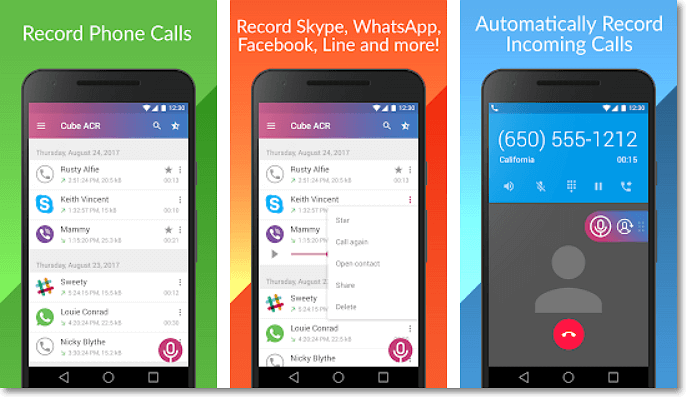
A step-by-step guide on how to record TeamSpeak with Cube Call Recorder ACR:
Step 1. To start, go to the Google Play Store and search for the Cube Call Recorder ACR app. After that, download and install the application on your Android device.
Step 2. After the installation of the app, launch Cube Call Recorder ACR and commence your session on TeamSpeak.
Step 3. Click on the "Record" button to record your TeamSpeak chat. Once you're done, tap the "Record" button again, and that's it. You'll see your recordings on the main screen of the app.
Share this post about recording TeamSpeak with others.
Conclusion
This post shows you 5 easy-to-use TeamSpeak recorders to help you capture TeamSpeak quickly and easily. For mobile devices users, Cube Call recorder ACR and Voice Recorder - Audio Record are nice options.
If you like to capture TeamSpeak on desktop, then we highly recommend EaseUS RecExperts. It is a one-click solution to record TeamSpeak audio with no hassle for future use on Windows and Mac. On top of all, this tool is the solution for all of your recording needs. So, give it a try today!!
Record TeamSpeak Audio FAQs
1. Is there other ways to record TeamSpeak audio?
Yes, you can use a professional call recorder like EaseUS RecExperts and Audacity to capture TeamSpeak sound easily.
2. Does TeamSpeak have video call?
No, TeamSpeak does not support video calls. TeamSpeak is primarily a voice conferencing software that focuses on providing high-quality voice communication services.
EaseUS RecExperts

One-click to capture anything on screen!
No Time Limit, No watermark
Start Recording