-
![]()
Daisy
Daisy is the Senior editor of the writing team for EaseUS. She has been working in EaseUS for over ten years, starting from a technical writer to a team leader of the content group. As a professional author for over 10 years, she writes a lot to help people overcome their tech troubles.…Read full bio -
Jane is an experienced editor for EaseUS focused on tech blog writing. Familiar with all kinds of video editing and screen recording software on the market, she specializes in composing posts about recording and editing videos. All the topics she chooses …Read full bio
-
![]()
Alin
Alin is an experienced technical blog writing editor. She knows the information about screen recording software on the market, and is also familiar with data cloning and data backup software. She is expert in writing posts about these products, aiming at providing users with effective solutions.…Read full bio -
Jean is recognized as one of the most professional writers in EaseUS. She has kept improving her writing skills over the past 10 years and helped millions of her readers solve their tech problems on PC, Mac, and iOS devices.…Read full bio
-
![]()
Jerry
Jerry is a fan of science and technology, aiming to make readers' tech life easy and enjoyable. He loves exploring new technologies and writing technical how-to tips. All the topics he chooses aim to offer users more instructive information.…Read full bio -
![]()
Rel
Rel has always maintained a strong curiosity about the computer field and is committed to the research of the most efficient and practical computer problem solutions.…Read full bio -
![]()
Gemma
Gemma is member of EaseUS team and has been committed to creating valuable content in fields about file recovery, partition management, and data backup etc. for many years. She loves to help users solve various types of computer related issues.…Read full bio -
![]()
Shelly
"I hope my articles can help solve your technical problems. If you are interested in other articles, you can check the articles at the bottom of this page. Similarly, you can also check my Twitter to get additional help."…Read full bio
Page Table of Contents
Jane Zhou
Updated on Jan 21, 2026
0 Views |
0 min read
The new macOS Sonoma brings a lot of new features to your Macs. One such feature is high-performance Screen Share; while you can previously screen share using FaceTime calls, this is a built-in tool and allows you to control Macs remotely under the same Wi-Fi. Though Apple adapts to the new features a bit late, when it does, it hits the ball out of the park.
Learn how to set up macOS Sonoma screen sharing and connect it to access other Macs on this post. Additionally, know some important controls and an alternative in case macOS Sonoma screen sharing is not working.
What's New in macOS Sonoma Screen Sharing
Sharing your computer screen is the most used feature these days, considering the content creation and video conferencing tools. The macOS 14 screen sharing makes video conferencing more than just a way of communication. Previously, to screen share, one had to start a FaceTime call and then share the screen.
But the new screen-sharing app works just like TeamViewer or Anydesk, allowing users the complete ability to control the other Macs. The app offers the flexibility to select the quality based on the internet speed with very low audio and video latency. You will also get various controls to switch between observer mode or control mode, customizable webcam overlay, and more.
Overall, the new screen sharing on macOS Sonoma is more flexible and intuitive compared to the previous version. You can say this: with many exclusive features and ease of use, the app definitely makes it easy to share the screen, apps, messages, and access Macs remotely.
Don't forget to share this post with others in need!
How to Share Screen on macOS Sonoma
Now, let's get to the actual part. Since we want to share screen from one Mac to the other, we will consider two Macs, Mac A and Mac B.
There's one thing you need to remember before moving on to the next step. Both the Macs should be updated to macOS 14 (Sonoma) and later versions and connected to the same Wi-Fi.
#1. Sonoma Screen Sharing Set Up
The first thing we need to do is to set up Mac A and Mac B to be able to screen share. That is, we have to enable the features on both Macs. Let us see how to gain access to Mac A using the screen-sharing app from Mac B.
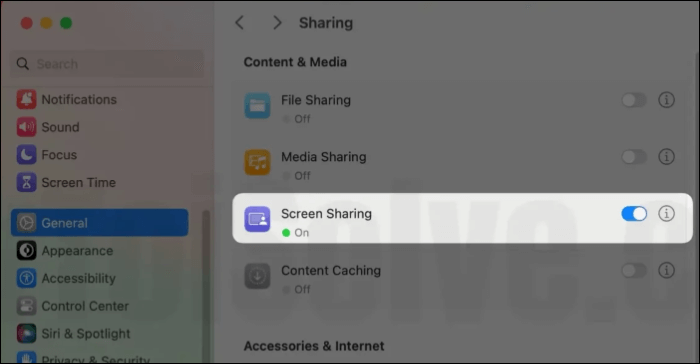
Step 1. Click on the Apple Logo at the top of your Mac A screen.
Step 2. Click on System Settings and navigate to General > Sharing.

Step 3. To enable the Screen Sharing, toggle the button next to it. Repeat the same for Mac B.
#2. How to Start Screen Sharing on macOS 14
Once both the Macs can share the screen, the next step is to connect them to start screen sharing. Follow the steps below to know how to connect two Macs.
Step 1. We want to access Mac A's screen using Mac B. So; we will send a connection request to Mac A using Apple ID through the screen-sharing app on Mac B.
Step 2. Open the macOS Sonoma Screen Sharing app on Mac B, and click on Network in the left panel.
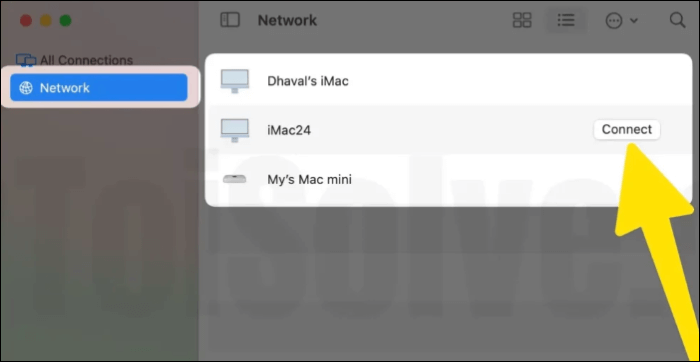
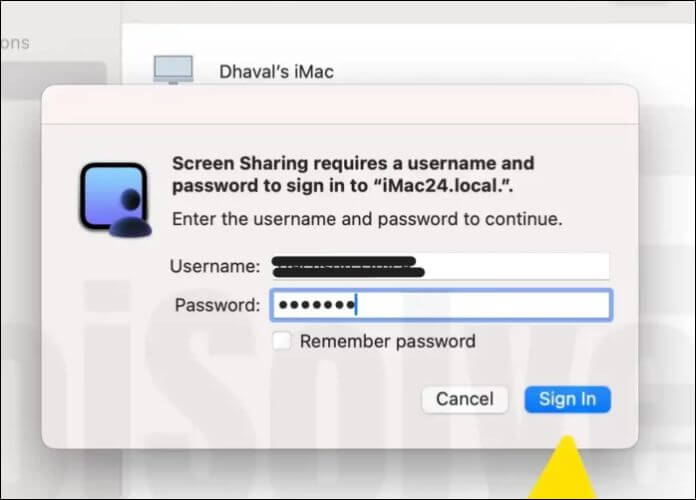
Step 3. Here, you can see the previously shared connections, or if you are new, click on the plus sign and enter the Username and Password of your Mac. Click on Connect.
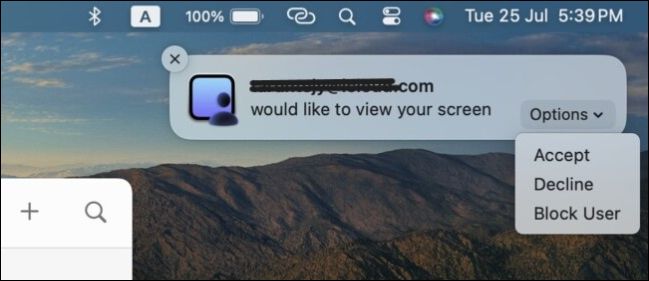
Step 4. Now, on Mac A, you can see a request notification to connect to Mac B. The notification also shows options to Accept, Decline, or Block User. Click on Accept.
Step 5. Once you accept the invitation on Mac A, the next screen shows you two options: Control my screen and Observe my screen. Select what you want and click Accept.
If you want more features to access the apps, quality, Show all tabs, Zoom in or Zoom out, etc., click the View option at the top.
#3. Stop macOS Sonoma Screen Sharing
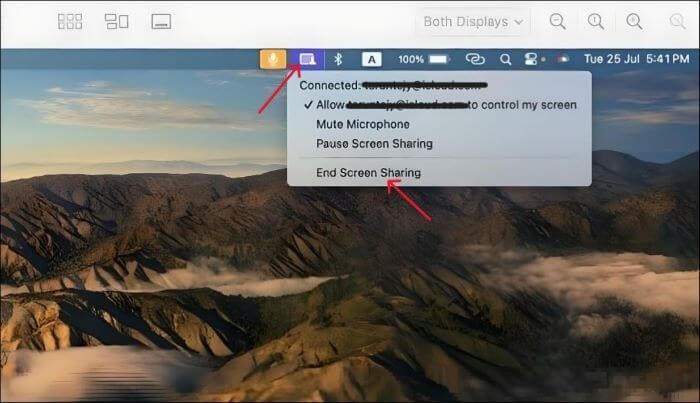
Once the work is done, you have to disconnect the screen-sharing. Click on the screen-sharing icon at the top on Mac A, and select End Screen Sharing from the options.
Now that you know how to set up and use Screen Sharing on macOS 14, you should remember that you accept only trusted people to observe or control your Mac. If the access goes to the wrong person, remember you can click on the exit screen sharing to end it.
Bonus Tip: Share Screen on macOS Sonoma via Screen Recorder
What if your macOS Screen Sharing is not working, or you are scared of giving another person access to control your Mac? Privacy concerns and issues with the app definitely call for an alternative that is secure and reliable for sharing what's happening on your screen. EaseUS RecExperts is a professional Mac screen recorder that captures your screen activity with a webcam overlay of high quality. But first, you need to allow screen recording on Mac.
With this software, along with capturing 4K/8K videos, you will have complete control over what's happening on your screen. You can record in multi-screen recording mode with various audio capabilities. You can record meetings, video calls, and gameplay without any lag. After recording, download the file in the desired format and share them.
Key Features of EaseUS RecExperts:
- Record your screen with flexible recording modes.
- Add webcam overlay for meetings, video calls, and gameplay.
- Allows audio recording and noise reduction features.
- Comes with an inbuilt video editor and screenshots tool.
- Record 4K/8K videos of 144 fps and export in 10+ formats
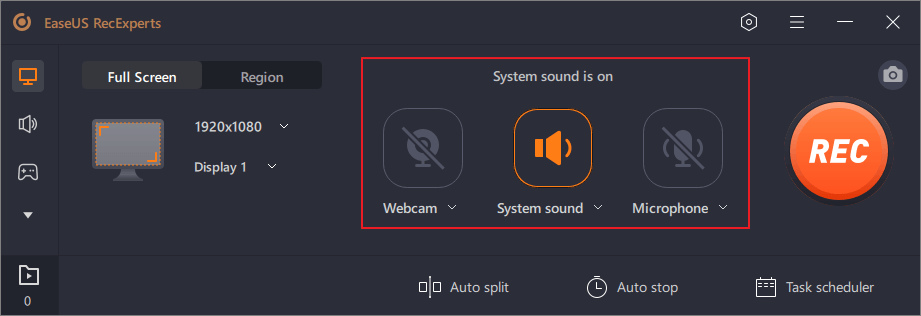
Step 1. Run EaseUS RecExperts on your device and you will see two recording modes. You can choose "Full Screen"to record the whole screen or choose "Region" to select the recording area manually before recording.

Step 2. After that, you can choose to record the webcam, system sound, microphone or record none of them as you like. You can also set auto split, auto recording with various functions on the interface.
Step 3. Then, you can click the red "REC" button to start recording. Here will be a menu bar on your screen. To pause the recording, click on the white double vertical bar; to end the recording, click on the red square sign.
Step 4. After recording, you will be led to the list interface. Here you can view or edit your recordings. To start a new recording, just click on the "REC" button on the top of the interface.

Final words
The macOS Screen Sharing is an excellent utility to collaborate, present, and control Macs remotely with ease. The tool offers excellent flexibility and features without having to depend on third-party apps. In this post, we will see how to set up macOS Sonoma Screen Share and use it to control other Macs.
Remote control access and the frequent app issues call for a safer alternative. We recommend the EaseUS RecExperts, a reliable screen recording app with complete control in your hands to record your screen in high quality and share them.
macOS Sonoma Screen Sharing FAQs
Here are some of the most frequent FAQs asked on the screen-sharing feature of macOS Sonoma. I hope you find these queries helpful.
1. Can you screen share on macOS Big Sur?
Yes, Bis Sur allows you to share the screen. To share your screen, you have to enable Screen Share on your Mac and the Mac which you want to see the Big Sur's screen. Connect the Macs using Apple ID and control the screen.
2. Is macOS Sonoma available?
The macOS Sonoma will be available for download for the general public on September 26, 2023. The Sonoma (macOS 14) release is much 3 weeks earlier compared to the previous OS version. The new macOS is stacked up with excellent features and upgrades, but currently, it is available only for developers and public beta testers.
3. How do I turn on Sonoma game mode on my Mac?
The Game Mode automatically turns on after you start your game. A notification lets you know about it. Also, you can check if it is on using the game controller icon in the menu bar. You can use the game mode only if you play it in full-screen; otherwise, it pauses automatically.
EaseUS RecExperts

One-click to capture anything on screen!
No Time Limit, No watermark
Start Recording