-
![]()
Daisy
Daisy is the Senior editor of the writing team for EaseUS. She has been working in EaseUS for over ten years, starting from a technical writer to a team leader of the content group. As a professional author for over 10 years, she writes a lot to help people overcome their tech troubles.…Read full bio -
Jane is an experienced editor for EaseUS focused on tech blog writing. Familiar with all kinds of video editing and screen recording software on the market, she specializes in composing posts about recording and editing videos. All the topics she chooses …Read full bio
-
![]()
Alin
Alin is an experienced technical blog writing editor. She knows the information about screen recording software on the market, and is also familiar with data cloning and data backup software. She is expert in writing posts about these products, aiming at providing users with effective solutions.…Read full bio -
Jean is recognized as one of the most professional writers in EaseUS. She has kept improving her writing skills over the past 10 years and helped millions of her readers solve their tech problems on PC, Mac, and iOS devices.…Read full bio
-
![]()
Jerry
Jerry is a fan of science and technology, aiming to make readers' tech life easy and enjoyable. He loves exploring new technologies and writing technical how-to tips. All the topics he chooses aim to offer users more instructive information.…Read full bio -
![]()
Rel
Rel has always maintained a strong curiosity about the computer field and is committed to the research of the most efficient and practical computer problem solutions.…Read full bio -
![]()
Gemma
Gemma is member of EaseUS team and has been committed to creating valuable content in fields about file recovery, partition management, and data backup etc. for many years. She loves to help users solve various types of computer related issues.…Read full bio -
![]()
Shelly
"I hope my articles can help solve your technical problems. If you are interested in other articles, you can check the articles at the bottom of this page. Similarly, you can also check my Twitter to get additional help."…Read full bio
Page Table of Contents
Alin
Updated on Jun 09, 2026
0 Views |
0 min read
Key Takeaways
- The Snipping Tool built into Windows 11 now supports screen recording with both system audio and microphone input.
- To record system audio, users must ensure their Windows OS and Snipping Tool are updated to the latest versions.
- During recording, Snipping Tool can capture sounds from both the microphone and internal system playback, delivering high-quality video with audio.
- For more advanced features like multi-track audio editing and flexible output formats, professional screen recorders like EaseUS RecExperts are recommended.
- Keeping Snipping Tool and Windows up to date ensures access to the latest features and optimal performance.
Does Snipping Tool Record Audio?
Yes, but only if you're using Windows 11 and know how to turn it on.
The updated Snipping Tool now supports screen recording with audio, including system sound and microphone input. And the recording will be saved in MP4, AVI, and MOV formats. However, many users are unaware of this feature or don't know how to enable it properly. In this guide, we'll show you exactly how to record your screen with sound using Snipping Tool. We'll also introduce alternative tools if you need more control and flexibility. Let's get started!
How to Use Snipping Tool to Record Video with Audio
1. Allow Audio Recording in the Snipping Tool
If you are one of the Windows Insider users, you can record a video and audio using the Snipping Tool. But you need to change the settings first. You must update your Windows PC to the latest available build beforehand. If you have updated your Windows PC, follow the steps below to enable audio recording in the Snipping Tool.
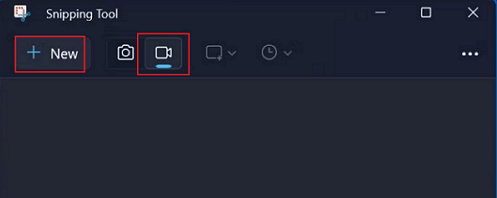
Step 1. Search and open the Snipping Tool on your computer. Then, click on the Video Record > New icon.
Step 2. When the recording is started, you will see the toolbar. Click on Microphone > Open Microphone privacy settings > Yes to continue.

Step 3. Navigate to the Let apps and access your microphone section, and scroll down to toggle the Snipping Tool app. In this way, the Snipping Tool can access the microphone.

- Tip
-
- 🟣To record the system audio by default, select three dots(in the top-right corner of the main interface) > Settings > Screen recording > toggle on Include microphone input by default when a screen recording starts.
- 🟣To prevent recording the microphone by default, select three dots(in the top-right corner of the main interface) > Settings > Screen recording > toggle off Include system audio by default when a screen recording starts.
Let's go to the next part to screen record with audio using the Snipping Tool now.
2. Record Sound with Video Using Snipping Tool
The Snipping Tool will capture the system audio by default if you don't turn it off in the settings. Therefore, you can start a screen recording directly if you want to capture the screen video along with the internal audio. If you want to record the microphone sound together, follow the steps below.
Step 1. Launch the Snipping Tool app and click on Video Record > New. Select the screen area you want to capture.
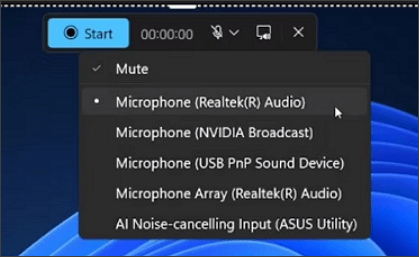
Step 2. Click on the Microphone sign to open the drop-down menu. Select the internal or external mic you want to record from the list.
Step 3. Click Start to record the screen and audio, and click Stop Recording to finish.
Share this post with more people if you find it useful!
Snipping Tool No Sound? Fix It with These Tips
If your screen recordings using Snipping Tool have no sound, don't worry, you're not alone. This is a common issue for Windows 11 users, and it usually comes down to a few simple settings you might have missed.
Here are some quick fixes to help you record audio successfully with Snipping Tool:
1. Make Sure You're Using Windows 11
Audio recording is only available in Windows 11 Snipping Tool (Version 11.2212.24.0 and later). If you're using Windows 10 or an older version, you won't be able to record audio.
🔧 Tip: Go to Microsoft Store > Library > Get Updates to update Snipping Tool
2. Check Your Privacy Settings
Windows may be blocking microphone access. To fix this:
- Go to Settings > Privacy & security > Microphone
- Make sure Microphone access and Snipping Tool are both enabled
3. Test Your Microphone
Before recording, test your mic:
- Go to Settings > System > Sound
- Under Input, choose your microphone and make sure the input level responds when you speak
4. Restart Snipping Tool or Your PC
If all settings are correct but there's still no sound, try:
- Restarting the Snipping Tool
- Rebooting your computer to refresh all permissions and services
Snipping Tool Alternative: Screen Record with More Features
Although the Sniping Tool can meet the basic demands of users, it offers no advanced functions. Not to say that only Insider users can use this function right now. Therefore, we suggest you download and use an alternative screen recorder - EaseUS RecExperts from the button below for now.
This screen recorder for Windows and Mac can record the Windows screen along with the system audio, microphone, and even the webcam. No time limit is put on your recording. It compresses the videos before saving them, saving a lot of storage space for your computer. Also, it offers a schedule recording feature to start and end recording automatically.

More reasons to choose EaseUS RecExperts:
- Record a video on Windows 11/10/8.1/8/7
- Remove or add a watermark you like
- Adjust the volume of the audio source freely
- Record the video in MP4, MOV, FLV, MKV, and AVI formats
The Bottom Line
This article mainly shows you how to screen record with audio using the new Snipping Tool on Windows. Unfortunately, not all Windows users can use the screen recording feature right now. In this case, you'd better try an alternative like EaseUS RecExperts to record a video with audio on your Windows computer. Download it to start now!
Snipping Tool Screen Record with Audio FAQs
Here are some frequently asked questions from people with the same demand as you. Check the answers below.
1. Can you record audio with the Snipping Tool?
Yes, but this function is not available for all users. Only Windows Insider users can experience this feature for now. You may wait for a while.
2. Can you record a video with the Snipping Tool?
Yes, the new Snipping Tool allows users to record the screen as a video. But make sure you have updated your Windows PC before upgrading the Snipping Tool app.
3. Snipping Tool Screen Record No Sound?
The reason may be:
- You are not a Windows Insider user.
- You didn't enable the Snipping Tool to record the microphone.
- You disabled the system audio recording feature.
If you are a Windows Insider user, check the Snipping Tool audio setting.