-
![]()
Daisy
Daisy is the Senior editor of the writing team for EaseUS. She has been working in EaseUS for over ten years, starting from a technical writer to a team leader of the content group. As a professional author for over 10 years, she writes a lot to help people overcome their tech troubles.…Read full bio -
Jane is an experienced editor for EaseUS focused on tech blog writing. Familiar with all kinds of video editing and screen recording software on the market, she specializes in composing posts about recording and editing videos. All the topics she chooses …Read full bio
-
![]()
Alin
Alin is an experienced technical blog writing editor. She knows the information about screen recording software on the market, and is also familiar with data cloning and data backup software. She is expert in writing posts about these products, aiming at providing users with effective solutions.…Read full bio -
Jean is recognized as one of the most professional writers in EaseUS. She has kept improving her writing skills over the past 10 years and helped millions of her readers solve their tech problems on PC, Mac, and iOS devices.…Read full bio
-
![]()
Jerry
Jerry is a fan of science and technology, aiming to make readers' tech life easy and enjoyable. He loves exploring new technologies and writing technical how-to tips. All the topics he chooses aim to offer users more instructive information.…Read full bio -
![]()
Rel
Rel has always maintained a strong curiosity about the computer field and is committed to the research of the most efficient and practical computer problem solutions.…Read full bio -
![]()
Gemma
Gemma is member of EaseUS team and has been committed to creating valuable content in fields about file recovery, partition management, and data backup etc. for many years. She loves to help users solve various types of computer related issues.…Read full bio -
![]()
Shelly
"I hope my articles can help solve your technical problems. If you are interested in other articles, you can check the articles at the bottom of this page. Similarly, you can also check my Twitter to get additional help."…Read full bio
Page Table of Contents
0 Views |
0 min read
Can You Record Shows on YouTube TV?
Yes, YouTube TV allows users to record both upcoming programs and live broadcasts. Recordings are stored in the cloud, but there are some limitations: access requires a subscription, recorded content may expire after a certain period, and files cannot be exported or managed outside the YouTube TV library.
Next, let's look at the official YouTube TV recording guide and see how the system works in practice.
How to Record on YouTube TV with Built-in DVR(All Platforms)
YouTube TV provides a cloud DVR feature that lets users record shows, sports games, and live broadcasts. Recordings are automatically saved to your cloud library and can be accessed on multiple devices with the same account. The official DVR is easy to use, but it does require a subscription, recordings may expire after a certain period, and files cannot be exported or managed outside the YouTube TV platform.
How YouTube TV Recording Actually Works
Unlike traditional DVRs, YouTube TV DVR does not record a single episode or time slot. When you add a show, movie, or sports team to your Library, YouTube TV automatically records:
- All upcoming airings
- Reruns
- Live broadcasts
Key Features of YouTube TV DVR
|
Feature |
Description |
| Unlimited Storage | Your library can hold as many recordings as you want, whether you are saving YouTube TV shows, sports games, or live events. |
| 9-Month Storage |
Recordings are kept for 9 months from the original air date. |
| No Conflicts | You can capture multiple live broadcasts or shows simultaneously; there are no tuner conflicts. |
| Suitbale for |
|
1️⃣Steps to record live videos on YouTube TV
- Open the Live Guide on your TV, phone, or computer.
- Find the show that is currently airing or will air soon.
- Select the show to bring up its information card.
- Click the + Add to Library button. Once clicked, it will change to a checkmark and say "Added to Library."
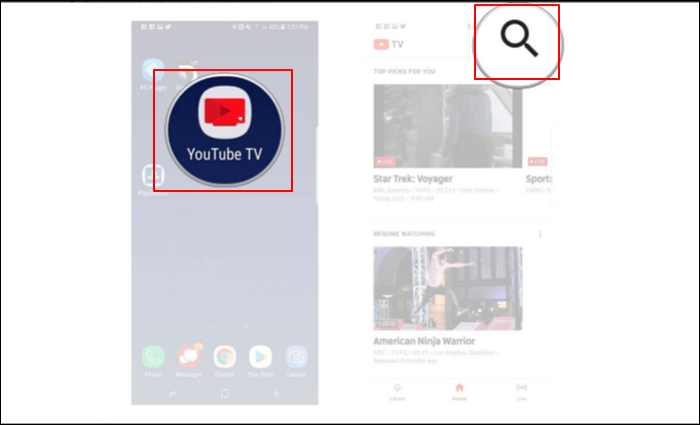
2️⃣Steps to Record Future Shows with YouTube TV
- Use the Search magnifying glass icon at the top of the app.
- Type the name of the show, movie, league, or team you want to record.
- Select the correct result from the list.
- On its details page, click the + Add to Library button.
🚩Check an intuitive video tutorial below!
- 0:25 - Intro
- 0:26 - Record a show
- 1:38 - Access the recorded show
Share this post to help more people screen record YouTube TV!
🔶YouTube TV lets you record programs and live events easily, but what if you want to keep recordings indefinitely, export them to other devices, or capture content that isn't supported by the official DVR? That's where an alternative recording solution comes in.
Record YouTube TV on Computer(Browser)
While YouTube TV's official DVR provides a convenient way to record things, it comes with several limitations: recordings expire after 9 months, a subscription is required, and content cannot be exported or edited outside the platform. EaseUS RecExperts offers a flexible and comprehensive solution to overcome these restrictions. With it, you can keep recordings permanently or watch them offline.
With this YouTube TV recorder, users can record YouTube live streams, live events, or sports games, whether it is currently airing or scheduled in the future. Recordings are saved locally on your device, giving you full control over storage, organization, and playback. This makes it ideal for users who want to save YouTube TV shows permanently, capture live games without limitation, or create a personal library of favorite content.
Steps on How to record with YouTube TV on Windows and Mac:
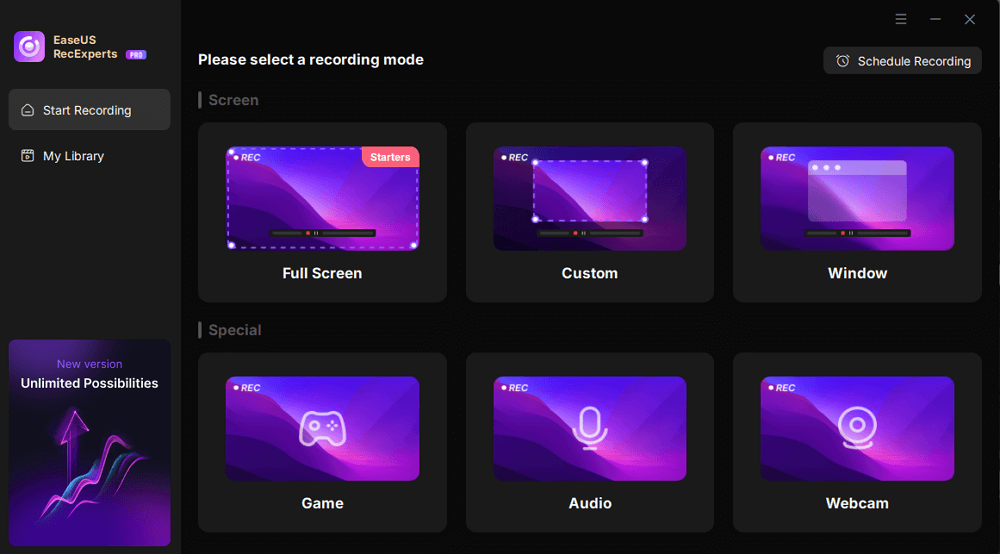
Step 1. Launch EaseUS RecExperts. Choose a recording mode such as Full Screen, Custom, or Window. For a smoother recording experience, we recommend selecting Full Screen, especially when capturing streaming videos, webinars, or content from platforms like YouTube, Netflix, or Zoom.
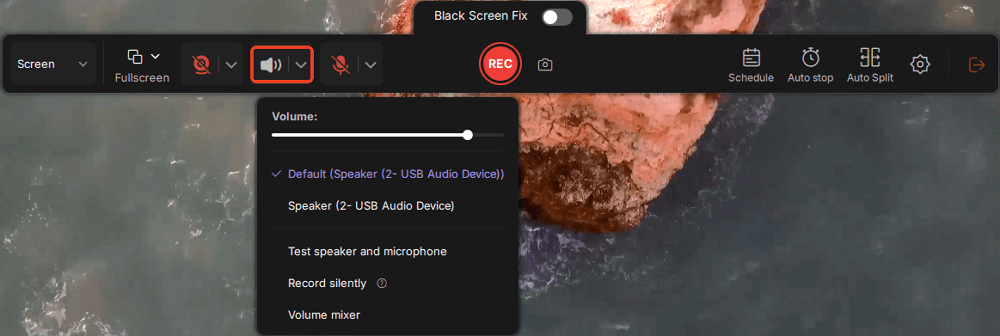
Step 2. Most videos include audio, so make sure to enable the system sound. Click the Speaker icon to turn on system audio, and use the small arrow beside it to select your preferred playback device. If you want to record without background distractions, enable the Record silently option - this will mute system output during recording, but still capture the internal audio of the video.
Step 3. Once everything is set, press the red REC button to begin recording. During the process, click the white Pause button if you need to take a break, or the red Stop button to finish and save your recording.
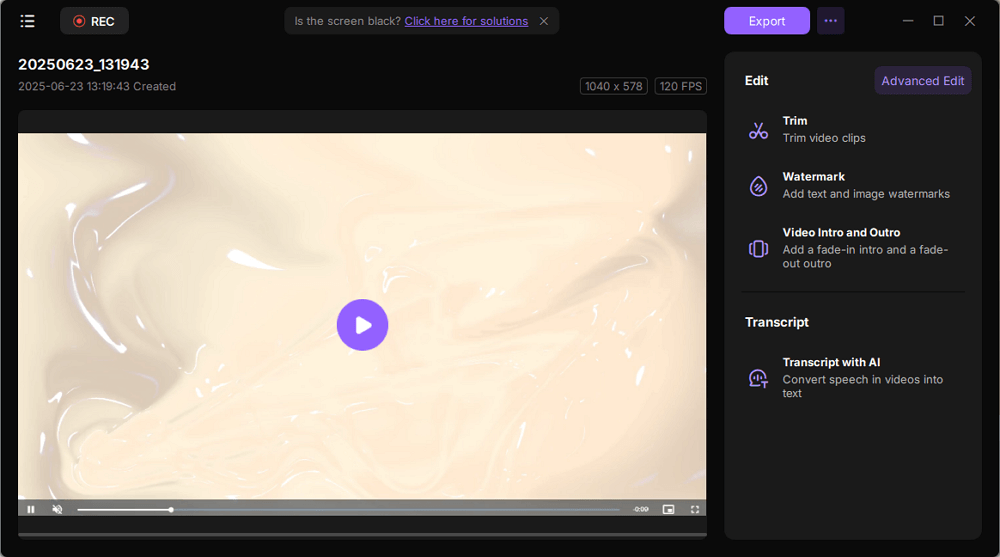
Step 4. After recording, you'll be taken to the preview window, where you can watch, split, delete, and organize your recordings. This is especially helpful when you're capturing long-form online meetings, streamed movies, or video tutorials, as it allows you to quickly edit and manage key moments.
You need this third-party software when YouTube TV's DVR is not enough:
- 1. Want to keep YouTube TV recordings permanently without expiration
- 2. Need to save recordings locally for personal archiving
- 3. Prefer offline playback on your own devices
- 4. Want more control over video quality, audio sources, or file formats
- 5. Record live sports, events, or shows and need reliable local backups
- 6. Create personal highlights or clips for private use
Share this post to help more people screen record YouTube TV!
How to Screen Record YouTube TV on iPhone/Android
Can you screen record YouTube TV on iPhone or Android? The answer is YES! YouTube TV already includes a built-in cloud DVR, which is the recommended and official way to save shows and live events on iPhone and Android for later viewing. By adding a program to your Library, all upcoming airings will be recorded automatically and synced across your devices.
Saving Clips to Your Phone Using Screen Recording (Optional)
If you want to save short clips or specific moments directly to your phone, you can try using the built-in screen recording feature on iOS or Android.
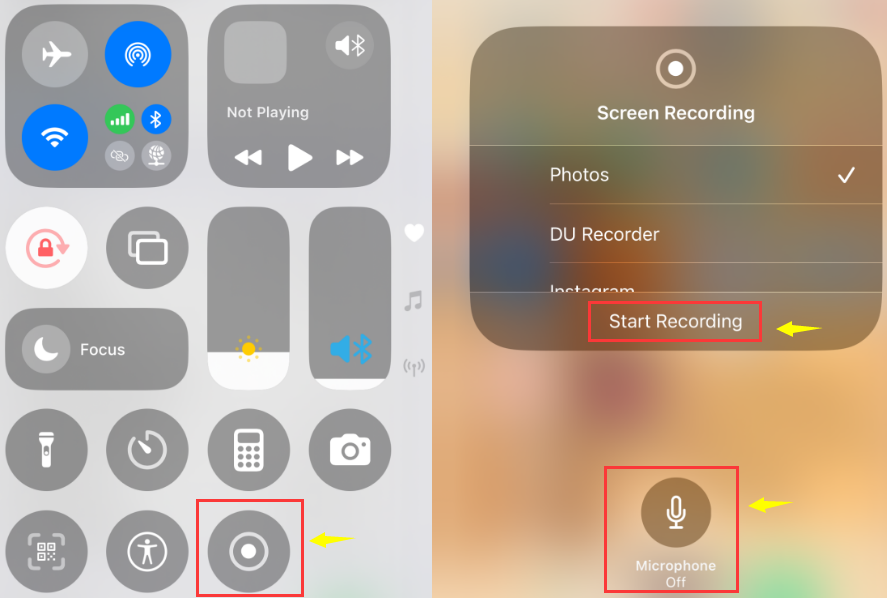
However, this method has important limitations like:
- DRM protected content cannot be recorded and may result in a black screen;
- Full episodes usually cannot be captured successfully
Because of these restrictions, mobile screen recording is not reliable for most YouTube TV content. If you want to save content locally for personal use, recording on a desktop or laptop is generally a better option.
How to Watch Recorded Shows on YouTube TV
After recording, the shows will be saved in the Library. One thing to know is that YouTube TV only keeps your recordings for 9 months. You need to watch it within the time limit. If you don't know how to find and play your recorded shows on YouTube TV, follow the steps below now!
Step 1. Go to the YouTube TV and sign in with your account.
Step 2. Click on the "Library" tab at the top of the screen. You will see all your recordings here.
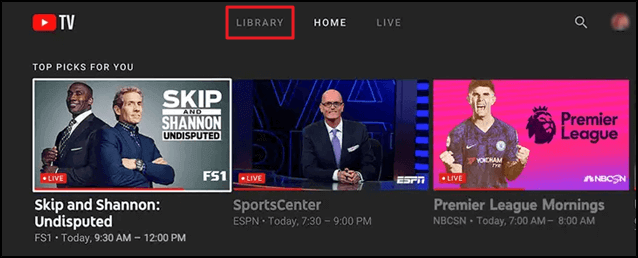
Step 3. Select a recorded show and click the "Play" button to start watching it.
Share this post to help more people screen record YouTube TV!
Conclusion
In a word, you can screen record on YouTube TV in two ways. The first is to use the built-in recorder within the YouTube TV show, and the other one is to use some screen recorders for TV shows you like. EaseUS RecExperts is a nice tool with fantastic features for Windows and Mac users. Click the button to download it now.
🚩Here is a quick comparison of the methods covered herein:
|
Feature |
EaseUS RecExperts |
YouTube TV DVR |
|
Platform |
Windows, macOS |
Cloud-based (YouTube TV app/browser) |
|
Skip Ads |
Yes |
No |
|
Offline Viewing |
Yes |
No |
|
Recording Expiry |
Never expires |
Expires after 9 months |
|
Audio Quality Control |
High quality with mic/system audio |
Depends on the stream quality |
|
Advanced Features |
Scheduled recording, auto-stop, annotation, webcam overlay |
Auto-record all new episodes |
|
Best For |
Users who want complete control over video/audio |
Casual users who wish to auto-record |
|
Cost |
Free&Paid |
Included in YouTube TV subscription |
Share this post to help more people screen record YouTube TV!
FAQs About How to Record on YouTube TV
Follow this part if you want to know more information on YouTube TV recordings.
1. Can you record TV shows on YouTube TV?
Can you screen-record YouTube TV? The answer is Yes. However, only YouTube TV shows without DVR settings can be recorded. YouTube videos with DVR protection can not be recorded because of limitations.
2. How does YouTube TV DVR work?
When recording programs on YouTube TV, all shows you selected will be automatically added to the DVR media library. YouTube TV DVR provides unlimited storage space. Therefore, you can capture TV shows easily.
3. Can You Record on YouTube TV Free Trial?
Yes, if you use the YouTube TV Free Trial version, you can record as many programs as you want. The unlimited DVR has no storage space limit. After recording, you can enjoy the programs or TV shows when you have free time.
4. How far in advance can you record on YouTube TV?
You can add shows or events to your Library as soon as they're listed in the YouTube TV schedule, which is usually up to two weeks in advance. Once added, all upcoming airings will be automatically recorded.
5. How to add to library on YouTube TV?
- Open YouTube TV and sign in.
- Search for the show, movie, or event you want to record.
- Click the + icon or Add to Library button next to the title.
- This will automatically record all upcoming airings to your Library.
6. Does YouTube TV prevent screen recording?
YouTube TV doesn't explicitly block screen recording, but it may show a black screen when using some screen recorders due to DRM (Digital Rights Management) protection.
7. Can You Record a Show Already in Progress on YouTube TV?
Yes. YouTube TV will let you "record" a live program that is already on the air, but the key detail is that the capture starts the instant you press Add (or the + button).
- Anything that aired before you tapped the button is not saved; you get only the portion from that moment to the end of the broadcast.
- If the same episode is re-aired later, YouTube TV automatically replaces your partial recording with the full episode so you can eventually watch it from the beginning.
EaseUS RecExperts

One-click to capture anything on screen!
No Time Limit, No watermark
Start Recording
