- About
- Discover EaseUS
- Reviews & Awards
- License Agreement
- Privacy Policy
- Student Discount
Ⅰ. What Video Can You Record on Mac
When it comes to recording videos on Mac, it can always be divided into 2 main groups, including capturing Mac screen activities as well as recording videos from a webcam on Mac. And that depends on your needs and preferences. In the following, we will discuss them in detail.
🧜Record Webcam Video on Mac
Many Mac users are content creators and want to record themselves for vlogs, tutorials, or other types of videos. Recording webcam video on Mac allows for a simple and convenient way to capture their performances or presentations.
Besides, you can choose to record yourself on Mac to create a video resume, video message, or capture special moments for later reminiscing and sharing with loved ones.
😎 Capture Screen Activity Video on Mac
The other one is to record videos of your Mac screen, including recording some movies, video conference calls, gameplay highlights, etc. For instance, you can record YouTube video on Mac so that you can enjoy them offline. Similarly, you can even record videos from streaming services like Netflix, Amazon Prime, HBO Max, and more on your Mac. To conclude, you can capture almost any video on your Mac.
Ⅱ. How to Record Video on Mac - 7 Ways
In this part, we give you some inbuilt and third-party tools that can record videos on your Mac. With these tools and methods, you can record video on a Mac desktop, webcam videos, and even screen videos. All in all, these methods meet almost all your requirements swiftly and steadily.
| 🛠️Method | 👍Effectiveness | 🙉Difficult Level |
| EaseUS RecExperts | High - Record both screen and webcam video with a customized background; no time limit for any recording; | Very Easy |
| Photo Booth | Medium - Only capture camera horizontal video on Mac in average quality; | Easy |
| iMovie | Medium - Only record built-in webcam video on Mac; | Easy |
| QuickTime Player | Medium - Support capturing screen and camera videos on Mac with only your microphone sound; | Moderate |
| Camtasia | High - Allow recording of various videos on Mac, but it's a little expensive; | Moderate |
| Screencast-O-Matic | High - Support recording webcam and screen activities and editing recordings; high price; | Difficult |
| Screenflow | Medium - Support common video recording activities on Mac | Moderate |
| OBS Studio | High - Support free high-quality video recording on Mac; | Difficult |
1️⃣EaseUS RecExperts
Whether you are going to record video of your screen on Mac or capture the camera video, you can always rely on an all-in-one video recorder, EaseUS RecExperts.
This software is easy to operate and runs perfectly on your macOS devices. As for capturing camera video on Mac, this tool enables you to adjust the recording parameters, including resolution, position, etc. If needed, you can even choose to record video on Mac with a background, as it provides a green screen effect to customize your background!
Apart from that, you can also use it to capture any videos from your Mac screen, such as streaming videos, encrypted videos, TV shows, gameplay highlights, and so on. To conclude, the EaseUS screen recorder will help you deal with any video recording task.
how to record video of your Mac screen activity:
Step 1. Download and launch EaseUS RecExperts on your Mac. To capture the whole screen, click on the "Full Screen" button from the main interface. If you want to customize the recording area, choose the "Region" button.
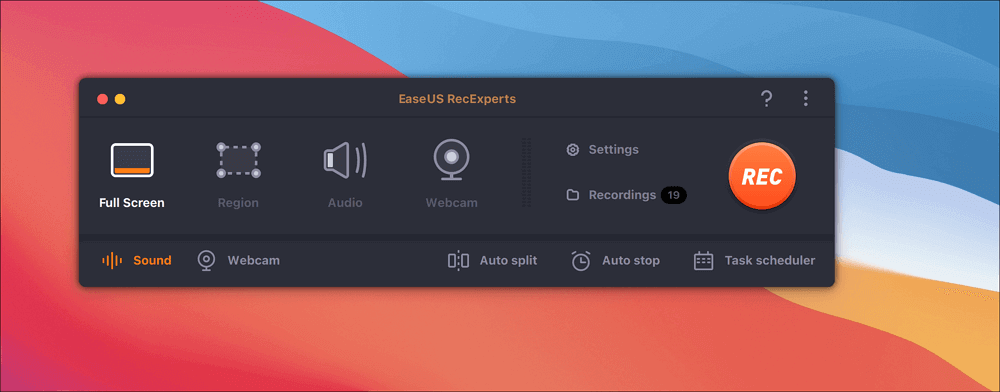
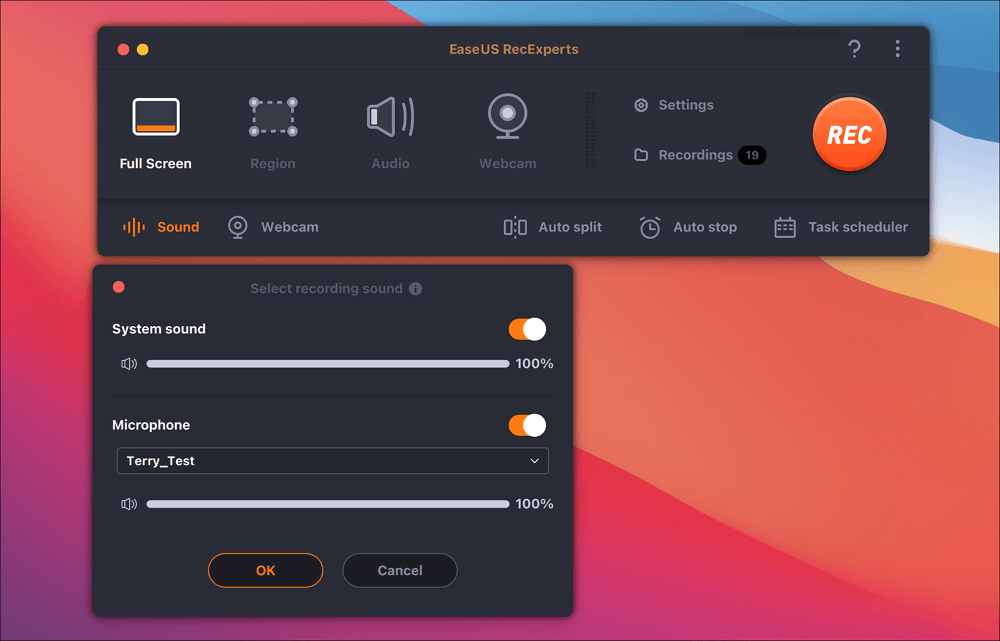
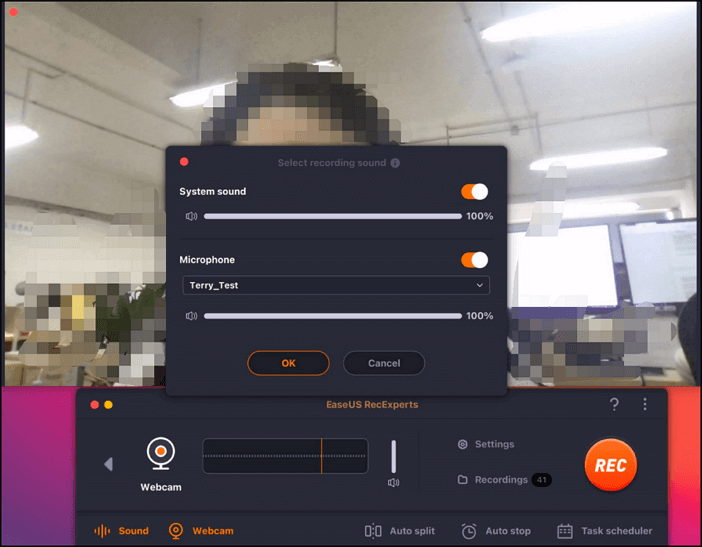
Step 2. To record the screen with audio, hit the Sound icon from the bottom left side of the toolbar. The audio resources can be your external sound or system audio. Based on your needs, enable the target option.
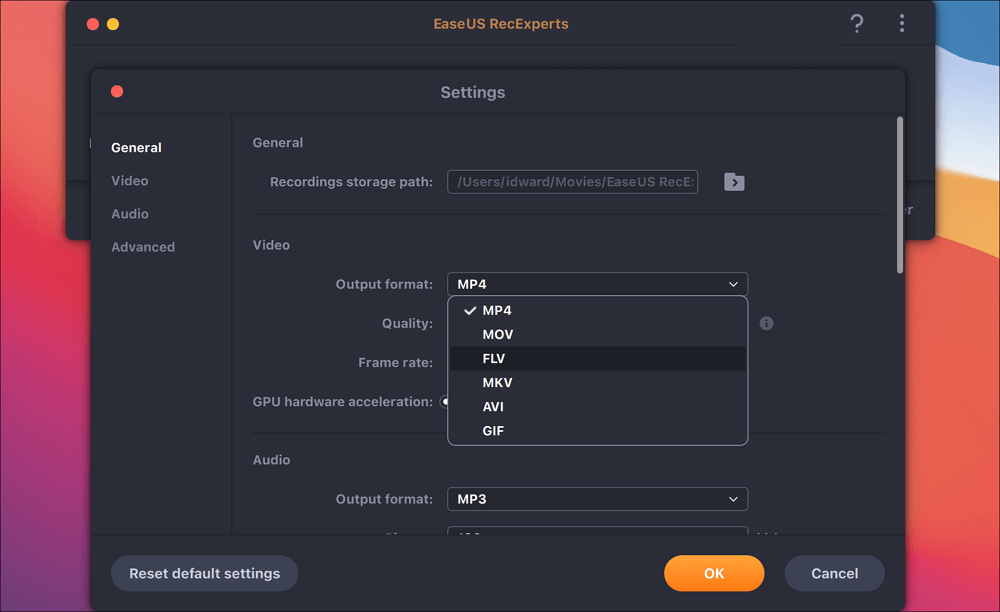
Step 3. Before capturing, you can change the output format of the recorded video by clicking "Settings" from the main interface. Then, scroll down the menu of Output format for Video. Choose the output type as you like.
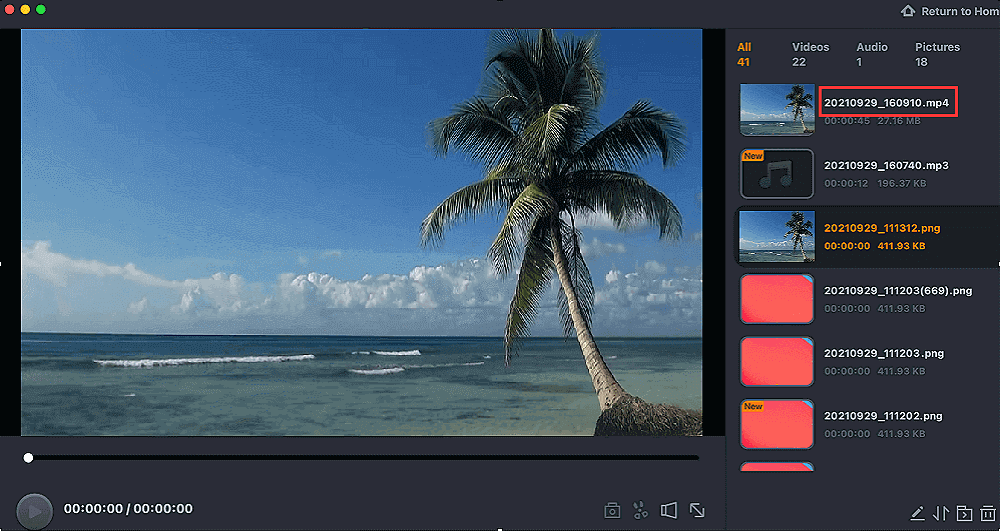
Step 4. Once done, click the REC button to begin recording. It captures anything displayed on your Mac screen. When you are done, click the Stop button. Then you can watch the recorded video from "Recordings".
How to capture webcam video on Mac:
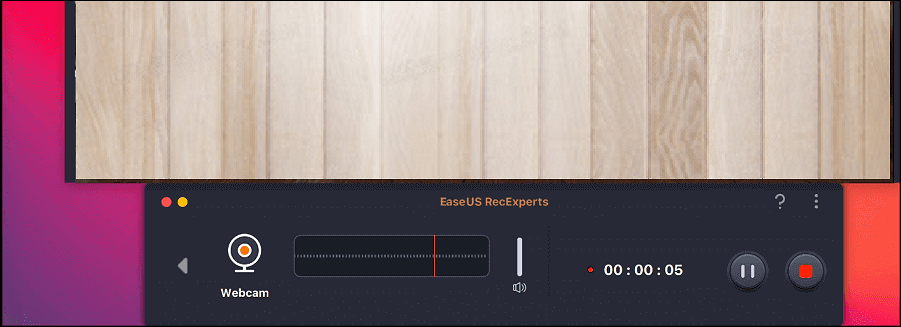
Step 1. Open EaseUS RecExperts, and choose the "Webcam" button on the main interface.

Step 2. Then the inbuilt camera will open automatically, and you can see the recording window on the desktop. If you want to record the webcam with audio, click on the "Sound" icon at the bottom left to select the audio source.
Step 3. Click "REC" to start your webcam recording, and you can choose to pause, resume, or end the recording by clicking the two buttons on the left side. At last, the recording will be saved on your Mac.
Share this post on social sites to help more users learn how to record videos on Mac!
2️⃣Photo Booth
- 🛠️ What to Prepare:
- Make sure you are in a quite environment
- Your camera is working
Photo Booth is a great choice to record a video of yourself on Mac. All Macs come with Photo Booth pre-installed, which allows you to take photos and videos using your webcam.
This freeware offers various effects that will enrich your video recordings with a few simple clicks. Besides, you also can use it to take picture with webcam for later sharing.
However, Photo Booth's live preview and take photos are reversed horizontally to make the user feel like looking into a mirror. Still, it's nice to know that you have the option.
Step 1. Find and open Photo Booth on your Mac.
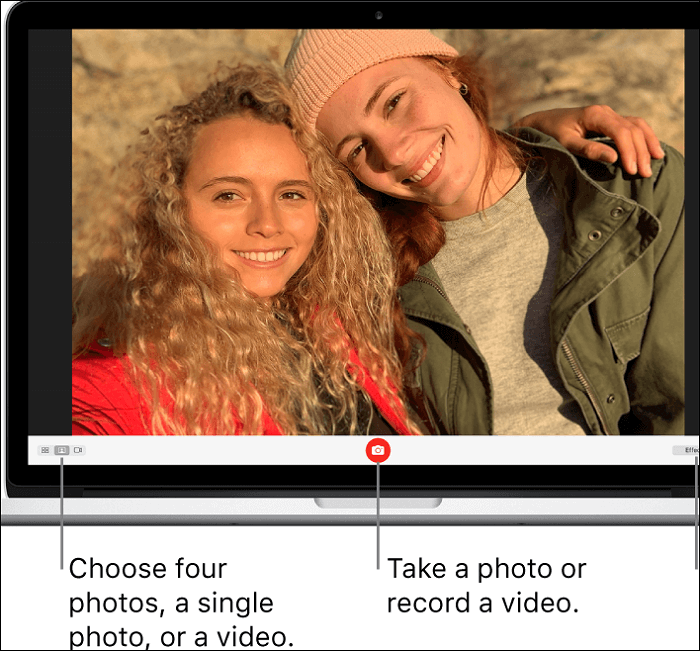
Step 2. Once it is open, you can see a preview of what your camera sees.
Step 3. Then, click the video icon in the bottom-left corner to switch to the Video mode. Ensure you are entirely in the frame and everything looks good before recording. If not, you can adjust the position or something else.
Step 4. When ready, click the red recording button to start recording yourself on Mac.
3️⃣iMovie
- 🛠️ What to Prepare:
- iMovie on your Mac
- A Mac computer running macOS 12.6 or later
- The content you want to record
iMovie is a video editing software that can be used on iOS and macOS devices. Users can make their videos look like movies with the editing feature iMovie offers. In this way, special memories, moments, and sceneries with families and friends can be saved.
But some people may not know that iMovie is also a video recorder. How does it work? In fact, It records a video using a FaceTime HD camera built into your Mac. So, you can see the biggest advantage of using this tool is that you don't need to download or install anything to start recording. But a coin has two ends. You can't record an external camera with iMovie.
How to record video on Mac with iMovie:
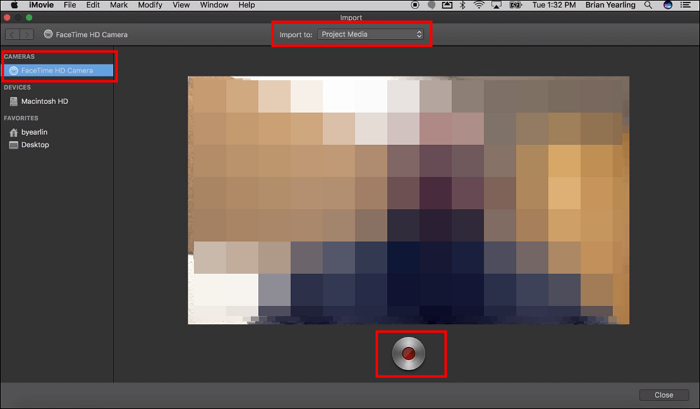
Step 1. Launch the iMovie app on your Mac and click to open the Import button in the toolbar.
Step 2. Select the built-in camera in the Cameras section. A live video image will appear.
Step 3. Then you need to select the event you want to record. Do one of the following:
- Choose an existing event: Click Import to to choose the event.
- Create a new event: Click Import to > New Event > type a name for the new event > click OK.
- Choose the open project: Click Import to and choose Project Media.
Step 4. Click the Record button to start recording from the selected camera. To stop recording, click the Record button again. Click the Close button to return to the iMovie main window.
LEARN MORE
As mentioned before, iMovie records video from the inbuilt camera. What if the inbuilt camera doesn't work? Well, in this case, you will need to record from an external camera. Check how you can record video on Mac with external cameras.
4️⃣QuickTime Player
- 🛠️ What to Prepare:
- QuickTime X or higher on your Mac
- A Mac running on macOS X Yosemite (10.10) or later
- Soundflower extension (selective)
QuickTime Player is another inbuilt tool that can be used to record a video on your Mac. Known as a media player, it provides useful video-playing functions. But in fact, it is also capable of recording the screen and external audio as a tutorial or course. And it can even record streaming video on Mac for later viewing.
However, it can't record the internal/system audio along with the screen. This is undoubtedly not good for those who want to record a movie on the screen. If you need to capture the internal audio, you will need an extension called Soundflower.
How to record video on Mac with QuickTime Player:
Step 1. Launch QuickTime Player and navigate to File > New Screen Recording.
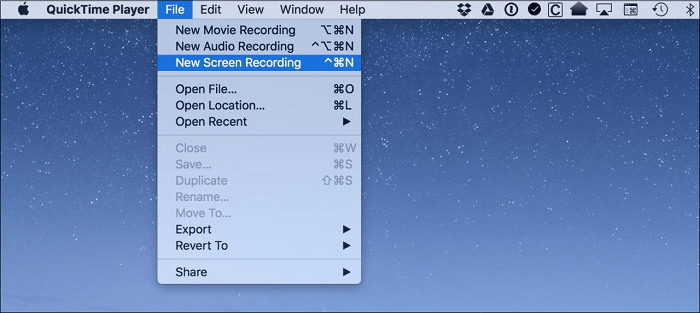
Step 2. A screen-capturing window will appear. You can selectively set more options from the arrow-down menu.
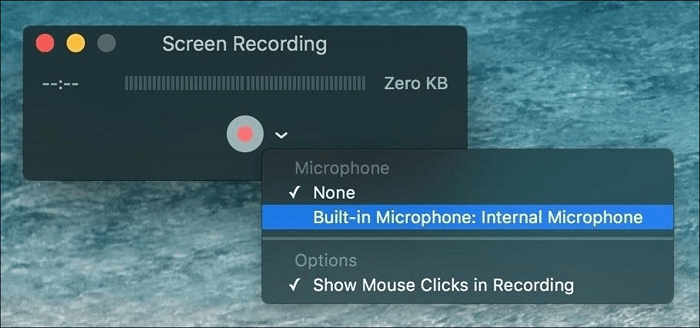
Step 3. Click the red Record button on QuickTime to start capturing. Once you want to stop, click the Stop button or press the Command-Control-Esc keyboard combination.
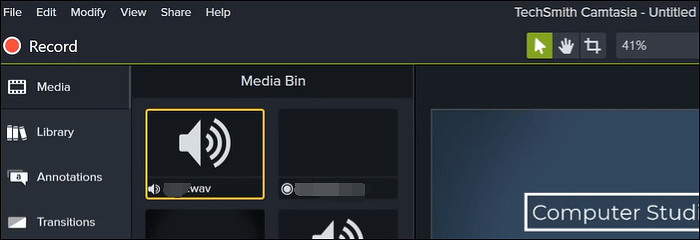
5️⃣Camtasia
- 🛠️ What to Prepare:
- Make sure your Mac is running macOS 11.0 or later
- An webcam device (if you want to record video from your webcam)
Another best Mac screen recorder, Camtasia, can also help create video clips on your Mac hassle-free. With its user-friendly interface and extensive features, this tool makes the process of recording high-quality videos effortless and efficient.
A standout feature is its advanced screen video recording capabilities. Whether you want to create tutorials, demos, or presentations, this software enables you effortlessly record anything that appears on your Mac screen.
Additionally, it offers a seamless webcam video recording feature that allows users to incorporate their webcam footage into their videos. With Camtasia, you can effortlessly switch between screen video recording and webcam video recording on your iMac, MacBook, etc.
Step 1. Download and install this software on your Mac computer.
Step 2. Click Record the screen in the top left corner, and next, you can choose to capture the recording region you want to capture.
Step 3. Turn on the webcam option if you want to record screen video with a webcam.
Step 4. Once done, click the Record button to start your recording. To end it, just press Option + Command + 2 on your keyboard.
6️⃣Screencast-O-Matic
Screencast-O-Matic, now called ScreenPal, also performs perfectly when you want to record video on Mac with audio.
It offers many features ranging from screen recording, video editing, video hosting, and sharing. You can use this free Mac video recorder to capture full screen, window, region, webcam, microphone, and computer sound flexibly according to your needs. All in all, this software is suitable for those who want to record and edit on Mac at once!
Step 1. Download and install this Mac video capture software on your device.

Step 2. Launch this tool, and you will see Screecast-O-Matic on your screen.
- To capture the screen activity, you can choose the Screen option.
- To make a video from a webcam only, you can select the Webcam option.
- To capture the screen and webcam at the same time, you can click Both.
Step 3. When you are ready, click the Rec button at the top-left corner to start recording.
7️⃣ScreenFlow
- 🛠️ What to Prepare:
- ScreenFlow Installed on your Mac
- A Mac computer running macOS Ventura/Monterey/Big Sur/Catalina
- The content you want to record
After learning the methods to record a video on Mac with inbuilt tools, let's look at a third-party tool - ScreenFlow. This is a screen recording program that can be used on the latest macOS version. With this tool, you can capture anything you want as a video.
It is a nice tool when you want to play a movie or sports game and record them as a video to be kept forever. You can also share the recording taken by this tool to YouTube and other platforms. Of course, you need to download and install it before using it, which is complained about by some Mac users.
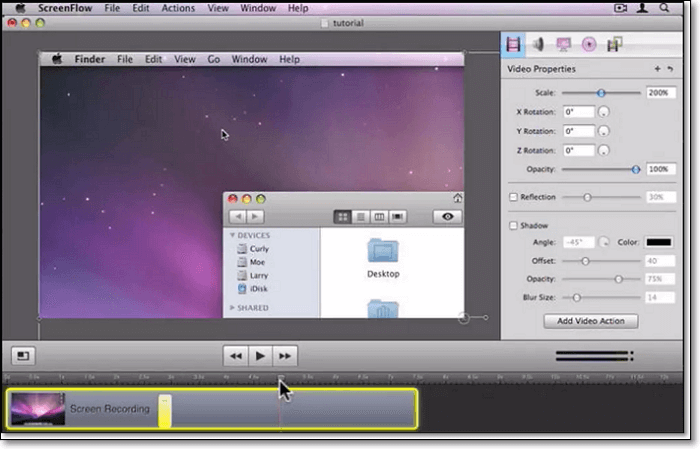
How to record video on Mac with ScreenFlow:
Step 1. Download and install ScreenFlow. Launch it and click New Recording on the left menu.
Step 2. On the following screen, pick the monitor you want to record on. And press the red Record button to begin recording.
Step 3. Click the Stop Recording button or press the shift + command +2 keys to finish.
8️⃣OBS Studio
- 🛠️ What to Prepare:
- OBS Studio Installed on your Mac
- A Mac computer running macOS 11 or later
- The content you want to record
OBS Studio is almost the most popular open source screen recorder for Mac and Windows devices. Users can use it to record videos of high quality. Games, streaming videos, and video calls can all be captured. Many people like it because it is completely free to use and powerful in functions.
Although professionals like it very much, novices may have different sounds. Some novices said this program is hard to figure out. And the multiple-screen recording function opens many windows at the same time. They feel confused about it.
How to record video on Mac with OBS Studio:
Step 1. Download and launch OBS Studio on your Mac. Click Settings in the Control box. And adjust the audio and video settings for your recording.
Step 2. Click the + icon under the Sources and choose Display Capture to create a new display. After that, click OK to proceed.
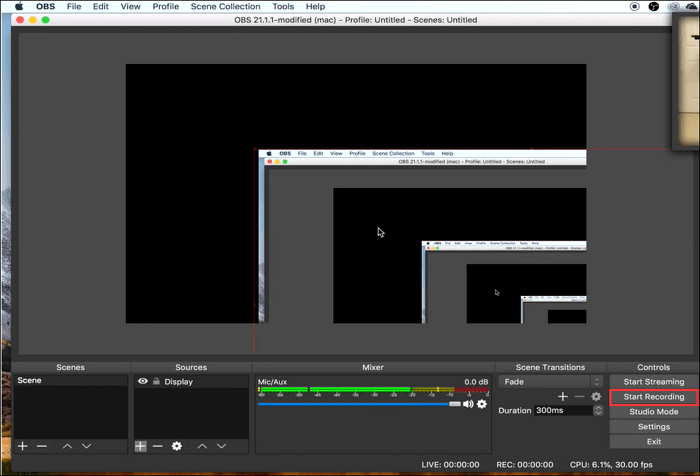
Step 3. Clicking Start Recording to start recording a video on your Mac. Then, click Stop Recording to finish.
LEARN MORE
This part showed you how to record normal videos with OBS Studio on Mac. You may also be interested in how to record vertical video on Mac.
Ⅲ. What's the Best Way to Record Video on Mac
As you can see, there are many great Mac video recorders that help you capture video on your macOS computer effortlessly. However, their performance, target audiences, and advantages are different. So, to help you choose the one that suits your need best, you can check the below comparison table:
| Method | Ease of use | Screen Activity | Camera | Customize Background | No Time Limit | 4K Quality |
| EaseUS RecExperts | ✅ | ✅ | ✅ | ✅ | ✅ | ✅ |
| Photo Booth | ✅ | ❌ | ✅ | ❌ | ❌ | ❌ |
| iMovie | ✅ | ❌ | ✅ | ❌ | ❌ | ❌ |
| QuickTime Player | ✅ | ✅ | ✅ | ❌ | ❌ | ❌ |
| Camtasia | ✅ | ✅ | ✅ | ❌ | ❌ | ✅ |
| Screencast-O-Matic | ✅ | ✅ | ✅ | ❌ | ❌ | ✅ |
| Screenflow | ✅ | ✅ | ✅ | ❌ | ❌ | ✅ |
| OBS Studio | ❌ | ✅ | ✅ | ❌ | ✅ | ❌ |
According to the comparison information, it's clear that EaseUS RecExperts is the best option for capturing both screen and webcam video on your Mac, undoubtedly.
This professional Mac video capture software offers no time limit and no watermark recording features and enables you to record video up to 4K quality. Most importantly, it is easy to operate for any level of user, even a 5-year-old child. Just hit the below button to get it now!
Ⅳ. Great Tips for Recording High-Quality Video on Mac
This part shows you some tips for recording a high-quality video on your Mac, especially when you need to record from the camera.
#1. Open the Camera on Mac
To open the camera on your Mac, you need to go to the Finder app > click Go and then Applications in the menu bar > double click on FaceTime or Photo Booth.
#2. Check How You Look on Camera
To make sure there are no unnecessary things captured in your video, it's better to preview the camera image before the recording is started. It's better if the webcam captures your voice so you can record a reaction video or a tutorial.
#3. Adjust the Light
You need to let enough light into the room as well as make sure your camera is not facing any strong light source (like a window).
#4. Adjust the Camera Settings
Make sure the camera settings are adjusted to the device you use. This will vary a little based on the device you use. Just try to find the most appropriate settings for your camera.
#5. Organize the Space Behind You
If you can't use a virtual background, organize the space behind you to make sure there's no distraction. This will help you look more professional and efficient.
#6. Choose a Good Camera
Although Mac has an inbuilt camera, a good external webcam will make you look more professional on Zoom, YouTube, and Twitch, etc. If you don't know how to choose one, there's a list:
- 1. Razer Kiyo Pro
- 2. Logitech Streamcam
- 3. Elgato Facecam
- 4. Logitech Brio Ultra HD Pro
- 5. Obsbot Meet 4K
- 6. Logitech C922 Pro
- 7. Razer Kiyo
- 8. eMeet c960
- 9. Logitech C270 HD Webcam
- 10. Logitech ConferenceCam Connect
Ⅴ. How to Record Video on Mac FAQs
Check some frequently asked questions related to this topic.
1. Does my Mac have a video camera?
Yes, many Mac computers have a built-in FaceTime or FaceTime HD camera installed. And it automatically turns on when you open FaceTime or Photo Booth. This is because the system thinks you are about to use a camera.
2. Does Mac have a built-in video recorder?
Yes, and in fact, there are two. QuickTime Player and iMovie can both be used as video recorders on a Mac computer. One thing to note is that QuickTime Player will not capture internal audio by itself. You will need Soundflower to let it record the system audio along with the screen.
3. How do I record video and audio on my Mac?
You can use iMovie to record video and audio on your Mac by following the steps below:
Step 1. Click the Import button in the iMovie toolbar.
Step 2. Select the built-in camera in the Cameras section.
Step 3. Click Import to to choose the event to choose an existing event for recording.
Step 4. Click the Record button to start recording from the selected camera. Click it again to stop recording.
4. Can I record myself and my screen on Mac?
Yes, you can. You can use a third-party program like EaseUS RecExperts to do so. Check the steps:
Step 1. Launch EaseUS RecExperts on your Mac. Choose to record Full Screen or Region.
Step 2. Click on the Webcam button to activate the webcam.
Step 3. To capture the screen with audio, tick the Sound button next to Webcam.
Step 4. Click the red Record button to start recording. Hit the Stop button to finish.
Was This Page Helpful?
Jane is an experienced editor for EaseUS focused on tech blog writing. Familiar with all kinds of video editing and screen recording software on the market, she specializes in composing posts about recording and editing videos. All the topics she chooses
Written by Melissa Lee
Alin is an experienced technical blog writing editor. She knows the information about screen recording software on the market, and is also familiar with data cloning and data backup software. She is expert in writing posts about these products, aiming at providing users with effective solutions.
Related Articles
-
How to Record Zoom Meeting on Mac [2024 Comprehensive Guide]
![author icon]() Jane Zhou/May 27, 2024
Jane Zhou/May 27, 2024 -
How to Record the Screen with Audio on Your iPhone
![author icon]() Melissa Lee/Jul 02, 2024
Melissa Lee/Jul 02, 2024 -
10 Best Web-based Online Screen Recorders [2024 Updated List]
![author icon]() Rel/Apr 19, 2024
Rel/Apr 19, 2024 -
How to Record Presentation on Google Slides Easily (4 Ways)
![author icon]() Jane Zhou/May 23, 2024
Jane Zhou/May 23, 2024