-
![]()
Daisy
Daisy is the Senior editor of the writing team for EaseUS. She has been working in EaseUS for over ten years, starting from a technical writer to a team leader of the content group. As a professional author for over 10 years, she writes a lot to help people overcome their tech troubles.…Read full bio -
Jane is an experienced editor for EaseUS focused on tech blog writing. Familiar with all kinds of video editing and screen recording software on the market, she specializes in composing posts about recording and editing videos. All the topics she chooses …Read full bio
-
![]()
Alin
Alin is an experienced technical blog writing editor. She knows the information about screen recording software on the market, and is also familiar with data cloning and data backup software. She is expert in writing posts about these products, aiming at providing users with effective solutions.…Read full bio -
Jean is recognized as one of the most professional writers in EaseUS. She has kept improving her writing skills over the past 10 years and helped millions of her readers solve their tech problems on PC, Mac, and iOS devices.…Read full bio
-
![]()
Jerry
Jerry is a fan of science and technology, aiming to make readers' tech life easy and enjoyable. He loves exploring new technologies and writing technical how-to tips. All the topics he chooses aim to offer users more instructive information.…Read full bio -
![]()
Rel
Rel has always maintained a strong curiosity about the computer field and is committed to the research of the most efficient and practical computer problem solutions.…Read full bio -
![]()
Gemma
Gemma is member of EaseUS team and has been committed to creating valuable content in fields about file recovery, partition management, and data backup etc. for many years. She loves to help users solve various types of computer related issues.…Read full bio -
![]()
Shelly
"I hope my articles can help solve your technical problems. If you are interested in other articles, you can check the articles at the bottom of this page. Similarly, you can also check my Twitter to get additional help."…Read full bio
Page Table of Contents
Jane Zhou
Updated on Jun 09, 2026
0 Views |
0 min read
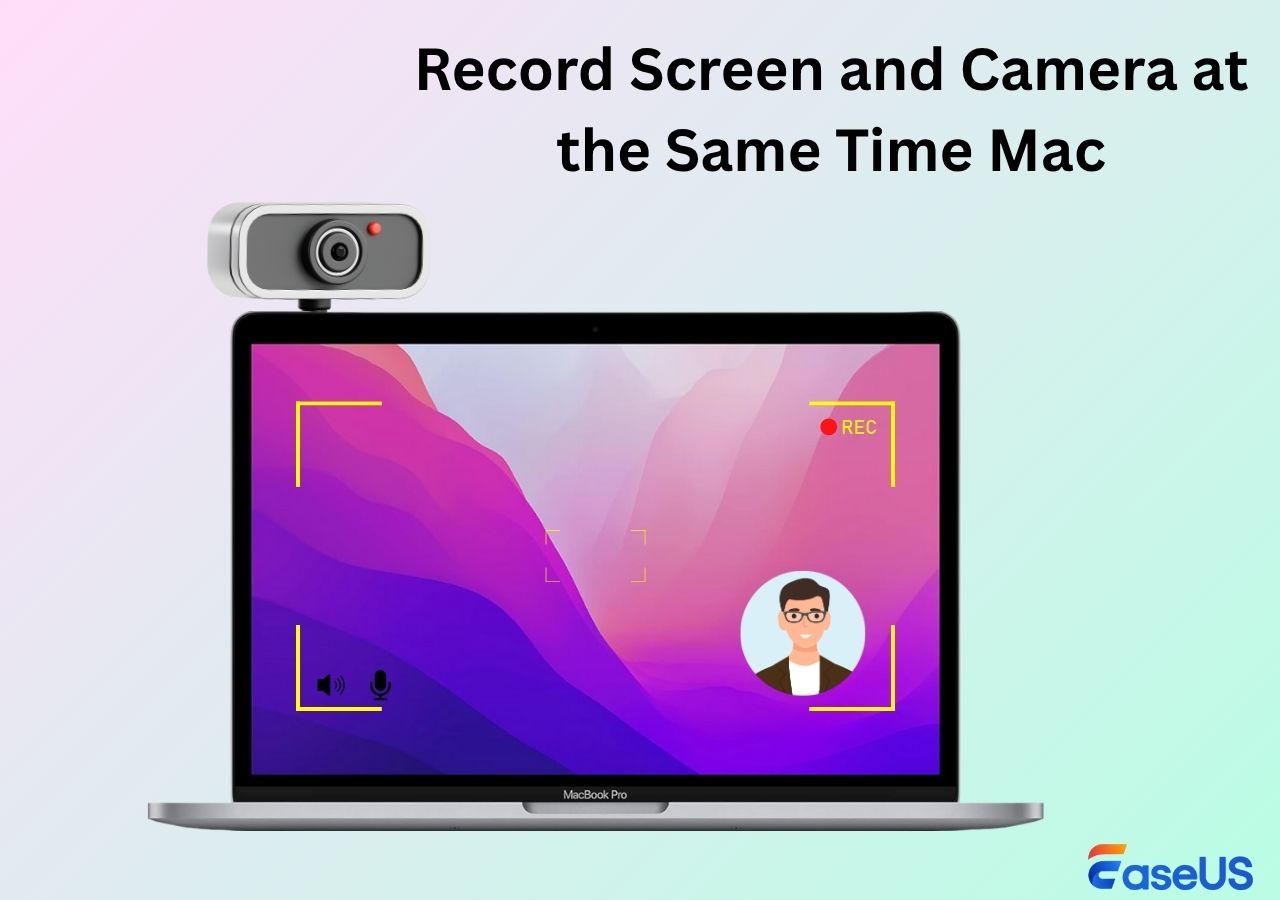
Want to record clear, professional videos on your Mac with external camera? Whether using a USB webcam, or iPhone, a webcam recorder can deliver higher image quality and more natural footage. This guide will walk you through how to record video on Mac with external camera, allowing you to easily shoot high-quality vlogs, tutorial videos, or live streams with no lag or stuttering, quickly elevating the professionalism of your work.
Record Video on Mac with External Camera using EaseUS RecExperts
- OS: macOS 10.13 or later
- Support: M1/M2/M3/M4 chipset
EaseUS RecExperts for Mac is a lightweight and reliable tool that easily sets your external webcam as the default input source. With this Mac camera app, you can record yourself on Mac with ease. It supports customizable settings, including resolution adjustment and AI background removal and replacement, for more professional video quality.
Download EaseUS Screen Recorder
Download EaseUS Screen Recorder
Trustpilot Rating 4.7
Whether for online teaching, video conferencing, content creation, interview recording, or live streaming, this Mac webcam app adapts flexibly to different scenarios, helping you easily record high-quality videos. You can freely select the audio source during the recording, which means you can record internal audio on Mac, microphone sound, or both.
EaseUS RecExperts
- Simple and easy-to-use interface
- Record webcam and screen simultaneously or separately
- Capture any area of your screen with simple clicks
- Schedule recording feature to capture facecam video automatically
- Extensive customization options
- Provide solutions about how to record Zoom meeting
Download EaseUS Screen Recorder
Download EaseUS Screen Recorder
Trustpilot Rating 4.7
How to use Mac External Camera to Record Videos:
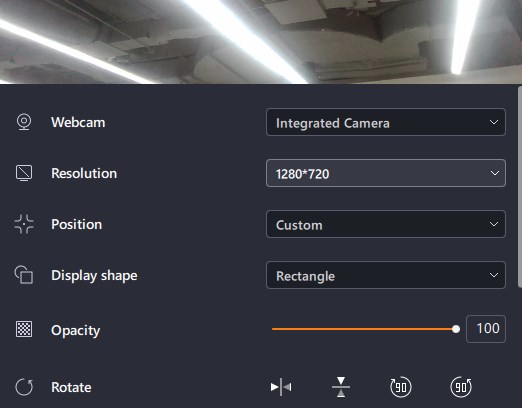
Step 1. Launch this webcam recorder, and select the little webcam icon by clicking the down-arrow button on the left panel.
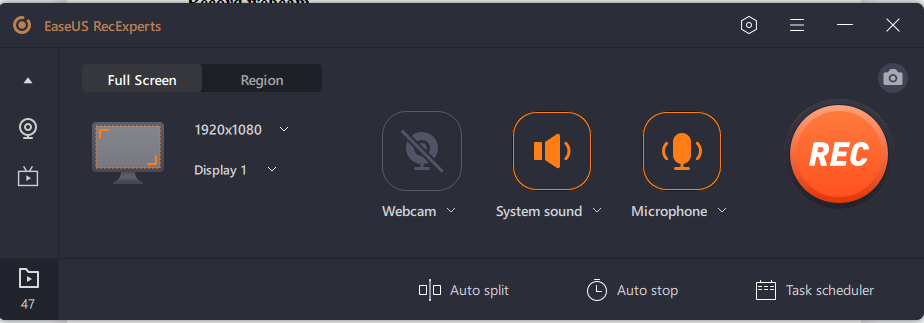
Step 2. If there is more than one camera device connected to your computer, you can freely choose your desired one. Besides, you can also select the audio source, adjust resolution and position, and even adjust the opacity if needed.
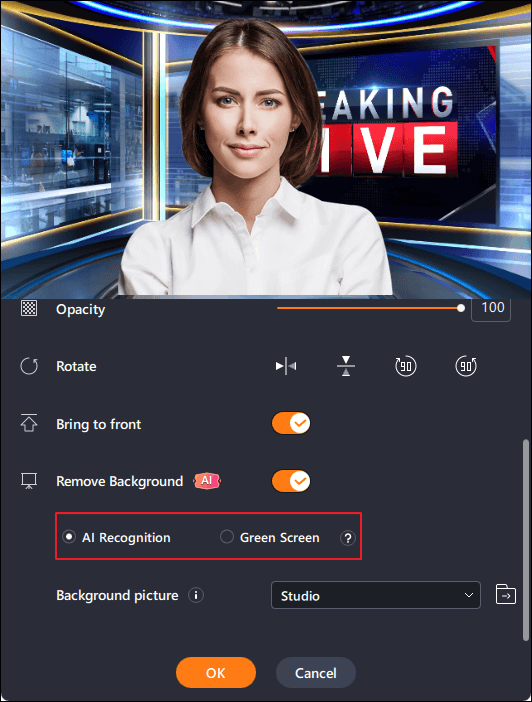
Step 3. Then enable the Remove Background, it will download the AI module.
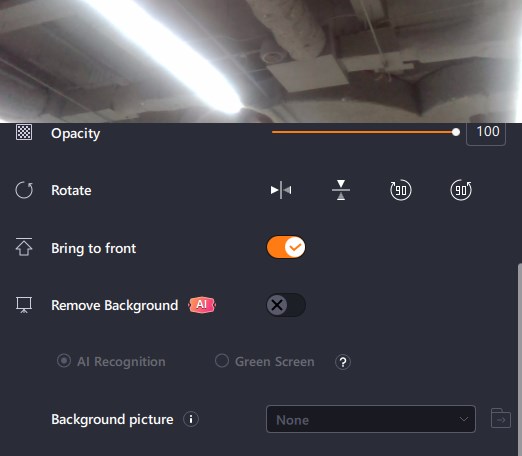
Step 4. After that, you can change the background picture by using some effects, like blur, scenery, studio, and classroom. Or you can upload a picture from your own device. It is recommended that you are in a solid color background, and the effect of AI recognition to remove the background will be better.
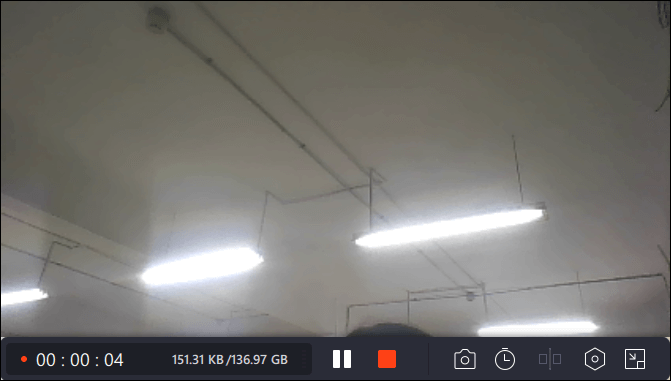
Step 5. You can click on the REC button when you are ready to start your webcam recording. During the process, you can choose to resize the recording window, take screenshots, pause or stop the recording flexibly. To end the recording, just click on the red square icon.
Step 6. Then, it will lead you to preview the recorded videos. Apart from that, you can enhance the recordings with some tools.
Share this post about facecam video capture on a Mac with more people.

Use iPhone as Webcam on Mac to Record Video
Compared to regular USB cameras, iPhone cameras offer higher image quality, more realistic skin tones, and more stable exposure. With Continuity Camera, your iPhone can directly function as a high-quality webcam, significantly enhancing image detail for meetings, lectures, or product photography.
Furthermore, the iPhone camera boasts a larger sensor, HDR, Portrait mode, and intelligent algorithms like Center Stage, delivering better lighting, depth of field, and background blur effects in vlogs, live streams, or interviews, allowing you to easily achieve near-professional camera-level image quality.
Tips for Recording Video Using an iPhone as a Webcam
- iPhone runs iOS 16 or newer and macOS macOS runs Ventura (13) or later
- Use the rear camera whenever possible for higher clarity.
- Enable Portrait Mode for a cleaner background blur effect.
- Use a stand for greater stability.
- Connect your iPhone via USB cable to reduce latency and improve image quality stability.
- Enable Desk View to display your desktop simultaneously (suitable for tutorials and unboxing videos).
Steps on How Use iPhone as Camera on Mac to Record Video:
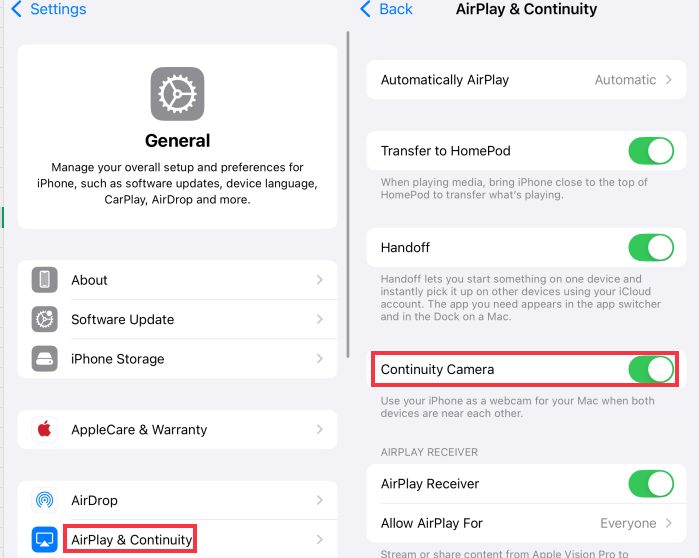
Step 1. Go to iPhone Settings > General > AirPlay & Continuity > Continuity Camera and enable it.
Step 2. Sign in with the same Apple ID via the same Wi-Fi network or Bluetooth. You can also use a USB cable to connect your phone and Mac.
✨Tip: Using a USB cable improves clarity and connection reliability.
Step 3. Open a recording app such as QuickTime or EaseUS RecExperts and select your iPhone camera as the source.
Step 4. Adjust lens effects, such as Portrait mode, subject centering, and lighting, then tap the REC icon to start recording.
Use QuickTime to Capture Video with External Webcam on Mac
Another way is to use QuickTime Player, a multimedia application developed by Apple. This pre-installed Mac webcam recorder can work as a video editor to trim, rotate, split, and merge video clips because of its multifunctionality.
Besides that, you can also use it to record what is happening on your screen and also your external webcam. If you want to upload your recordings to various platforms like YouTube, Vimeo, and Facebook, you only need to click several buttons.
How to Record External Webcam on Mac with QuickTime Player:
Step 1. Connect external webcam to MacBook. Launch QuickTime Player, click on the drop-down "File" menu, and choose "New Movie Recording."
Step 2. Click the drop-down arrow icon to select iPhone as your camera.
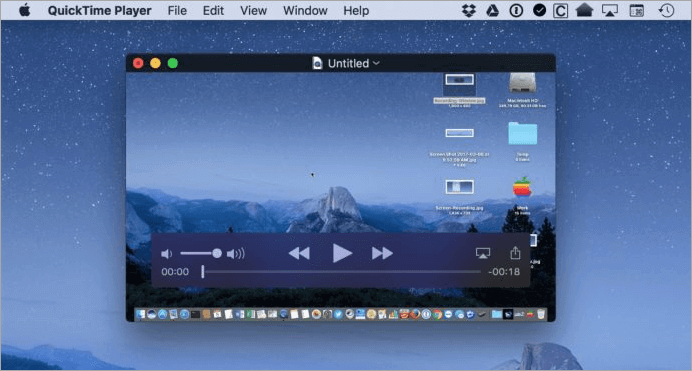
Step 3. Click on the red "Record" button to start your recording.
Step 4. Click on the stop button to end the recording. You can crop your recording into a short one if it's necessary.
Step 5. Select "Save" from the drop-down "File" menu. Save the video file to wherever you want.
Share this post about facecam video capture on a Mac with more people.
Using External Camera on Mac Video Capture Online
If you are not willing to download and install software on Mac, some optional online webcam recording tools can help you. You can open those pages in an Internet browser and utilize them directly.
Record a Webcam Video on Mac with EaseUS Online Recorder
EaseUS Online Webcam Recorder as a web-based tool that can works on Chrome, Firefox, Edge, Safari, and more. This free online Mac webcam recorder is free to use and does not limit the amount or duration of your recordings.
With just one click, and by selecting the camera you've connected, you can immediately start recording video. And you can easily save the camera videos to your local device in MP4 format.
Steps on How to Record Camera Video on Mac with EaseUS Online Webcam Recorder:
Step 1. Open the page and click the "Start Recording" button.
Step 2. Choose the external camera source and turn on the microphone if needed.

Step 3. Click on the REC button to start the recording process. If you finish your recording, click the button again.
Step 4. Click the "Save" button to get your video file.
Record a Webcam with Webcam Test
This famous online recorder is also very full-featured. Before you start the recording, you can decide if you want to record only videos or record voice from your microphone, too. It can detect the maximum camera resolution to create videos of the best quality.
Webcam Test Recorder is a background video recorder that allows you to switch between tabs or minimize your browser during the recording. If you have no idea about how to record video using external webcam on Mac, try to use this online tool to do that.
How to Record Camera Mac Online:
Step 1. Open the page and select the Webcam Recorder Options according to your needs.
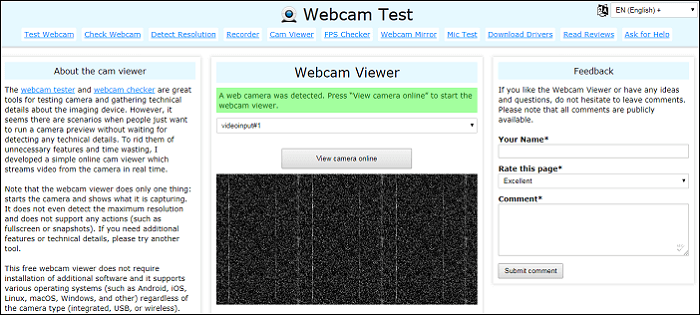
Step 2. Click the "Start recording" button.
Step 3. Choose "Stop recording" and review your video. You can choose to download it or retake a new video.
Troubleshooting External Camera Not Working Issues
| Problem | Problem Description | Simplified Solution |
|
External Camera Not Recognized (Black Screen / No Signal) |
After connecting via HDMI/USB, the camera does not appear in QuickTime or OBS, or only a black screen is shown. |
• Enable clean HDMI/UVC output |
|
Noticeable Lag or Stuttering |
Preview is delayed by 0.3–1s, or frames drop during recording. |
• Lower to 1080p / 30fps |
|
Audio & Video Out of Sync |
Lip movements do not match sound, especially when using an external microphone. |
• Use same input source (HDMI with audio) |
|
Poor Image Quality (Exposure / Color Issues) |
Auto exposure fluctuates, color looks yellow/blue, or the image looks worse than in-camera preview. |
• Turn off auto exposure / auto white balance |
|
Aspect Ratio Error (Cropped / Stretched) |
The output appears stretched or zoomed in, and does not match the camera’s real 16:9 ratio. |
• Set HDMI output to 1080p/4K 16:9 |
|
Mac Permissions Not Enabled |
Software cannot detect camera/mic and shows “No permission” or cannot access devices. |
• System Settings → Privacy & Security → enable Camera/Microphone/Screen Recording |
Share this post about facecam video capture on a Mac with more people.
Bonus Tip: How to Record Video With Macbook Built-in Camera
Whether you are using a Macbook or Macbook Pro, you can always record your webcam video with the built-in camera, without downloading any third-party software. But how to get it done? Just check the following steps:
Step 1. Open Photo Booth, and choose the "Record a movie clip" button from the lower-left corner of the screen.
Step 2. Then your inbuilt camera will open automatically, and you can view yourself on the screen. Next, click the "Record" button in the center of the screen to begin your webcam recording.
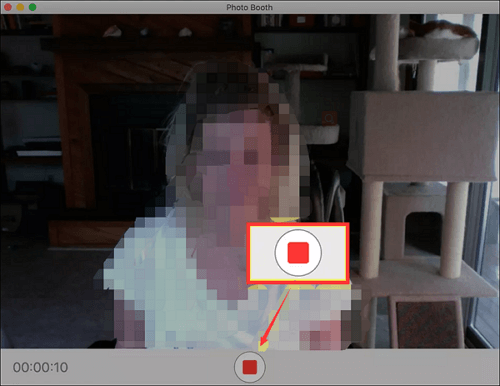
Step 3. Once done, you can click the thumbnail images to preview your recordings.
Conclusion
To help people who are not familiar with recorders, we introduced some practical tools and how to record video on Mac with an external camera using those recorders. There is no doubt that EaseUS RecExperts is the most powerful recorder for Mac users through all those analyses above. Download it and try to record videos on Mac with an external camera.
Download EaseUS Screen Recorder
Download EaseUS Screen Recorder
Trustpilot Rating 4.7
FAQs About Recording External Webcam on Mac
If you have more questions about how to record video on Mac, those answers may help you.
1. How to use external camera on Mac?
How to use camera on MacBook? This is not a difficult question. But fewer people know how does Mac record video from an external camera.
First of all, you need to connect the external webcam to your MacBook with a USB cable and wait for several seconds until the Mac recognizes the external camera.
Then, launch the Photo Booth program, choose Camera from the options at the top of the screen, and select the external camera as the options list's video source. Now, you can use the external one instead of the default iSight webcam.
2. How to take videos on Mac with audio?
To record videos on Mac with audio, a powerful recorder is necessary. We take EaseUS RecExperts as an example. First, you need to download and install it on your Mac, then choose the appropriate recording mode, such as screen recording or Webcam recording.
There will be a menu for you to select the audio source. You can choose from system audio, microphone audio, and both of them. Click the Rec button to start recording, and click the stop button after you capture all the contents you need, the recorded video with audio will be saved on your Mac.