-
![]()
Daisy
Daisy is the Senior editor of the writing team for EaseUS. She has been working in EaseUS for over ten years, starting from a technical writer to a team leader of the content group. As a professional author for over 10 years, she writes a lot to help people overcome their tech troubles.…Read full bio -
Jane is an experienced editor for EaseUS focused on tech blog writing. Familiar with all kinds of video editing and screen recording software on the market, she specializes in composing posts about recording and editing videos. All the topics she chooses …Read full bio
-
![]()
Alin
Alin is an experienced technical blog writing editor. She knows the information about screen recording software on the market, and is also familiar with data cloning and data backup software. She is expert in writing posts about these products, aiming at providing users with effective solutions.…Read full bio -
Jean is recognized as one of the most professional writers in EaseUS. She has kept improving her writing skills over the past 10 years and helped millions of her readers solve their tech problems on PC, Mac, and iOS devices.…Read full bio
-
![]()
Jerry
Jerry is a fan of science and technology, aiming to make readers' tech life easy and enjoyable. He loves exploring new technologies and writing technical how-to tips. All the topics he chooses aim to offer users more instructive information.…Read full bio -
![]()
Rel
Rel has always maintained a strong curiosity about the computer field and is committed to the research of the most efficient and practical computer problem solutions.…Read full bio -
![]()
Gemma
Gemma is member of EaseUS team and has been committed to creating valuable content in fields about file recovery, partition management, and data backup etc. for many years. She loves to help users solve various types of computer related issues.…Read full bio -
![]()
Shelly
"I hope my articles can help solve your technical problems. If you are interested in other articles, you can check the articles at the bottom of this page. Similarly, you can also check my Twitter to get additional help."…Read full bio
Page Table of Contents
Jane Zhou
Updated on Jun 09, 2026
0 Views |
0 min read
Key Takeaways
- · The simplest way is to use a professional Mac stream recorder like EaseUS RecExperts. This tool offers a one-click solution for recording screen and internal audio. It skips complex audio configuration or audio virtualization.
- · Alternatively, if you prefer built-in tools like QuickTime Player or Screenshot Tool, you'll need to install an audio loopback driver to capture system audio.
Are you still looking for methods on how to record livestream on Mac for offline watching, whether it's a YouTube Live show, Twitch gameplay, live TV, or an online event? This guide explains four practical ways to record streaming videos on macOS with internal audio, from built-in tools to professional streaming video recorders.
Record Live Stream on Mac with Audio via Streaming Recorder
- OS: macOS 10.13 or later & M1, M2, M3, M4-based Mac devices
- Best for: Advanced users who want to record and edit livestreams
Let's start with a professional streaming video recorder - EaseUS RecExperts for Mac. This excellent Mac screen recorder enables you to capture almost all activities with audio on your screen hassle-free.
Download EaseUS Screen Recorder
Download EaseUS Screen Recorder
Trustpilot Rating 4.7
With its help, you are able to screen record Mac with internal audio, including a live sports event, streaming audio or videos, or a webinar, and even personalize and make your recordings pop out with the advanced tools it offers. Besides, it also supports a schedule recording feature, which means you can set a specific time to start and end your live stream recording, even if you are not around your Mac.
Pros
- Capture screen and system sound on Mac with one-click
- Record video from stremaing services without black screen
- No time limit or watermark while recording
Cons
- Keep in mind that the free version comes with some limitations
Steps to capture a live stream on Mac with the EaseUS Mac streaming video recorder:
Step 1. Run EaseUS RecExperts on your device and you will see two recording modes. You can choose "Full Screen"to record the whole screen or choose "Region" to select the recording area manually before recording.

Step 2. After that, you can choose to record the webcam, system sound, microphone or record none of them as you like. You can also set auto split, auto recording with various functions on the interface.
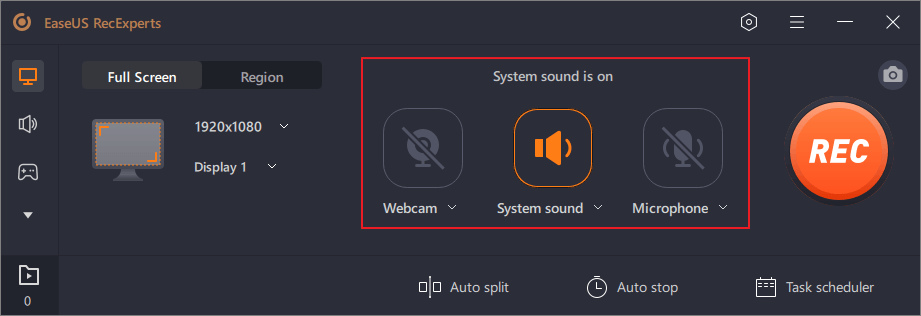
Step 3. Then, you can click the red "REC" button to start recording. Here will be a menu bar on your screen. To pause the recording, click on the white double vertical bar; to end the recording, click on the red square sign.
Step 4. After recording, you will be led to the list interface. Here you can view or edit your recordings. To start a new recording, just click on the "REC" button on the top of the interface.

Don't forget to share this helpful guide with your friends!
Record Streaming Video on Mac using QuickTime Player
- Best for: Mac users who don't need advanced recording and editing features
For Mac users, there is actually a built-in video capture software called QuickTime Player. This tool helps you start live stream recording tasks with a few simple clicks because of its friendly UI and intuitive workflow. However, it also has a big drawback, that is, the system sound won't be included in your recording, as Apple doesn't allow you to record internal audio on Mac for safety concerns.
Pros
- No installation required
- Lightweight and stable
Cons
- Cannot directly record internal (system) audio due to macOS security policy
- Limited editing and audio track options
- Tip
- 1. If you only need to capture visuals (like a live presentation), this built-in method is the quickest choice. However, if you need to capture internal audio, you will need to install a virtual audio driver like BlackHole.
- 2. Some Reddit users suggested creating an aggregation device to record system audio, but after testing, I found that it could only record system audio and microphone audio simultaneously, and the system audio was very low and unstable.
Here's how to use the built-in streaming video recorder on Mac:
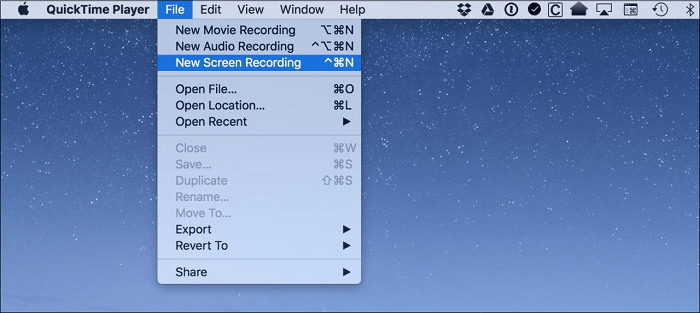
Step 1. Launch QuickTime Player, then click File > New Screen Recording on the top toolbar.
Step 2. Next, a screen recording window will appear. Here you can click the white arrow pointing down to choose an audio source for your recording.
Step 3. Once ready, click the Record button to begin your live stream recording.
How to Record Live Stream on Mac with Hotkeys
- OS: macOS Mojave or later
- Best for: User who work with macOS Mojave or later versions
If you prefer a quicker and easier way to save a streaming video on Mac, you can use the inbuilt Screenshot tool with keyboard shortcuts. With only a few key combinations, you can capture the live stream you want from your Mac desktop. However, this tool is only available on macOS Mojave or later versions. So check your macOS version before adopting this method.
Here's how to record a live stream on Mac via shortcut:
Step 1. Press Shift + Command + 5 on your keyboard to open the Screenshot tool window. Also, open the live streaming window that you want to capture.
Step 2. Choose your desired recording mode from the recording toolbar. If you want to record the audio at the same time, click Options and select Microphone.

Step 3. When you are ready, click the Record button to capture the live streaming on your Mac.
Step 4. To end the recording, click it again or directly press Ctrl + Cmd + Esc. Then, the recording will be saved to your desktop as a .mov file automatically.
Record A Live Stream on Mac via OBS
- Best for: Tech-savvy Mac users who need advanced control over the recording process
For those who want to find a free yet high-quality streaming recorder, OBS Studio is your best choice. As an open source screen recorder, it allows you to capture and even start a live stream for free on your Mac.
With its aid, you can easily record a Mac screen with audio. Unlike the built-in Mac recorder, OBS enables you to choose the audio source freely, including the system sound, built-in microphone, or even external mic. However, this software is a little difficult for novices, as its interface is a little bit complicated.
Pros
- Free, open source, highly customizable
- Supports both microphone and system audio
- Great for Twitch / YouTube Live
- laptop while recording
Cons
- Slightly higher learning curve
- Needs audio driver setup
Here are the steps on how to a live stream on Mac with OBS:
Step 1. Download and launch OBS Studio on your Mac device.
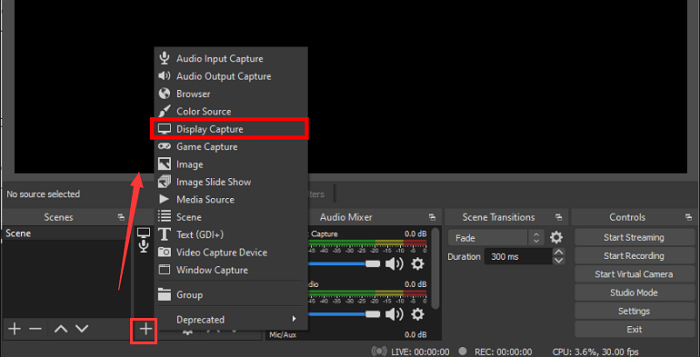
Step 2. Find that Scenes tab and click the + icon to create a new scene.
Step 3. Similarly, from the Source section, click the + icon > Display Cpature > OK to choose what you want to capture.
Step 4. (Optional) If you want to include the audio or change the recording settings, you can adjust them in the Settings section.
Step 5. Once done, click on the Start Recording button to start your recording.
Save a Livestream Online with Sound Directly
Best for: Most Mac users who want to save livestreams without installing software
For a quick and easy way to record live streams on a Mac without installing software, EaseUS Online Screen Recorder is a great choice. This browser-based tool lets you record screen activity and system audio in just a few simple steps. It’s ideal for those who need a lightweight, no-hassle solution.
The tool is simple to use and supports common audio formats like MP3 and AAC, making it easy to save and share recordings. However, it may not offer advanced features or customization options, making it better for occasional or basic recording needs.
Steps to save livestreams on Mac for free:
Step 1. Open your browser and go to the EaseUS Online Screen Recorder website.
Step 2. Click on the Start Recording button to launch the online recorder.

Step 3. Select whether you want to record the entire screen, a specific window, or just system audio.
Step 4. Once you're ready, click Start Recording to begin capturing the live stream.
Legal & Copyright Reminder
Recording your own content, such as personal live sessions, online classes, or gameplay, is generally allowed. However, when it comes to other creators' live streams, copyright rules become much stricter:
- You may watch and record for personal reference.
- You cannot upload, share, republish, or monetize the recorded live stream without explicit permission from the content owner.
- Different platforms (YouTube, Twitch, Facebook Live) have their own copyright and fair-use policies, so make sure to review the terms before recording.
How to Find the Best Stream Recorder for Mac
Now that we've explored the different options for recording live streams on Mac, let's take a look at how to choose the best stream recorder based on your specific needs and preferences.
- Determine Your Recording Needs: Consider whether you need basic or advanced features, such as audio capture, editing tools, or scheduled recording.
- Check for System Audio Capture: Ensure the recorder supports capturing both system audio (internal audio) and microphone input if required.
- Look for Easy Setup and Use: Choose a stream recorder with a user-friendly interface that suits your skill level, whether you are a beginner or an advanced user.
- Evaluate Recording Quality: Look for high-quality video and audio output, ideally without any significant loss in quality.
- Ensure Compatibility with macOS: Make sure the software is compatible with your macOS version to avoid any technical issues during installation or use.
Based on the factors above, EaseUS RecExperts is highly recommended for users looking for a powerful and user-friendly stream recorder for Mac.
Download EaseUS Screen Recorder
Download EaseUS Screen Recorder
Trustpilot Rating 4.7
How to Record A Live Stream on Mac FAQs
1. Can you record live on a Macbook?
Of course, YES. You can record live on a Macbook, as there are some built-in and third-party Mac screen recorders. For the inbuilt ones, you can use the QuickTime Player or Screenshot Tool to record live on your Macbook.
2. Does the Mac have a recording feature?
The answer is YES.
- If your Mac runs macOS Mojave or later versions, you can find the Screenshot Tool that allows you to record something on your Mac desktop.
- If you use an older Mac device, you can try QuickTime Player to start recording.
3. Is it illegal to record live stream?
It depends on your recording purpose. If you record live streams and use them for commercial purposes, it might be illegal. However, if not, it's perfectly okay to record anything from video streaming sites.
4. What's the best way to record a YouTube or Twitch live on Mac?
Use OBS for free or EaseUS RecExperts for an easier one-click setup with both audio sources. In this way, you can easily record YouTube, Twitch live or other live streaming.