-
![]()
Daisy
Daisy is the Senior editor of the writing team for EaseUS. She has been working in EaseUS for over ten years, starting from a technical writer to a team leader of the content group. As a professional author for over 10 years, she writes a lot to help people overcome their tech troubles.…Read full bio -
Jane is an experienced editor for EaseUS focused on tech blog writing. Familiar with all kinds of video editing and screen recording software on the market, she specializes in composing posts about recording and editing videos. All the topics she chooses …Read full bio
-
![]()
Alin
Alin is an experienced technical blog writing editor. She knows the information about screen recording software on the market, and is also familiar with data cloning and data backup software. She is expert in writing posts about these products, aiming at providing users with effective solutions.…Read full bio -
Jean is recognized as one of the most professional writers in EaseUS. She has kept improving her writing skills over the past 10 years and helped millions of her readers solve their tech problems on PC, Mac, and iOS devices.…Read full bio
-
![]()
Jerry
Jerry is a fan of science and technology, aiming to make readers' tech life easy and enjoyable. He loves exploring new technologies and writing technical how-to tips. All the topics he chooses aim to offer users more instructive information.…Read full bio -
![]()
Rel
Rel has always maintained a strong curiosity about the computer field and is committed to the research of the most efficient and practical computer problem solutions.…Read full bio -
![]()
Gemma
Gemma is member of EaseUS team and has been committed to creating valuable content in fields about file recovery, partition management, and data backup etc. for many years. She loves to help users solve various types of computer related issues.…Read full bio -
![]()
Shelly
"I hope my articles can help solve your technical problems. If you are interested in other articles, you can check the articles at the bottom of this page. Similarly, you can also check my Twitter to get additional help."…Read full bio
Page Table of Contents
Alin
Updated on Jun 09, 2026
0 Views |
0 min read
Many users on Microsoft Community, Reddit, and other forums want to know how to record internal audio on Windows 10. Some users attempt to use the built-in Windows Voice Recorder to capture online classes, music, or other audio, only to discover that it records only their own voice - not the sound coming from the computer. Why does this happen? Can Windows Voice Recorder actually record system audio? And are there other free, reliable tools for recording internal audio on a Windows PC? You'll find all the answers right here in this article.
🚩Here's a quick overview of the internal audio recording tools we cover in this article:
|
Tools |
Record Internal Audio Only |
Record Mic Only |
Record Both Internal & Mic |
Extra Setup Required |
Notes |
| EaseUS RecExperts |
✅ |
✅ |
✅ |
❌ |
Built-in audio source selection |
| Voice Recorder |
❌ (Stereo Mix required) |
✅ |
❌ |
Stereo Mix required |
Pre-installed, simple to use |
| Audacity |
✅ |
✅ |
✅ |
Some setup needed |
Free and open-source |
| Game Bar |
❌ (must record screen) |
✅ |
✅ (with screen recording) |
❌ |
Pre-installed, convenient |
| OBS |
✅ |
✅ |
✅ |
Audio track setup required |
Powerful, mainly for screen capture |
| Audio Cable |
✅ |
❌ |
✅ (with configuration) |
Hardware or software installation |
Available in physical and virtual versions |
A Perfect Way to Record Internal Audio on PCs
Compatibility: Windows 11/10/8.1/8/7, macOS 10.13 or later
Best for: Novices and professionals who want a comprehensive and user-friendly screen and audio recorder
EaseUS RecExperts is a powerful Windows sound recorder that lets you capture internal audio, system sound, microphone input, or speaker output with ease. Perfect for recording YouTube audio, online courses, music, or any application audio, it supports separate or mixed audio tracks. Beginners can start recording in just a few clicks, thanks to its intuitive interface and built-in audio settings.
Advanced users benefit from flexible control over recording sources, bitrates, sampling rates, and noise cancellation. High-quality output in MP3, WAV, or AAC ensures professional results for tutorials, podcasts, gameplay, and other internal audio recording needs on a Windows pc and laptop.
🚩Steps for how to record audio from Windows 10 computer with EaseUS audio recorder:
Step 1. Launch EaseUS RecExperts and choose Audio mode (looks like a speaker) from the main interface.

Step 2. Select the sound source by clicking on the speaker sign (the system sound) or the mic sign (the microphone). Or, you can record them both at the same time.
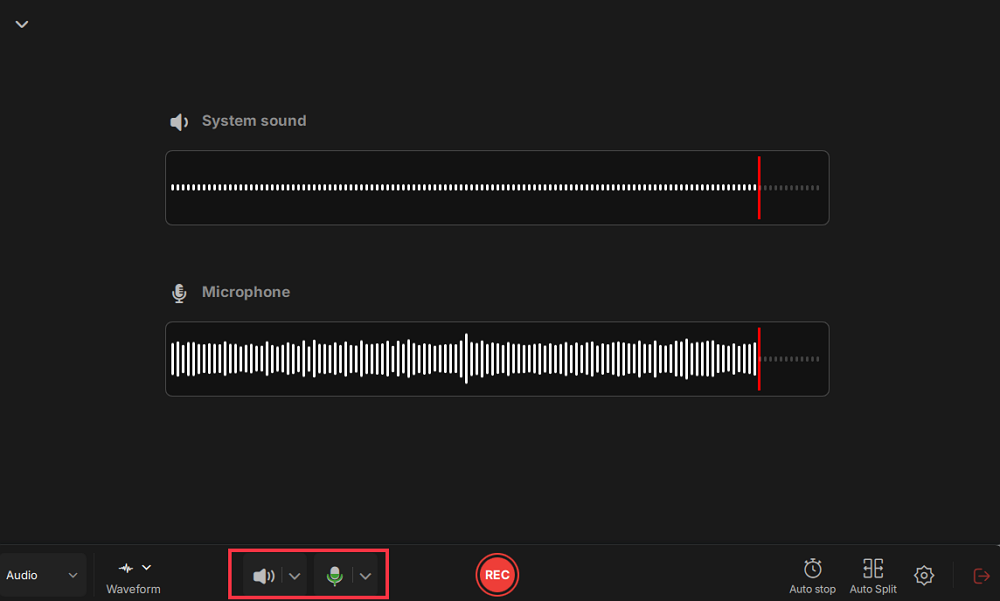
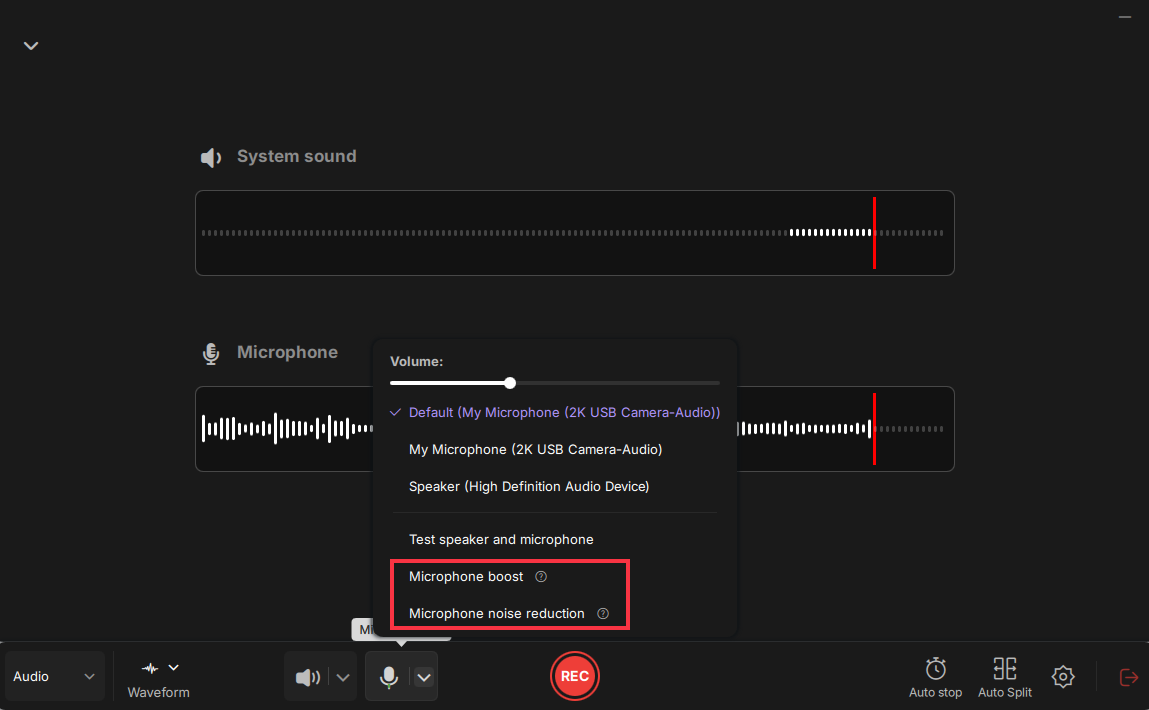
Step 3. Click the drop-down buttons next to the Speaker and Microphone to adjust the audio source settings.
- In the Speaker tab, you can adjust the volume, test the speaker and microphone, record silently, or open the volume mixer.
- In the Microphone tab, you can also enable Microphone boost and Microphone noise reduction features.
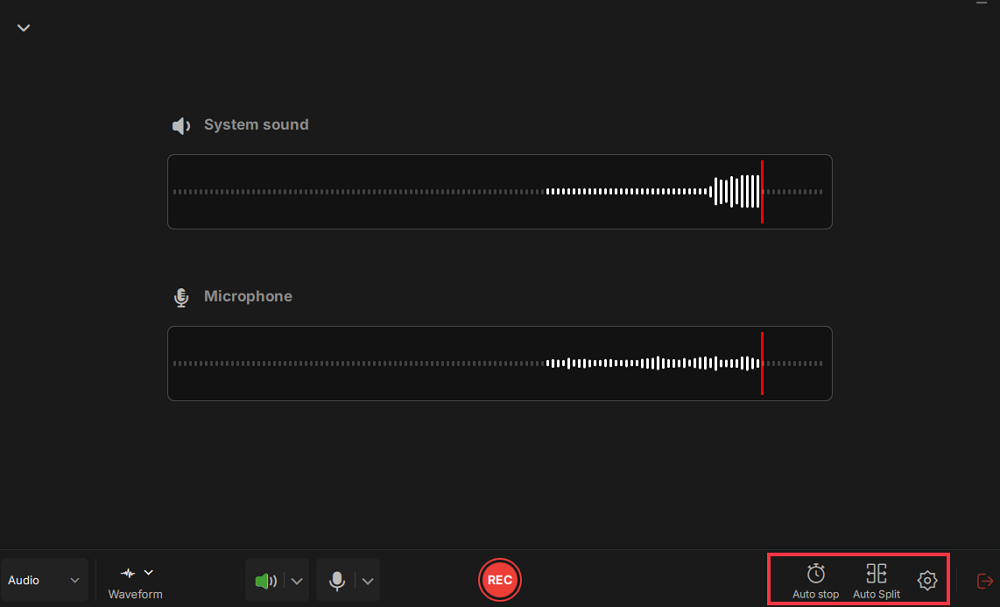
Step 4. To change the output format, bitrate, or sampling rate, you can click the Settings button in the lower right corner of the page. Of course, you can also set the automatic stop audio recording and automatic audio segmentation as needed.
Step 5. Hit the REC button to start recording audio. To finish it, just click on the red square icon to stop the recording.
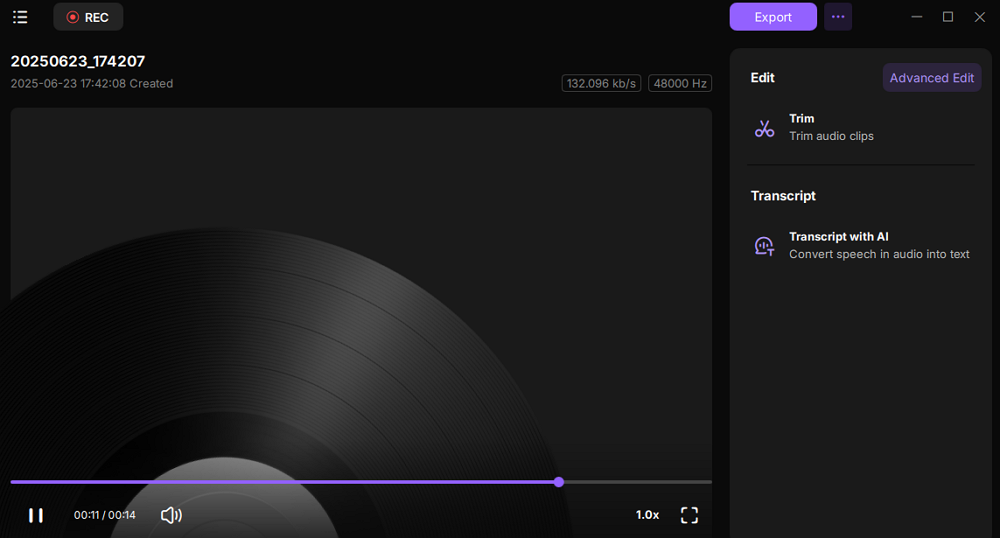
Step 6. Once finished, the audio recording will be saved automatically. You can listen to or edit the recording with built-in tools.
🚩Check the video tutorial about how to record computer audio on Windows 10:
- 00:28 Method 1. Record Computer Audio on Windows 10 with Voice Recorder
- 00:59 Method 2. Capture Internal Audio with Audacity
- 01:38 Method 3. Record System Audio with EaseUS RecExperts
- 02:22 Method 4. Record Computer Audio Windows 10 with Stereo Mix
Share this post to help more Window 10 users record internal and external audio with ease!

How to Record Internal Audio on Windows 10 Voice Recorder
Compatibility: Windows 10 PCs
Best for: quick microphone recordings, voice memos, lectures, or meetings
Windows 10 Voice Recorder (called Sound Recorder in Windows 11/8/7) is a built-in app primarily designed for recording microphone input. Many users trying to capture system audio, online courses, or music often find it frustrating that Voice Recorder cannot natively record internal sounds. The good news is that by enabling Stereo Mix, you can record everything your computer plays with this internal audio recorder: system sounds, YouTube audio, game sound, and more.
Voice Recorder is pre-installed, easy to use with one-click recording, and supports basic trimming of recordings in widely compatible M4A format. However, it lacks multi-track recording, advanced audio controls, and export options, so it works best for simple voice memos or quick audio capture.
🚩Steps for how to record system audio on Windows 10 with Voice Recorder:
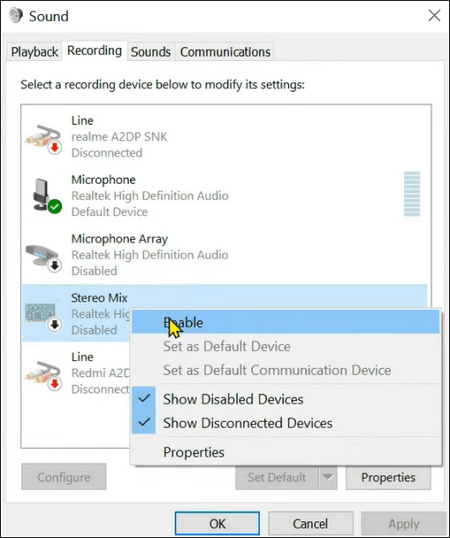
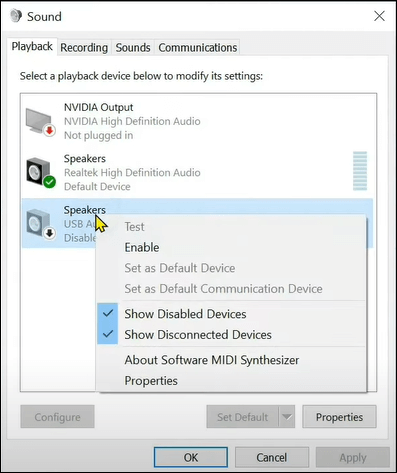
Step 1. Enable Stereo Mix.
- Right-click the speaker icon in the taskbar.
- Select Sounds and go to the Recording tab.
- Right-click in the blank area and select Show Disabled Devices.
- If Stereo Mix appears, right-click it and choose Enable.
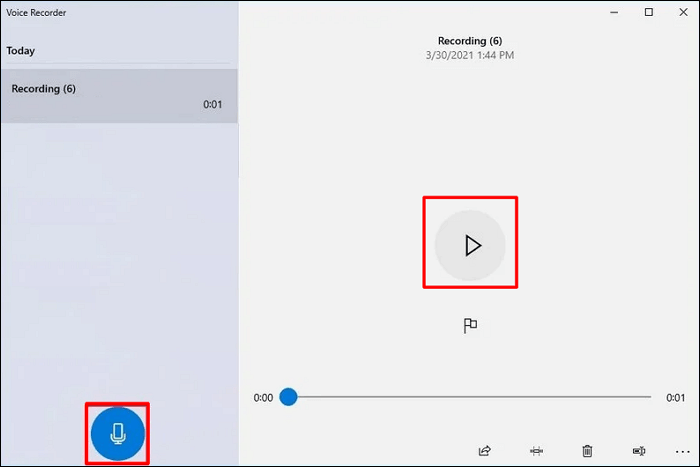
Step 2. Use Voice Recorder to capture sound from Windows PC.
- Search for Voice Recorder on your computer and click on the top result to open it.
- Click on the Record button. To help yourself jump to the critical part of the audio file later, click on the Flag button to add a marker during the recording. This operation will not interrupt the audio recording process.
- Click on the Pause button to stop recording temporarily or the Stop button to end the voice recording. You can choose the Play button to preview your audio file.
- After recording, the audio file will be saved automatically as an .m4a format in the Sound recordings folder below Documents.
💡Editor's experience:
- If you only need to capture the microphone sound, skip step 1; if you want to record the mic sound next time, disable the Stereo Mix.
- Stereo Mix is disabled by default in modern Windows devices. If you don't see Stereo Mix, update your sound drivers: go to Device Manager > Sound, video, and game controllers > Update driver > Search automatically for updated driver software.
- If no update is available, your sound card may not support Stereo Mix.
- If there is no update available, your sound card may not support Stereo Mix. In this way, you can download and install a third-party audio recording software like EaseUS RecExperts.
Share this post to help more Window 10 users record internal audio with ease!
How to Pick Up Computer Audio with Audacity for Free
Compatibility: Windows 11/10/8.1/7/Vista, Mac OS X 10.7 Lion and later, Ubuntu 22.04
Best for: recording and editing Windows system and microphone
Audacity is a free, open-source audio recorder and editor that lets users capture both system audio and microphone input without needing Stereo Mix. Many beginners struggle to record internal audio on Windows, especially when Voice Recorder cannot do it natively. Audacity solves this by using WASAPI Loopback, enabling high-quality recordings from YouTube, online courses, or any application.
It is ideal for users who want flexible editing, multi-track recordings, and lossless audio output in WAV or FLAC. While the interface may be overwhelming for first-timers, and it cannot record video, Audacity excels for detailed audio projects, podcasts, tutorials, or professional-grade internal audio capture.
🚩Steps for record computer audio on Windows 10 with Audacity:
Step 1. Download & Install Audacity from the official website.
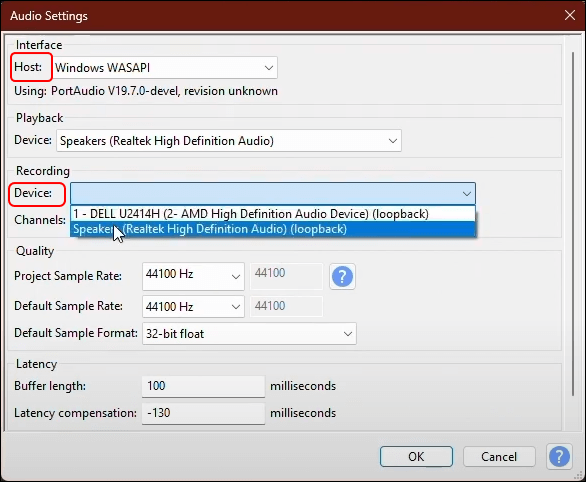
Step 2. Open Audacity and go to Audio Setup > Audio Settings.
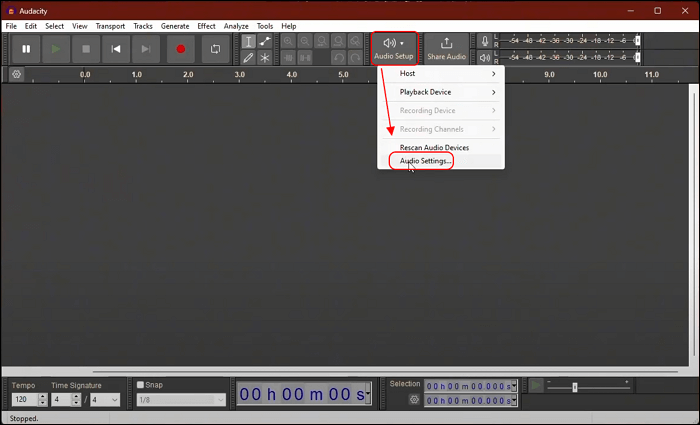
Step 3. In the Audio Settings popup, select:
- Host: Windows WASAPI (let Audacity capture the audio directly from your computer's output)
- Recording Device: choose to record sound from the system or the microphone
- Other parameters you need
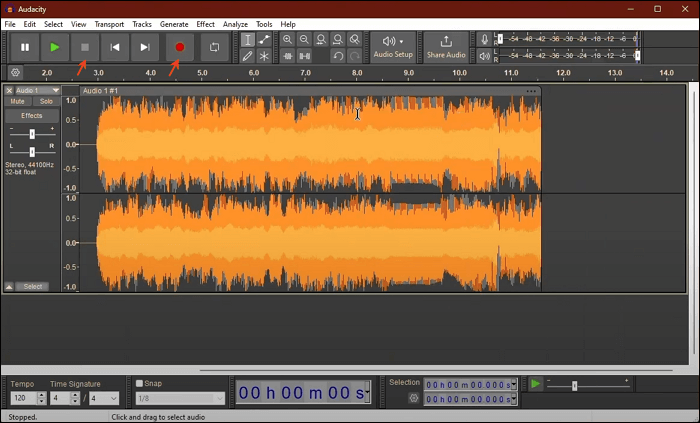
Step 4. Click the Record button (red dot) and start speaking or playing.
Step 5. Click Stop (square) when done. You can play and edit the recording.
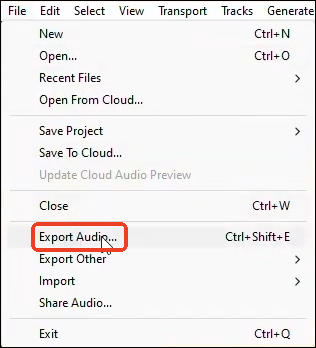
Step 6. To save your Audacity recording, go to File > Export Audio.... Follow the on-screen instructions.
- More details from the official document from Audacity Support:
-
1. When using the default MME device, you might see a virtual microphone named Stereo Mix, What You Hear, or something similar - this lets you record your desktop audio.
2. Make sure Software Playthrough is turned off by going to Transport > Transport Options > Software Playthrough (the check mark should be unchecked). You can also turn off Overdub here.
3. Also, ensure that the audio is playing before you start recording. While WASAPI can capture an audio stream, it cannot record if no sound is being output.
Share this post to help more Window 10 users record internal audio with ease!
Record Screen and Audio on Windows 10 Together Using Game Bar
Compatibility: Windows 10/11 PCs
Best for: recording gameplay with system and mic sound simultaneously
If you want to capture game sounds, app audio, or online lessons without installing extra software, Xbox Game Bar recording on Windows 10 and 11 is a solid built-in option. It records both system sounds and microphone input simultaneously or seperately, allowing you to capture in-game audio, app notifications, or your commentary in one go.
Keep in mind that it cannot record audio alone; you must capture the screen as well. Additionally, it won't separate tracks for mic and system sound. Use Game Bar when you want a quick, lightweight recording that's ready to share, whether it's a gameplay clip, a tutorial, or a meeting on your PC.
🚩Steps for how to record screen with audio on Windows 10 with Xbox Game Bar:
Step 1. Press Win + G to open the Game Bar.
Step 2. Go to Settings > Widget > Capture to select:
- All (Records game + system + microphone)
- Game Only (Records only game sounds + microphone)
- None (Disables audio recording)
Step 3. Open the app or game you want to record (e.g., browser, music player, game).
Step 4. Click Start recording (white circle) or press the Windows + Alt + R shortcut to start recording.
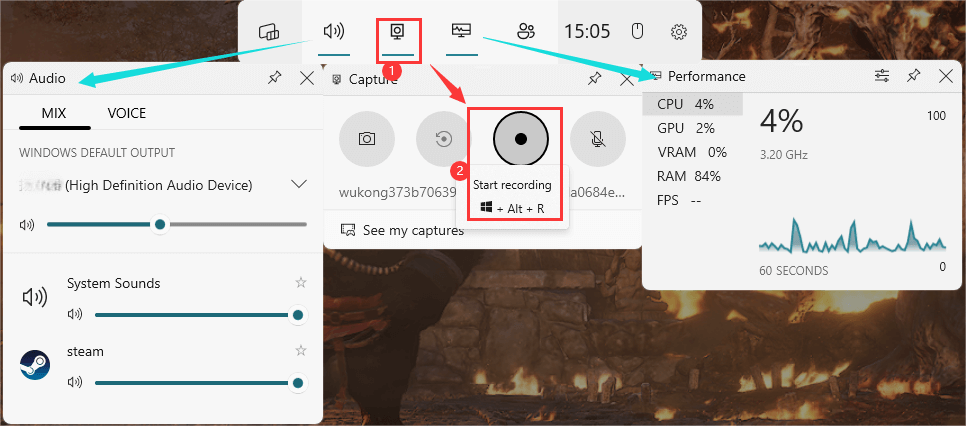
Step 5. When done, hit Stop recording in the status bar or press the Windows + ALT + R shortcuts to end the session.

Step 6. Go to See my captures to view the video recording. Or go to C:\Users\username\Videos\Captures.

Step 7. If needed, convert the MP4 video to an audio file like MP3 with the EaseUS RecExperts format.
Share this post to help more Window 10 users record internal and external audio with ease!
Record Sound Coming from Computer with OBS Studio
Compatibility: Windows & Mac & Linux
Best for: advanced gameplay recording and live streaming
Looking for a way to record internal audio on Windows 10 while keeping your mic crystal clear? OBS Studio is a free, open source screen recorder tool that lets you record system sound and microphone separately or together, mix audio in real time, and capture multiple sources, ideal for podcasts, gameplay, YouTube tutorials, and more.
It's not the easiest for beginners and can't save audio-only files without extra steps. Still, if you want professional sound capture, multi-track recording, and advanced control over desktop audio, OBS is one of the best free options out there.
🚩Steps for how to record desktop audio on Windows with OBS:
Step 1. Download OBS Studio from the official website. Install and launch OBS and follow the on-screen guidance.
Step 2. At the bottom-right corner:
- Go to Settings > Audio.
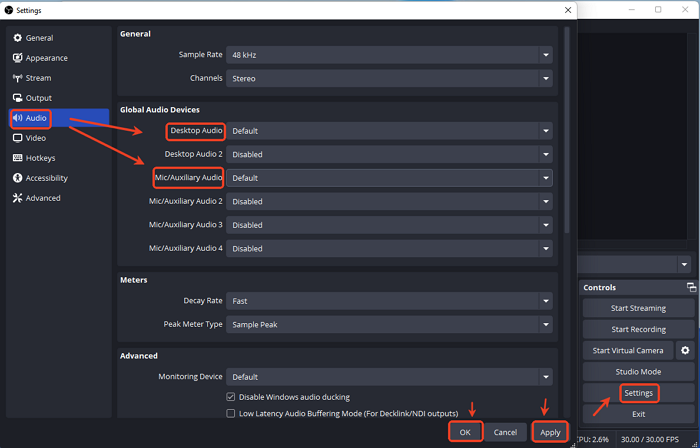
- Under Global Audio Devices, set Desktop Audio (internal audio) or Mic/Auxiliary Audio (external sound) if needed.
- Click Apply and OK.
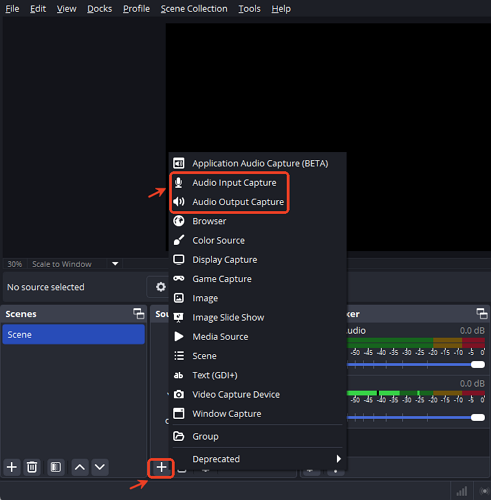
Step 3. In the Sources panel (bottom-left), click +, then:
- Select Audio Output Capture (for system sounds) and choose your speakers/headphones; Select Audio Input Capture (for microphone) and choose your mic if needed.
- Click OK to confirm.
Step 4. Click Start Recording at the bottom-right corner and click Yes to confirm the popup. (If you want to add a video source, click + under the Sources panel to select Display Capture instead.)
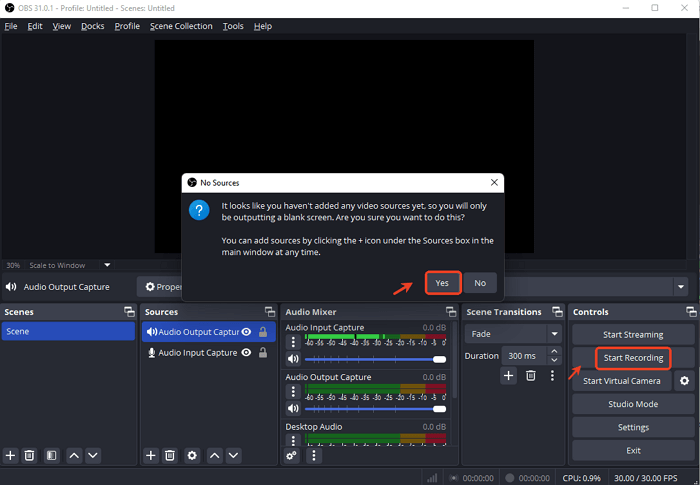
Step 5. Now, speak into your microphone or play system audio. Click Stop Recording when done. The OBS recording file (.mkv) will be saved automatically in C:\Users\admin\Videos by default.
- Tip: To change the recording path and format in OBS, go to File > Settings > Output > Recording.
Share this post to help more Window 10 users record internal audio with ease!
Record System Sound from Win 10 Computer with Audio Cable
Compatibility: Any Windows computer
Best for: Users who have cable and adapter and want a stable recording experience.
If you can't get Stereo Mix to work or your PC doesn't support it, an audio cable setup is a simple hack to record internal audio on Windows 10. Just connect a 3.5 mm male-to-male AUX cable from your headphone jack to a USB audio adapter, and you can capture everything your computer plays even with the built-in Windows Voice Recorder.
This method works on any PC without extra software, but it can't record your microphone, audio quality may drop, and you'll need to adjust volume manually. It's best for quick fixes, older devices, or when you need basic desktop audio recording without installing third-party tools.
🚩See how to record audio from computer using an audio cable:
Step 1. Plug one end into the microphone jack on your PC and the other end into the headphone jack of the audio adapter.
Step 2. Move to the Sound Control Panel and set the USB audio device as the default.
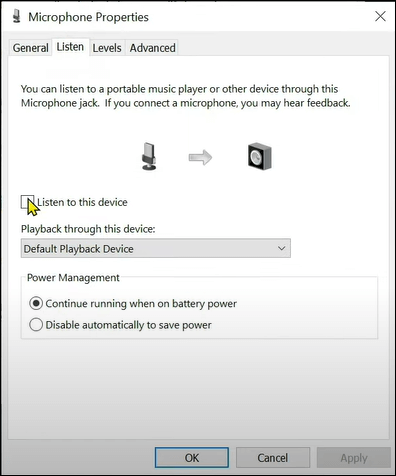
Step 3. In the recording tab, set the microphone as the default communication device. Right-click on Microphone and click Properties to enable Listen to this device, and click Apply.
Step 4. Finally, you can use any audio recording software to capture computer sounds on Windows 10.
- Tip: If no audio cable is available, you can record internal sound (system audio) on Windows 10 using a virtual audio cable (VAC).
Share this post to help more Window 10 users record internal and external audio with ease!
Conclusion
Capturing internal audio on Windows 10 can be done in many ways, from built-in tools like Voice Recorder and Game Bar to advanced options like OBS, Audacity, or even audio cables.
The best choice depends on your needs: quick and simple, or high-quality with full control. By understanding each method's pros, cons, and setup, you can pick the most efficient solution for recording system sounds, online classes, music, or gameplay.
If you want to find the easiest way to capture internal sound from your Windows PC, EaseUS RecExperts is your best choice. This recording software not only helps you record audio but also captures screen, webcam, and gameplay effortlessly.
FAQs About Sound Recorder Windows 10
Here, we collect some questions that most people frequently ask, and you can take a look.
1. Does Windows 10 have an audio recorder?
Yes, Windows 10 has a sound recorder called the Voice Recorder App. If you need a quick way to record audio on your computer, this app can help you. You can use it to record interviews, conversations, lectures, and anything that can make a sound.
2. How can I record sound from my computer?
Audacity can help you record sound from your computer. You can choose to record the internal voice, microphone, or your voice and microphone at the same time. Moreover, you can use it to record your screen and favorite games.
3. How do I record only internal audio?
- Download and install EaseUS RecExperts, launch this program on your computer, and click "Audio" on the main interface.
- Click the Sound icon on the lower left to select the "System sound" as the recording source.
- Click "REC" to begin your recording.
4. How do I record internal system audio on a Mac?
By default, macOS blocks direct system sound recording. To record internal audio on Mac, you'll need a virtual audio driver such as BlackHole, Loopback, or Soundflower. These route your Mac's output to apps like QuickTime, GarageBand, or Audacity, letting you capture music, streaming audio, or in-app sound without microphone noise.
5. Can I record audio online without installing software?
Yes. You can use free online voice recorders like 123Apps Online Voice Recorder or Apowersoft Free Online Audio Recorder. They run in your browser and record microphone input instantly. For capturing internal audio online, you may still need Stereo Mix on Windows or a virtual audio driver on Mac.
6. What is the best software to record internal audio on Windows 10?
For Windows 10, EaseUS RecExperts is an all-in-one solution to record system audio, microphone, or both, perfect for YouTube videos, online classes, or podcasts. For free tools, Audacity offers advanced editing, while OBS Studio records multiple audio sources and your screen at the same time.
⭐2025-08 - Article Update Log
1. Updated comparison table in the introduction: refined the introduction's comparison table to highlight audio recording features, helping users quickly find the right internal audio recorder.
2. Refined tool descriptions: split pros and cons, insights from forums, and consolidated key information.
3. Added practical tips: based on editor testing and official documentation to solve common user issues.
4. Expanded example scenarios: include online courses, YouTube, gaming, and meeting recordings.
5. New FAQ entries: covering Mac recording, online audio recording, and tool recommendations.
6. Replaced videos: updated with content directly relevant to internal audio recording on Windows 10 instead of capturing the screen with audio.