-
![]()
Daisy
Daisy is the Senior editor of the writing team for EaseUS. She has been working in EaseUS for over ten years, starting from a technical writer to a team leader of the content group. As a professional author for over 10 years, she writes a lot to help people overcome their tech troubles.…Read full bio -
Jane is an experienced editor for EaseUS focused on tech blog writing. Familiar with all kinds of video editing and screen recording software on the market, she specializes in composing posts about recording and editing videos. All the topics she chooses …Read full bio
-
![]()
Alin
Alin is an experienced technical blog writing editor. She knows the information about screen recording software on the market, and is also familiar with data cloning and data backup software. She is expert in writing posts about these products, aiming at providing users with effective solutions.…Read full bio -
Jean is recognized as one of the most professional writers in EaseUS. She has kept improving her writing skills over the past 10 years and helped millions of her readers solve their tech problems on PC, Mac, and iOS devices.…Read full bio
-
![]()
Jerry
Jerry is a fan of science and technology, aiming to make readers' tech life easy and enjoyable. He loves exploring new technologies and writing technical how-to tips. All the topics he chooses aim to offer users more instructive information.…Read full bio -
![]()
Rel
Rel has always maintained a strong curiosity about the computer field and is committed to the research of the most efficient and practical computer problem solutions.…Read full bio -
![]()
Gemma
Gemma is member of EaseUS team and has been committed to creating valuable content in fields about file recovery, partition management, and data backup etc. for many years. She loves to help users solve various types of computer related issues.…Read full bio -
![]()
Shelly
"I hope my articles can help solve your technical problems. If you are interested in other articles, you can check the articles at the bottom of this page. Similarly, you can also check my Twitter to get additional help."…Read full bio
Page Table of Contents
Jane Zhou
Updated on Jun 09, 2026
0 Views |
0 min read
Many Logitech keyboards, such as the popular K380, K850, G512, and other wireless or compact models, do not have a dedicated Print Screen key. This often leaves users unsure of how to capture screenshots quickly. Whether you're using Logitech keyboards for work, gaming, or everyday tasks, this article will guide you through various methods to screenshot on Logitech keyboards.
Screenshot on All Models of Logitech Keyboard Easily
The best way to screenshot on a Logitech Keyboard is to use EaseUS RecExperts. As a versatile screen recorder and screenshot tool, it offers a great snipping feature to capture your screen. You can screenshot a full-screen, part of your screen, or a webpage and edit them too. This works with the popular Logitech keyboard k850, k780, k650, G11, G13, G15, G105, G510, and more models with ease.
Upon a click, you can capture the full screen or a selected area. Additionally, the app is an excellent screen recorder capable of capturing the screen in UHD quality with dual audio. Along with the pictures, you can edit the videos and export them in popular file formats. The software is best for gaming walkthroughs, tutorials, and capturing game highlights using the screenshot feature.
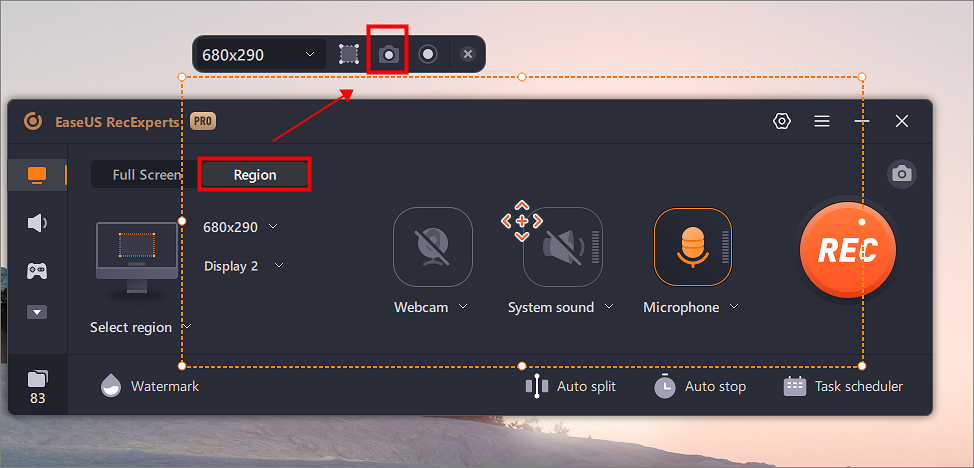
1Step 1. Launch this tool and choose your desired area to take a screenshot on your screen. If you want to take a full-screen snapshot, click "Full Screen" and choose Display (if there is more than one monitor). Then, click the camera icon in the upper right to start your task.
2Step 2. (Optional) If you are going to take a partial screen, choose the Region option. Next, left-click and hold your mouse to select the target region. Once selected, choose the camera icon to snapshot your screen.
3Step 3. Finally, you can click Recordings >Pictures to find and view your screenshots.

How to Screenshot on 60 Keyboard
This article discusses some simple ways to help you take screenshots on your 60% keyboard effortlessly. Read more >>
How to Screenshot on Logitech Keyboard via Windows Shortcuts
Many Logitech keyboards may not have a dedicated Print Screen (PrtSc) key, but Windows offers several built-in shortcut combinations to help you capture screenshots quickly and easily.
#1. Basic Print Screen Shortcuts
- Print Screen (PrtSc): Captures the entire screen and copies it to the clipboard. You can paste it into Paint or other image editors to save.
- Alt + PrtSc: Captures only the active window and copies it to the clipboard.
- Windows key + PrtSc: Captures the entire screen and automatically saves the screenshot to the Pictures > Screenshots folder.
#2. Snipping Tool
Windows included a Snipping Tool to capture screenshots on the PC. The Snipping tool can take full-screen, part-of-the-screen, or irregular screenshots. In fact, along with the conventional rectangle snaps, you can also choose different shapes. So, if the PrintScreen is unavailable, let us see how to screenshot on the Logitech keyboard with the snipping tool.
Step 1. The Windows shortcut for the Snipping tool is Windows + Shift + S.
Step 2. Select the type of screenshot you want: full-screen, rectangle, freeform, window.
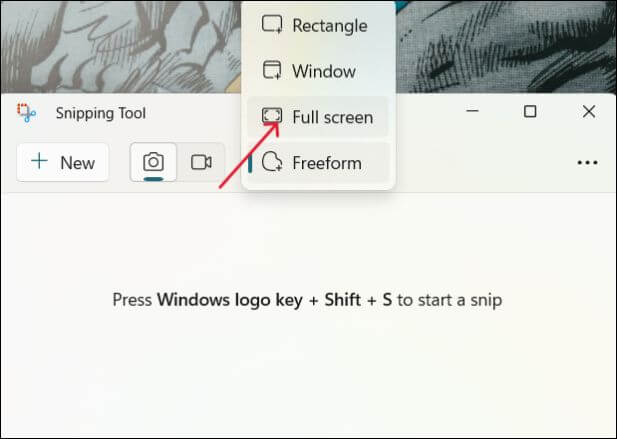
Step 3. While the full screen captures the entire screen, use the rectangle and freeform, and use the cursor to cover the screen area you want to capture.
Step 4. Once you release the mouse, the screenshot gets saved in the Screenshot folder.
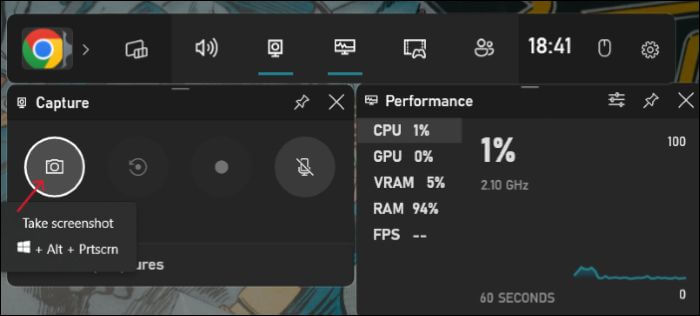
#3. Game Bar
The Game Bar feature is mainly introduced to capture game recordings and achievements. But, along with the game recording, Game Bar allows you to capture any screen on your PC.
Step 1. Press Windows + G to open the Game Bar.
Step 2. Click on the Camera icon to capture the current screen contents. You can find the screenshot in the Videos\Captures folder.
Tip: On some Logitech keyboards without a dedicated Print Screen key, try pressing
Fn + Insert or check if the Print Screen function is mapped to another key. Also, the Windows key may be labeled as "Start" but functions identically.Taking Screenshots on Logitech Keyboards with Mac Shortcut Keys
If you're using a Logitech keyboard on a Mac, here are the main macOS system shortcuts for screenshots:
Shift + Command + 3: Capture the entire screen, saved automatically to your desktop.
Shift + Command + 4: Capture a selected portion of the screen using a crosshair selector.
Shift + Command + 5: Opens the screenshot toolbar offering options for full screen, window, selection capture, and even screen recording.
Shift + Command + 6: Captures the Touch Bar (available on MacBook Pros with Touch Bar).
Tip: Most Logitech keyboards designed for Mac clearly label these keys to ensure easy access. If your keyboard is missing any of these keys, check Logitech’s Mac-compatible models to ensure full screenshot support.
Screenshot in Logitech Wireless Keyboard using Logitech G Hub
If your Logitech wireless keyboard doesn't come with a dedicated Print Screen key or you prefer to use your own screenshot shortcuts, Logitech G Hub offers a smart and flexible way to customize your keyboard for screenshot capture. This method is especially helpful for wireless models like the K380, MX Keys, MX Mechanical, or G-series keyboards.
Tip: G Hub customization also works for screenshot automation if you use Logitech mice, assign a screenshot shortcut to a mouse button!
Step 1. Launch the G Hub software, and select your keyboard as the device.
Step 2. Open the Assignments tab, and choose the key you want to use to capture the screenshots.

Step 3. In addition to the key, click on the + icon and assign the Screen Capture function for the key.
Step 4. Also, choose the type of screenshot you want to take with the key (full screen, window, or custom area).
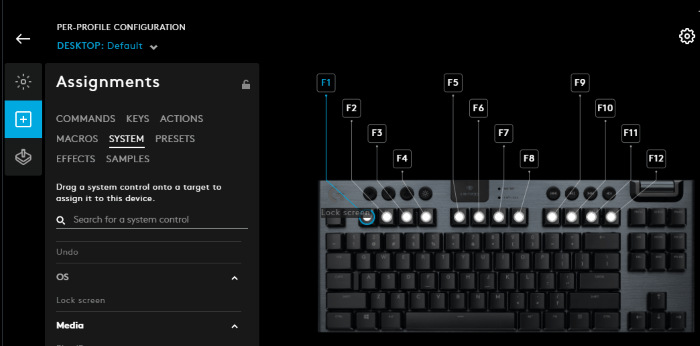
Step 5. Save the assignment and close the app. Now, you can use the custom key to capture screenshots with ease.
Share this helpful guide with others in need!
Common Issues and Troubleshooting for Screenshot on Logitech Keyboard
Users often encounter several common issues when using Logitech keyboards to take screenshots. Understanding these problems and their solutions can save time and improve your experience.
1. Screenshot Shortcut Not Working
Many Logitech keyboards require pressing the Fn key together with the Print Screen or other assigned keys to capture screenshots. Pressing the key alone may not work because the Print Screen function is secondary on some models. To fix this, try combinations like Fn + PrtSc or Fn + Insert. Additionally, check if the Print Screen function has been remapped using Logitech software such as Logi Options+ or G Hub.
2. Software Compatibility Conflicts
Sometimes, third-party screenshot or recording software can conflict with Logitech’s key customization tools or Windows shortcuts. This can prevent screenshots from being captured properly. To resolve this:
- Ensure your screenshot software (e.g., EaseUS RecExperts) is updated.
- Disable any overlapping hotkeys in Logitech G Hub or Logi Options+.
- Restart your computer after making changes to refresh settings.
3. Issues with Multiple Monitors
If you use multiple monitors, you may notice that screenshots only capture a single screen or fail to target the intended display. To overcome this, use screenshot tools that allow manual selection of screens or regions, such as the Windows Snipping Tool or EaseUS RecExperts. You can also configure custom shortcuts via Logitech G Hub to specify which monitor to capture.
4. Screenshots Not Saving or Difficult to Locate
Sometimes screenshots taken by keyboard shortcuts save automatically but end up in folders users don’t expect. For example:
- Screenshots captured with Windows Key + PrtSc are saved by default in Pictures > Screenshots.
- Third-party tools may have customizable save locations—check app settings to confirm or change the folder.
- If you're unsure where your screenshots are, try searching recent image files using your file explorer.
5. Logitech Keyboards Without a Dedicated Print Screen Key
Some compact or wireless Logitech keyboards do not include a dedicated Print Screen key, making the default screenshot shortcuts unavailable. In these cases:
- Use Logitech customization apps like G Hub or Logi Options+ to remap screenshot functions to other keys or create your own shortcuts.
- Alternatively, rely on Windows' built-in shortcuts, such as Windows + Shift + S, to open the Snipping Tool for flexible screenshot capture.
The Bottom Line
Screenshots help quickly capture what's on the screen without much worry. If you are facing issues with the screenshot keys or want to take custom screenshots, you should know how to take a screenshot on the Logitech keyboard. Learn multiple ways to take a snap of your screen without any print screen key. The best of all is EaseUS RecExpters. The app lets you capture the entire screen and add annotations and edits to your screenshots. Download it now, and snap your screen now.
How to Screenshot on Logitech Keyboard FAQs
Here are some frequently asked questions about how to take a screenshot on the Logitech keyboard.
1. How do you take a screenshot from a keyboard?
Most keyboards have dedicated keys or key combinations for taking screenshots. For Windows, you can use the Windows key + PrtSc, and for Mac, use the Shift + Command + 3 keys at once.
2. How do you screenshot on the Logitech keyboard without the Print Screen button?
Consider using a Snipping tool, Game Bar, or G Hub app to take screenshots without a print screen button.
3. What key is a screenshot on the Logitech keyboard?
Logitech Keyboard contains a dedicated Print Screen (PrtSc) key to screenshots. You must use it with the Windows key to snap the on-screen contents.
4. Where is the Windows button on the Logitech k850 keyboard?
The Windows key is in the usual space on the Logitech k850 keyboard. But, the key is named Start instead of Windows or Windows icon.