-
![]()
Daisy
Daisy is the Senior editor of the writing team for EaseUS. She has been working in EaseUS for over ten years, starting from a technical writer to a team leader of the content group. As a professional author for over 10 years, she writes a lot to help people overcome their tech troubles.…Read full bio -
Jane is an experienced editor for EaseUS focused on tech blog writing. Familiar with all kinds of video editing and screen recording software on the market, she specializes in composing posts about recording and editing videos. All the topics she chooses …Read full bio
-
![]()
Alin
Alin is an experienced technical blog writing editor. She knows the information about screen recording software on the market, and is also familiar with data cloning and data backup software. She is expert in writing posts about these products, aiming at providing users with effective solutions.…Read full bio -
Jean is recognized as one of the most professional writers in EaseUS. She has kept improving her writing skills over the past 10 years and helped millions of her readers solve their tech problems on PC, Mac, and iOS devices.…Read full bio
-
![]()
Jerry
Jerry is a fan of science and technology, aiming to make readers' tech life easy and enjoyable. He loves exploring new technologies and writing technical how-to tips. All the topics he chooses aim to offer users more instructive information.…Read full bio -
![]()
Rel
Rel has always maintained a strong curiosity about the computer field and is committed to the research of the most efficient and practical computer problem solutions.…Read full bio -
![]()
Gemma
Gemma is member of EaseUS team and has been committed to creating valuable content in fields about file recovery, partition management, and data backup etc. for many years. She loves to help users solve various types of computer related issues.…Read full bio -
![]()
Shelly
"I hope my articles can help solve your technical problems. If you are interested in other articles, you can check the articles at the bottom of this page. Similarly, you can also check my Twitter to get additional help."…Read full bio
Page Table of Contents
Jane Zhou
Updated on Jun 09, 2026
0 Views |
0 min read
Quick Navigation:
- Record Oculus Quest Gameplay with Built-in Recording Feature
- Screen Record Oculus Quest Gameplay Video on PC/Mac
- Final Words
- How to Record Oculus Gameplay FAQs
Oculus Quest Gameplay has proved to be an efficient video recorder with which you can achieve a high-quality video recording experience. After providing services for over five years, its advanced version Oculus Quest came into the market with new & better VR technology.
This evolution was not only a minor internal upgrade but also the hardware. With extra storage, better RAM, an advanced processor, a good display, and stable graphics & frame rate, it's obvious for people to record Oculus 2 gameplay videos. However, it's better to learn the correct procedure for how to record Oculus Quest gameplay.
So this write-up focuses on the technical knowledge about Oculus, methods for how to record VR gameplay videos in better quality, and relevant information. Let's dive deep into its details!
Record Oculus Quest Gameplay with Built-in Recording Feature
Oculus Quest 2 headset lets you have the best video recording experience without cables. With a sharper screen, lightweight design, and powerful processor, it offers an immersive experience. It is an excellent choice for those who want to capture gameplay smoothly, and you can effortlessly use its in-built recording and sharing function. Along with taking screenshots, it helps you in casting graphics to TV, PC, or phone.
Keeping in view all these features, you would undoubtedly be excited to learn about how to record Oculus Gameplay:
Step 1. Firstly, you have to press the "Oculus" button from the right controller of your headset, which will lead you to the main Quest menu. Click the "Share" icon from the right side to open the "Sharing" menu.

Step 2. Next, you will see the four options such as "Record Video," "Take Photo," "Go Live," and "Chat." Go to the "Record Video" to get the video recording; however, you must have enabled the "Voice Commands" first to take screenshots, stream, or cast during gameplay.
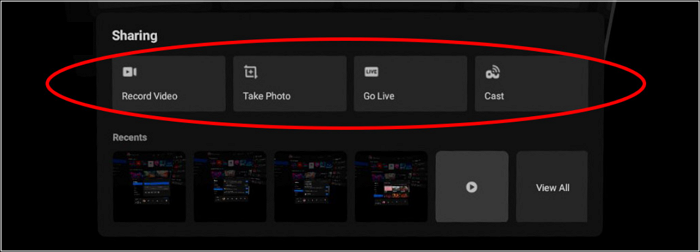
Step 3. You need to use the "Cast" option to stream videos on a LAN network or devices like a PC, Mac, TV (via Chromecast), or even phone using the Oculus app. While the "Go Live" tab helps you stream the gameplay videos over the internet, only Facebook.
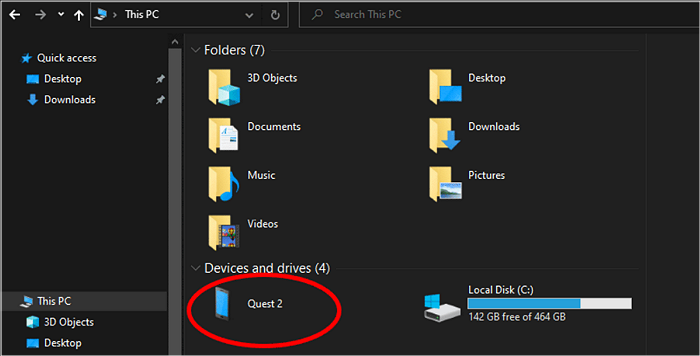
Step 4. The headset can access all recorded videos by hitting the "View All" button. But if you want to save these videos on a PC for sharing or editing purposes, it is possible by connecting Quest 2 to your computer. That's all!
Screen Record Oculus Quest Gameplay Video on PC/Mac
If you are considering ways to achieve lossless recording, EaseUS RecExperts must be your way to go. This Windows screen recorder is credible and comprehensive to help you record screens without any lagging or watermark issues. So you will be able to record smoothly and efficiently while playing games. Also, turning on the game recording mode and recording protected videos is at your fingertips.
Beginners can benefit from its user-friendly and intuitive interface and complete the task in a few clicks. More so, the game recording software supports 10+ file formats to record and edit videos. It aids you in capturing screenshots and adjusting other settings like playback speed, volume, device sounds, and more. Even you will be able to use its additional features like trimming, adding opening/closing, extracting audio from videos, etc.
Features
- Record a lot of games without any lagging
- Support flexibility to record an area or whole screen
- Let you record game and face at the same time
- Help you schedule the video recording quickly
- Offer advanced media player to preview videos
Let's consider the steps below on how to use EaseUS RecExperts for Oculus gameplay:
Stage 1. Share OCulus Gameplay in The Browser Window
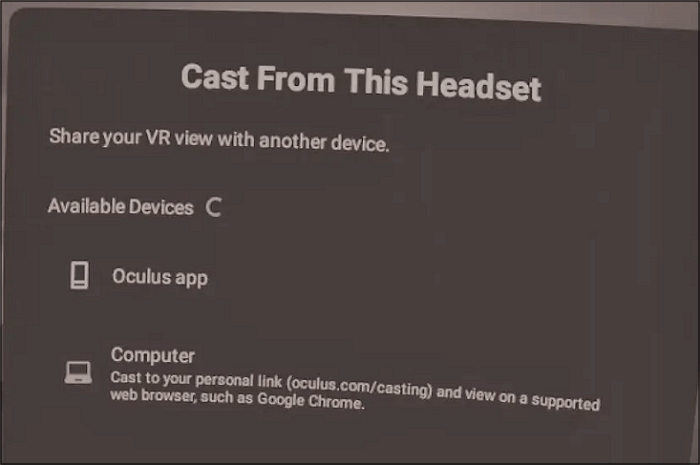
Step 1. Go to Meta's Oculus casting portal in the browser and log in.
Step 2. Press the Oculus button on Quest, and then choose the Sharing button. Once done, you will see the gameplay video on your computer.
Stage 2. Use EaseUS Game Recorder
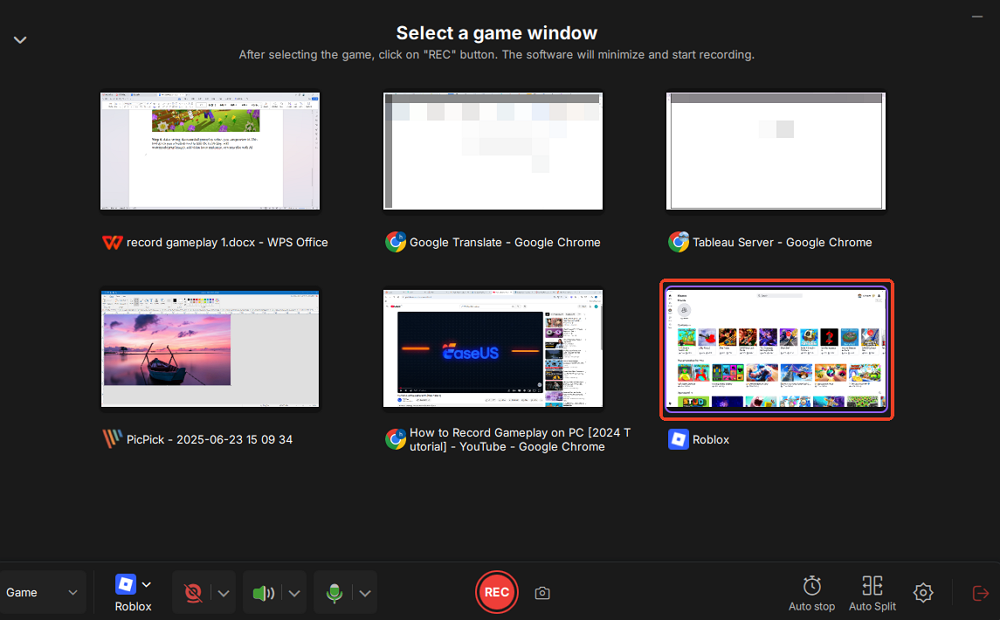
Step 1. Launch the gameplay that you want to record. Next, open EaseUS RecExperts and click on the Game mode on the main interface.

Step 2. Then, choose a Game Window. Then, you can enable the audio and webcam recording if needed. When all are done, click the REC button to start the gameplay recording.
Step 3. A floating toolbar will pop up, allowing you to pause or stop the recording. Additionally, the camera icon lets you take a screenshot, and the timer icon enables you to set an automatic stop for the recording.

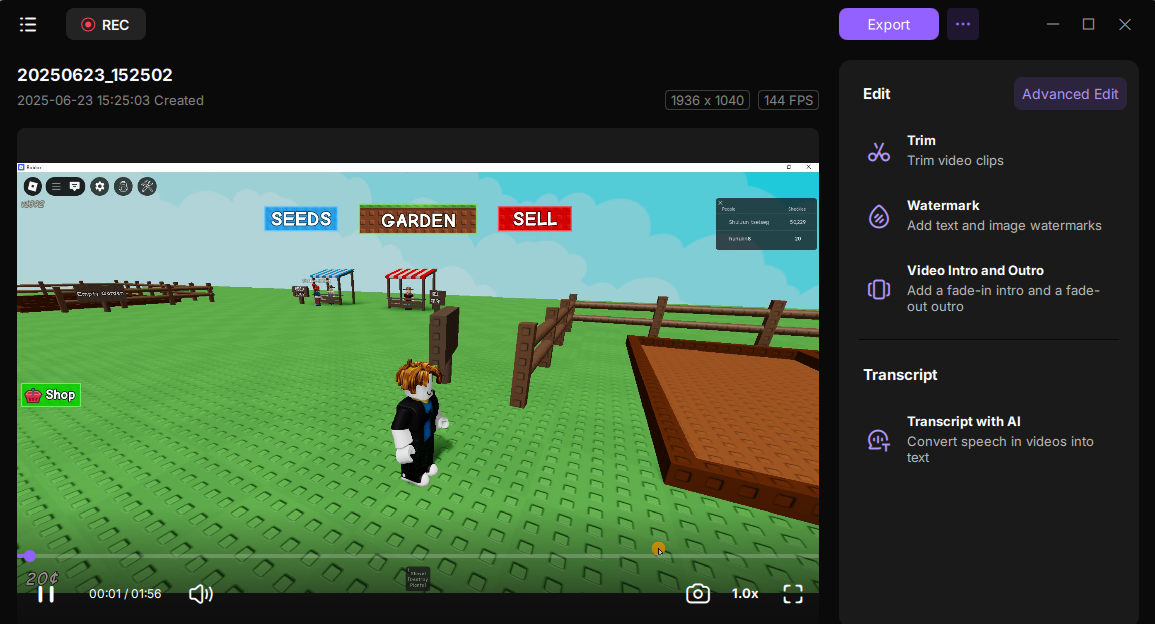
Step 4. After saving the recorded gameplay video, you can preview it. This tool provides a built-in feature to trim the recording, add a watermark (text/image), add video intro and outro, or transcribe with AI.
Final Words
Undoubtedly, recording with an Oculus built-in recorder is easier if you know the processing method. And the above guide offers the complete process for how to record Oculus 2 gameplay video on your PC or Mac. Even you will be able to get improved output quality.
In addition, a better & intelligent screen recording software is recommended for recording Oculus gameplay videos. Not only will you be able to adjust all the settings with EaseUS RecExperts, but you will also get the highest video quality in a quick manner. Let us try this recorder once!
How to Record Oculus Gameplay FAQs
1. How do I record Oculus on my phone?
Downloading or recording videos (Gameplay) from Oculus Quest on your phone is straightforward. You must insert the files menu to the Oculus home page, and don't forget to turn on the auto sync option. Otherwise, it is possible to sync manually by pressing the three-dot menu button on the video and selecting Sync.
Next, you need to open the Oculus application and choose the Gallery button. Click on the desired video you want to download, opt for the Share icon, and select Recording from the top-right corner.
2. How do I get videos off of Oculus 2?
Connecting the device to your PC is possible to take and share video clips off Oculus 2. Now, you need to view PC files, open the internal storage, go to the Oculus folder, and then the folder with desired videos. From here, you will be able to copy or share the files.
3. How long can you record a video on Oculus Quest 2?
The duration to record a video on Oculus Quest 2 depends upon the storage of the Oculus you are using. But whether you use the one with 128GB or 256GB, you will be able to record as many videos as possible. You need to adjust the recording settings so the output resolution can improve.
4. Does the Oculus Quest record you?
Oculus Quest 2 also has a set of 4 infrared cameras for gameplay to be identified in the room. According to the information, even if they capture any data, it is not a part of the data collection. Since it always cares for your privacy, you won't become a victim of spying cameras.