-
![]()
Daisy
Daisy is the Senior editor of the writing team for EaseUS. She has been working in EaseUS for over ten years, starting from a technical writer to a team leader of the content group. As a professional author for over 10 years, she writes a lot to help people overcome their tech troubles.…Read full bio -
Jane is an experienced editor for EaseUS focused on tech blog writing. Familiar with all kinds of video editing and screen recording software on the market, she specializes in composing posts about recording and editing videos. All the topics she chooses …Read full bio
-
![]()
Alin
Alin is an experienced technical blog writing editor. She knows the information about screen recording software on the market, and is also familiar with data cloning and data backup software. She is expert in writing posts about these products, aiming at providing users with effective solutions.…Read full bio -
Jean is recognized as one of the most professional writers in EaseUS. She has kept improving her writing skills over the past 10 years and helped millions of her readers solve their tech problems on PC, Mac, and iOS devices.…Read full bio
-
![]()
Jerry
Jerry is a fan of science and technology, aiming to make readers' tech life easy and enjoyable. He loves exploring new technologies and writing technical how-to tips. All the topics he chooses aim to offer users more instructive information.…Read full bio -
![]()
Rel
Rel has always maintained a strong curiosity about the computer field and is committed to the research of the most efficient and practical computer problem solutions.…Read full bio -
![]()
Gemma
Gemma is member of EaseUS team and has been committed to creating valuable content in fields about file recovery, partition management, and data backup etc. for many years. She loves to help users solve various types of computer related issues.…Read full bio -
![]()
Shelly
"I hope my articles can help solve your technical problems. If you are interested in other articles, you can check the articles at the bottom of this page. Similarly, you can also check my Twitter to get additional help."…Read full bio
Page Table of Contents
0 Views |
0 min read
PAGE CONTENT:
macOS Sonoma is the latest upgrade to macOS Ventura. However, many users face a macOS Sonoma black screen after the upgrade. If your Mac shows a black screen, your data is at risk of loss, and we suggest you fix it instantly.
We have discussed the possible causes and their solutions to fix the black screen issue. Also, there is an unlimited screen recorder or online screen recorder to elevate your entertainment experience. If your macOS Sonoma works fine, try our suggestion to record your screen hassle-free. Let's explore the reasons, fixes, and bonus suggestions!
What Is macOS Sonoma
macOS Sonoma 14.0 is the latest upgrade of Apple's operating system, macOS, for Macintosh computers, released on 26 September 2023. It is the successor to macOS Ventura and was announced at WWDC 2023 in June, named after California's wine region in Sonoma County.
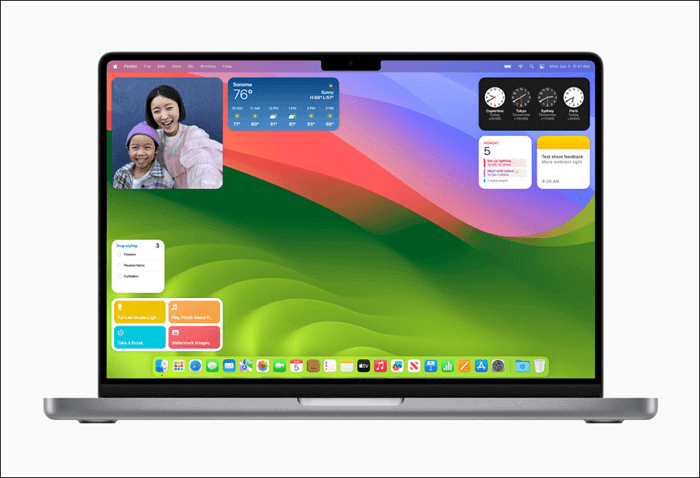
macOS Sonoma has many features and improvements, primarily focusing on productivity and creativity. For example, app icons are now more round, widgets are entirely revamped, and the lock screen includes date and time, like iOS and iPadOS. The upgrade supports MacBook Air and MacBook Pro (2018 or later), iMac, iMac Pro, Mac Mini, Mac Pro, and Mac Studio.
Why Does Your Mac Screen Go Black After Upgrading to macOS Sonoma
After upgrading to macOS Sonoma, you may run into three common scenarios:
- Your Mac may get stuck on the black screen at the restart stage
- You do not see the login screen after the Sonoma installation completes, followed by a restart
- You see a black screen after entering the password on the login screen after upgrading to Sonoma
You may notice a macOS Sonoma black screen due to the following reasons:
- Interference of external devices and incompatible peripherals
- The startup disk is corrupted
- Poor contact between firmware and hardware
- macOS upgrade fails, and your Mac has not installed the intact macOS Sonoma installer
- Incompatible software/hardware
- Your MacBook battery lacks the power to boot up the system
- Due to authorization database corruption, you have limited access to your Mac system
- Apple Silicon Mac takes a while to load up the new system after the update. But unfortunately, you did not wait long enough after the update, and the screen went black.
🔎People Also Read:
How to Fix Black Screen on macOS Sonoma
Regardless of your situation after upgrading to Sonoma, you can follow these quick solutions to resolve the macOS Sonoma black screen issue. Check out these eight methods to fix the problem with detailed steps. Here is a fast list of these methods.
- 1. Check the Power Supply
- 2. Disconnect External Devices
- 3. Disable FileVault in Disk Utility in Recovery Mode
- 4. Run First Aid to Check Your Macintosh HD in Recovery Mode
- 5. Run the Command in Terminal and Restart Your Mac
- 6. Reset NVRAM
- 7. Recover data and Clean Install macOS Sonoma
- 8. Disable Automatic Graphics Switching
1. Check the Power Supply
macOS update requires a sufficient power supply. Check the power supply when the MacBook won't turn on and shows a black screen. It could be that your Mac's battery has drained out. You must connect your Mac to a power source and wait some time before pressing the power button to restart it.

2. Disconnect External Devices
Another reason for your macOS Sonoma's black screen is that the connected peripherals block your system from booting up after the upgrade. Consider disconnecting them all to check if you can start and load the system from the black screen.

If it boots up successfully, reconnect the external devices individually to find which one's responsible for the cause.
3. Disable FileVault in Disk Utility in Recovery Mode
macOS has a disk encryption feature called FileVault that helps protect data on your startup disk. You can fix the black screen issue once you turn off the FileVault on Mac.
Step 1. Boot into macOS Recovery Mode and open Disk Utility.
Step 2. Click your startup disk from the Disk Utility sidebar.

Step 3. Click File > Turn Off Encryption from the top menu bar and enter your admin password.
Step 4. Click the Apple menu and restart to see if your MacBook boots up.
4. Run First Aid to Check Your Macintosh HD in Recovery Mode
Startup disk errors also cause a black screen. You can use a Disk Utility First Aid to check and repair your startup disk.
Step 1. Boot your Mac in Recovery Mode and open Disk Utility from the macOS utilities.
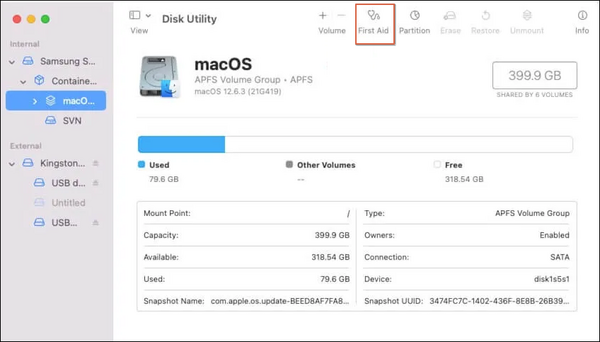
Step 2. Select your startup disk and click First Aid in the Disk Utility window.
Step 3. Hit Run to start check and wait until the process finishes before restarting your Mac.
5. Run the Command in Terminal and Restart Your Mac
The authorization database on the system may have some errors, causing your requirement for the rights from it to log into your Mac not to be granted. In such a case, your Mac gets stuck on the login or loading screen and shows a black screen after the upgrade. You can run a command to let the system replace the authorization database with a default copy.
Step 1. Enter the macOS Recovery Mode and hit Utilities on the menu bar to open Terminal.
Step 2. Copy-paste the command into the Terminal window and click Return. Replace Macintosh HD with macOS if your Mac startup disk is named macOS in Disk Utility.
mv "/Volumes/Macintosh HD/var/db/auth.db"
"/Volumes/Macintosh HD/var/db/auth.db.bak"
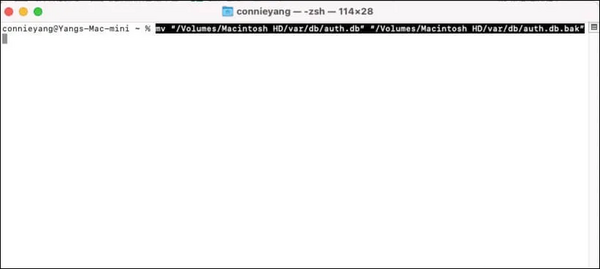
Step 3. Restart your Mac.
6. Reset NVRAM
NVRAM, or Non-volatile random access memory, is the amount of memory in your macOS that stores system settings to keep the Mac boot up properly. Resetting NVRAM can also fix the unbootable Mac with a black screen.
Step 1. Shut down your Mac by pressing the Touch ID (power button).
Step 2. Hold the Power button again and press the Option key + Command key + P and R keys together for 20 seconds.
Step 3. Release all the keys until the second startup sounds out. Or until you see the second disappearance of the Apple logo.
- Important:
- Apple Silicon Mac auto-resets NVRAM when necessary; you need not do so manually.
7. Recover data and Clean Install macOS Sonoma
Clean Install macOS Sonoma on your Mac by erasing your Mac and reinstalling the system. However, it can result in permanent data loss. So ensure backing your data first.
Step 1. Boot into Internet recovery mode.

Step 2. For Apple Silicon or T2-chipped Mac: Click Recovery Assistant on the menu bar and tap Erase Mac.
For non-T2 secured and Intel-based Mac: Click Disk Utility and select Macintosh HD (or macOS drive). Then click Erase.

Step 3. Back to the Utilities window, tap the Reinstall macOS Sonoma utility to install macOS Sonoma on your Mac.
8. Disable Automatic Graphics Switching
You can turn off Automatic Graphics card (GPU) Switching, but this fix only works for black screens on dual-GPU MacBook Pro.
Step 1. Tap System Preferences from the Apple menu and go to Energy Saver.

Step 2. Toggle the switch next to Automatic Graphics Switching to disable it.
Step 3. Restart your Mac normally.
Bonus Tip: Screen Record on macOS Sonoma
Have you ever thought of a screen record on a Mac? EaseUs RecExperts can indeed cease your search with its top-notch features and seamless functions.
- 🧩Rating: 4.9 out of 5 stars
- 💻Compatibility: Windows PC and macOS
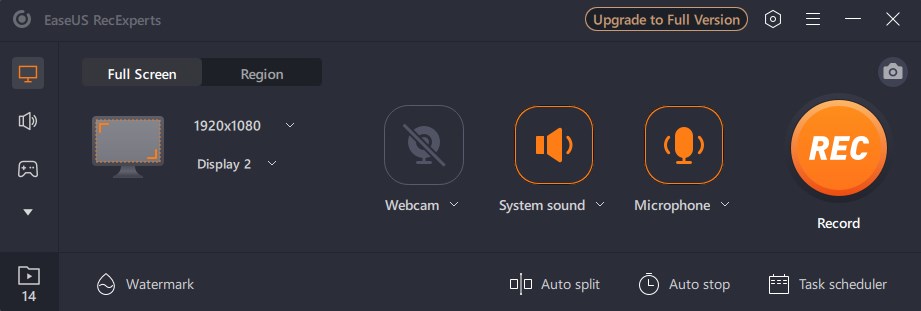
EaseUS RecExperts is a screen and audio recorder that helps capture PCs with high-quality videos without a watermark. The app records any region on the PC screen with audio or webcam and 2D/3D gameplay highlights without lag or time limit. Furthermore, its embedded video editor and media player enhance your experience.
You can click the button to download this perfect screen and audio recorder!
✅Prominent features
- Helps record voice on Mac
- Offers a built-in free screenshot software to capture whole or targeted screen area
- Supports a built-in free record player to play video and audio without hassle
- Record audio from YouTube
EaseUs RecExperts helps record podcasts on a Mac or on a PC and enhances 4K/8K video. Consider downloading this excellent screen recorder to elevate your entertainment experience.
So, if you were looking to record gameplay on PC for live streaming with up to 144fps and without lags, EaseUs RecExperts can be your best choice.
You can share this article on your social media platforms to let more Mac users in need know how to fix black screens after upgrading to macOS Sonoma and know about this excellent screen recorder!
Conclusion
macOS Sonoma black screen is annoying. But we have shared the plausible reasons and workable fixes to help tackle the issue. Check for the exact cause to use the right solution. However, if you wish to record your gameplay, video, podcast, or sound on your macOS Sonoma, don't forget to try EaseUS RecExperts for an unhindered entertainment experience.
FAQs About macOS Sonoma Black Screen
Fixing the macOS Sonoma black screen can be frustrating. However, if any query still needs to be solved, these FAQs can help solve the doubts.
1. How do I fix my black screen on the CSGO Mac?
It can be annoying when you open CSGO and cannot see anything but hear the music. Try this fix to resolve the issue.
Step 1. Press Command h simultaneously to bring your desktop.
Step 2. Press the CSGO icon (on the dock: csgo_osx64) and click Show All Windows. Then tap the window that pops up.
2. How do you wake up with a black screen on a Mac?
If you are using a MacBook Pro, try restarting it by holding the Control + Command keys and Power/Touch ID button to restart it automatically.
Or, hold the power button for 5 seconds to shut down the system, wait for 15 seconds, and press the button again to reboot.
3. How to reboot the Mac with Terminal?
You can restart a MacBook via Terminal following these steps:
Step 1. Press the Command + Space keys together to open Spotlight Search and find Terminal.
Step 2. Enter the command: sudo shutdown -r
Step 3. Replace with the specific time you'd like to reboot your Mac. For example, type "now" to reboot immediately or +30 to do it after half an hour.
Step 4. Tap Enter and type your Mac's password when prompted.
EaseUS RecExperts

One-click to capture anything on screen!
No Time Limit, No watermark
Start Recording

