-
![]()
Daisy
Daisy is the Senior editor of the writing team for EaseUS. She has been working in EaseUS for over ten years, starting from a technical writer to a team leader of the content group. As a professional author for over 10 years, she writes a lot to help people overcome their tech troubles.…Read full bio -
Jane is an experienced editor for EaseUS focused on tech blog writing. Familiar with all kinds of video editing and screen recording software on the market, she specializes in composing posts about recording and editing videos. All the topics she chooses …Read full bio
-
![]()
Alin
Alin is an experienced technical blog writing editor. She knows the information about screen recording software on the market, and is also familiar with data cloning and data backup software. She is expert in writing posts about these products, aiming at providing users with effective solutions.…Read full bio -
Jean is recognized as one of the most professional writers in EaseUS. She has kept improving her writing skills over the past 10 years and helped millions of her readers solve their tech problems on PC, Mac, and iOS devices.…Read full bio
-
![]()
Jerry
Jerry is a fan of science and technology, aiming to make readers' tech life easy and enjoyable. He loves exploring new technologies and writing technical how-to tips. All the topics he chooses aim to offer users more instructive information.…Read full bio -
![]()
Rel
Rel has always maintained a strong curiosity about the computer field and is committed to the research of the most efficient and practical computer problem solutions.…Read full bio -
![]()
Gemma
Gemma is member of EaseUS team and has been committed to creating valuable content in fields about file recovery, partition management, and data backup etc. for many years. She loves to help users solve various types of computer related issues.…Read full bio -
![]()
Shelly
"I hope my articles can help solve your technical problems. If you are interested in other articles, you can check the articles at the bottom of this page. Similarly, you can also check my Twitter to get additional help."…Read full bio
Page Table of Contents
0 Views |
0 min read
PAGE CONTENT:
High-definition video or HD video has higher resolution and quality than a common one. Uploading an HD video to social media platforms like Facebook can please viewers, as a clear video brings a better visual experience and engages your audience. Some people might ignore video in bad quality directly, so it's necessary to maintain its quality. The desktop version of Facebook has many benefits, like allowing high-quality videos to be uploaded. To keep good video quality, follow here to learn how to upload HD video to Facebook from the desktop.

🔎Here is a quick guide to uploading HD video to Facebook:
1. Open Facebook on your browser. Log into your account. Check this platform via Internet Explorer.
2. Go to Account. Hit "Settings and Privacy" and choose "Settings". Scroll down the menu and find "Videos".
3. Now, from the "Video Settings", you choose "HD if available">>>More
Bonus Tips: Capture HD Video Before Uploading it to Facebook
Are you looking for how to record live videos and calls from Facebook? Follow the below tutorial!
Related Article:
How to Upload an HD Video to Facebook in Desktop on Windows/Mac
Most people want to upload videos to Facebook as it's the desired way to share their moments. To avoid losing much quality of the video, you can find a smart way to make the video in HD. In the desktop version of Facebook, use the Video Settings to change your uploaded video quality. Follow the guide below to change the setting.
💡Advised settings for video: Video in a very long time can affect the quality when uploading it to Facebook. You need to control the size and time of it. Better ensure that the time of the video is shorter than 120 minutes. Also, you can change the frame rate of the video using an efficient tool.
Please note that before starting the operation, please make sure that the following things are ready.
- 📝What to prepare
- A Windows or Mac PC
- Capture a HD Video
- Frequently used browsers
Here is a list of steps for how to upload HD video to Facebook from desktop on Windows/Mac:
Step 1. Open Facebook on your browser and log into your account. For Windows users, check this platform via Internet Explorer. For Mac, find it in Safari or Google Chrome. After logging in, set video quality before posting.
Step 2. To upload the HD videos, go to Account, which is on the top right of the page. Then, go to the "Settings and Privacy" and choose "Settings". Scroll down the menu and find the "Videos".
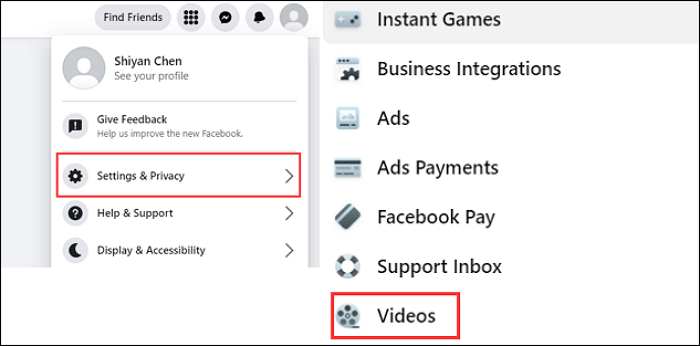
Step 3. Now, from the "Video Settings", you choose "HD if available". Then, uploading HD videos to Facebook is the next step. On this page, you can also make other adjustments based on your needs.

Step 4. Back to "Home" and hit "Photo/Video". Choose the video from your desktop. Meanwhile, you are allowed to add a description of the video before posting it to Facebook. Then, wait for it to be uploaded and click "Post".

Bonus Tips: Capture HD Video Before Uploading it to Facebook
Believe that you have learned about how to upload HD videos to Facebook from the desktop. If you find an interesting living story in a browser and want to upload it to Facebook, choose one practical screen recorder. EaseUS RecExperts, this outstanding screen recorder, is the most efficient tool to capture your screen in high-definition on Windows.
The saved video in this tool can show you a higher resolution and maintain high quality. Even better, you can also set the frame rate of the video to 60fps which can also contribute to keeping good quality. Besides making it a high-quality video, you can choose saved video formats like MP4, MOV, FLV, etc. Also, you can add the microphone as an external sound source.
Now, to capture high-quality video with sound, download it for free! No registration is needed.
EaseUS RecExperts
- Record videos on Snapchat, Facebook, or other medial social platforms.
- Trim video/audio, add effects, and compress files.
- Record Zoom meeting without permission
- Choose the sound source like system and microphone sound
- Record the screen with audio on Mac
This is a powerful tool that helps in capturing your favorite video with high quality. Whether you need to capture video on Facebook or make an HD video when capturing the screen, it meets your requirements. Also, it provides you with more fantastic functions when capturing the screen as mentioned.
To know how to capture the screen with this tool, you can see more steps:
Step 1. Launch EaseUS RecExperts and select your preferred mode: Full Screen, Custom, Window, Game, Audio, or Webcam, depending on what you want to capture. For example, if you're recording a tutorial or walkthrough, the Full Screen or Window mode may work best.
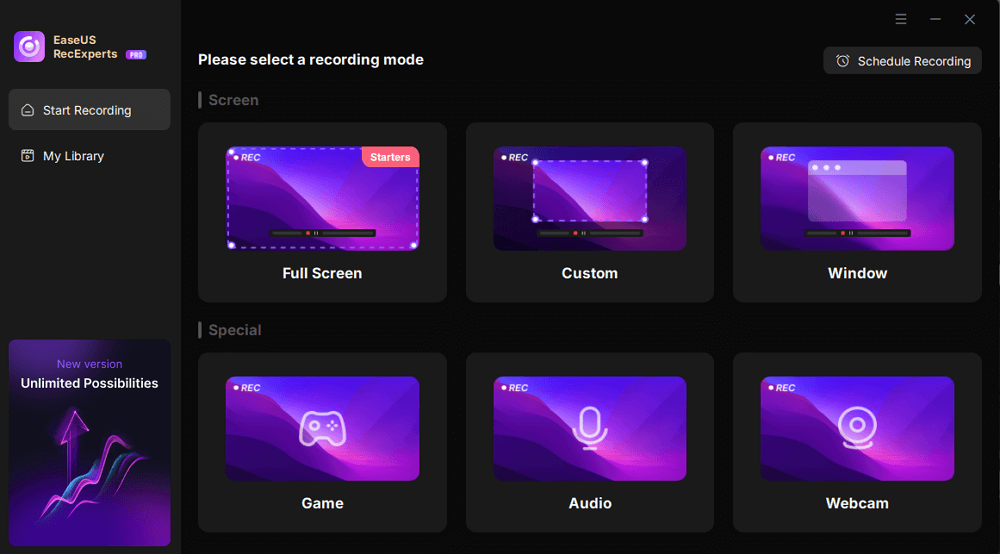
Step 2. Use the toolbar to toggle on the Speaker, Microphone, or Webcam. This is useful if you're explaining something and want your voiceover or facecam included in the recording. You can also turn them off for a clean, silent screen capture.

Step 3. Click the red REC button to begin. While recording, you'll see a floating control bar on your screen. Click the pencil icon to activate annotation features. These tools allow you to highlight areas, draw arrows, underline key content, or write directly on the screen.

Step 4. You can click the Pause button to temporarily stop recording if you need to adjust your content, or click the Stop button to finish. If you want to remove annotations while recording, use the clear option in the drawing toolbar.
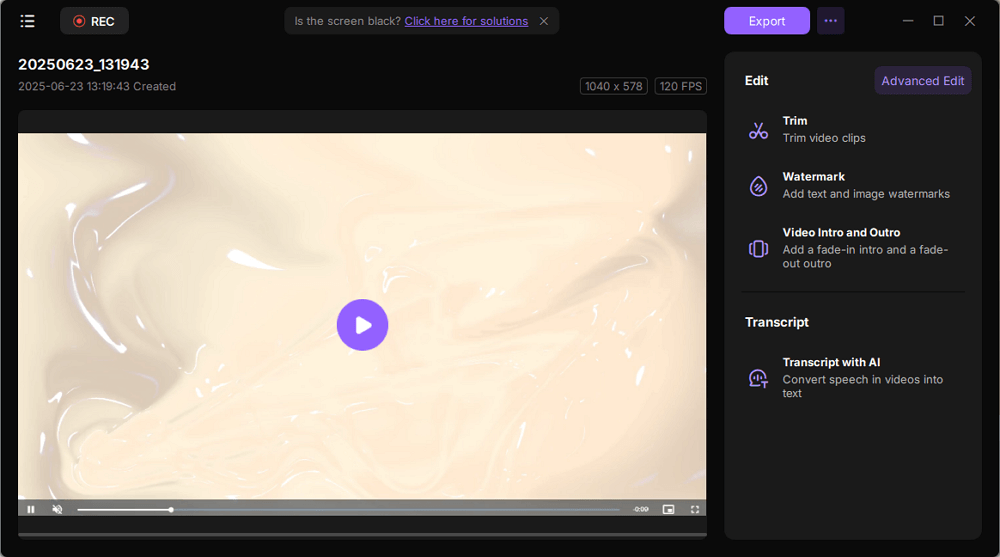
Step 5. Once the recording ends, you'll be taken to the preview window where you can edit or manage your files. The annotations you made will be preserved in the final video.
FAQs About Uploading HD Video to Facebook from Computer
Look at this part if you have the same issues.
1. Why is my video blurry when I upload it to Facebook?
Facebook may reduce the size of your videos when uploading them. Most social media platforms have this setting for controlling storage. The quality may be reduced when showing on the platform. To avoid this situation, you can adjust some advanced settings.
2. How do I upload high-quality videos to Facebook?
Here is a list of steps to upload an HD video to Facebook. You should set the uploading video in HD.
1. Find "Settings and Privacy" when you open Facebook.
2. Then, you should select "Settings". Scroll down the menu and hit "Videos".
3. In the "Video Settings", you should select the "HD if available" option.
4. Finally, back to the "Home" and choose "Photo/Video". Now, you can upload videos.
EaseUS RecExperts

One-click to capture anything on screen!
No Time Limit, No watermark
Start Recording

