-
![]()
Daisy
Daisy is the Senior editor of the writing team for EaseUS. She has been working in EaseUS for over ten years, starting from a technical writer to a team leader of the content group. As a professional author for over 10 years, she writes a lot to help people overcome their tech troubles.…Read full bio -
Jane is an experienced editor for EaseUS focused on tech blog writing. Familiar with all kinds of video editing and screen recording software on the market, she specializes in composing posts about recording and editing videos. All the topics she chooses …Read full bio
-
![]()
Melissa Lee
Melissa Lee is an experienced technical blog writing editor. She knows the information about screen recording software on the market, and is also familiar with data cloning and data backup software. She is expert in writing posts about these products, aiming at providing users with effective solutions.…Read full bio -
Jean is recognized as one of the most professional writers in EaseUS. She has kept improving her writing skills over the past 10 years and helped millions of her readers solve their tech problems on PC, Mac, and iOS devices.…Read full bio
-
![]()
Jerry
Jerry is a fan of science and technology, aiming to make readers' tech life easy and enjoyable. He loves exploring new technologies and writing technical how-to tips. All the topics he chooses aim to offer users more instructive information.…Read full bio -
![]()
Rel
Rel has always maintained a strong curiosity about the computer field and is committed to the research of the most efficient and practical computer problem solutions.…Read full bio -
![]()
Gemma
Gemma is member of EaseUS team and has been committed to creating valuable content in fields about file recovery, partition management, and data backup etc. for many years. She loves to help users solve various types of computer related issues.…Read full bio -
![]()
Shelly
"I hope my articles can help solve your technical problems. If you are interested in other articles, you can check the articles at the bottom of this page. Similarly, you can also check my Twitter to get additional help."…Read full bio
Page Table of Contents
0 Views |
0 min read
Are you wondering why your Chrome screen recorder no sound on the Chrome browser? Have no idea how to record on a school Chromebook with audio? Read this article for a detailed guide on how to record Chrome screen with audio on a Windows PC, Mac device, or Chromebook.
How to Screen Record on Chrome with Audio on Windows/Mac
When using Chrome browser on a Windows/Mac laptop or desktop, if you want to let Chrome capture video with audio, there are three methods available (listed by level of effectiveness):
1️⃣Desktop recorder: comprehensive recording features; require downloads & installations; no signup; unlimited free recording times.
2️⃣Online recorder: basic recording features; no downloads, installations, signup; unlimited free recording times.
3️⃣Chrome Extension: basic recording features; require downloads, installations, signup; limited free recording times.
Let's delve into the three options one by one.
Record Audio from Chrome with Desktop Apps
Using a third-party desktop recorder is the most effective choice to record web browser. Here you are recommended to try EaseUS RecExperts.
This robust screen recorder supports both Windows and Mac operating systems. It lets you seamlessly record Chrome, Firefox, Microsoft Edge, Opera, and more browsers with audio in simple clicks.
Let's see how to record Chrome screen with audio
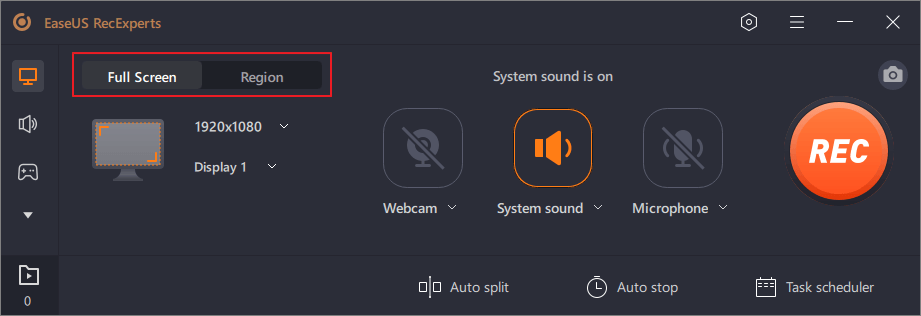
Step 1. Launch EaseUS RecExperts. There are two modes for screen recording. Choose "Full Screen", this tool will capture the whole screen; choose "Region", you will need to select the recording area manually.
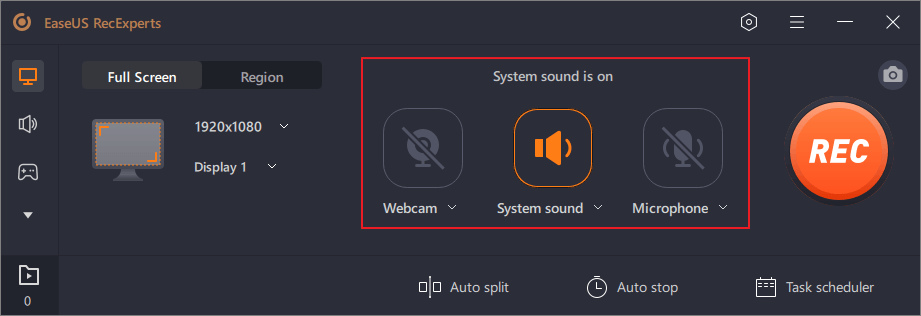
Step 2. After that, you can choose to record the webcam, system sound, or microphone as you like. Of course, you can turn them off if you only need to record the silent screen.
Step 3. Then, you can click the red "REC" button to start recording. Now you will see a menu bar on your screen. If you want to pause the recording, click on the white "Pause" button; to end the recording, click on the red "Stop" button.
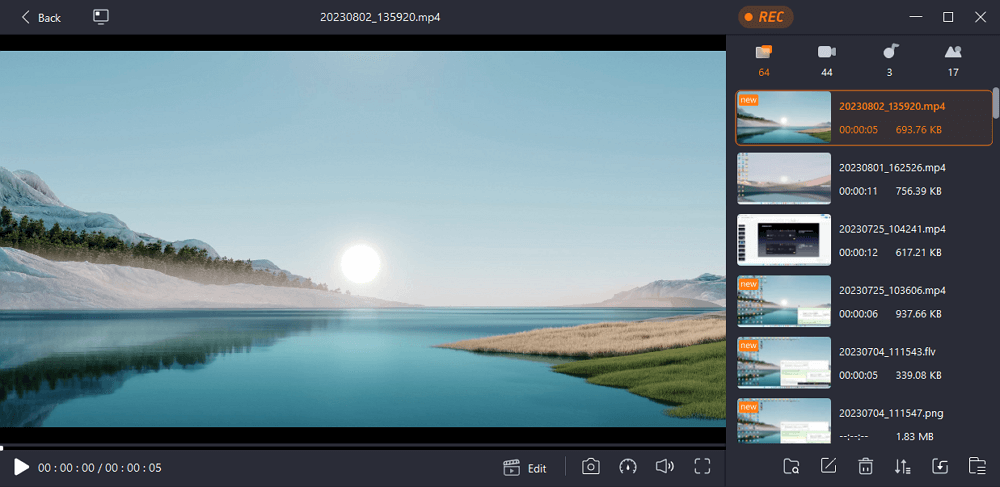
Step 4. After recording, you will be led to the recording list interface. Here you can view or edit your recordings easily.
Capture Chrome Audio with Online Tool
If you want to screen record Chrome without software, using an online screen recorder is the best choice.
EaseUS online screen recorder supports Windows, Mac, and ChromeOS devices, letting you record Chrome tab with sound and video without a watermark or time limit.
See how to screen record Chrome with audio from websites:
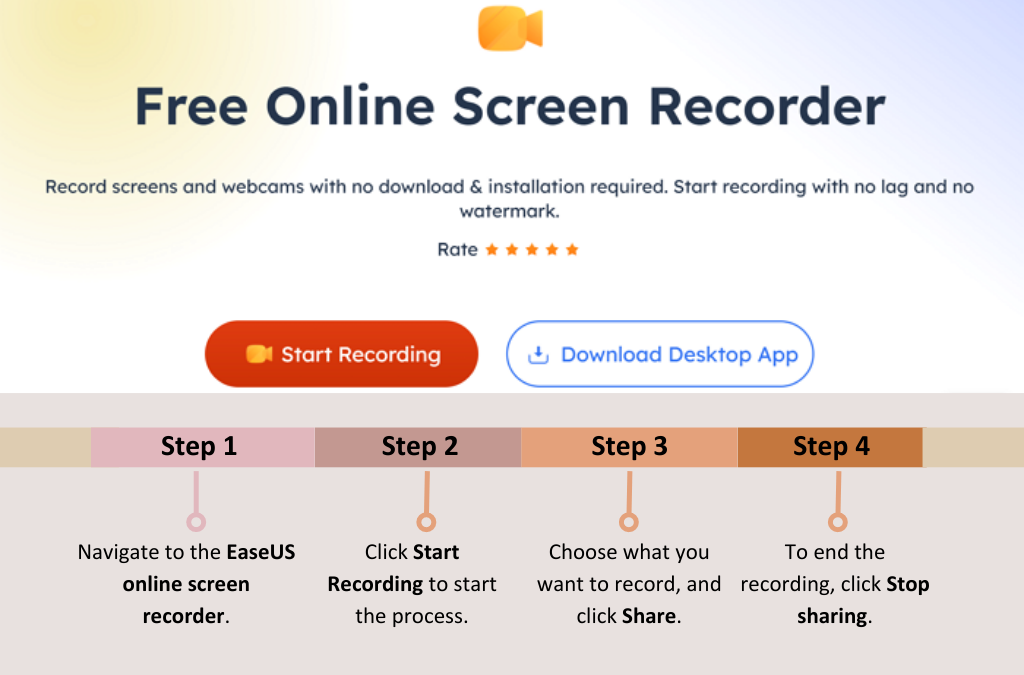
Step 1. Open the tab or window you want to record.
Step 2. Visit https://recorder.easeus.com/online-screen-recorder.html on the Chrome browser. Click Start Recording.
Step 3. Toggle on the Webcam, System Sound, or Microphone if necessary. Then, click Start Recording.
Step 4. Select a Chrome tab, window, or entire screen and click Share. Before the 3-second countdown is over, go back to the screen you want to record.
Step 5. Click Stop sharing from the page if it is over. You will automatically return to the recording page, where you can preview and play this recording.
Step 6. Click Save to download this video to your computer. To record the game again, click Start a new recording.
Share this post with more people on your social media platforms!
Record Chrome Screen and Audio with Google Extension
Google Chrome extension is another way to help record screen on Chrome with audio. There are many Chrome extension step recorders in the market. Here we take Screencastify as an example.
Step 1. Visit the Screencastify extension page with the Chrome browser on your Windows or Mac computer.
Step 2. Click Add to Chrome on the page and click Add extension in the popup. The download task will be initiated right now.
Step 3. When finished, click the Extensions button left to the Download button on the Chrome browser panel. Click Screencastify.
Step 4. Click the Sign In button on the popup. Follow the on-screen instructions to create an account.
Step 5. Go to the tab or window you want to record. Click the Screencastify icon on the Chrome extensions panel. You have three recording options: THIS LAB, FULL SCREEN, WEBCAM ONLY. Here we select THIS LAB.
Step 6. You can adjust the recording settings: microphone, camera, countdown, and drawing tools. Click Record.
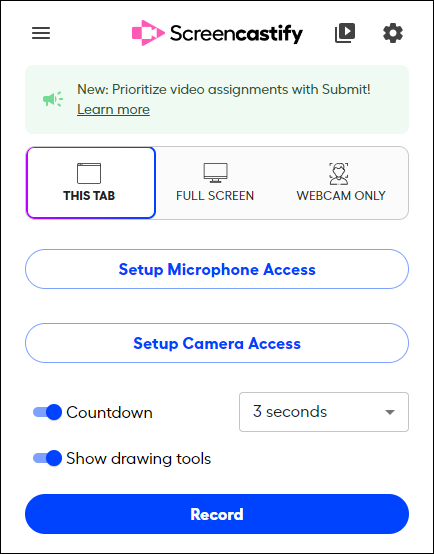
Step 7. To stop recording, click the Screencastify extension icon again. Click End in the recording bar.
Step 8. You will be led to a Screencastify Options page where you can save the video to your Google Drive or Local Device.
- Notice: The free version can record 10 free videos only.
How to Screen Record on Chromebook with Audio
The way to screen record Chromebooks with audio differs from that of recording a Chrome browser on Windows or Mac computers.
Finding a desktop Chromebook audio recorder for a school or work Chromebook is hard. You can choose an online recording tool or an add-on extension we talked about above.
Besides these two methods, Asus, Dell, HP, and other Chromebook users have a more convenient option: the built-in recording feature.
See how to record Chromebook screen with audio via its native recording feature:
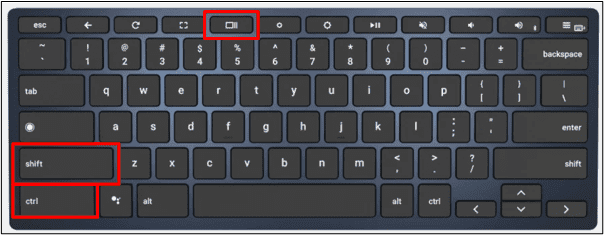
Step 1. Press and hold the Ctrl + Shift + Overview keys together. This will launch a snipping tool or a status area. Select Capture Screen here.
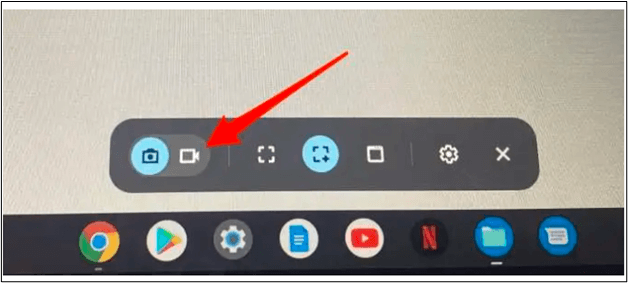
Step 2. A recording toolbar will appear on the screen. Switch the tab from screenshot to video recording.
Step 3. The Record Partial Screen button is selected by default. You can choose the plus-shaped crosshair icon to customize any region you want to record.
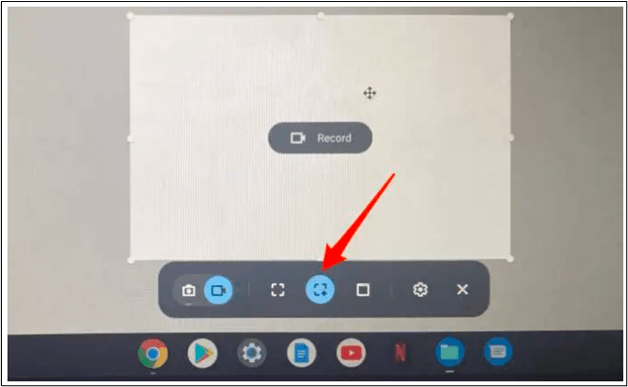
Step 4. Click the Settings button to toggle on the Record microphone option if needed.
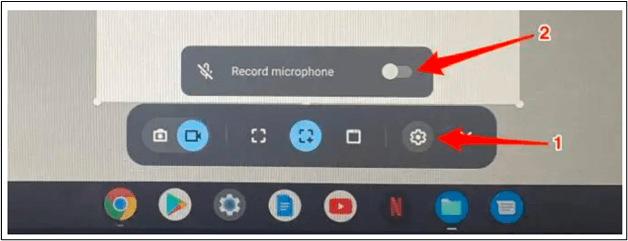
Step 5. You can start recording your Chromebook screen with audio.
Conclusion
Now, you have learned how to record Chrome screen with audio. You can use a desktop app, online tool, Chrome extension, and even a built-in feature to do this.
A desktop screen recorder like EaseUS RecExperts is the best choice considering the recording quality, simplicity, and effectiveness. It can meet your various demands on tutorials, lectures, gameplay footage, audio recording, music production, demo product marketing, etc.
No matter which method you choose, remember to select the most suitable one for yourself.
FAQs About How to Record Google Chrome Screen
Read this part to check more questions and answers on the topic of screen recording Chrome.
1. Does Chrome allow internal audio recording?
Chrome allows you to record internal audio in multiple ways:
- Use a desktop screen recorder like EaseUS RecExperts.
- Use online recording tools like EaseUS Online Screen Recorder.
- Use a Chrome extension like Chrome Audio Capture and Screencastify.
2. How do I enable recording in Chrome?
To grant screen recording permission in Google Chrome on Windows:
Step 1. When you choose to share the screen, a prompt will appear to let you record the entire screen, window, or tab. Select one option
Step 2. Check Share system audio. This lets you capture the audio of the recorded video.
To grant screen recording permission in Google Chrome on Mac:
Step 1. On the Screen Recording prompt, click Open System Preferences. (Navigate to Apple Menu > System Preferences > Security & Privacy > Screen Recording if you don't see the prompt.)
Step 2. Go to Security & Privacy > Screen Recording. Click Authenticating… on the bottom left corner to enter your password to unlock this feature.
Step 3. Under the Privacy tab, tick Google Chrome.
Step 4. Click Quit & Reopen in the popup to close all your Chrome tabs and windows.
Now, you can return to the screen you want to record audio.
3. Why is there no sound when I screen record on Chromebook?
The built-in recording feature of Chromebook doesn't allow you to record audio by default. To enable the audio recording on your Chromebook, go to Settings and turn on the microphone for your video.
EaseUS RecExperts

One-click to capture anything on screen!
No Time Limit, No watermark
Start Recording