-
![]()
Daisy
Daisy is the Senior editor of the writing team for EaseUS. She has been working in EaseUS for over ten years, starting from a technical writer to a team leader of the content group. As a professional author for over 10 years, she writes a lot to help people overcome their tech troubles.…Read full bio -
Jane is an experienced editor for EaseUS focused on tech blog writing. Familiar with all kinds of video editing and screen recording software on the market, she specializes in composing posts about recording and editing videos. All the topics she chooses …Read full bio
-
![]()
Alin
Alin is an experienced technical blog writing editor. She knows the information about screen recording software on the market, and is also familiar with data cloning and data backup software. She is expert in writing posts about these products, aiming at providing users with effective solutions.…Read full bio -
Jean is recognized as one of the most professional writers in EaseUS. She has kept improving her writing skills over the past 10 years and helped millions of her readers solve their tech problems on PC, Mac, and iOS devices.…Read full bio
-
![]()
Jerry
Jerry is a fan of science and technology, aiming to make readers' tech life easy and enjoyable. He loves exploring new technologies and writing technical how-to tips. All the topics he chooses aim to offer users more instructive information.…Read full bio -
![]()
Rel
Rel has always maintained a strong curiosity about the computer field and is committed to the research of the most efficient and practical computer problem solutions.…Read full bio -
![]()
Gemma
Gemma is member of EaseUS team and has been committed to creating valuable content in fields about file recovery, partition management, and data backup etc. for many years. She loves to help users solve various types of computer related issues.…Read full bio -
![]()
Shelly
"I hope my articles can help solve your technical problems. If you are interested in other articles, you can check the articles at the bottom of this page. Similarly, you can also check my Twitter to get additional help."…Read full bio
Page Table of Contents
0 Views |
0 min read
MP3 is still the most universal audio format, but users may find it hard to know how to record MP3 on Mac: QuickTime can record audio, but it only saves in M4A; Voice Memos also saves in AAC. Besides the audio format, finding an internal audio recording software to capture sound from streaming sites, podcasts, music clips, or system sounds on macOS is also tricky. This article introduces MP3 recorders that can capture internal audio and microphone audio with ease.
|
MP3 Recorders |
Microphone |
Internal Audio |
MP3 Supported |
|
✅ |
✅ |
✅ |
|
|
✅ |
❌ (need BlackHole or Loopback to route ) |
❌ (only saves in M4A; need to convert to MP3) |
|
|
✅ |
❌ |
❌ (only saves in M4A; need to convert to MP3) |
|
|
|
✅ |
❌ (need BlackHole or Loopback to route ) |
✅ |
|
✅ |
❌ (need BlackHole or Loopback to route ) |
✅ |
|
|
✅ |
❌ |
✅ |
Record MP3 on Mac with EaseUS RecExperts
Recording MP3 files on Mac using a third-party screen recorder like EaseUS RecExperts is the easiest and most effective choice. It lets you record computer audio and microphone together or separately, no extra audio drivers or setup needed. Just choose the audio sources and start recording sound immediately.
Whether you want to record YouTube audio or capture voices from an external mic, RecExperts is the option. You can remove the background noise, increase the mic volume, and export your recording in MP3, FLAC, WAV, or other common audio formats.
🚩Now, check how to record MP3 on Mac perfectly:
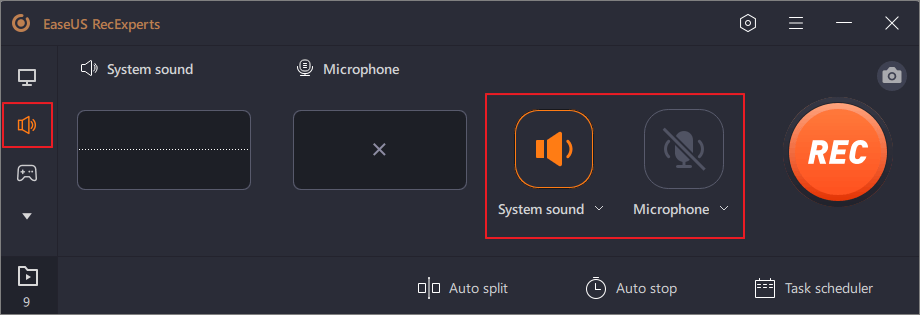
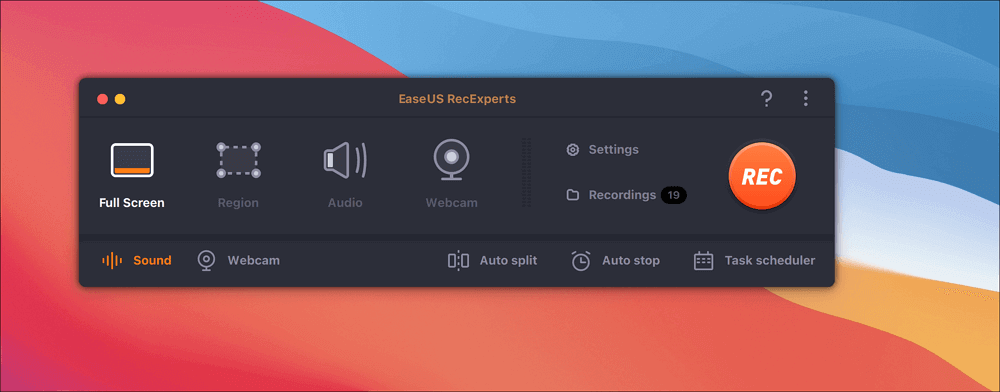
Step 1. Launch EaseUS RecExperts and choose "Audio" (looks like a speaker) from the left side of the interface. Select the sound source by clicking on the speaker sign (the system sound) or the mic sign (the microphone). Or, you can record them both at the same time.
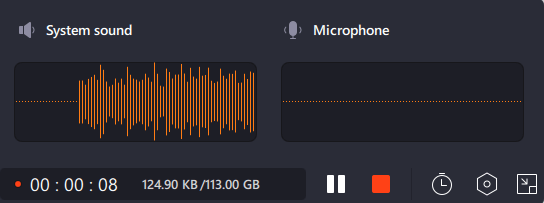
Step 2. Hit "REC" button to start recording audio. To finish it, you just click on the red square icon to stop the recording.
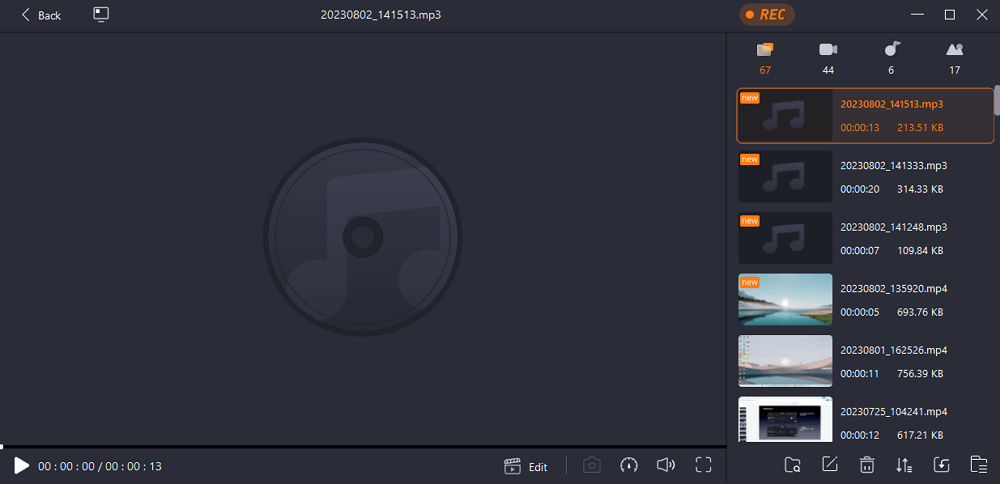
Step 3. After that, the recording list window will pop up automatically. You can listen to or edit the recording with built-in tools.
- Tip
- Apart from recording sound only, you can also choose a screen recording mode to capture the Mac screen alongside the system sound and your voice easily.
Share this post to help more users!
How to Record Internal Audio on Mac QuickTime
QuickTime Player is a capable built-in Mac software tool. It not only enables users to play MKV files on Mac, open MP3, MOV, etc. but also helps users to record audio from a computer or microphone. After recording, you can even edit the audio by cutting, merging, and pasting the recording sections. However, its audio-recording features are pretty limited.
By default, QuickTime can only capture external audio from your microphone, not the internal system sound from apps, browsers, or streaming platforms. To record internal audio, you must install a virtual audio driver, such as BlackHole (freeware), and route your system's output through it. Another limitation is that QuickTime saves all audio recordings as M4A files, so you'll need a separate converter to convert them to MP3 afterward.
🚩Here's how to set it up and record internal audio on your Mac:
Step 1. Download and install BlackHole on your macOS.
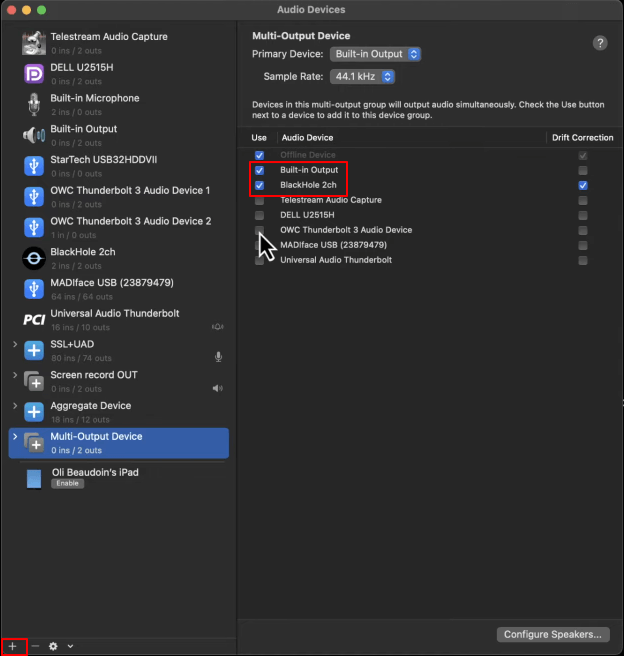
Step 2. Navigate to Go > Applications > Utilities > Audio MIDI Setup. Create a Multi-output Device, check BlackHole 2ch and Speakers, and tick Drift Correction next to each option.
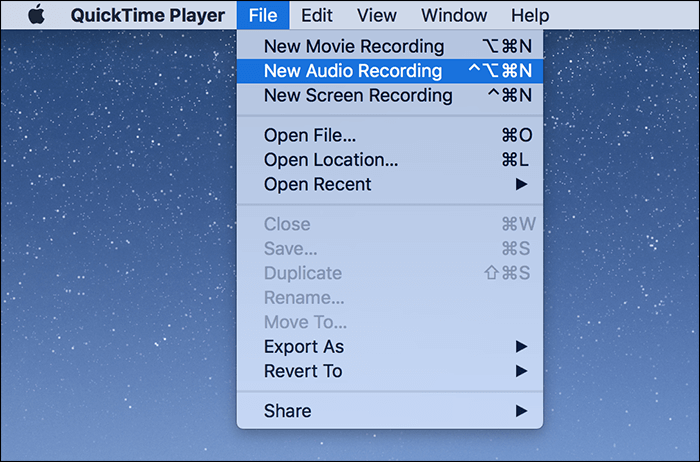
Step 3. Launch QuickTime Player. Go to File → New Audio Recording.
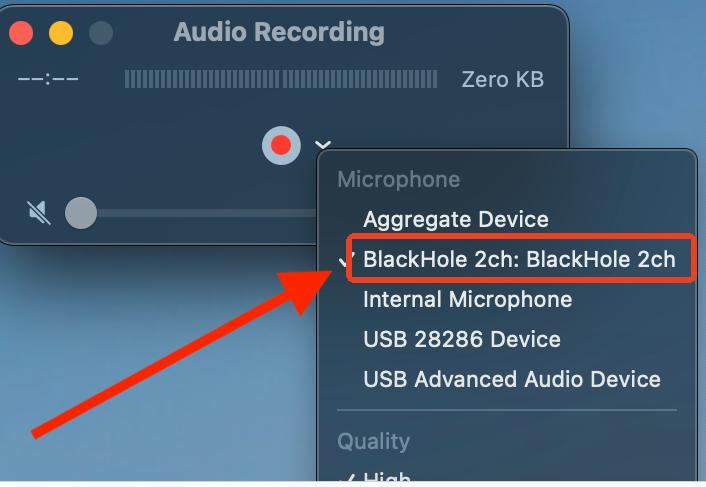
Step 4. Next to the red record button, click the arrow icon. Choose BlackHole 2ch under Microphone.
Step 5. Click the Record button. Play the internal audio you want to capture (music, YouTube, streaming video, etc.). Click Stop when you're done.
Step 6. QuickTime will automatically save your recording as an M4A file.
Step 7. Since QuickTime doesn't support MP3 export, you'll need another tool, such as iTunes, the Music app, or an online audio recorder.
Share this post to help more users!
Record Microphone in High Quality with Voice Memos
Voice Memos has been brought to macOS since 10.14. It can keep your recordings perfectly syncing with your iPhone, iPad, and other Apple devices of yours. And after recording the audio, you can play MP3 on Mac.
It gives users an intuitive interface so everyone can handle it without using it. The only thing you need to take care of is that it records audio only in MP3 format. If you are OK with that, just follow the steps below to record MP3 on Mac.
🚩How to record microphone audio with Voice Memos on Mac:
Step 1. Launch Voice Memos from Applications or Spotlight.
Step 2. Go to System Settings > Sound > Input. Select your preferred microphone (built-in mic, USB mic, or external mic).
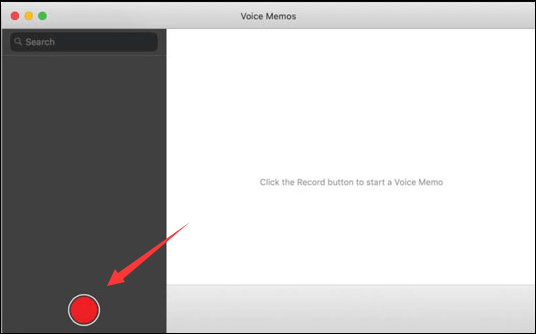
Step 3. Click the big red Record button. Speak clearly into your microphone.
Step 4. Click Pause if you need a break. Click Resume to continue recording. Click Done to finish.
Step 5. The recording automatically appears in your list in M4A format.
Step 6. You must convert the file afterward if you need an MP3.
How to Record MP3 on Mac with GarageBand
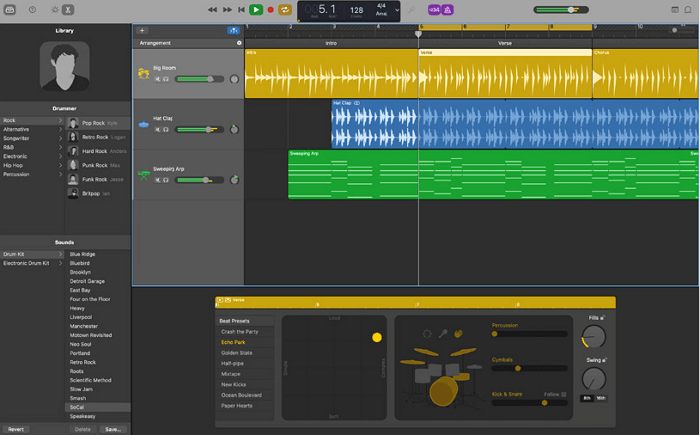
GarageBand is another pre-installed app on Mac computers. With this app, you can use create and edit music on your Mac. And surprisingly, it is also a useful utility for recording MP3 on Mac.
With GarageBand, you can record audio on PCs. For example, you can record your voice or instrument sound, with a microphone, including the sound of pianos, synthesizers, guitars, drums, horns, etc. The only thing that might stop you from using it is that it is not so friendly for novices.
🚩How to record audio in MP3 format using Garafeband:
Step 1. Launch GarageBand. Choose Empty Project. Select Audio > Record using a microphone or line input. Click Create.
Step 2. Click GarageBand > Settings (Preferences). Go to the Audio/MIDI tab. Set:
- Input Device: Your microphone (or BlackHole if recording internal audio)
- Output Device: Your headphones / speakers
Step 3. Click the track header. Enable the red Record Enable button (if it doesn't show, enable it via Track → Configure Track Header).
Step 4. Use the input gain slider to prevent clipping. Test your microphone by speaking normally.
Step 5. To start recording, press R on your keyboard or click the Record button.
Step 6. Press the Spacebar to stop. Play back the recording to confirm audio quality.
Step 7. Go to Share > Export Song to Disk. Choose MP3 under "Format". Select audio quality (High Quality is enough for most voice recordings). Click Export. You now have a clean MP3 file directly from GarageBand.
Share this post to help more users!
How to Record MP3 on Mac with Audacity
Audacity is a powerful, free, open-source audio recorder. It supports MP3 natively (no LAME installation needed in recent versions). Like GarageBand, it can only record your microphone by default. To capture internal audio, you must first install BlackHole and configure your Mac's audio routing.
Before getting started, you need to configure and install BlackHole for system recording; for microphone capture only, skip this step.
🚩Steps to record and export MP3 with Audacity:
Step 1. Download the latest version from the official website. Install and open the app.
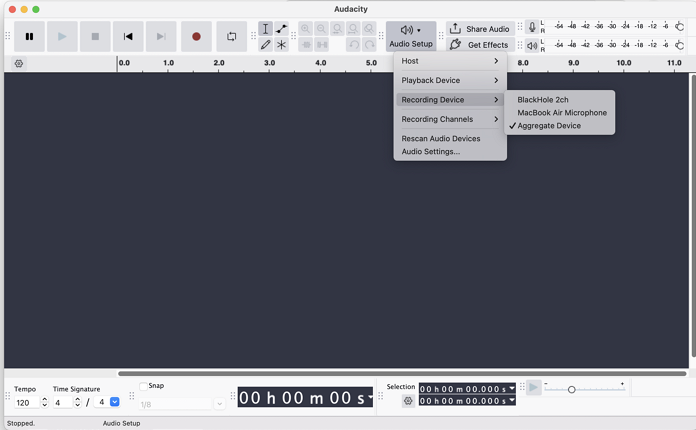
Step 2. At the top toolbar:
- Open the Audio Setup dropdown.
- Choose your Input Device (microphone or BlackHole).
- Select your preferred Host (usually "Core Audio" on macOS).
Step 3. Speak into the mic and check the input meter. Adjust the gain slider to avoid red peaks.
Step 4. Click the Record (●) button to start recording. Audacity will begin capturing audio immediately.
Step 5. Press Stop (■) when finished. You can trim, amplify, normalize, or reduce noise if needed.
Step 6. Go to File > Export > Export as MP3. Pick the bitrate (128 kbps for speech, 192–320 kbps for music). Name the file and save it. You now have an MP3 file created directly from Audacity.
Share this post to help more users!
How to Record Audio on Mac from the Internet Online
If you don't want to install any software on your Mac, an online audio recorder can be a simple way to capture voice or short sound clips. These browser-based tools rely on your microphone, so they cannot record internal audio or system sound directly due to macOS and browser security restrictions. This means they are suitable only for recording your voice reacting to online content, not for audio from websites, videos, or music streaming platforms.
Still, if your goal is to make quick MP3 voice recordings using just your browser, here's how to use a free online recorder to create an MP3 file on Mac:
Step 1. Open an online audio recorder, such as https://recorder.easeus.com/online-voice-recorder.html, in Safari, Chrome, or Edge.
Step 2. Your browser will ask for permission to use your microphone: click Allow when prompted.
Step 3. Select the microphone you prefer—built-in mic, USB mic, or external mic.
Step 4. Click the Record button in the web tool. Speak into your microphone. You can pause or resume the recording depending on the website.
Step 5. Click Stop when you're done. Play back the recording to check its clarity.
Step 6. Download the file as an MP3 to your computer.
Further Reading: How to Convert M4A to MP3
If you've recorded audio on your Mac using QuickTime, Voice Memos, or another built-in tool, you probably noticed that macOS saves most audio files in M4A format. While M4A is excellent for quality and compression, many users still prefer MP3 because it's more universal and works with almost every device, player, and editor. The quickest way to switch formats without losing quality is to use a tool that supports direct audio conversion.
One simple option is EaseUS RecExperts. Besides screen and audio recording, it also includes a built-in audio converter that lets you import an existing file and turn it into MP3, WAV, AAC, FLAC, OGG, and several other formats. You don't need extra plugins, and there's no complicated workflow—add the file, pick the output format, and export.
🚩How to convert M4A to MP3 for free:
Step 1. Launch EaseUS RecExperts, and click "Recordings" on the lower right to open the media player.
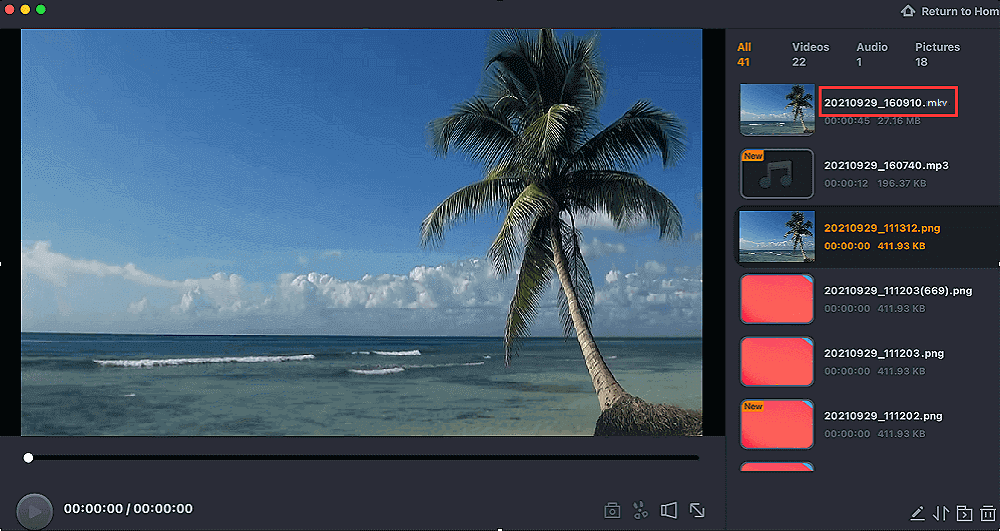
Step 2. In this window, you can see all your recorded files, including MP4, MOV, FLV, AVI, MP3, etc.
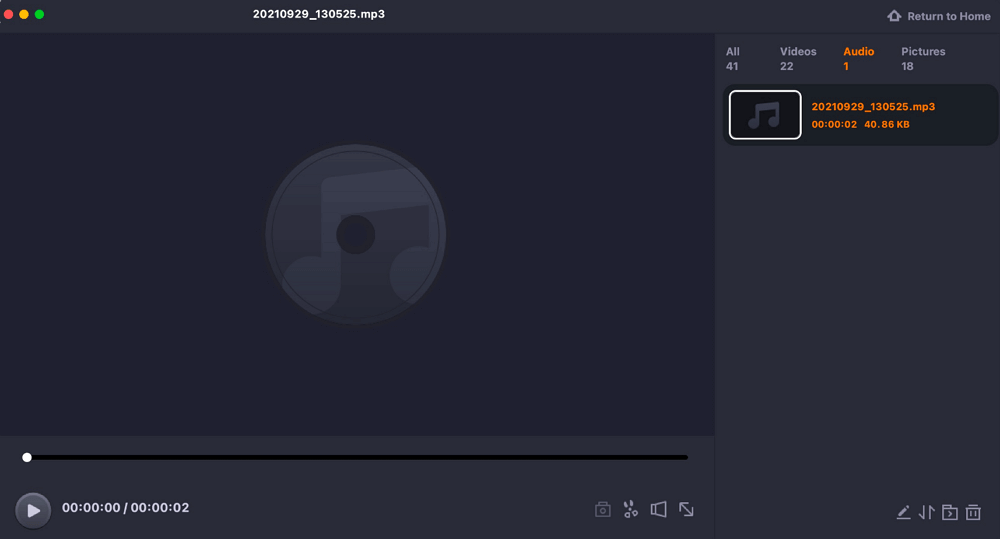
Step 3. Click the file you want to play to view it immediately. You can also trim the file by clicking the scissor sign on the bottom.
FAQs about How to Record MP3 on Mac
We gathered some frequently asked questions here. Let's check their answers together.
1. How do I make an MP3 File on my Mac?
You need to follow the steps here.
- 1. In the "Music" app on your Mac, choose "Music" > "Preferences" and click "Files".
- 2. Click "Import Settings", choose the format you want to convert songs to, then click "OK" to save the settings.
- 3. Select one or more songs in your library, then choose "File" > "Convert" > "Create MP3 Version".
2. Can I record MP3 in QuickTime?
The answer is yes. QuickTime is well-known as a video and audio player on Mac. But many people don't know that it can also be used to record things on your computer. Moreover, you can save your other audio files as MP3s with this tool.
3. How do I record an audio file on my Mac?
To record an audio File on your Mac computer, you will need EaseUS RecExperts. Read the introductions and follow the steps to record audio on Mac with it.
Conclusion
Recording MP3 on Mac is easy if you have got a feasible tool on your device. In this article, we give you some capable ones. All the programs can record MP3 on Mac. But we suggest you download and use EaseUS RecExperts as it is user-friendly and comprehensive in the meantime.
✅ Article Update Log (2025, November)
1️⃣Improved the comparison table at the beginning of the article to give readers a clear, side-by-side view of all solutions, helping them quickly find the option they need.
2️⃣Added a new online recording method for users who prefer not to download software and want to record MP3 files directly on their Mac.
3️⃣Updated and refined the step-by-step instructions for each solution to ensure accuracy and clarity—for example, added detailed guidance on installing and configuring BlackHole, which is a common pain point for Mac users.
4️⃣Introduced a new section on how to convert M4A to MP3, making it easier for readers who need format conversion to complete the process safely and correctly.
EaseUS RecExperts

One-click to capture anything on screen!
No Time Limit, No watermark
Start Recording
