-
![]()
Daisy
Daisy is the Senior editor of the writing team for EaseUS. She has been working in EaseUS for over ten years, starting from a technical writer to a team leader of the content group. As a professional author for over 10 years, she writes a lot to help people overcome their tech troubles.…Read full bio -
Jane is an experienced editor for EaseUS focused on tech blog writing. Familiar with all kinds of video editing and screen recording software on the market, she specializes in composing posts about recording and editing videos. All the topics she chooses …Read full bio
-
![]()
Alin
Alin is an experienced technical blog writing editor. She knows the information about screen recording software on the market, and is also familiar with data cloning and data backup software. She is expert in writing posts about these products, aiming at providing users with effective solutions.…Read full bio -
Jean is recognized as one of the most professional writers in EaseUS. She has kept improving her writing skills over the past 10 years and helped millions of her readers solve their tech problems on PC, Mac, and iOS devices.…Read full bio
-
![]()
Jerry
Jerry is a fan of science and technology, aiming to make readers' tech life easy and enjoyable. He loves exploring new technologies and writing technical how-to tips. All the topics he chooses aim to offer users more instructive information.…Read full bio -
![]()
Rel
Rel has always maintained a strong curiosity about the computer field and is committed to the research of the most efficient and practical computer problem solutions.…Read full bio -
![]()
Gemma
Gemma is member of EaseUS team and has been committed to creating valuable content in fields about file recovery, partition management, and data backup etc. for many years. She loves to help users solve various types of computer related issues.…Read full bio -
![]()
Shelly
"I hope my articles can help solve your technical problems. If you are interested in other articles, you can check the articles at the bottom of this page. Similarly, you can also check my Twitter to get additional help."…Read full bio
Page Table of Contents
Jane Zhou
Updated on Jun 09, 2026
0 Views |
0 min read
Why is there no sound on my screen recording Mac QuickTime Player? When record computer audio Macbook, you may encounter the QuickTime screen recording no audio error. Don't worry. Follow this guide from EaseUS RecExperts to learn how to screen recording Mac with audio step by step.
PAGE CONTENT:
Why Is QuickTime Screen Recording No Sound on Mac?
Many issues might cause Mac screen recording no sound. In the following, we list some common reasons people agreed with macOS Mojave, Catalina, Big Sur, Monterey, Ventura, and Sonoma:
1️⃣Internal audio is not captured by default. The macOS's built-in screen recorder (QuickTime) does not record system audio. To record internal audio on Mac, use a third-party screen and audio recorder instead.
Download EaseUS Screen Recorder
Download EaseUS Screen Recorder
Trustpilot Rating 4.7
2️⃣The microphone is not enabled. If recording with a mic, it might not be selected.
3️⃣Permission issues. macOS may not have granted screen recording or microphone permissions.
4️⃣Audio settings are misconfigured. Wrong input/output audio settings, like too low volume, could prevent sound recording.
5️⃣Third-party software conflict. Other apps like Zoom or virtual audio drivers could interfere with audio capture.
6️⃣Outdated QuickTime Player's version. This can cause compatibility issues with Mac.
Whatever the reason, you can find the following solutions to fix it. Now, let's get started!
Share this post for how to screen record in Mac with audio!

Top 6 Solutions to Fix Mac Screen Recording No Audio
After learning some reasons, we will show you some solutions to screen recording Mac with audio. I hope one of them will get the job done for you!
| Methods | Effectiveness | Time Cost | Difficulty |
| Check macOS Microphone Permissions | High | 1 Minute | Easy |
| Check macOS Sound Input Settings | Medium | 2 Minutes | Medium |
| Enable Microphone in QuickTime | Medium | 2 Minutes | Easy |
| Switch to QuickTime Alternative🔥 | High | 30 Seconds | Easy |
| Use a Virtual Audio Driver for Internal Audio | Super High | 1-2 Minutes | Easy |
| Update QuickTime Player | High | 10 Minutes | Medium |
Solution 1. Check macOS Microphone Permissions
To successfully record screen with audio on Mac, you should ensure the application has permission to use your Mac's built-in Microphone. So, follow the below steps to confirm that:
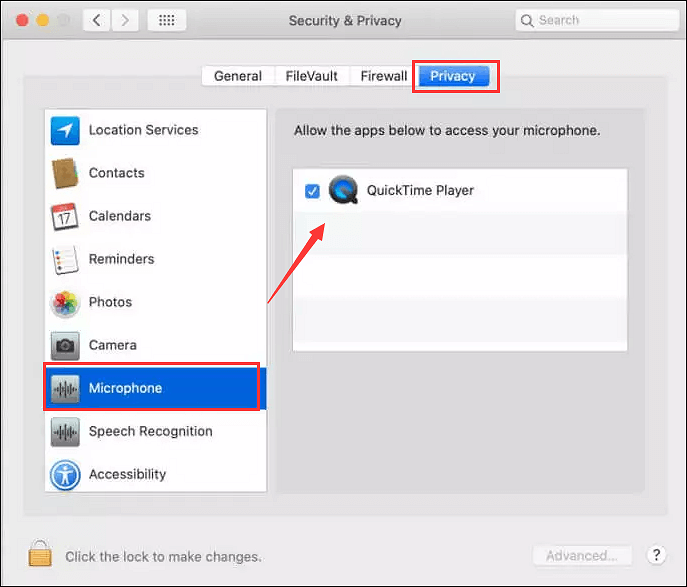
Step 1. Click on the Apple logo, then choose System > Preferences > Security & Privacy > Privacy.
Step 2. Next, select Microphone on the toolbar on the left side. After that, you will see all the apps that allow you to use the microphone. If QuickTime Player doesn't get permission, tick the box.
Step 3. Once done, reopen QuickTime Player and try to record again.
Share this post for how to screen record in Mac with audio!
Solution 2. Check macOS Sound Input Settings
If QuickTime has permission to use the microphone without audio, you should ensure that macOS selects the correct microphone.
macOS Sound Input Settings controls which device macOS recognizes for input (microphone). This affects all apps that use audio input, not just QuickTime. If it's set to the wrong device or muted, QuickTime might not detect audio, even if it is selected correctly in its settings.
In this case, we recommend you check the macOS sound settings first.
🚩Steps for setting a microphone as the input device in MacBook:
Step 1. Click the Apple logo to select the System Preferences option.
Step 2. Next, click the Sound icon and choose the Input pane from the options.
Step 3. Select Mac's native Microphone and then make the necessary changes.
Step 4. At last, move the slider to turn up the Input volume, capturing the audio quickly.

Share this post for how to screen record in Mac with audio!
Solution 3. Enable Microphone in QuickTime
Change the QuickTime settings if you only need to use QuickTime to capture microphone sound. However, macOS Sound Input Settings must also be correct for QuickTime to detect the microphone correctly, or for QuickTime screen recording, no audio error can still exist.
🚩Steps for setting the microphone in QuickTime:
Step 1. Open QuickTime and start a recording activity by clicking File > New Screen Recording.
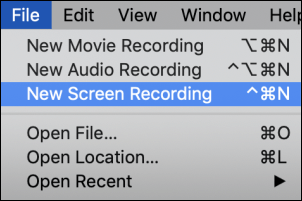
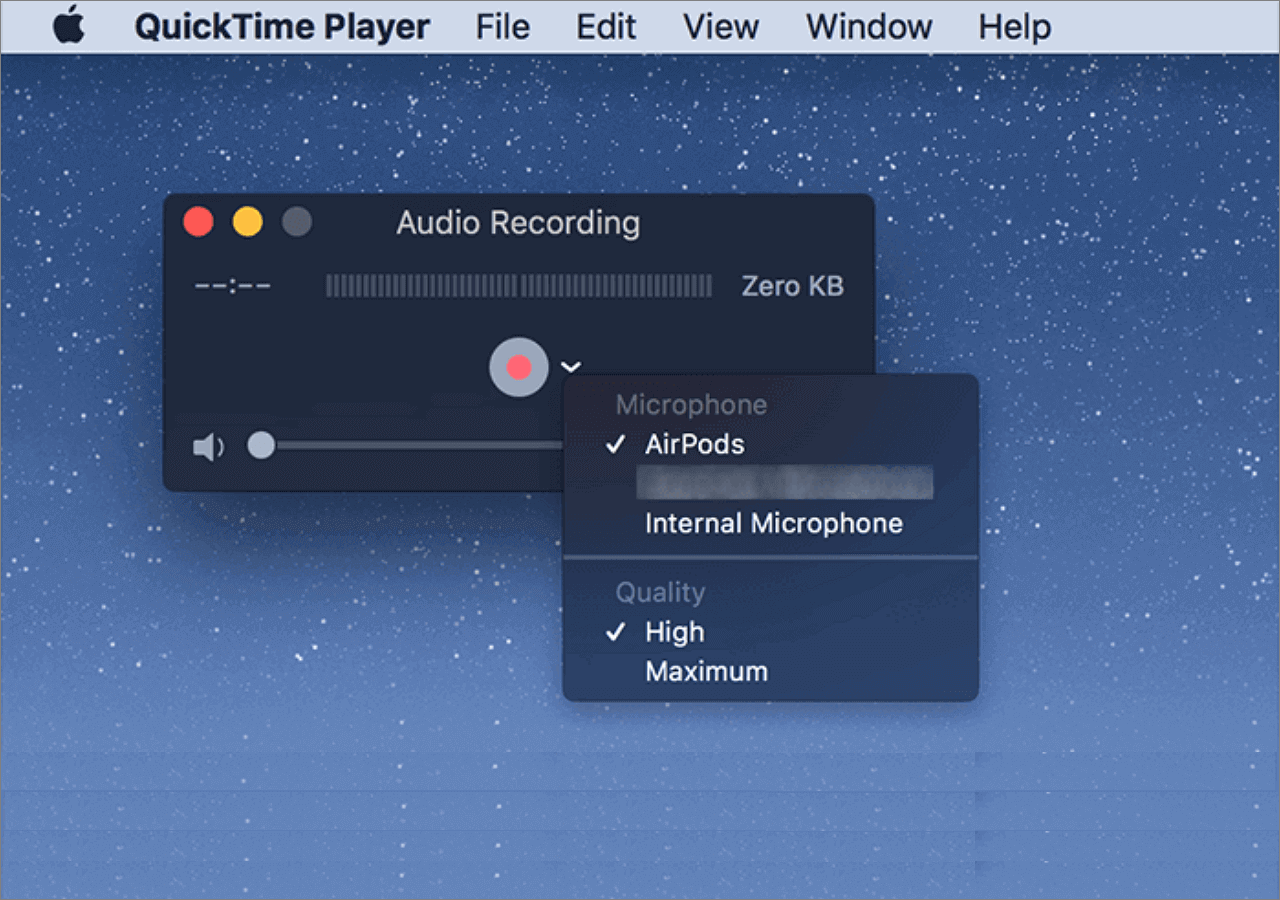
Step 2. Then, click the arrow next to the red record button on the QuickTime screen. Next, select the internal Microphone. You can also hit Options to change it from None to MacBook Air Microphone.
Solution 4. Switch to QuickTime Alternative
If none of the above solutions can fix the issue, try a different screen recorder - EaseUS RecExperts for Mac is a nice choice.
It is one of the best Mac screen recorder programs, making it easy to capture a microphone, system sound, or both simultaneously or separately. With its help, you can record YouTube live streams and more streaming sites like Netflix, Hulu, and Amazon Prime.
Excellent features of RecExperts:
- Allow you to record as long as you want
- Support creating schedule recording tasks based on your needs
- Export recordings in various formats, including but not limited to MP4, MOV, MKV, AVI, etc.
- Provide built-in editing tools to modify your recorded files
- Trim QuickTime video if you need to
Download EaseUS Screen Recorder
Download EaseUS Screen Recorder
Trustpilot Rating 4.7
🚩Follow the tutorial about how to screen record on Mac with audio:
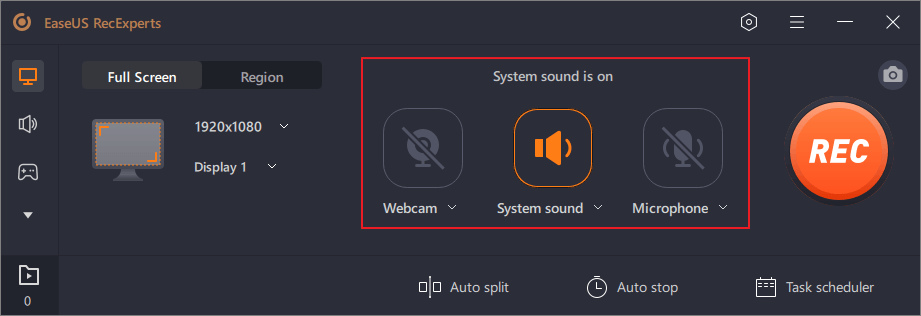
Step 1. Run EaseUS RecExperts on your device and you will see two recording modes. You can choose "Full Screen"to record the whole screen or choose "Region" to select the recording area manually before recording.

Step 2. After that, you can choose to record the webcam, system sound, microphone or record none of them as you like. You can also set auto split, auto recording with various functions on the interface.
Step 3. Then, you can click the red "REC" button to start recording. Here will be a menu bar on your screen. To pause the recording, click on the white double vertical bar; to end the recording, click on the red square sign.
Step 4. After recording, you will be led to the list interface. Here you can view or edit your recordings. To start a new recording, just click on the "REC" button on the top of the interface.

Share this post for how to screen record in Mac with audio!
Solution 5. Use a Virtual Audio Driver for Internal Audio
Since macOS doesn't allow direct internal audio recording, you need a virtual driver if you still want to use QuickTime Player to record computer sound on Mac. These virtual audio drivers act as a virtual sound device, routing your system's audio as an input source for recording.
Here are some extra add-ons you can configure to your Mac mini or other MacBook:
- BlackHole (free)
- Soundflower (older, but still works)
- Loopback (paid)
🚩Steps for how to configure a virtual sound device into QuickTime Player:
Step 1. Install a virtual driver on your Mac
Download and install an add-on from its official website. Here, we take the BlackHole as an example.
Step 2. Open audio MIDI setup
Go to Finder > Applications > Utilities > Audio MIDI Setup. You'll see all connected audio devices, including BlackHole.
Step 3. Configure audio settings
- If using an external microphone, click "+" (bottom left) > Create Aggregate Device > Tick Built-in Microphone and BlackHole. (Skip if only recording internal audio.)
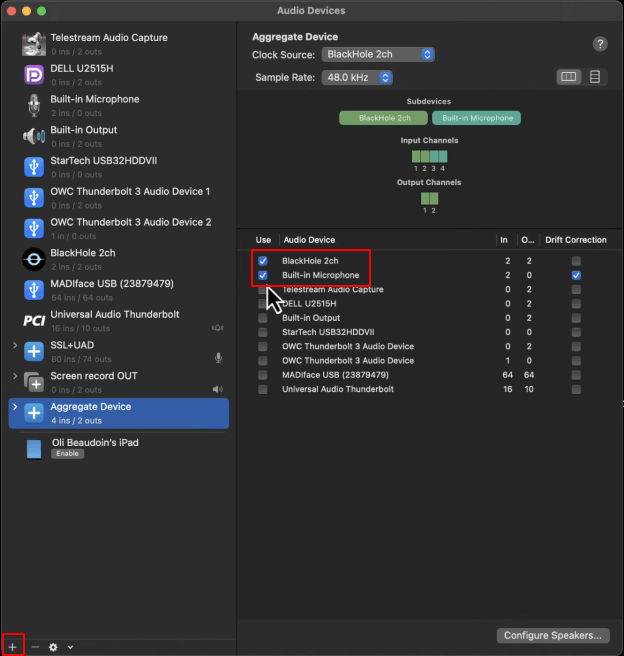
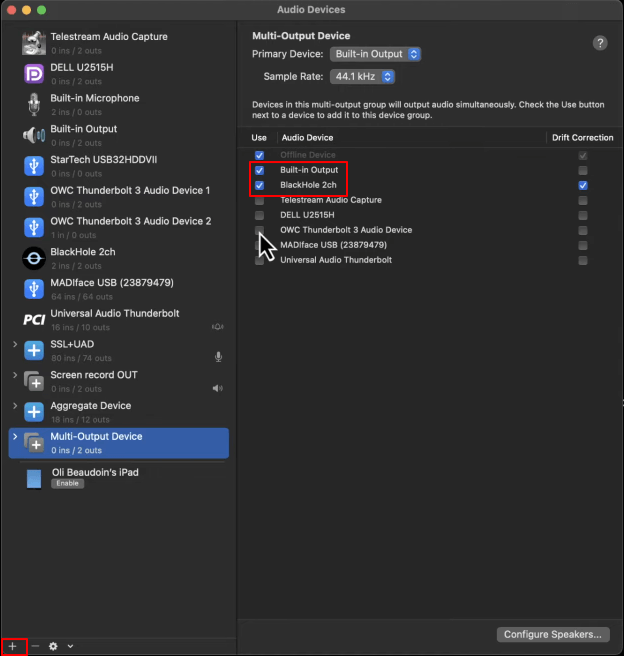
- To capture system audio, click "+" > Create Multi-Output Device > Tick Built-in Output and BlackHole.
Step 4. Set up QuickTime for recording
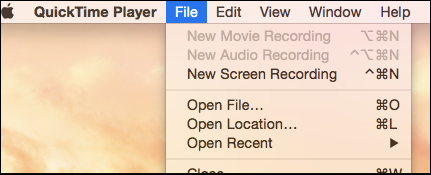
- Open QuickTime Player > File > New Screen Recording.
- Click Options and select BlackHole as the microphone input to capture system audio and mic sound (if needed).
Step 5. Start recording Mac with audio.
Click "Record Entire Screen" or "Record Selected Portion". Open the video or item you want to record. Click "Record". QuickTime will capture both video and audio.
Step 6. Stop and save the recording
- Click the Stop button in the menu bar or press Command + Control + Esc.
- Go to File > Save, choose a destination, and save the recording as a MOV file.
Share this post for how to screen record in Mac with audio!
Solution 6. Update QuickTime Player
An outdated QuickTime Player version could cause Mac screen recording no audio issues, but it is not the most common reason for no sound in screen recordings. macOS automatically updates QuickTime with system updates, so manually update your QuickTime if you're using a very old macOS version.
🚩Steps for how to update QuickTime:
Step 1. Open QuickTime Player, then click QuickTime Player > Update Existing Software.
Step 2. If there are some updates available, follow the onscreen instructions to install them.
Step 3. Finally, relaunch QuickTime to try screen recording on Mac again.
Share this post for how to screen record in Mac with audio!
Wrap Up
This post has provided several solutions to help fix the QuickTime screen recording no audio error. You can refer to the methods mentioned here to solve the problem. If you are still facing the issue, switch to EaseUS RecExperts. This screen and audio recorder for Mac will satisfy all your needs about recording.
Download EaseUS Screen Recorder
Download EaseUS Screen Recorder
Trustpilot Rating 4.7
Mac Screen Recording No Sound FAQs
1. Why is screen recording not recording audio on Mac?
If you use QuickTime Player to screen record on Mac and find no sound, you can check if the built-in Microphone is selected. If not, you must manually select a microphone to capture your voice and sound before recording.
2. How to get internal audio on Mac screen recording?
If you only screen record on Mac with microphone sound, you can use QuickTime Player:
Step 1. Open QuickTime Player, then click File > New Screen Recording from the menu bar.
Step 2. Then, you will see the Recording interface. Click the arrow right next to the record button to choose a microphone.
Step 3. Click the Record button to start your recording on Mac.
But if you need to record a Mac screen with internal sound, EaseUS RecExperts is an ideal solution:
Step 1. Download and install RecExperts on your Mac, then launch it.
Download EaseUS Screen Recorder
Download EaseUS Screen Recorder
Trustpilot Rating 4.7
Step 2. Click on Full Screen to select the recording area, and also hit the Sound icon to select the audio source: System sound, Microphone, or both.
Step 3. At last, click the REC button to screen record on Mac with audio.
3. How to get sound on QuickTime screen recording?
It is extremely easy to record Mac screen without QuickTime, as there are lots of Mac screen recorder software available. Some are free. Some are paid; you can select the one that suits your needs best.
4. Does QuickTime record internal audio?
No, QuickTime Player cannot record internal audio by default. If you insist on recording internal audio with this freeware, you must download and install some plugins like Soundflower to capture the audio. Or you will fail to capture internal audio via QuickTime.
Share this post for how to screen record in Mac with audio!