-
![]()
Daisy
Daisy is the Senior editor of the writing team for EaseUS. She has been working in EaseUS for over ten years, starting from a technical writer to a team leader of the content group. As a professional author for over 10 years, she writes a lot to help people overcome their tech troubles.…Read full bio -
Jane is an experienced editor for EaseUS focused on tech blog writing. Familiar with all kinds of video editing and screen recording software on the market, she specializes in composing posts about recording and editing videos. All the topics she chooses …Read full bio
-
![]()
Alin
Alin is an experienced technical blog writing editor. She knows the information about screen recording software on the market, and is also familiar with data cloning and data backup software. She is expert in writing posts about these products, aiming at providing users with effective solutions.…Read full bio -
Jean is recognized as one of the most professional writers in EaseUS. She has kept improving her writing skills over the past 10 years and helped millions of her readers solve their tech problems on PC, Mac, and iOS devices.…Read full bio
-
![]()
Jerry
Jerry is a fan of science and technology, aiming to make readers' tech life easy and enjoyable. He loves exploring new technologies and writing technical how-to tips. All the topics he chooses aim to offer users more instructive information.…Read full bio -
![]()
Rel
Rel has always maintained a strong curiosity about the computer field and is committed to the research of the most efficient and practical computer problem solutions.…Read full bio -
![]()
Gemma
Gemma is member of EaseUS team and has been committed to creating valuable content in fields about file recovery, partition management, and data backup etc. for many years. She loves to help users solve various types of computer related issues.…Read full bio -
![]()
Shelly
"I hope my articles can help solve your technical problems. If you are interested in other articles, you can check the articles at the bottom of this page. Similarly, you can also check my Twitter to get additional help."…Read full bio
Page Table of Contents
Alin
Updated on Jun 09, 2026
0 Views |
0 min read
Want to screen record PowerPoint Mac with audio, webcam, and animations intact? This guide shows you the best tools and step-by-step solutions to capture smooth, professional presentation videos, perfect for teaching, training, or sharing. Let's solve your Mac screen recording problems today.
🚩Comparison table of PowerPoint screen recording Mac:
|
Method |
System Audio |
Microphone |
Camera |
Editing Features |
|
✅ Yes |
✅ Yes |
✅ Yes |
✅ Built-in editor |
|
|
❌ No |
✅ Yes |
✅ Yes |
❌ None |
|
|
❌ No |
✅ Yes |
❌ No |
❌ None |
|
|
❌ No (needs BlackHole) |
✅ Yes |
✅ Yes |
✅ Basic trim |
Screen Record on Mac in PowerPoint
PowerPoint for Mac comes with a built-in Recording Studio that lets you record presentation or specific slides. You can capture your voice, ink gestures, and even your webcam feed to create a more dynamic, personal video.
Once done, the presentation can be played in Slide Show mode or exported as a full MP4 video, perfect for lectures, client pitches, or internal training.
🚩Here is how to screen record a PowerPoint presentation on Mac :
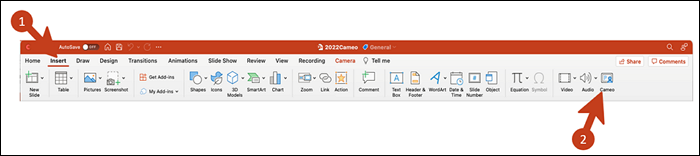
Step 1. Use Cameo (Optional)
Want your camera feed embedded into the slide design? Insert Cameo via: Recording > Cameo. Then click Camera Format to customize size, shape, and position.
Step 2. Launch Recording Studio
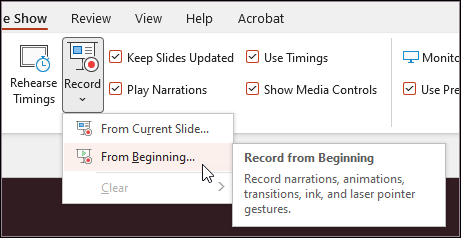
Go to the top right corner of PowerPoint and click Record; or navigate via menu: Record > From Beginning or From Current Slide.
Step 3. Enable Camera or Mic (Optional)
Use the toolbar to toggle your camera and microphone on/off. You can also blur your background for a cleaner appearance (under Camera Options).

Step 4. Customize Your View
Choose between Teleprompter View (see your script while maintaining eye contact) or Presenter View.
Step 5. Start Recording
Use the Record button to begin. Use Pause and Resume as needed. Click the Trash Can icon to delete and re-record any slide.

Step 6. Add Ink or Pointer
During recording, annotate your slides with a laser pointer, pen, or highlighter tools - they'll be captured in the final video.
Step 7. Preview and Export
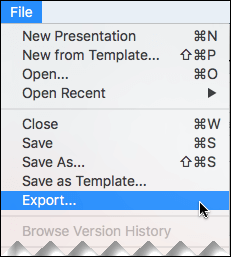
Click Play to preview your recording. When done, go to File > Export and choose MP4 to save the video.
- Editor's Tips
-
1. System Audio Not Captured: This method doesn't record audio within the slide (e.g., background music or embedded videos). You'll need a third-party tool if that's required.
2. Cameo ≠ Webcam Recording: The Cameo feature embeds your live camera view into the slide layout, but it's still a static visual element, not an accurate picture-in-picture video recording like with screen recorders.
3. No Screen Demonstration: PowerPoint's built-in recorder doesn't capture actions outside the slide show (e.g., switching apps, showing code or browser windows). For tutorials or demos, use a full-screen recording tool like EaseUS RecExperts.
4. Edit After Recording: After exiting Recording Studio, you can resize, reposition, or delete any recorded audio/video or ink gestures directly in the slide edit mode.
5. For more detailed information, refer to the official document from Microsoft Support.
Share this guide to help more users!

Other Ways to Screen Record PowerPoint on Mac
Since there are obvious limitations with PowerPoint's native recorder, here are more advanced options for you to record screen with internal audio, mic sound, and webcam seamlessly on MacBook.
1️⃣Screen Record on Mac with EaseUS RecExperts
Many people complain about the PowerPoint screen recording not working issue. This may be due to various reasons. If you can't make it right, the best solution is to find an alternative to record PowerPoint on your Mac. And EaseUS RecExperts is among the best ones.
EaseUS internal audio recorder is one of the most reliable tools that lets you screen record a PowerPoint presentation on Mac with system audio, narration, and webcam. It offers high-quality recording without watermark and allows flexible export options for editing or sharing.
⭐Top features Mac users love:
- Record system sound + microphone at the same time
- Overlay webcam while presenting to add a personal touch
- Real-time annotation to highlight key points during recording
- Built-in video trimmer for quick edits before saving
- Multiple output formats like MP4, MOV, GIF for compatibility
🚩Here is how to record PowerPoint on Mac:
Step 1. Launch EaseUS RecExperts on your computer. Choose a recording mode from "Full Screen" or "Region". To record a part of the screen, select the recording area manually.

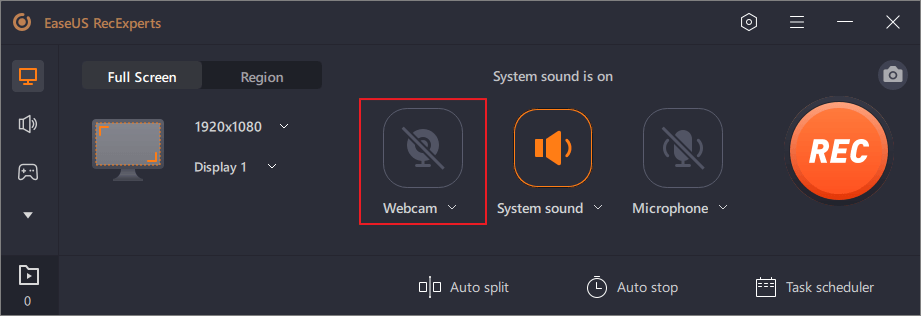
Step 2. After selecting the recording mode, click on the camera sign on the interface. This will let the tool record your screen and the webcam at the same time.
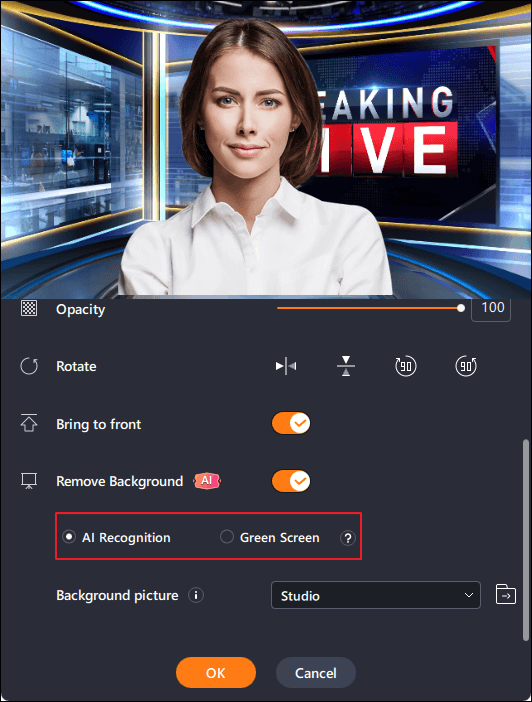
Step 3. You can also change the background with the AI Recognition ot green screen feature. Classroom, blur, studio, or your local images are supported. Just click "Webcam" > "Settings" > "Remove Background" to download and use these modules. Then, click the "REC" button to start recording.
Step 4. After recording, the recording list window will open. Here you can view, split, delete, manage your recordings easily.

Share this guide to help more users!
2️⃣Screen Record on Mac with Recording Shortcut
Mac also has a built-in recorder. So you can screen record on Mac with the shortcut. You can use it to record your PowerPoint presentations without any 3rd party app. The video quality is superb. However, it doesn't allow any video editing or customization.
This is how the Mac screen recorder works.
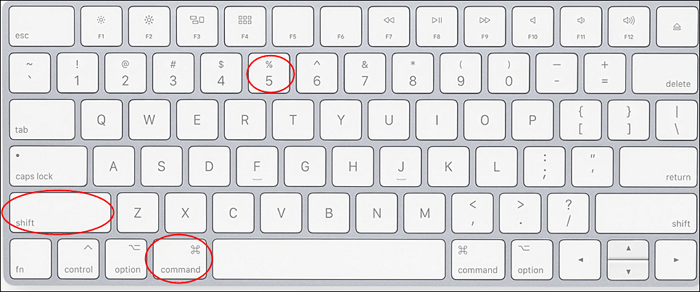
Step 1. Open the desired PowerPoint slide. Press Command + Shift+ 5 simultaneously to open the toolbar.
Step 2. Select Record Entire Screen or Record Selected Portion options as per requirement.
Step 3. After this, Press the Record button to start recording. Stop it when you're done. Then click File to save it in any folder you want.
3️⃣Screen Record on Mac with QuickTime
QuickTime Player is a free, built-in tool on Mac that allows you to screen record your PowerPoint presentations easily. It's ideal for users who want a simple, no-install solution to capture slideshows, narrations, or on-screen actions.
🚩How to screen record PowerPoint with QuickTime:
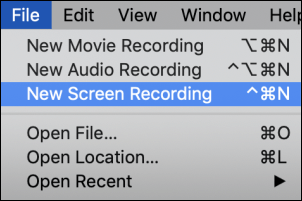
Step 1. Open QuickTime on your Apple device. Then from its main interface, go to the File menu and choose file New Screen Recording.
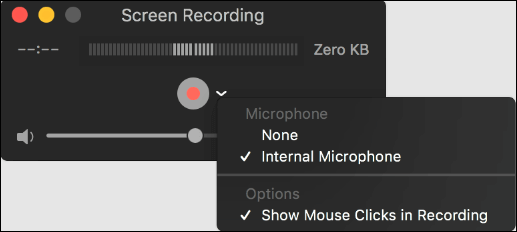
Step 2. Click the down arrow adjacent to the Record icon. Select the microphone or audio input and then adjust the volume of the sound recorder.
Step 3. Select Start and choose the PowerPoint area you want to cover. The recording will start. Once done, click Stop. The recording will end. Save it in your preferred location.
- Editor's Tip
-
1. QuickTime doesn't support recording internal audio by default; you'll need a third-party extension like BlackHole screen recording if that's required.
2. There are only limited video editing features after recording; consider importing to iMovie or another editor if needed.
3. It records the entire screen or a selected portion, not just the PowerPoint window.
4. To record screen and camera at the same time Mac, you can start a New Movie Recording, choose the webcam, and set it Float on Top in advance.
Share this guide to help more users!
Tips for PowerPoint Screen Recording Mac
Before hitting the record button, consider these practical tips to ensure a smooth and high-quality PowerPoint screen recording on your Mac. These insights address common issues shared by real users across forums and support communities.
1. Set Your Display to Full Screen
Users often complain about black borders or inconsistent layout in their final video. To avoid this, switch your PowerPoint to full-screen (Slideshow Mode) before recording. This keeps the focus clean and professional.
2. Use External Microphones for Clearer Audio
Mac's built-in mic is serviceable but not ideal for voiceovers. Many users on Reddit and Apple Discussions recommend using USB microphones or AirPods for clearer, more consistent audio quality.
3. Minimize Background Activity
Recording can be resource-intensive. Close unnecessary apps and disable notifications (like iMessage or Calendar alerts) to prevent interruptions and reduce frame drops.
4. Practice Your Timing and Annotations
Whether you're using EaseUS RecExperts or PowerPoint's built-in tools, test your flow beforehand. Some users suggest rehearsing the narration and testing ink annotations if you're drawing or highlighting during the recording.
5. Check Output Settings Before Saving
If using third-party tools, confirm that your resolution (e.g., 1080p or 4K) and format (MP4 or MOV) meet your needs, especially important if you're uploading to YouTube or LMS platforms.
Share this guide to help more users!
How to Screen Record on Mac PowerPoint FAQs
These are the most asked questions about how to record screen on Mac PowerPoint
1. Does Mac PowerPoint have Screen Recording?
Yes, Mac PowerPoint has a video recorder. It can capture the full or selected PowerPoint region with ease.
2. How do you record a video on PowerPoint on a Mac?
You can use a PowerPoint video recorder, Mac Recorder, Quick Time, and EaseUS RecExperts to record videos of PowerPoint on Mac. The choice of method depends upon your requirements.
3. How can I screen record a PowerPoint?
You can screen record a PowerPoint slide with built-in video recorders or 3rd party screen recording apps. The in-house doesn't put a burden on RAM, While the 3rd apps provide high audio and video quality.
4. Why can't I record in PowerPoint on my Mac?
PowerPoint for Mac lacks some recording features available on Windows, such as Record Slide Show with narration. If you don't see the Record option, it may be due to an outdated version or missing permissions (e.g., microphone access). Alternatively, use a screen recorder like EaseUS RecExperts or QuickTime Player to capture your presentation with audio.
5. How to turn recorded PowerPoint into a video on Mac?
You can export your presentation as a video by clicking File > Export, then choosing MP4 or MOV under File Format. Make sure to set slide timings or record your slideshow first. PowerPoint will use these timings in the video. For more flexibility (like webcam overlay), record your screen with EaseUS RecExperts and save it directly as a high-quality video.
6. How do you record yourself giving a presentation on a Mac?
To record yourself alongside the slides:
- Open EaseUS RecExperts and select the Screen + Webcam mode.
- Play your PowerPoint in full-screen mode.
- Hit Record to capture both your screen and face.
This setup works great for tutorials or online courses, and is often preferred over PowerPoint's native tools due to better layout control and audio quality.
Share this guide to help more users!
Conclusion
PowerPoint screen recording converts dull presentations into watchable videos. These videos are easy to understand and share. This article presents 4 methods to screen record PowerPoint presentations for Mac users.
You can screen record PowerPoint with PowerPoint Recorder, EaseUS RecExperts, Mac Recorder, and Quick Time. The details of all methods have been shared. We recommend downloading EaseUS RecExperts for the highest quality.