-
![]()
Daisy
Daisy is the Senior editor of the writing team for EaseUS. She has been working in EaseUS for over ten years, starting from a technical writer to a team leader of the content group. As a professional author for over 10 years, she writes a lot to help people overcome their tech troubles.…Read full bio -
Jane is an experienced editor for EaseUS focused on tech blog writing. Familiar with all kinds of video editing and screen recording software on the market, she specializes in composing posts about recording and editing videos. All the topics she chooses …Read full bio
-
![]()
Alin
Alin is an experienced technical blog writing editor. She knows the information about screen recording software on the market, and is also familiar with data cloning and data backup software. She is expert in writing posts about these products, aiming at providing users with effective solutions.…Read full bio -
Jean is recognized as one of the most professional writers in EaseUS. She has kept improving her writing skills over the past 10 years and helped millions of her readers solve their tech problems on PC, Mac, and iOS devices.…Read full bio
-
![]()
Jerry
Jerry is a fan of science and technology, aiming to make readers' tech life easy and enjoyable. He loves exploring new technologies and writing technical how-to tips. All the topics he chooses aim to offer users more instructive information.…Read full bio -
![]()
Rel
Rel has always maintained a strong curiosity about the computer field and is committed to the research of the most efficient and practical computer problem solutions.…Read full bio -
![]()
Gemma
Gemma is member of EaseUS team and has been committed to creating valuable content in fields about file recovery, partition management, and data backup etc. for many years. She loves to help users solve various types of computer related issues.…Read full bio -
![]()
Shelly
"I hope my articles can help solve your technical problems. If you are interested in other articles, you can check the articles at the bottom of this page. Similarly, you can also check my Twitter to get additional help."…Read full bio
Page Table of Contents
Larissa
Updated on Jun 09, 2026
0 Views |
0 min read
💡How to record screen and camera at the same time Mac Quick Answer:
- To record yourself and webcam at the same time on Mac, you can use EaseUS RecExperts. It's simple to use and allows simultaneous screen, webcam, and internal audio capture with 4K output and real-time annotation.
- macOS's built-in QuickTime Player allows you to record your face and screen for free without installation, but its internal audio capture and webcam overlay controls are limited. Alternatively, free and web-based tool like EaseUS online recorder is also one of the options.
- A free and powerful facecam recorder called OBS Studio is more suitable for users who want more control over streaming or recording.
Ever needed to record your Mac screen and camera at the same time for tutorials, gameplays, webinars, or online courses? Whether you're a content creator, teacher, or gamer, this hybrid recording style has become essential.
In this article, we'll show you four webcam recorders for Mac (including built-in and professional options), their pros and cons, and exactly how to use each so you can capture video and your face effortlessly. Let's dive in.
How to Screen Record on Mac with Facecam via EaseUS Recorder
✅ Best for: Users who want a simple and all-in-one facecam screen recorder with mic and internal audio on Mac
✅Suitable for: macOS 10.13 or later
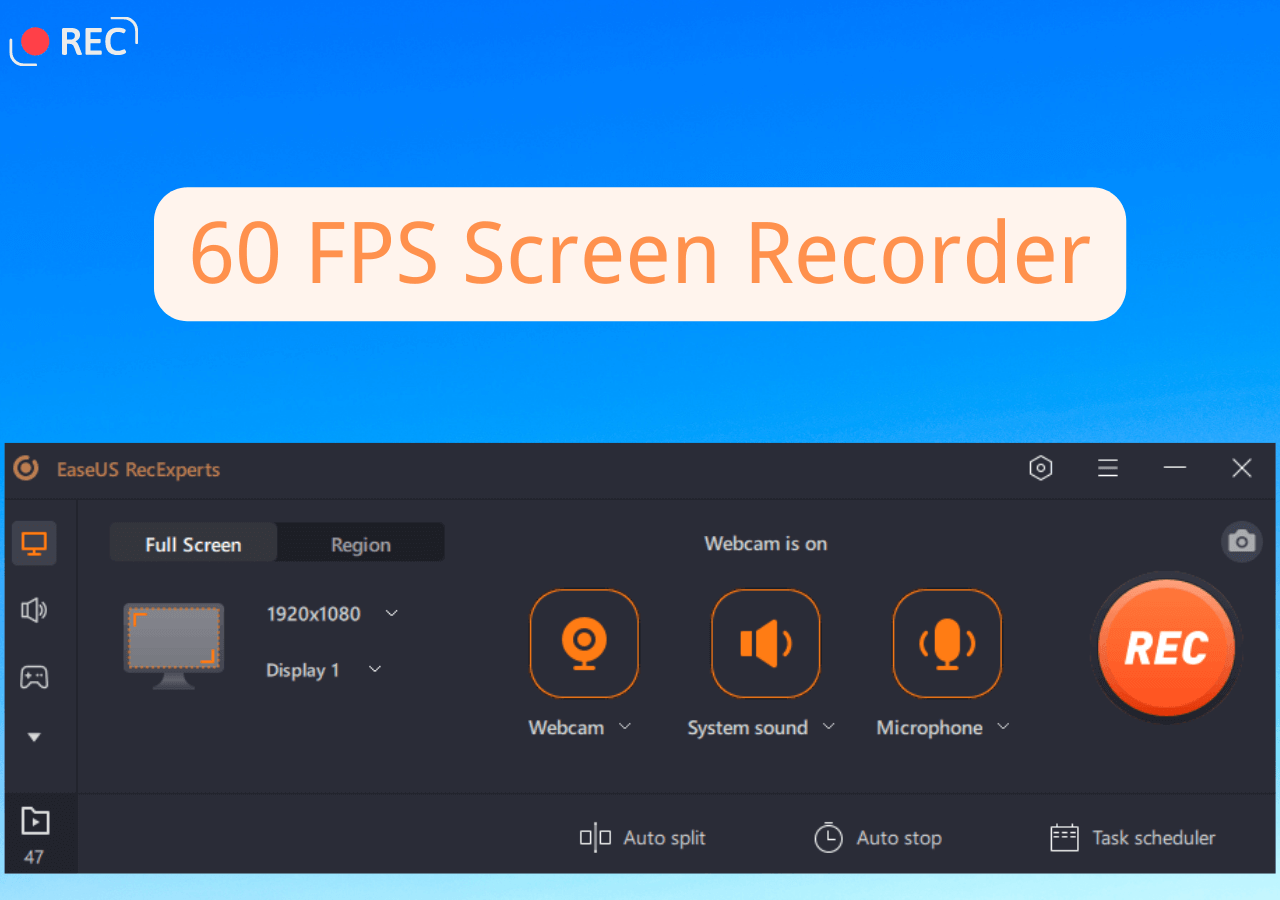
EaseUS RecExperts is a powerful Windows and Mac screen recorder that lets you record your screen and webcam simultaneously with internal and external audio. It's ideal for creating tutorials, reaction videos, gameplay walkthroughs, and presentations with a facecam overlay. This facecam screen recorder captures camera video in 4K and will not drop frames.
👍Why We Recommend It:
- Mac screen recording with internal audio, mic, screen, and webcam at the same time
- 4K screen and camera capture with green-screen background removal
- Real-time annotations, scheduled recordings, multiple output formats like MP4, MOV, AVI
- No time limits, lightweight, beginner-friendly interface
👉Download EaseUS RecExperts for Mac
Download EaseUS Screen Recorder
Download EaseUS Screen Recorder
Trustpilot Rating 4.7
🚩Steps on how to record yourself and screen on Mac with this webcam screen recorder:
Step 1. Launch EaseUS RecExperts on your computer. Choose a recording mode from "Full Screen" or "Region". To record a part of the screen, select the recording area manually.

Step 2. After selecting the recording mode, click on the camera sign on the interface. This will let the tool record your screen and the webcam at the same time.
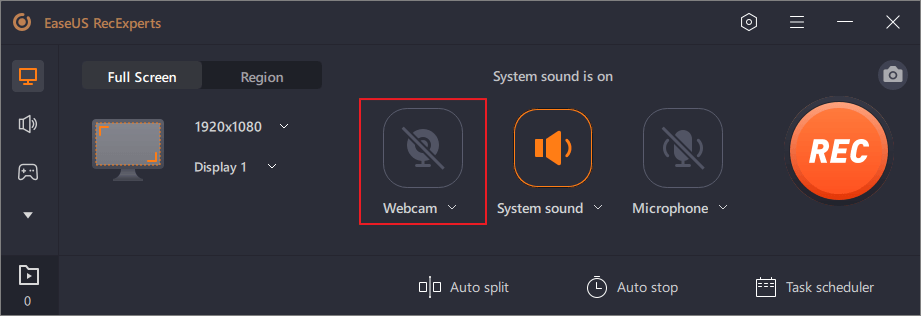
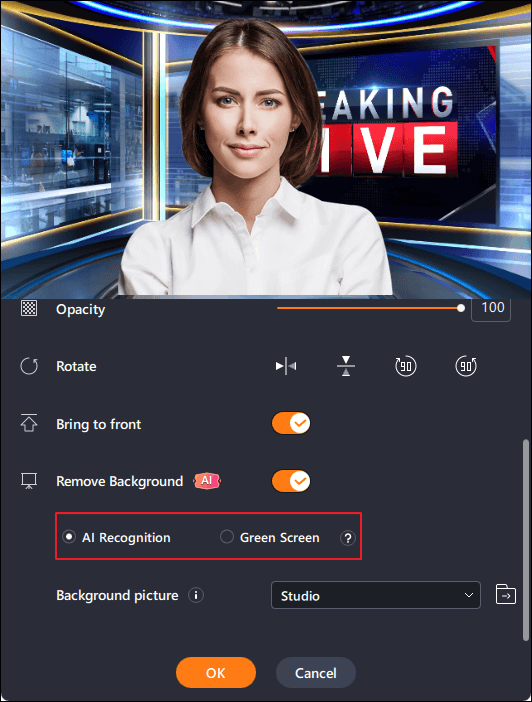
Step 3. You can also change the background with the AI Recognition ot green screen feature. Classroom, blur, studio, or your local images are supported. Just click "Webcam" > "Settings" > "Remove Background" to download and use these modules. Then, click the "REC" button to start recording.
Step 4. After recording, the recording list window will open. Here you can view, split, delete, manage your recordings easily.

- Tip: For best quality, use an external webcam and test your mic beforehand.
Don't forget to share this tutorial if you find it helpful!

Record Screen and Camera at the Same Time Mac with QuickTime
✅Best for: macOS users who prefer a free and no-installation option
QuickTime Player comes pre-installed on macOS and supports basic screen and webcam recording. While it lacks advanced features like editing, it's good enough for recording yourself and screen on Mac.
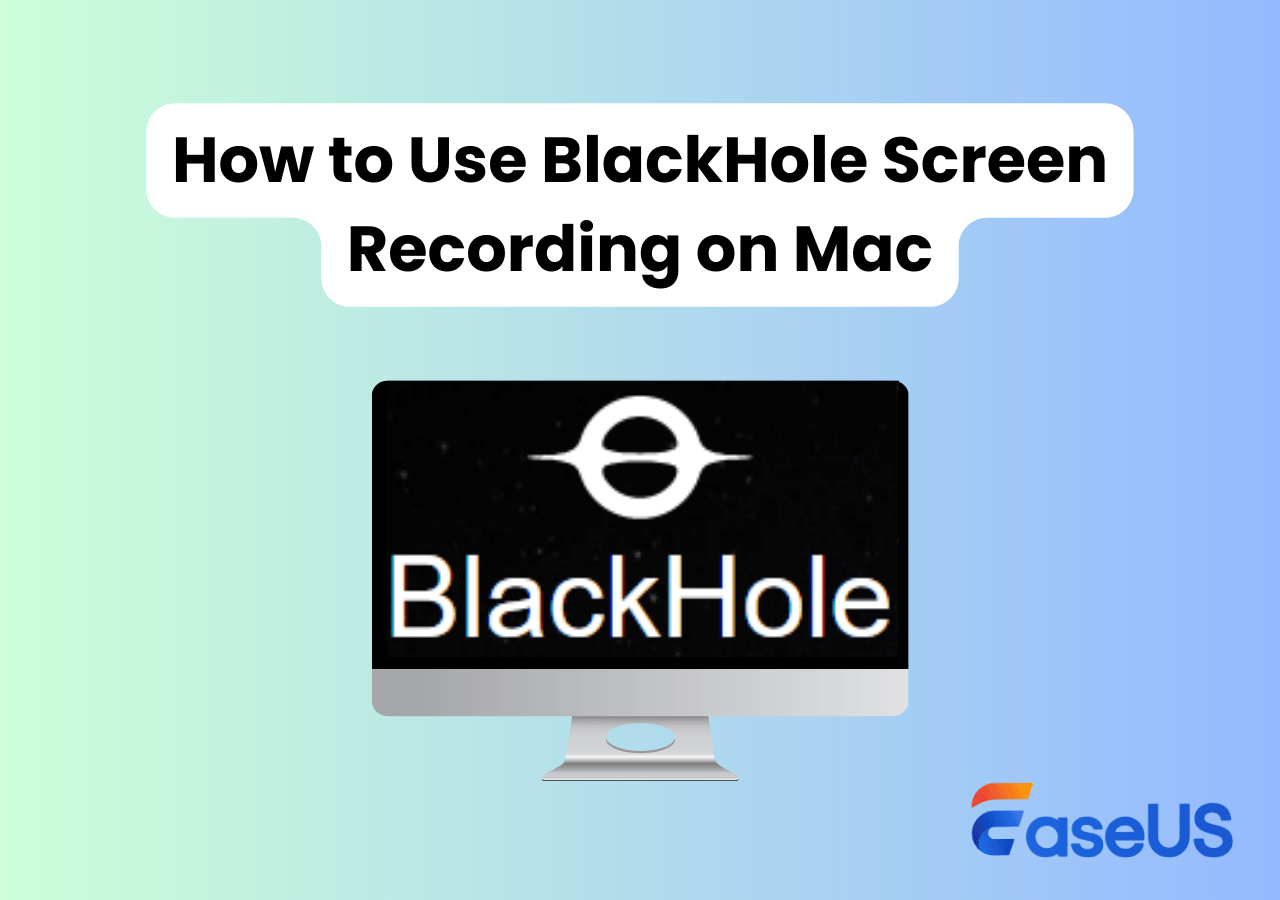
Please note that you may encounter errors, such as QuickTime screen recording with no audio, especially with internal audio. If you want to capture system audio, you'll need to install a virtual audio driver, like BlackHole.
Editor's Review
![]() Pros
Pros
- 100% free, built-in on all Macs
- Record facecam and screen with mic audio
- Simple and straightforward interface
![]() Cons
Cons
- Limited editing tools
- System audio is not recordable
- No automatic recording
🚩Step-by-step guide on screen recording with camera Mac:
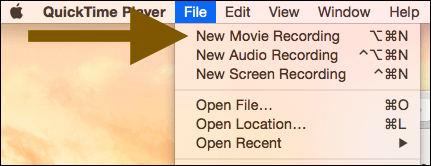
Step 1. Open QuickTime > File > New Movie Recording. This will show your webcam on the Mac screen.
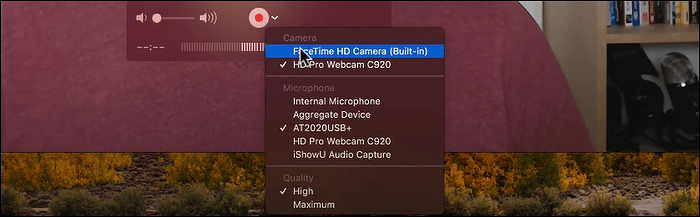
Step 2. Click the arrow-down button to select a facecam source. Then, you can resize or move the feed.
Step 3. Click View > Float on Top. This camera feed will float on top of any window.

Step 4. Go to File > New Screen Recording for the screen capture window. Select the region you need to record on the screen.
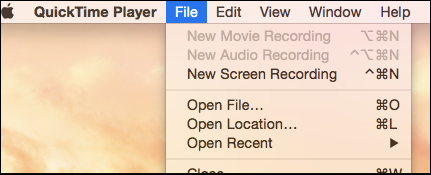
Step 5. Click the drop-down arrow beside the Rec button, and choose the audio source for the camera and screen.
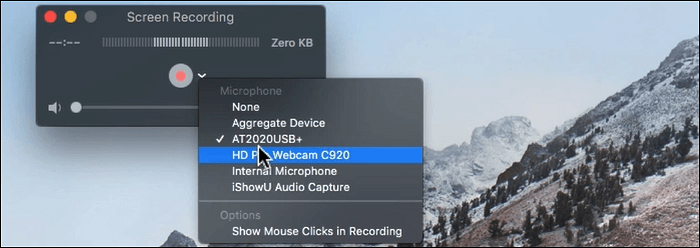
Step 6. Now, click the red Rec button to start recording. The screen and camera on your Macbook will both be captured.
Don't forget to share this tutorial if you find it helpful!
Mac Screen Recording with Camera and Audio with OBS Studio
✅ Best for: Advanced users and streamers who need more layout control
OBS Studio is a free, open source screen recorder widely used for live streaming and video recording. This Mac webcam recorder offers powerful scene management and multi-input recording. It's feature-rich, but setup can be overwhelming for beginners. It sometimes crashes or stops for no reason, like OBS game capture not working with LOL.
Editor's Review
![]() Pros
Pros
- Highly customizable with scenes/sources
- Supports multi-device inputs (camera, mic, game, window)
- Free to use with no watermark or time limits
![]() Cons
Cons
- Steep learning curve
- Requires initial setup and external webcam for Mac
- High CPU usage on older Macs
- Without a video editing feature
🚩Step-by-step guide on how to screen record on Mac with webcam and audio:
Step 1. Install a macOS version from its official website and open OBS Studio.
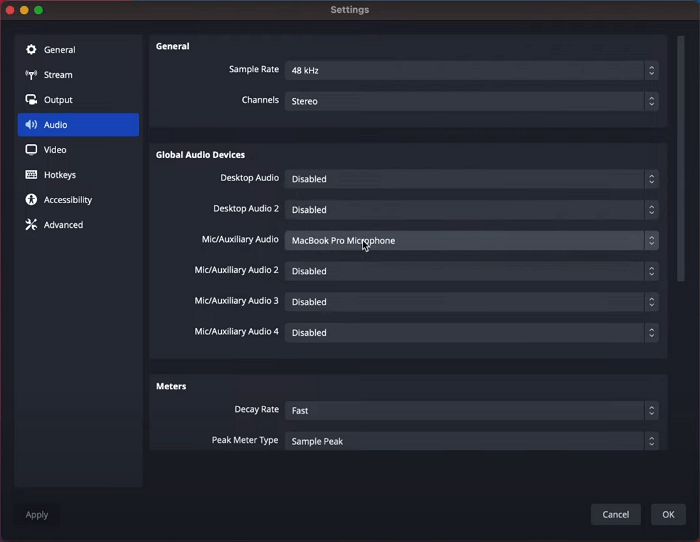
Step 2. Go to Settings > Audio > Global Audio Devices. Here, you can select your system audio input from Desktop Audio and mic sound input from Mic/Auxiliary Audio.
Step 3. Go to + (Sources), select macOS Screen Capture, and finish the setup. This lets you record screen on your macOS device.
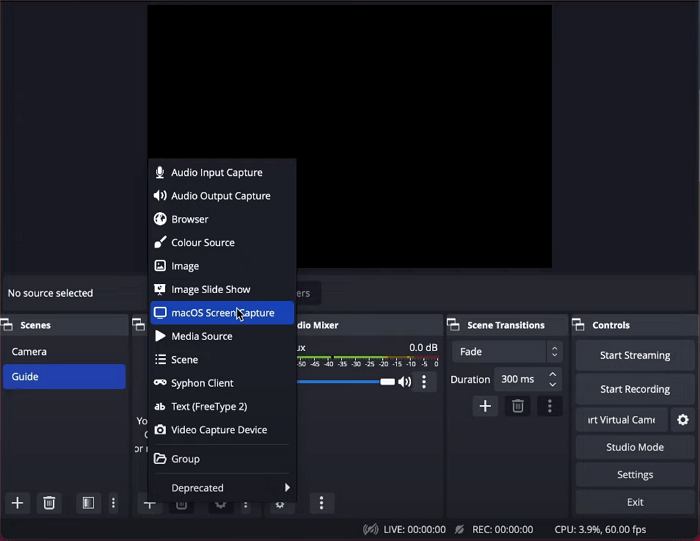
Step 4. Go to + (Sources), select Video Capture Device, and finish the setup. This lets you record webcam footage on your macOS device. You can resize or move the camera feed.

Step 5. Now, you can click Start Recording to begin capturing all inputs. When done, click Stop recording.
Record Screen and Webcam Mac via Free Online Recorder
✅Runs well on Google Chrome, Edge, Sfari, and more
Trying to get a free online tool to record yourself on Mac with your screen? EaseUS Online Screen Recorder is a 100% free and simple selection. This Mac online screen recorder provides a straightforward way to record yourself and the screen on a website without installing apps. No registration or login required; simply visit the website to start capturing your webcam and screen on MacBook Air, MacBook Pro, or other series.
Editor's Review
![]() Pros
Pros
- Works well on Chrome, Safari, Firefox, Opera, etc.
- Easily capture screen and HD facecam video in just a few simple steps
- 100% free with intuitive interface
![]() Cons
Cons
- Lack of advanced editing skills
Detailed steps on how to screen record with webcam overlay on macOS with EaseUS online recorder:
⚠️Note: During recording, please do not turn off the screen you want to record, otherwise the screen may go black.
Step 1. Visit the EaseUS online screen recorder website and click on the Start Recording button to enable it.
Step 2. Select your camera and agree to authorize this website to access it.
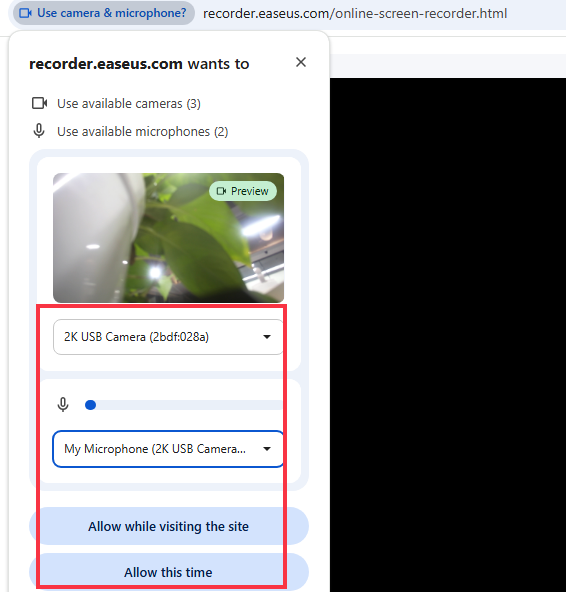
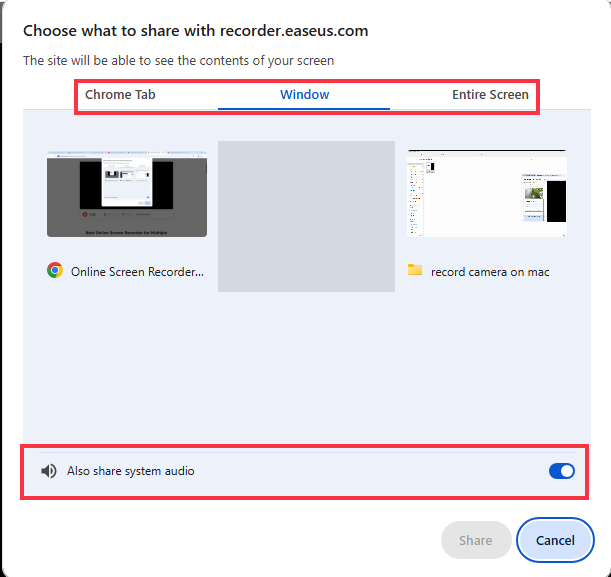
Step 3. Choose the screen recorder source, like a tab, a window, or the entire screen. Then, place the camera overlay in the appropriate position in the preview interface.
Step 4. Click the REC button to begin recording yourself and the screen on your Mac.
Don't forget to share this tutorial if you find it helpful!
Summary: Best Way to Screen Record Mac with Camera
It can be easy to record screen and camera at the same time Mac if you choose the proper method. Here is a comparison of the four Mac screen and webcam recorders:
| Feature | EaseUS RecExperts | Online Recorder | QuickTime Player | OBS Studio |
|---|---|---|---|---|
| Screen + Facecam Simultaneously | ✅ Yes | ✅ Yes (browser-based, needs camera access) | ⚠️ Manual setup only | ✅ Yes |
| Record Internal Audio | ✅ Built-in | ⚠️ System audio via browser permission | ❌ Not supported | ✅ (setup required) |
| Ease of Use | ⭐⭐⭐⭐ (One-click setup) | ⭐⭐⭐⭐⭐ (Instant, no install) | ⭐⭐⭐⭐ (Simple, limited) | ⭐⭐ (Complex for beginners) |
| Editing Tools | Built-in trim, annotation | No | No | No |
| Installation Needed | ✅ Yes | ❌ No | ❌ No | ✅ Yes |
| Best For | All users needing full control | Quick recording & beginners | Quick captures | Streamers & power users |
| Platform Compatibility | macOS / Windows | macOS / Windows / Chrome / Edge | macOS only | macOS / Windows / Linux |
If you want to record your Mac screen and webcam together - with internal audio and zero setup hassle, EaseUS RecExperts for Mac is one of your best choices. It takes advantage of the other two in terms of scheduled recording, a simple user interface, multiple video editing options, audio extraction from recordings, multiple video & audio output formats, etc. We strongly recommend you download and try it. It will meet your screen recording needs and won't disappoint you.
Download EaseUS Screen Recorder
Download EaseUS Screen Recorder
Trustpilot Rating 4.7
Alternatively, if you want to record a simple screen and camera video, QuickTime Player, which comes pre-installed on macOS, is a free option. For users who wish to have more customizable recording settings or want to synchronize live stream footage, OBS is an advanced solution.
Screen Record on Mac with Camera FAQs
1. How do I record my Mac screen with my webcam?
To record a Mac screen with a webcam, you need to decide which tool you use. EaseUS RecExperts, QuickTime Player, and OBS Studio are all available. You need to enable the webcam function is enabled while recording. You can refer to the specific steps we have shown in the post.
2. How do I record my screen with my face?
To record the screen with your face, you need to ensure the webcam feature is on. A good screen recorder, like EaseUS RecExperts, can help to make the process easy.
- Launch the app, and click the "Webcam" button.
- Select the camera device, and adjust the resolution and orientation.
- Click the "REC" button when you are prepared.
3. How do I record my screen and webcam on Mac with internal audio?
Use EaseUS RecExperts or OBS Studio - they allow recording both screen and facecam with internal system audio.
4. Can I record Mac screen and FaceTime at the same time?
Yes, with RecExperts, you can record FaceTime calls with your screen and facecam. Just ensure microphone/system audio is enabled.
5. Is it legal to record webcam and screen at the same time?
For personal use like tutorials or education, it's usually legal. But always inform participants if you're recording video calls or meetings.
6. Why is my camera not showing in QuickTime or OBS?
Check if another app is using your camera. Also ensure you've granted MacOS permissions via System Preferences > Security & Privacy > Camera.
7. What's the best format to save screen and webcam recordings?
MP4 or MOV formats are widely supported and great for editing or sharing. EaseUS RecExperts lets you choose output formats.