-
![]()
Daisy
Daisy is the Senior editor of the writing team for EaseUS. She has been working in EaseUS for over ten years, starting from a technical writer to a team leader of the content group. As a professional author for over 10 years, she writes a lot to help people overcome their tech troubles.…Read full bio -
Jane is an experienced editor for EaseUS focused on tech blog writing. Familiar with all kinds of video editing and screen recording software on the market, she specializes in composing posts about recording and editing videos. All the topics she chooses …Read full bio
-
![]()
Alin
Alin is an experienced technical blog writing editor. She knows the information about screen recording software on the market, and is also familiar with data cloning and data backup software. She is expert in writing posts about these products, aiming at providing users with effective solutions.…Read full bio -
Jean is recognized as one of the most professional writers in EaseUS. She has kept improving her writing skills over the past 10 years and helped millions of her readers solve their tech problems on PC, Mac, and iOS devices.…Read full bio
-
![]()
Jerry
Jerry is a fan of science and technology, aiming to make readers' tech life easy and enjoyable. He loves exploring new technologies and writing technical how-to tips. All the topics he chooses aim to offer users more instructive information.…Read full bio -
![]()
Rel
Rel has always maintained a strong curiosity about the computer field and is committed to the research of the most efficient and practical computer problem solutions.…Read full bio -
![]()
Gemma
Gemma is member of EaseUS team and has been committed to creating valuable content in fields about file recovery, partition management, and data backup etc. for many years. She loves to help users solve various types of computer related issues.…Read full bio -
![]()
Shelly
"I hope my articles can help solve your technical problems. If you are interested in other articles, you can check the articles at the bottom of this page. Similarly, you can also check my Twitter to get additional help."…Read full bio
Page Table of Contents
Jean
Updated on Jun 09, 2026
0 Views |
0 min read
Want to record Keynote presentation with webcam? Looking for how to record a presentation on Mac? Whether you're using Keynote or Microsoft PowerPoint to create a lecture, record a meeting, or launch a product, follow this guide.
How Do You Record a Presentation on Mac?
There are three ways to record presentation on MacBook:
Way 1. Record Keynote presentation with its internal recording feature. This Apple presentation tool lets you record your voice on slides. However, you cannot record yourself on a Mac because Keynote is unable to capture the webcam overlay. You can use QuickTime Player to record a Keynote presentation with a webcam instead.
Way 2. Record presentation on PowerPoint for Mac with its built-in recorder. If you need to record yourself presenting in PowerPoint, there is a native feature that lets you capture slideshows as videos with audio and webcam.
Way 3. Use a reliable third-party Mac screen recorder, like EaseUS RecExperts, to screen record Keynote, PowerPoint, or any presentations on Mac perfectly. This tool lets you seamlessly capture slideshows, system audio, a microphone, and your face without any lag.
Share this post on your social platform to help more users!

The Best Way to Record Presentations on Mac with Audio and Webcam
Compared with recording presentations on Apple Keynote and MS PowerPoint using the built-in feature, EaseUS RecExperts provides a more optimal recording experience for how to record yourself on PowerPoint Mac.
It lets you record PowerPoint presentation with audio and video on Mac in just a few clicks. Apart from recording MS PowerPoint, it also records slides from Keynote, Google Slides, Zoom meetings, and more.
When recording is finished, you can trim the content using the AI-empowered editing functions if needed. Then, export a recorded PPT video in high quality with MP4, MOV, and other file types.
Download EaseUS Screen Recorder
Download EaseUS Screen Recorder
Trustpilot Rating 4.7
Now, open the PPT on Keynote, PowerPoint, Google Slides, or other presentation apps. Then, follow the steps below to record a presentation on Mac:
⭐Before you begin:
- To record a presentation with your face, connect a webcam (e.g., Logitech C920 or similar) or a digital camera or HD camcorder with video recording capabilities to your computer.
- To capture your narration sound, connect an external microphone (USB condenser microphones, Lavalier mics, or Headset mics) to the device.
- Prepare good lighting for high-quality video.
- Set up a clean and professional background.
- Practice your presentation and be familiar with the content.
Step 1. Launch EaseUS RecExperts on your computer. Choose a recording mode from "Full Screen" or "Region". To record a part of the screen, select the recording area manually.

Step 2. After selecting the recording mode, click on the camera sign on the interface. This will let the tool record your screen and the webcam at the same time.
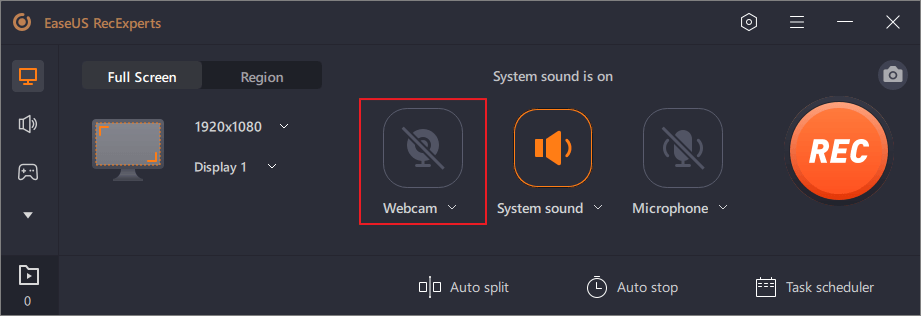
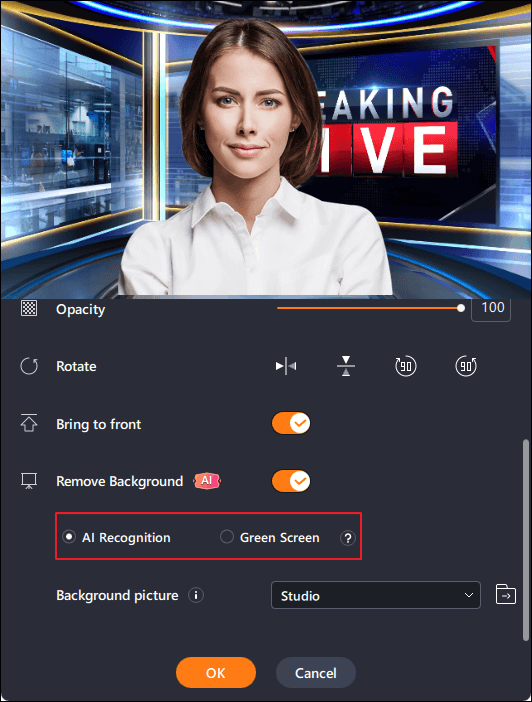
Step 3. You can also change the background with the AI Recognition ot green screen feature. Classroom, blur, studio, or your local images are supported. Just click "Webcam" > "Settings" > "Remove Background" to download and use these modules. Then, click the "REC" button to start recording.
Step 4. After recording, the recording list window will open. Here you can view, split, delete, manage your recordings easily.

Download EaseUS Screen Recorder
Download EaseUS Screen Recorder
Trustpilot Rating 4.7
Share this post on your social platform to help more users!
Record Keynote Presentation with the Built-in Recording Feature
Keynote is part of Apple's iWork suite, designed for creating and presenting slides on Mac, iPad, and iPhone. It includes a built-in recording feature that lets you capture your presentation with voiceover and slide transitions, perfect for creating narrated lessons or business presentations.
However, Keynote's built-in recorder only captures your voice and slide actions, not your webcam. If you want to record your presentation with narration, you can rely on this native feature. But if you wish to include your face alongside the slides, you'll need to use an external recorder such as QuickTime Player.
Below are two practical methods you can try:
Option 1. Record Keynote Presentation with Audio (Built-in Tool)
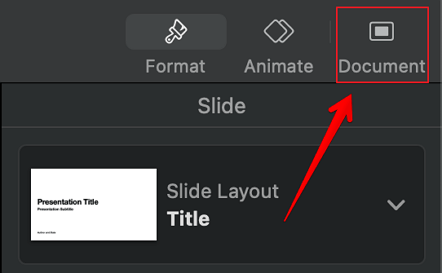
Step 1. Open the presentation in Keynote. Click Document in the upper right corner.
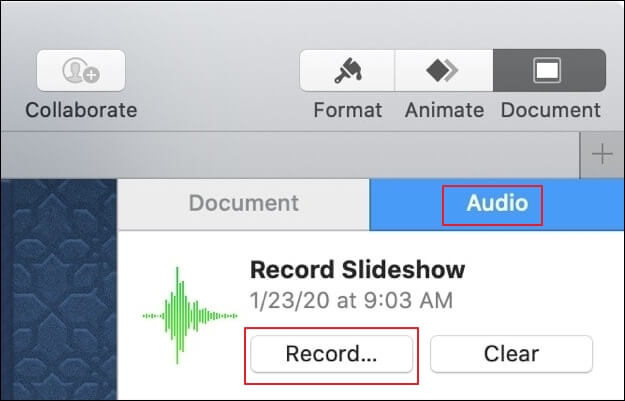
Step 2. Go to the Audio tab and click Record….
Step 3. This will launch a new, full-screen window. Click the red recording button. The timer counts down from 3 before the recording starts. You can use the right or left arrow key to go to the next or previous slide.
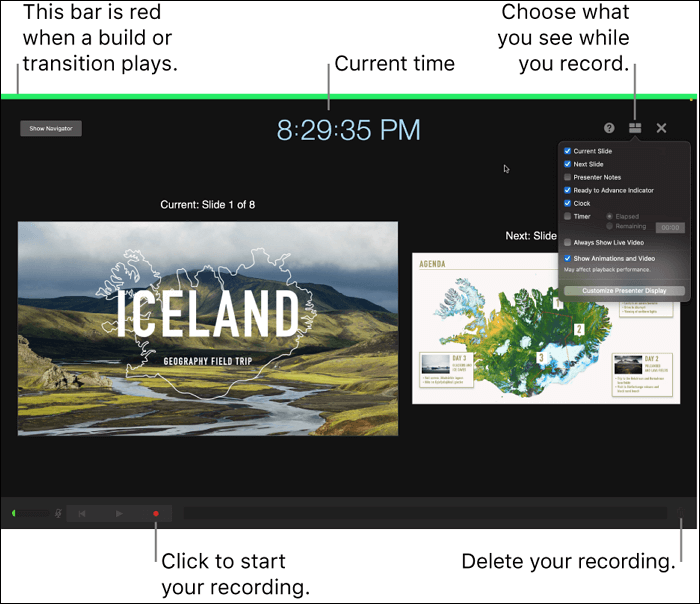
Step 4. Click the red button again to stop recording. You can click the play button to preview the recording.
- To re-record from a specific location: Drag the playback slider at the bottom of the screen to the location where you want to start recording, then click the red recording button. Select Record in the pop-up menu to start recording.
- Delete the entire recording: Click the trash can icon at the bottom right corner of the screen and then select Clear.
Step 5. Press the Esc key to exit the presenter's display.
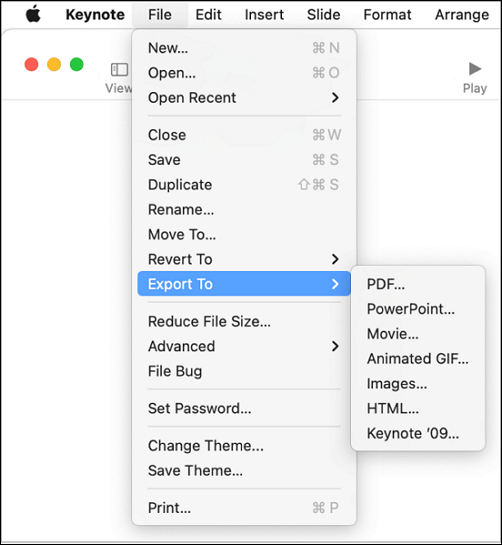
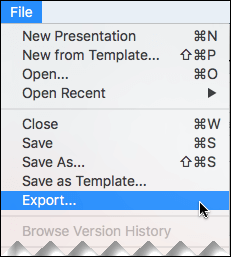
Step 6. To export the Keynote presentation, go to File > Export To. Select a file format and click save. Type a filename, choose a location, and click Export.
- Tip
- Make sure your Mac microphone is enabled under System Settings > Privacy & Security > Microphone before recording.
Option 2. Record Keynote Presentation with Webcam Using QuickTime
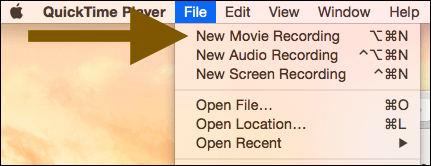
Step 1. Open QuickTime Player from the Launchpad.
Step 2. Click File > New Movie Recording to turn on your webcam.
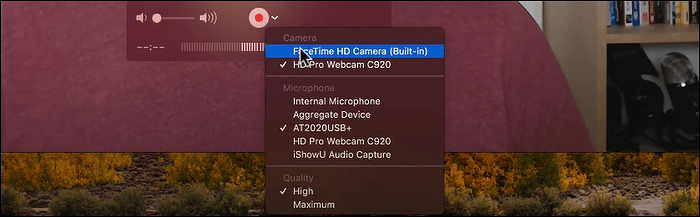
Step 3. Click the arrow-down button to select the FaceCam source.
Step 4. Click View > Float on Top. This camera feed will always float on top of any window.

Step 5. Resize and place the webcam window beside or over your Keynote slides.
Step 6. Then, click File > New Screen Recording to start capturing both the Keynote window and webcam overlay.
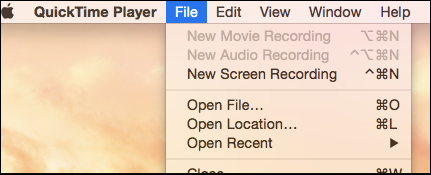
Step 7. Begin your slideshow in Keynote full-screen mode and present as usual.
Step 8. Once done, stop recording from the menu bar and save the file as .MOV or .MP4.
- Tip
- For a cleaner look, you can crop or combine your screen and webcam recordings in a video editor.
Share this post on your social platform to help more users!
Record a PowerPoint Presentation with the Internal Recorder
MS PowerPoint for Mac is not only a tool for creating, editing, and sharing presentations but is also equipped with an internal audio recorder to help presenters capture the screen, audio, and webcam simultaneously on macOS.
People who want to record presentations on Mac with themselves showing faces can use the Cameo feature in PowerPoint. Cameo enables users to insert a live camera feed directly on a slide.
- Notice: Cameo is only available to Microsoft 365 subscribers. Make sure that the Microsoft account you use to log into PowerPoint on your Mac has a valid Microsoft 365 subscription. If not, try EaseUS RecExperts mentioned above.
Let's look at how to record PowerPoint presentations with audio and video Mac.
If you don't need to record yourself on Mac, skip the first two steps, which aim to add a webcam overlay to the PPT.
Step 1. Open the slides on PowerPoint. Go to Insert > Cameo.
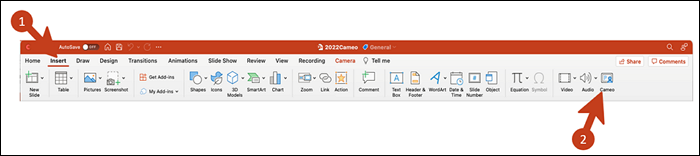
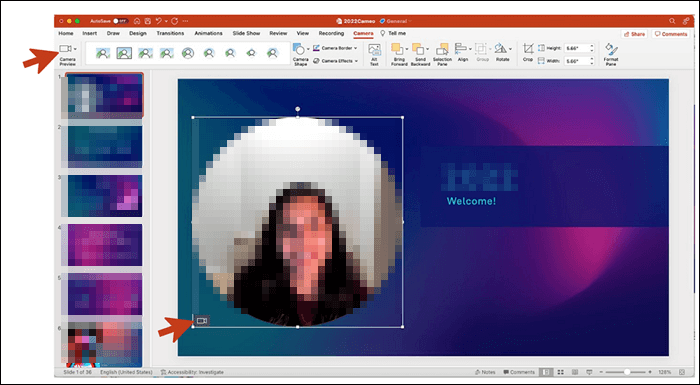
Step 2. A new tab of Camera will appear along with a placeholder for your camera feed. Click the on-off icon to turn on the video feed. You can see yourself on the slide.
- If you have multiple cameras, click Preview to pick another one.
- You can apply effects to your camera.
- You can use the anchor to change the placement and size of your camera feed.
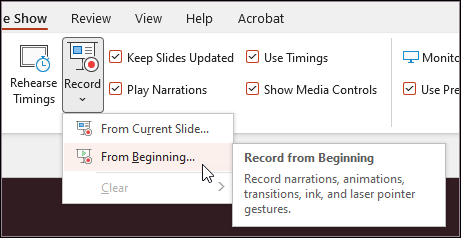
Step 3. Go to Slide Show > Record Slide Show. Select Record from Beginning… or Record from Current Slide….
Step 4. In the recording toolbar, toggle on video (camera icon) and audio (speaker icon) in the dropdown options.
- Select Blur Background in the camera options menu to avoid any background distractions for your audience.
- To make a video from PPT with audio only, toggle the camera (video button) off.

Step 5. Click on the red record button in the top right corner. A three-second countdown timer will appear. When it ends, the recording starts.

Step 6. During the recording session, you can use the pause and resume buttons to manage narration and navigation.

Step 7. Click the red button again to stop recording. You can preview the records.
- Warning: The recordings are saved on each slide separately. Try to finish the content of one PPT slide and then go to the next. Do not return to the previous PPT to add content.
Step 8. If you want to re-record your narration, click the Clear recording button (trash can icon) to the left of the red record button to delete the existing capture. Then, start recording again.

Step 9. After pressing Esc or clicking End show to exit the Record Slide Show experience, you will see the narration (audio/video) applied to the slides, as well as the appropriate slide timing and inking animations.
Step 10. Go to File > Export to export your presentation as a video. Select a video format you need (MP4 or MOV).
Share this post on your social platform to help more users!
Conclusion
This article offers three ways on how to record a presentation on Mac. Follow the guide above, and the recording task will be easy to operate. After making the presentation a video, you can share it offline or online to engage audiences.
To simplify your slide presentation recording task, we recommend EaseUS RecExperts. It lets you record presentations on Mac with audio, video, and a webcam. Regardless of the presentation app you use, EaseUS RecExperts works properly.
Download EaseUS Screen Recorder
Download EaseUS Screen Recorder
Trustpilot Rating 4.7
Record Yourself on Mac FAQs
Learn more frequently asked questions on how to record yourself presenting a presentation on Mac.
1. How do you voice over a presentation on a Mac?
You can record a voiceover narration on Mac with the QuickTime Player.
Step 1. Open the presentation slides in advance. Launch QuickTime Player
Step 2. Click File > New Screen Recording.
Step 3. In the Recording window, select the microphone used to record your voice. Click the red Record button.
Step 4. You can record your entire screen or drag it to select areas of your presentation. Start the presentation and talk while looking at the slides.
Step 5. Click the Stop button in the menu bar at the top of the screen.
Step 6. QuickTime prompts you to save your recording. Select the desired format and save.
2. Why is PowerPoint not recording audio on Mac?
If PowerPoint is not recording audio on Mac, there can be several reasons and according methods:
- Check the microphone settings: Go to System Preferences > Sound > Input.
- Check PowerPoint permissions: Go to System Preferences > Security and Privacy > Privacy tab > Microphone.
- Update PowerPoint: Go to Help > Check for Updates in PowerPoint.
- Simply restart PowerPoint or your Mac.
- Test audio recording in other applications.
- Check PowerPoint settings: Open PowerPoint and navigate to the Slide Show tab. Make sure you follow the appropriate steps to begin recording audio.
- Reinstall PowerPoint.
- Contact Technical Support.
3. How to turn a video to an audio file on Mac?
You can turn a video into an audio file on a Mac using QuickTime Player.
Step 1. Open the video in QuickTime Player.
Step 2. Go to File in the menu bar.
Step 3. Select Export As and then choose Audio Only.
Step 4. Choose a location to save the audio file and give it a name.
Step 5. Click Save. Your audio file will be saved in .m4a format.
4. What is the shortcut for screen record on Mac?
On Mac computers, use the shortcut Shift + Command + 5 at the same time to use the built-in screen recording feature. This will open the screen recording toolbar, where you can choose to record the entire screen, a selected portion of the screen, or a screenshot.
5. How to save recorded sideshow on Keynote?
When you finish recording in Keynote, click Play > Record Slideshow > Stop Recording, then go to File > Export To > Movie. This will save your recorded slideshow as a video file (.mov) that includes your voiceover or timing.
6. Why Keynote record slideshow greyed out?
This usually happens when your presentation is in Edit mode instead of Play mode, or when no audio input device (like a microphone) is detected. To fix it, connect a working mic, select Play > Record Slideshow, and ensure no external display conflicts with Keynote.
7. How to add a video to Keynote on iPad?
Open your Keynote presentation, tap + (Add) > Photo or Video, and choose a video from your Photos library. You can then resize or move it within a slide. To embed videos from Files, tap Insert > Choose, then navigate to your desired video file.
✅ Article Update Log (2025, November)
1️⃣Added a new method to record Keynote presentations with webcam, covering a wider range of user needs.
2️⃣Included three new FAQs to address more user-focused questions and interests.
3️⃣Reviewed and refined existing methods to ensure accuracy and completeness of all information.