-
![]()
Daisy
Daisy is the Senior editor of the writing team for EaseUS. She has been working in EaseUS for over ten years, starting from a technical writer to a team leader of the content group. As a professional author for over 10 years, she writes a lot to help people overcome their tech troubles.…Read full bio -
Jane is an experienced editor for EaseUS focused on tech blog writing. Familiar with all kinds of video editing and screen recording software on the market, she specializes in composing posts about recording and editing videos. All the topics she chooses …Read full bio
-
![]()
Alin
Alin is an experienced technical blog writing editor. She knows the information about screen recording software on the market, and is also familiar with data cloning and data backup software. She is expert in writing posts about these products, aiming at providing users with effective solutions.…Read full bio -
Jean is recognized as one of the most professional writers in EaseUS. She has kept improving her writing skills over the past 10 years and helped millions of her readers solve their tech problems on PC, Mac, and iOS devices.…Read full bio
-
![]()
Jerry
Jerry is a fan of science and technology, aiming to make readers' tech life easy and enjoyable. He loves exploring new technologies and writing technical how-to tips. All the topics he chooses aim to offer users more instructive information.…Read full bio -
![]()
Rel
Rel has always maintained a strong curiosity about the computer field and is committed to the research of the most efficient and practical computer problem solutions.…Read full bio -
![]()
Gemma
Gemma is member of EaseUS team and has been committed to creating valuable content in fields about file recovery, partition management, and data backup etc. for many years. She loves to help users solve various types of computer related issues.…Read full bio -
![]()
Shelly
"I hope my articles can help solve your technical problems. If you are interested in other articles, you can check the articles at the bottom of this page. Similarly, you can also check my Twitter to get additional help."…Read full bio
Page Table of Contents
Alin
Updated on Jun 09, 2026
0 Views |
0 min read
PAGE CONTENT:
We all know that Mac has its way of taking a screenshot. However, a lot of users have complained that they have encountered a "screenshot on Mac not working" problem or that the inbuilt function is not satisfying. If you have the same problem, you've come to the right place.
In this post, we have introduced several of the best screenshot tools for Mac 2025 that can take high-quality screenshots on your Mac computer. Before diving into the details, let's check the testing information and results about them in the table here.
| 🔢How many tested | 15, and only 7 selected |
| 🧑🏻🤝🧑🏻Selected for | Mac users |
| 📂Image format supported | PNG, JPG, JPEG, and more |
| 📽️More functions | Mac screen recording |
| 🔖App types | Inbuilt and third-party ones |
| 🥇Most recommended | EaseUS RecExperts for Mac |
If you find this post helpful, don't hesitate to share it with your friends and fans.

Mac Screenshot Apps Free
Are there any third-party apps that simplify screenshotting on a Mac? Yes! Now, let's move on to the app introduction part. Check all the information and choose the best tool based on your needs.
1️⃣EaseUS RecExperts for Mac[Hot]
- OS: macOS 10.13 or later
- Best for: High resolution screenshot on Mac from any websites or apps with one click
- Rating: 4.5⭐ - TechRadar
EaseUS RecExperts for Mac is an all-in-one screenshot tool and a screen recorder for Mac computers. As one of the best third-party free screenshot tools for Mac, it can help you print the screen on Mac in PNG format. It can easily take a partial or full screenshot on MacBook Air, MacBook Pro, iMac, Mac Mini, etc.
Download EaseUS Screen Recorder
Download EaseUS Screen Recorder
Trustpilot Rating 4.7
You can take a screenshot on a Mac during a screen recording or use the ⌘ + P hotkeys to take and save any screenshots. It can be used along with many applications like YouTube, Instagram, WhatsApp, Telegram, and desktop games. This macOS screenshot app makes it easy to take screenshots in restricted apps or other streaming services.

Pros
- Take a screenshot of the full screen or part of screen
- Users can customize hotkeys
- Take high resolution on Mac without losing quality
Cons
- Can't be used to take long screenshots
- Only save screenshots in PNG format
Download EaseUS RecExperts for Mac to start screenshotting and screen recording right now!
Download EaseUS Screen Recorder
Download EaseUS Screen Recorder
Trustpilot Rating 4.7
2️⃣Mac Screenshot App Shortcut
- Best for: High resolution screenshot on Mac from any websites or apps with one click
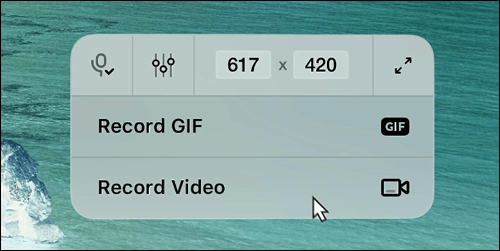
The screenshot shortcut on Mac varies based on different demands. Usually, you can take a screenshot of the whole screen, of a part of the screen, or of a specific window. You can use the shortcut with your keyboard.
In fact, the keyboard shortcut is seen as the easiest way to take screenshots freely. Users can do things like screenshotting OnlyFans without downloading, installing anything, or paying for this function. If you only need a basic screenshot-taking function, try this one. If you need to remove the drop shadow, you can hold the ALT key after you press the space bar.

Pros
- Take a screenshot with hotkeys
- Take a screenshot of the different areas on your screen
- Take lock screen screenshots
- Support various formats like JPEG, PNG, PDF, or HEIC.
- Add txt and shapes to the screenshot when previewing
Cons
- No advanced editing functions
- Take up device storage space
If you find this post helpful, don't hesitate to share it with your friends and fans.
3️⃣Skitch
- OS: macOS 10.11 or later
- Best for: Users who want to capture screenshots, make simple annotations and sharing quickly.
- Rating: 4.5⭐ - Mac App Store
Skitch is one of the best third-party apps that can take screenshots on your Mac, Zoom screenshot is also concluded. What's better, it's free to download and use. Skitch's biggest strengths are its powerful editing features, including adding arrows, lines, shapes, and even highlights to the screenshot.
After taking and editing the screenshot, you can save documents in eight different formats. Common formats like JPG and PNG are all supported. Then, you can share them with your friends through Apple AirDrop, Notes, and more.
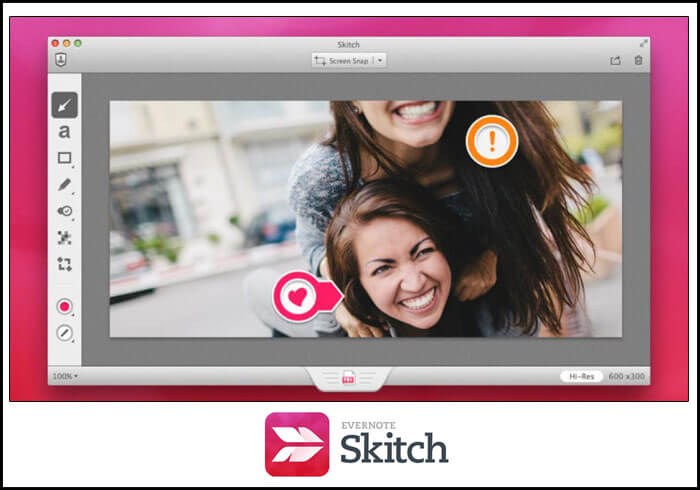
Pros
- Offer a variety of annotation features
- Allow users to add arrows, text, shapes, etc.
- Support cropping the screenshot
Cons
- It can't take screenshots on the lock screen
- It doesn't support the SVG format
4️⃣Monosnap
- OS: macOS 13.5 or later
- Best for: Users who want to capture and edit screenshots
- Rating: 4.2⭐ - Mac App Store
Monosnap is another popular screen print tool for Mac. It takes screenshots with different sizes for users. However, its strengths lie in its editing tools, including annotation, video recording, blurring, and many more.
The screenshots Monosnap takes are clear and accurate. But it doesn't mean you can hide important or private information on the screenshot. You can use the blur tool to hide anything on the screenshot or crop screenshots on Mac.
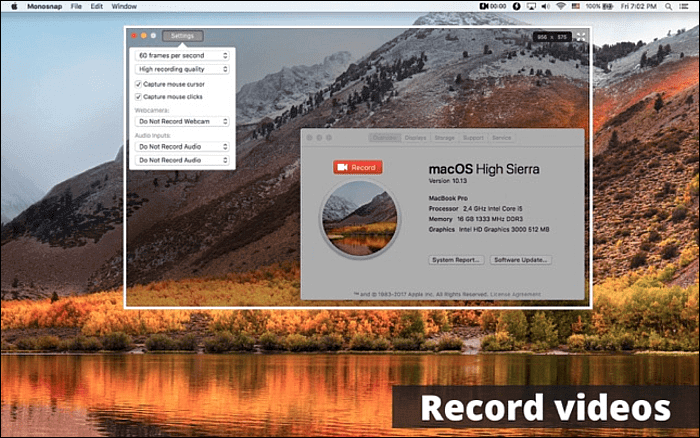
Pros
- It features an 8x magnifier to make the screenshot accurate
- Highlight details while recording videos
- Upload directly to YouTube or Monosnap
Cons
- Offer only 2GB of free cloud storage in the free version
- Third-party integrations are only in the paid versions
5️⃣Lightshot Screenshot
- OS: Requires macOS 10.7 or later
- Best for: Quickly share or add annotations
- Rating: 3.3⭐ - Mac App Store
After introducing some powerful screenshot-taking tools, we give you a lightweight and qualified tool here. As its name indicates, Lightshot Screenshot is what we want. It is minimal and useful at the same time. Even the Firefox screenshot is an easy task for it.
After taking the screenshot, you can annotate any element on it to emphasize the important information. Then, you can share these screenshots directly with Twitter, Facebook, and Pinterest. You can even share them through other platforms with the link generated.

Pros
- It is completely free to use
- Generate a link for the screenshot right away
- Allow users to annotate screenshots
Cons
- Limited functionality offered
- It lags while dragging the cursor to grab screenshots
If you find this post helpful, don't hesitate to share it with your friends and fans.
6️⃣Droplr
- OS: macOS 10.13 or later
- Best for: Quickly capture screenshots and share URLs
- Rating: 4.5⭐ - Software Advice
Then comes Droplr, a capable screenshot tool for both Mac and Windows users. Although the inbuilt screenshot-taking tool can meet your demands to take screenshots, it can't offer you advanced editing features.
In this case, you will need a third-party tool like Droplr. It can also be used to take screenshots for games. For instance, you can screenshot Genshin Impact easily. After editing, you can save the screenshots to the cloud or your local folders.
Pros
- Work as a high-resolution snipping tool
- Offer cloud storage to users
- Support screen recording in 4K resolution
Cons
- Share the screenshot with a link generated
- Not so friendly for novices
7️⃣Shottr
- OS: runs on macOS Catalina (10.15) and up
- Best for: Capturing long screenshots of web pages on Mac
- Rating: 4.9⭐ - Product Hunt
The last tool we want to share with you is Shottr. The company says that it is a small, fast, and human-sized screenshot app built for those who care about pixels. Also, it was crafted with Swift and can take macOS Ventura screenshots.
To be more specific, Shottr is a tiny (1.6mb dmg, 3.6mb unpacked) native app optimized for M1. And it takes only 17ms to grab a screenshot. It also offers advanced functions like taking a screenshot of a long web page, capturing a conversation in a chat, or marking up your picture.
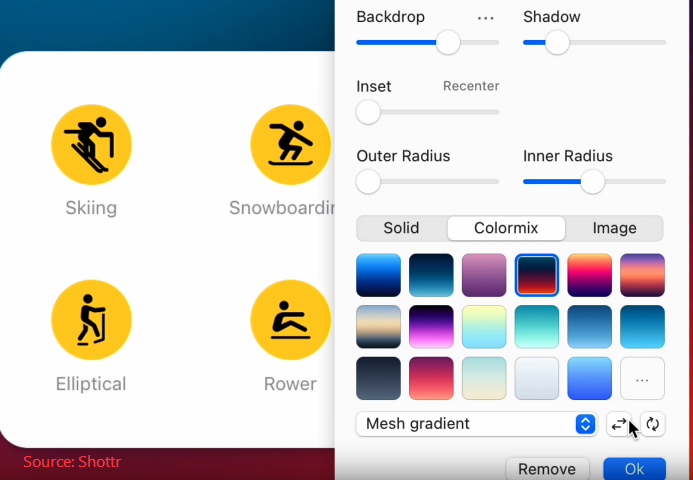
Pros
- Scrolling screenshots on Mac
- Support pixelating or removing objects
- Support text recognition (OCR)
- Supports gradient backgrounds, shadows, and rounded corners
Cons
- Advanced features are not free
- Not updated so often
8️⃣Cleanshot X
- OS: macOS 10.14 or newer
- Best for: Capture screen on Mac like a pro
- Rating: 4.9⭐ - Product Hunt
CleanShot is one of the top-notch Mac screenshot tools. It keeps screenshots floating above all windows for constant visibility. It also offers text recognition to extract text from images and scanned documents. Plus, it provides easy-to-use features for creating beautiful screenshot backgrounds and capturing scrolling content in any app.
Pros
- Supports scrolling screenshots, powerful and practical
- High-quality screenshots, clean images
- Create GIF or perform screen recording easily
- Integrated shortcut keys, easy to use
Cons
- Require a paid subscription
If you find this post helpful, don't hesitate to share it with your friends and fans.
Tips: Mac ScreenShot App not Responding?
If the screenshot app on your Mac doesn't work, check some of the troubleshooting tips in this part.
🎈Fix 1. Check the Keyboard Shortcut Settings
By default, the screenshot keyboard shortcuts on your Mac are activated. If not, the ScreenShot app may not work. Check if the screenshot shortcut is active on your Mac by:
- 1. Go to the Apple menu and navigate to System Preferences.
- 2. Tap on Keyboard and then Shortcuts.
- 3. Tap on Screenshots and make sure that all options here are active.
🎈Fix 2. Restart the Mac
Applications won't work perfectly if you've not restarted your system for a long time. Check three ways you can try to restart your Mac:
- Way 1. Press and hold down the Power button, then choose the Restart option. Alternatively, you can press Control + Eject and choose Restart.
- Way 2. Go to the Apple menu and choose Restart.
- Way 3. Use Control + Command + Eject or Control + Command + Power, and choose Restart.
🎈Fix 3. Reset the NVRAM
NVRAM stores basic information about your system settings, like time zone, volume, screen resolution, etc. Resetting NVRAM can solve the ScreenShot app not working issue. Do as follows:
- 1. Shut down your Mac and restart the system again using the power button.
- 2. When hearing the startup sound, press Command + Option + P + R at once.
- 3. Hold on for about twenty seconds and try ScreenShot later.
🎈Fix 4. Load in a safe mode
This issue may occur because malware not allowing your system to take screenshots. You can start your system in safe mode to find out if your Mac can take screenshots by:
- 1. First, shut down your Mac and wait for about twenty seconds.
- 2. Then, restart the system and press Shift.
- 3. Keep holding the key until you see the login window.
- 4. Then, you can see Safe Boot as you log in.
Final Words
This guide shows you the 8 best screenshot apps for Mac 2025. You can choose a suitable one to screen capture on your Mac with ease. In addition to the built-in snipping tool on Mac, you can also use tools that provide advanced features, such as Skitch, Cleanshot X, Shottr, etc., to capture macOS screenshots.
If you want to capture high-quality screenshots on Mac and capture content from streaming platforms, EaseUS RecExperts for Mac is your best choice.
Download EaseUS Screen Recorder
Download EaseUS Screen Recorder
Trustpilot Rating 4.7
Mac ScreenShot App FAQs
Here are some frequently asked questions and their answers offering related information. Check them out now!
1. Where is the ScreenShot app on Mac?
On your Mac, press Shift + Command+ 3/4 to open Screenshot and start taking a screenshot.
2. What is the screenshot app on Mac called?
The inbuilt screenshot app or the screenshot shortcut on Mac is called ScreenShot. It can take a screenshot of the full screen, an area, and a specific window.
3. Is there a free screenshot tool on Mac?
Yes, and it is the hotkey combinations on your keyboard. Note that it only offers users basic screenshot-taking functions. If you want more, you will need some third-party tools like EaseUS RecExperts for Mac, which can record everything on your Mac screen as well.
4. What are the best screenshot tools for Mac?
The best Mac screen capture apps include:
1. EaseUS RecExperts for Mac
2. Mac Screenshot App Shortcut
3. Skitch
5. Lightshot Screenshot
6. Droplr
7. Shottr
8. Cleanshot X