-
![]()
Daisy
Daisy is the Senior editor of the writing team for EaseUS. She has been working in EaseUS for over ten years, starting from a technical writer to a team leader of the content group. As a professional author for over 10 years, she writes a lot to help people overcome their tech troubles.…Read full bio -
Jane is an experienced editor for EaseUS focused on tech blog writing. Familiar with all kinds of video editing and screen recording software on the market, she specializes in composing posts about recording and editing videos. All the topics she chooses …Read full bio
-
![]()
Alin
Alin is an experienced technical blog writing editor. She knows the information about screen recording software on the market, and is also familiar with data cloning and data backup software. She is expert in writing posts about these products, aiming at providing users with effective solutions.…Read full bio -
Jean is recognized as one of the most professional writers in EaseUS. She has kept improving her writing skills over the past 10 years and helped millions of her readers solve their tech problems on PC, Mac, and iOS devices.…Read full bio
-
![]()
Jerry
Jerry is a fan of science and technology, aiming to make readers' tech life easy and enjoyable. He loves exploring new technologies and writing technical how-to tips. All the topics he chooses aim to offer users more instructive information.…Read full bio -
![]()
Rel
Rel has always maintained a strong curiosity about the computer field and is committed to the research of the most efficient and practical computer problem solutions.…Read full bio -
![]()
Gemma
Gemma is member of EaseUS team and has been committed to creating valuable content in fields about file recovery, partition management, and data backup etc. for many years. She loves to help users solve various types of computer related issues.…Read full bio -
![]()
Shelly
"I hope my articles can help solve your technical problems. If you are interested in other articles, you can check the articles at the bottom of this page. Similarly, you can also check my Twitter to get additional help."…Read full bio
Page Table of Contents
Jane Zhou
Updated on Jun 09, 2026
0 Views |
0 min read
Recording high-quality audio on Mac with external mic is not easy: you may find macOS doesn't always recognize external microphones right away, and the wrong settings can lead to Mac screen recording no sound or muffled audio.
In this guide, we'll show you exactly how to record audio on Mac with external mic, including how to set it up properly and which tools give you the best results. Whether you're using a USB mic, XLR via audio interface, or a simple clip-on mic, this guide has you covered.
💡Quick Comparison: Best Tools to Record Audio on Mac with External Mic
|
Tool |
Noise Reduction |
System + Mic Recording |
Ease of Use |
|
✅ AI-powered |
✅ Yes |
⭐⭐⭐⭐⭐ |
|
|
❌ None |
❌ Mic only |
⭐⭐⭐ |
|
|
❌ None |
❌ Mic only |
⭐⭐ |
Before You Start: 5 Tips for Better Audio Recording on Mac
To ensure your external mic captures clean, high-quality sound, make sure to set up your environment and gear properly. Here are 5 quick tips before you hit record:
1.🎤 Choose the Right Microphone
Not all mics are built for the same task. The type of mic you choose will directly impact the sound quality and clarity
- Lavalier (clip-on) – Best for podcasts and personal vlogs
- Condenser mic – Ideal for vocals and music recordings
- Boom mic – Great for distant or outdoor voice capture
Recommendation for Microphone and Audio interface for MacBook and iPad. Reddit
2. 🎧Use Headphones for Monitoring
Wearing headphones helps you monitor live input, identify background noise, and avoid echo or channel mismatches. This is especially important when recording system audio and mic simultaneously.
3. 🎶Reduce Background Noise
Keep your space quiet and control for ambient sounds (AC hum, fans, traffic).
Use a mic windshield (also called a "dead cat") to block wind noise or breath pops if you're recording outdoors or near airflow.
4. 🧑💻Check Mic Connection & Input Settings
- Plug in your external mic and go to: System Settings > Sound > Input.
- Then select your mic as the active input device.
- Run a quick test to confirm the input level is registering before you start recording.
5. 🛠️Isolate the Mic From Vibrations
Avoid placing the mic directly on hard surfaces. Use a shock mount or foam padding to prevent unwanted vibrations from being captured (like keyboard taps or table bumps).
- Pro Tip
- If you're recording for professional use (podcast, online course, YouTube), these small setup tweaks can make a huge difference in audio quality especially when using tools like EaseUS RecExperts, which amplify mic performance with built-in enhancements.
Share this post to help others in need!

Record Audio on Mac with an External Mic
We have explained the prerequisites of MacBook audio recording. Now let's dive straight into recording sound with an external mic. Here are 3 best ways to record audio on Mac with an external mic
#1. Use EaseUS RecExperts
✅Best for: Mac users who need studio-quality voice recordings, want to record system audio + mic, and prefer a user-friendly interface with built-in noise reduction.
EaseUS RecExperts is an all-in-one external and internal audio recorder. It is equally proficient in recording audio and video from your Mac and Windows systems. For videos, you can choose to record either the full or partial screen. Regarding recording audio, the tool provides studio-quality sound with minimal jitter. It utilizes a built-in AI noise remover that eliminates all unnecessary background sounds. As a result, you get a clear sound.
This tool is highly recommended to record audio on Mac from YouTube, podcast, music videos, marketing content, and more videos. After recording, you can add quality customization with editing options. In short, it is a one-window for all streamers and content creators.
🚩Here's how to screen record with external audio on Mac:
Step 1. Launch EaseUS RecExperts and choose "Audio" (looks like a speaker) from the left side of the interface. Select the sound source by clicking on the speaker sign (the system sound) or the mic sign (the microphone). Or, you can record them both at the same time.
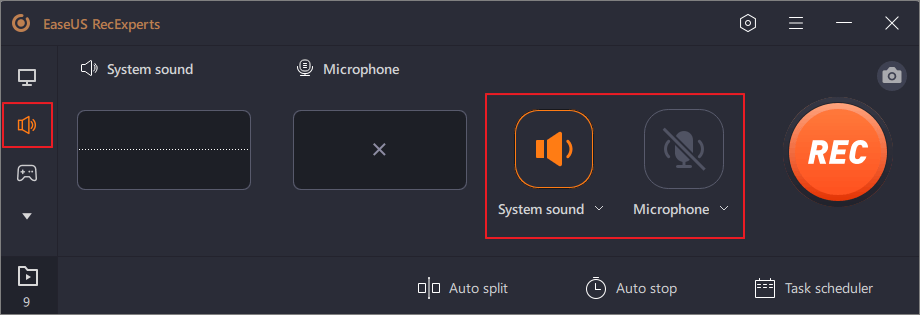
Step 2. Hit "REC" button to start recording audio. To finish it, you just click on the red square icon to stop the recording.
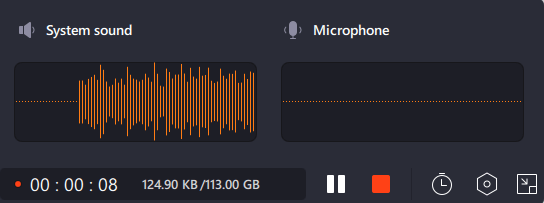
Step 3. After that, the recording list window will pop up automatically. You can listen to or edit the recording with built-in tools.

- Expert Notes:
- Unlike QuickTime or Voice Memos, EaseUS RecExperts enables you to combine multiple audio sources, filter out ambient noise, and instantly share or edit recordings - all within a single streamlined workflow.
Share this post to help others in need!
#2. Use Voice Memos
✅Best for: Mac users who need a quick way to record voice, such as class lectures, personal notes, or simple narration, without advanced editing or multi-source audio needs.
Voice Memos is an app that transforms your Mac device into a temporary audio recorder. You can record lectures, musical notes, ideas, or personal notes with it. It allows you to pause, stop, and edit the recorded audio. The app has been developed exclusively for Mac devices like iPhone, iPad, and MacBook.
🚩How to record a MacBook's external mic with voice memos.
Step 1. Plug an external mic into your MacBook system. Then, turn it on.
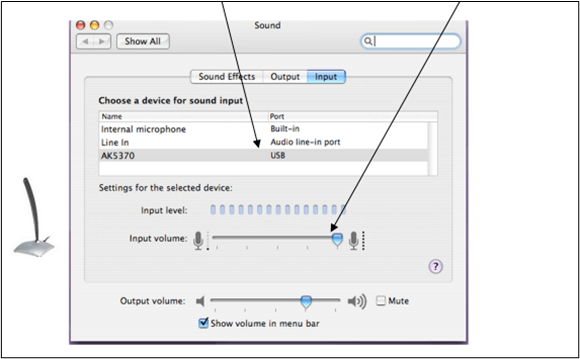
Step 2. Select System Preferences > Sound > Input in the phone menu. Now choose your attached external mic as the input sound device.
Step 3. Navigate to Voice Memos app on your system and open it.
Step 4. To initiate recording, click the red button. Move the mic closer to yourself for better quality.
Step 5. Once finished, tap to stop the recording.
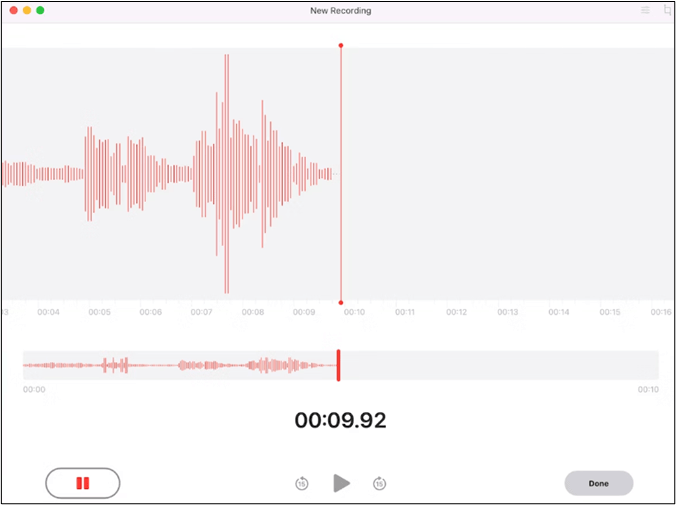
Step 6. Review the recorded audio file. You can drag the waveform back and forth to observe it.
- Expert Note:
- While convenient, Voice Memos is best suited for casual voice recordings. It lacks features needed for professional audio tasks or long-form recording. For more information, refer to Apple Support official document.
Share this post to help others in need!
#3. Use QuickTime Player
✅Best for: Users who want to record voice using an external mic without installing third-party software and are okay with limited features.
QuickTime player is among the most well-rounded media players ever developed by Apple. It provides efficient streaming and recording features. It supports MP3, MP4, AAC, and H.264 audio and video formats. For streaming, QuickTime has HTTP Live streaming protocol support.
QuickTime player provides the best recording from external devices like Mics, webcams, or DVDs. You can also control the output with editing features.
🚩Here is how you can record an external Mic from QuickTime Player:
Step 1. Open the QuickTime player from your Mac system.
Step 2. In the app, navigate to File > New Audio Recording. A new window will appear.

Step 3. Choose the triangle icon. After this, select the external audio device from which you want to record.
Step 4. Select the preferred audio quality.
Step 5. Click the record button and start recording. Once completed, click stop.
- Expert Notes:
-
QuickTime is good for simple, local recordings but lacks features like noise suppression, internal audio capture, or post-processing, making it less suitable for polished content.
If you can't record audio from an external source on Mac, check Apple Support official document.
Share this post to help others in need!
Common Issues When Recording Audio with an External Mic on Mac
Even with the best microphone and software, Mac users often encounter issues when trying to record external audio. Here are the most common problems and their solutions.
1️⃣Problem 1: Mac Doesn't Detect External Microphone
Symptom: Your mic is plugged in, but not showing up under System Settings > Sound > Input.
✅ How to Fix Mac Doesn't Detect External Microphone:
Step 1. Make sure the microphone is properly connected via USB, 3.5mm jack, or audio interface.
Step 2. Restart your Mac after connecting the mic.
Step 3. Try another USB port or cable if available.
Step 4. Go to System Settings > Privacy & Security > Microphone, and ensure the recording app (e.g., RecExperts) is granted microphone access.
Advanced tip: Some USB mics may need driver installation or firmware updates. Check the manufacturer's website for support.
2️⃣Problem 2: Mic Detected but No Sound Recorded
Symptom: The Input bar shows no levels, or the recorded file is silent.
✅ How to Fix Mic Detected but No Sound Recorded:
Step 1. Double-check that your mic is selected as the active input under Sound > Input.
Step 2. Increase the input volume slider - sometimes it's set too low by default.
Step 3. Use headphones to test the mic live.
Step 4. Try recording with a different app (e.g., test with Voice Memos) to rule out software issues.
3️⃣Problem 3: Recording Sounds Muffled or Too Noisy
Symptom: Audio contains hiss, hum, or background distortion.
✅ How to Fix Recording Sounds Muffled or Too Noisy:
Step 1. Use a microphone with built-in noise filtering, or pair it with software that supports this feature (such as EaseUS RecExperts).
Step 2. Keep the mic close to your mouth and away from fans, keyboards, or reflective surfaces.
Step 3. Add a pop filter or foam cover to reduce plosives and air interference.
Step 4. Avoid recording in echoey rooms. If possible, record in a carpeted space or with soundproof panels.
Tech tip: Background noise is usually caused by a high-gain setting or low-quality mic. Use an app with AI noise reduction to automatically clean your audio.
4️⃣Problem 4: Audio Is Echoing or Too Quiet
Symptom: Voice sounds distant, doubled, or lacks clarity.
✅ How to Fix Audio Is Echoing or Too Quiet:
Step 1. Avoid recording through your laptop's built-in microphone by accident. Always confirm the correct mic is selected.
Step 2. Use headphones to prevent your speaker audio from being picked up by the microphone.
Step 3. Turn off unused mic sources or virtual devices that may cause input conflict.
Share this post to help others in need!
Final Words
Recording audio on a Mac with an external mic doesn't have to be complicated, but your choice of tool can make or break your sound quality.
If you're aiming for studio-level clarity, need to capture both system and mic audio, and want built-in editing tools - EaseUS RecExperts is hands-down the best option. It's intuitive, powerful, and designed for creators who care about sound.
How to Record Audio on Mac with External Mic FAQs
These are the most frequently asked web questions about how to record audio on a Mac with an external mic.
1. Can I use an external mic with Voice Memos on Mac?
Yes, you can use an external mix with Voice Memos on Mac. They provide excellent recording quality. All you need is to select the external mic as an input audio source; then, you can start recording.
2. Can you record audio internally on Mac?
You can record Mac internal audio with software like EaseUS RecExperts, Easy Audio Recorder Lite, Audacity, etc. You can also use QuickTime player with a configured sound flower app to record internal Mac Audio.
3. How do I record good audio with my microphone?
You can record good audio with a Mac microphone by using QuickTime Player. Follow these steps
Step 1. Open the QuickTime player app. Then choose file> New Audio Recording.
Step 2. Choose the microphone and audio quality in the pop-up menu.
Step 3. Adjust the volume. Click on Start to initiate recording.
Step 4. Click the stop button after completing the work.
Step 5. Select File > Save to save the recording file.
4. How do I use a USB microphone on my Mac?
Most USB mics are plug-and-play on Mac. Just follow these steps:
Step 1. Plug the USB mic into your Mac
Step 2. Go to System Settings > Sound > Input
Step 3. Select your mic from the list
Step 4. Test input levels by speaking into the mic
Then you can record using any compatible app like Voice Memos, QuickTime, or RecExperts.
5. Why isn't my external mic working on Mac?
If your Mac isn't recognizing your mic:
- Confirm it's fully plugged in
- Try a different USB port or cable
- Restart your Mac
- Go to System Settings > Privacy & Security > Microphone and make sure your recording app has permission
- Check if your mic needs a driver (especially for older USB mics or audio interfaces)
- If all else fails, test the mic on another device to rule out hardware issues.
Share this post to help others in need!