-
![]()
Daisy
Daisy is the Senior editor of the writing team for EaseUS. She has been working in EaseUS for over ten years, starting from a technical writer to a team leader of the content group. As a professional author for over 10 years, she writes a lot to help people overcome their tech troubles.…Read full bio -
Jane is an experienced editor for EaseUS focused on tech blog writing. Familiar with all kinds of video editing and screen recording software on the market, she specializes in composing posts about recording and editing videos. All the topics she chooses …Read full bio
-
![]()
Alin
Alin is an experienced technical blog writing editor. She knows the information about screen recording software on the market, and is also familiar with data cloning and data backup software. She is expert in writing posts about these products, aiming at providing users with effective solutions.…Read full bio -
Jean is recognized as one of the most professional writers in EaseUS. She has kept improving her writing skills over the past 10 years and helped millions of her readers solve their tech problems on PC, Mac, and iOS devices.…Read full bio
-
![]()
Jerry
Jerry is a fan of science and technology, aiming to make readers' tech life easy and enjoyable. He loves exploring new technologies and writing technical how-to tips. All the topics he chooses aim to offer users more instructive information.…Read full bio -
![]()
Rel
Rel has always maintained a strong curiosity about the computer field and is committed to the research of the most efficient and practical computer problem solutions.…Read full bio -
![]()
Gemma
Gemma is member of EaseUS team and has been committed to creating valuable content in fields about file recovery, partition management, and data backup etc. for many years. She loves to help users solve various types of computer related issues.…Read full bio -
![]()
Shelly
"I hope my articles can help solve your technical problems. If you are interested in other articles, you can check the articles at the bottom of this page. Similarly, you can also check my Twitter to get additional help."…Read full bio
Page Table of Contents
0 Views |
0 min read
Screen sharing on Mac has become a usual practice in every field of life, from live streams, business presentations, and weekly meetings to technical support calls and interviews. But what to do if you run into the problem of Mac screen sharing not working? Don't get frustrated; find a quick fix!
To aid you, here are some practical methods for making the screen sharing feature work efficiently on your Mac. This guide also reveals the possible reasons behind this situation.
Why Is Mac Screen Sharing Not Working
Before diving into the solutions, let's explore some causes for Mac screen sharing not working problem. It's because identifying the cause will help you quickly resolve the issue.
- No Screen share permission on Mac
- The Mac firewall is blocking screen sharing
- Disabled screen recording access
- Blocked access to app permissions
- Sleep mode is activated on the Mac
- Weak or unstable internet connection
- Your system is frozen or corrupted
- macOS is not up to date
How to Fix Mac Screen Sharing Not Working Issue
If you share screen on FaceTime Mac and the screen sharing option is not working, below are the five efficient methods to fix it immediately. Before diving into the details of each solution, look at this table for some know-how.
Method 1. Share Mac Screen by Recording
The leading method to overcome the problem of screen sharing not working on Mac is recording it before sharing. EaseUS RecExperts is a comprehensive and secure Mac screen recorder in the market to help you with this task.
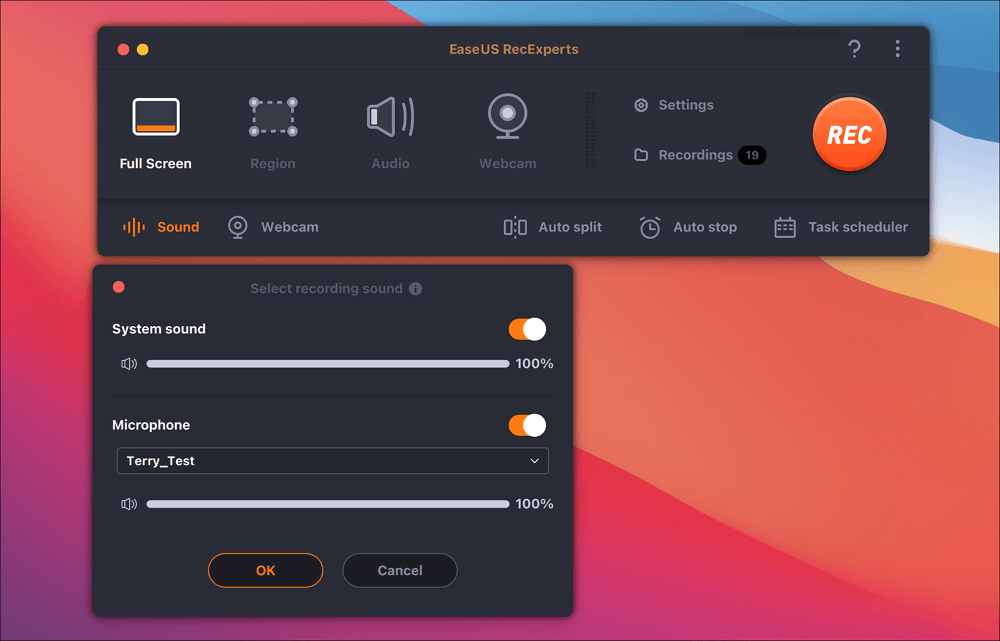
This software helps you record all your screen activities with a webcam if you want to capture yourself. You can flexibly capture the full screen or a custom region per your needs. Its advanced green screen technology allows you to create tutorials, gameplay videos, presentations, and more. Capturing your image from the webcam is also in your control. You can even record microphone voice, internal sound, or no audio at all.
In addition, it lets you adjust the output parameters, like format, frame rate, quality, etc. You can also adjust playback, extract audio, or trim your recorded videos with its editing toolkit. Lastly, you can capture videos without any time limit, and your recordings will be free of any watermark.
Method 2. Uncheck the Remote Management Feature
Besides screen sharing, remote management lets you access Macbooks from other devices. However, the problem is you can't activate both features simultaneously. You must deactivate the remote management to enable the screen-sharing function. Here are the steps to perform this task:
Step 1. Tap the "Apple" menu icon to unlock the "System Preferences" tab.

Step 2. Next, you have to choose the "Sharing" button. Scroll down the list under the "Service" section.

Step 3. Finally, uncheck the "Remote Management" option to disable this feature.

Don't forget to share this post with others if it's really helpful!
Method 3. Access the Administrator Account
Not using an admin account is one of the reasons behind the situation when you ask why I can't share the screen on Mac. Although you may have it on your Mac, you might not be using it because you are using the shared computer or for any other reason.
So whenever you face the issue of the Apple macOS Sonoma screen sharing not working, the solution is to log into the administrator account. Let's check it once by following the below tutorial.
Step 1. After going under the "System Preferences" section, press "Users & Groups."
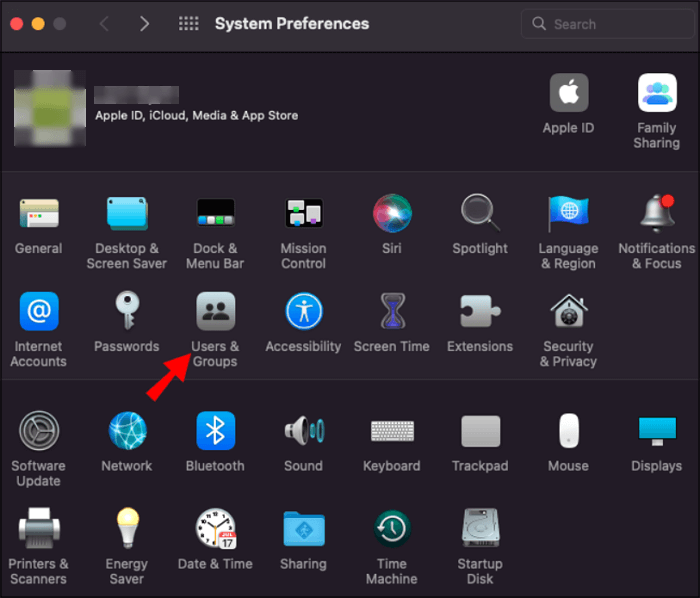
Step 2. Now, click the admin account username and type your password, and you will be ready to share the screen on Mac.
Method 4. Adjust your Mac Sleep Mode
Have you ever experienced a situation when your Macbook falls asleep, thus interrupting your screen share session? If yes, it's because one of your systems has fallen asleep. So, you must turn off all the screen-locking features before sharing your screen.
Step 1. Tap the "Battery" icon from the menu bar and press "Battery Preferences." You can also open this window by clicking "System Preferences"> "Battery."
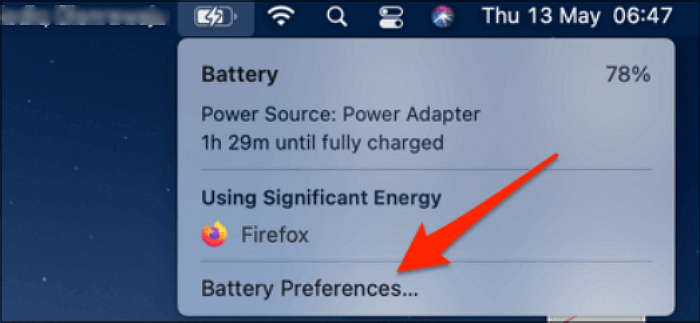
Step 2. Now, you have to increase the time duration to 30 minutes, 1 hour, or more by moving the slider from left to right.
Step 3. Press the "Power Adapter" button to extend the display timeout. You are all done!

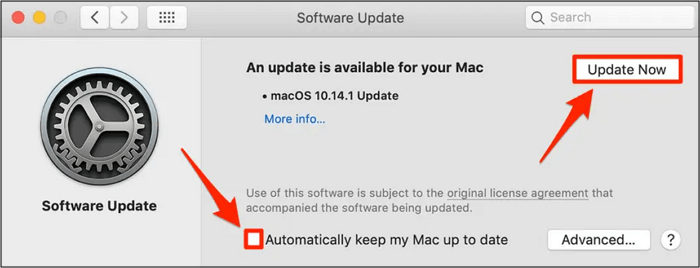
Method 5. Update your macOS
Updating any device is crucial for proper functioning; the same goes for Mac. Although you should have activated the feature of automatically keeping your Mac up to date, this needs to be checked before if you are facing the black screen while screen mirroring. It will help you get rid of the bugs and other issues, like Mac screen sharing not working.
Step 1. After connecting your Mac to the internet, open the Apple menu.
Step 2. Press the "System Preferences" tab > "Software Update."
Step 3. Finally, if available, hit the "Update Now" or "Upgrade Now" button. That's all!
Final Words
The above content has provided the top reasons and five fixes for your Mac screen sharing not working issue. Although you can choose any suitable method, EaseUS RecExperts is the most recommended solution.
It provides a wide range of advanced tools to help you eliminate all distractions, leading to smooth collaboration and improved efficiency of your daily workflow. Let's download this program and explore more functionalities.
Mac Screen Sharing Not Working FAQs
Besides discussing the solutions for Mac screen sharing not working, let's consider some frequently asked questions for more information:
1. How do I enable Screen Sharing on my Mac?
To enable screen mirroring on Mac:
Step 1. Open your Mac, tap the Apple icon, and choose "System Preferences."
Step 2. Press the "Sharing" tab from the various options.
Step 3. Lastly, checkmark the "Screen Sharing" box if unchecked.
2. Why won't my Mac allow me to share the screen on Zoom?
Various reasons exist for your Macbook not allowing screen sharing on Zoom, including increased security permissions on Mac. You may not have allowed Zoom access screen recording, or the option of enabling screen sharing for participants on this app is not turned on.
3. How do I make sure my firewall isn't blocking Screen Sharing?
To ensure your firewall is not blocking the screen sharing on Mac:
Step 1. From the Apple menu, click "System Preferences," select "Security & Privacy," and go under "Firewall."
Step 2. Choose the "Options" button and deselect "Block all incoming connections."
Step 3. So, set the "Screen Sharing" box to "Allow incoming connections."
EaseUS RecExperts

One-click to capture anything on screen!
No Time Limit, No watermark
Start Recording


