-
![]()
Daisy
Daisy is the Senior editor of the writing team for EaseUS. She has been working in EaseUS for over ten years, starting from a technical writer to a team leader of the content group. As a professional author for over 10 years, she writes a lot to help people overcome their tech troubles.…Read full bio -
Jane is an experienced editor for EaseUS focused on tech blog writing. Familiar with all kinds of video editing and screen recording software on the market, she specializes in composing posts about recording and editing videos. All the topics she chooses …Read full bio
-
![]()
Alin
Alin is an experienced technical blog writing editor. She knows the information about screen recording software on the market, and is also familiar with data cloning and data backup software. She is expert in writing posts about these products, aiming at providing users with effective solutions.…Read full bio -
Jean is recognized as one of the most professional writers in EaseUS. She has kept improving her writing skills over the past 10 years and helped millions of her readers solve their tech problems on PC, Mac, and iOS devices.…Read full bio
-
![]()
Jerry
Jerry is a fan of science and technology, aiming to make readers' tech life easy and enjoyable. He loves exploring new technologies and writing technical how-to tips. All the topics he chooses aim to offer users more instructive information.…Read full bio -
![]()
Rel
Rel has always maintained a strong curiosity about the computer field and is committed to the research of the most efficient and practical computer problem solutions.…Read full bio -
![]()
Gemma
Gemma is member of EaseUS team and has been committed to creating valuable content in fields about file recovery, partition management, and data backup etc. for many years. She loves to help users solve various types of computer related issues.…Read full bio -
![]()
Shelly
"I hope my articles can help solve your technical problems. If you are interested in other articles, you can check the articles at the bottom of this page. Similarly, you can also check my Twitter to get additional help."…Read full bio
Page Table of Contents
0 Views |
0 min read
Users often complain about OBS Virtual Camera not showing up when using their PC for streaming or recording. Now this annoying problem can be caused by many things. Perhaps it's a hardware issue, or maybe it's just caused by misconfiguration in the software or Windows.
Whether it's OBS virtual camera black screen, or camera not showing up in settings, or the OBS interface at all, this article will help users fix this problem. But it's important to understand the problems first and diagnose the issue first.
For that, we'll help users wondering, "Why is OBS blocking my camera?" for a few possible reasons. Then we'll discuss the possible fixes to get rid of this problem. So, let's begin with the root of the issue and then talk about the fixes.
Why OBS Virtual Camera Failed to Load
There are times when OBS doesn't detect the camera on a PC. Now a lot of users have simply fixed this bug by unplugging their camera and plugging it back in. And a simple restart seems to have done the trick other times.
However, there are some common problems that prevent OBS from using the camera, and that's why users would usually see the OBS virtual camera software fail to load. Some of those issues are as follows.
- Lack of administrative privileges granted to OBS for using Windows resources and camera
- Misconfigured output settings in OBS itself
- Outdated version of OBS
- OBS is not working with proper resolution or FPS settings
- Faulty or bad camera driver
Now, if the camera is showing up just fine in the Windows Camera app, then users do no need to worry. That means the camera and drivers are working just fine - it's OBS that requires fixing.
Fix OBS Virtual Camera Not Showing Up
Now users might understand what might be causing their OBS virtual camera not to show up in Discord/Zoom/Teams. So it's only fitting that we dive right into the fixes, and here are six of them.
Method 1. Restarting OBS
The first and perhaps the best method of fixing this issue is by restarting OBS. However, restarting only the OBS program won't always fix this issue. There are times when OBS doesn't exactly restart or shut down even after users quit OBS.
So if OBS virtual camera fails to load during a stream or call, here's what users should do to restart OBS properly.
Step 1. Press CTRL + Shift + ESC keys to prompt Task Manager.
Step 2. Find OBS Studio & Right click on it, then Go to details.

Step 3. Now right-click on OBS again and tap the End Process Tree option.
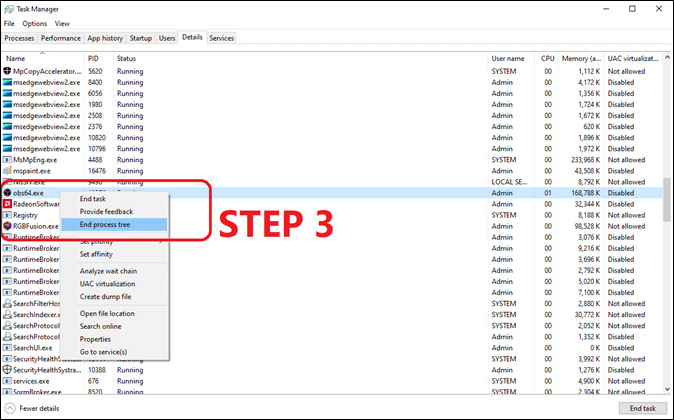
Step 4. Start OBS again as administrator.
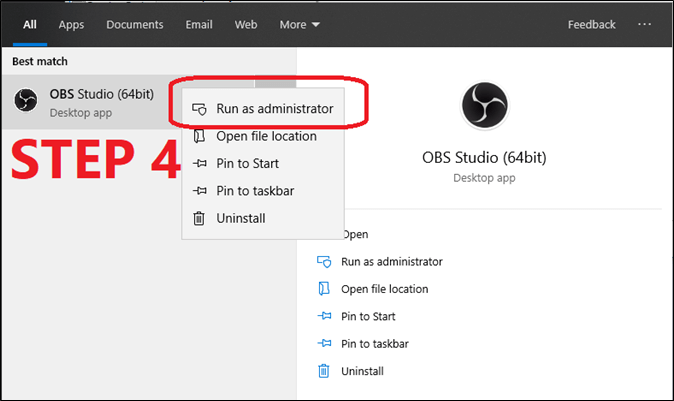
Restarting OBS like this will ensure that the OBS shuts down and starts again properly. Ending the process tree simply means any plugin or related programs that might be causing issues won't be getting in the way anymore.
Share this post with those in need now!
Method 2. Recheck Virtual Camera
Ensuring that the virtual camera on OBS is activated can also fix this problem. This requires users to start the virtual camera using the option titled as such. Then users will have to activate the virtual camera before starting the stream, and here's how to do that.
Step 1. Tap Activate button next to the Filters option.

Step 2. Now tap on Start Virtual Camera under the Controls section.
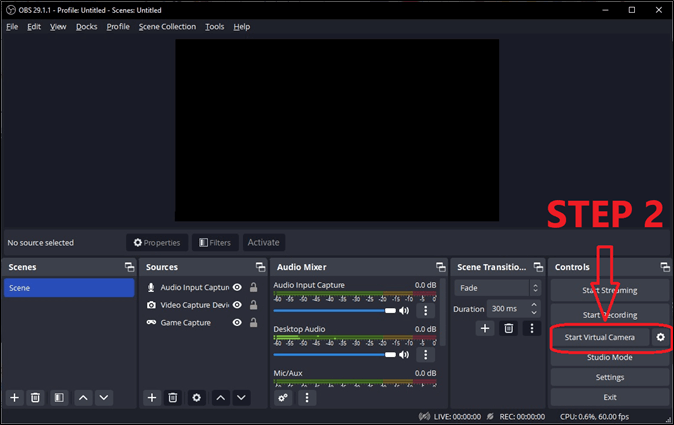
This will activate and launch Virtual Camera in OBS
Method 3. Change OBS Studio Output Settings
Modifying OBS settings will also help restore the Virtual Camera option. This happens when there's a wrong recording format is selected in the OBS output settings. To fix this, users must head into the main OBS settings and then do this.
Step 1. Head into Output options.
Step 2. Find Recording Format under Recording options and change MKV to MP4.
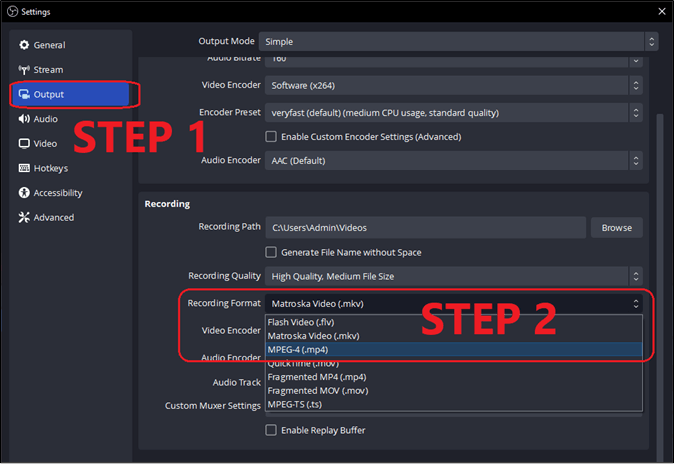
This method is known to help a lot of users fix this issue. If the MP4 doesn't work then users can try other formats as well.
Method 4. Try a Different Resolution or FPS
This method requires users to try different resolutions or FPS options. That means users will have to head into the OBS settings once again but go into Video settings this time. So here's what they can do to ensure they can see the virtual camera again.
Step 1. Change Base Canvas Resolution to a lower one, i.e., 1440p to 1080p.
Step 2. Change FPS from 30 to 60.

Step 3. Save settings and restart OBS.
This is the main problem behind the virtual camera not showing up in OBS. So, changing these settings might just prompt it to work again.
Method 5. Enable OBS Studio Camera Permissions
It's imperative to allow Windows to grant permissions to third-party apps to use specific hardware like a microphone or camera. This might be the case where OBS is not allowed to use the camera feature, and here's how it can be fixed.
Step 1. Press Windows + I to open Windows Settings.
Step 2. Head into Privacy settings.
Step 3. Find Camera settings and then toggle the OBS option to ON.
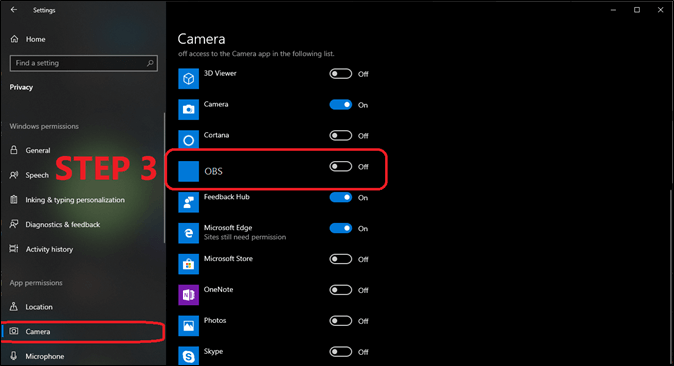
This will prompt Windows to allow OBS to use the camera on the user's PC. Once the user is done, they'll be able to see the OBS Virtual Camera option again.
Method 6. Update OBS
It might be that the OBS is out of date and OBS virtual camera failed to load. That's why updating OBS can help fix this problem quite easily. There are times when OBS virtual camera plugin isn't updated according to the camera model. So updating it can fix the problem.
Step 1. Head into Help options.
Step 2. Then click on Check for Updates.

Step 3. Tap on Update now if it's available.
This will update and provide any hotfixes for OBS virtual camera not showing up in Discord/Zoom/Teams.
Bonus: How to Record OBS Virtual Camera
Recording OBS Virtual Camera can be a difficult task, especially considering the complicated interface of OBS. That's why it's better to use a third-party alternative such as EaseUS RecExperts to record OBS Virtual Camera.
This screen recorder has many great options and might as well act as a total alternative to OBS for screen capturing. Some features make it one of the best screen recorders available today, and they are.
- Capture PC screen—be it the entire screen or a specific region
- Record videos with audio and webcam
- In-built video editor and media player
- AI-based video and audio enhancement
So download and install this software to record OBS Virtual Camera with EaseUS RecExperts.
Final Words
These are the methods to fix if OBS Virtual Camera is not showing up. There are various reasons that cause this issue, as mentioned earlier in the article. But it's imperative to fix those with the help of the 6 procedures mentioned above.
Now there are always going to be problems with OBS Virtual Camera Recording because of its difficult interface. That's why it's better to use a viable alternative like EaseUS RecExperts—which isn't only easier but much more efficient.
OBS Virtual Camera Not Showing Up FAQs
Here are some of the frequently asked questions if users need further assistance or have any more questions.
1. How do I enable a virtual camera on OBS?
There are particular options in the Tools menu on OBS that allow users to enable Virtual Camera. So, open OBS, go to the "Tools" menu, and select "VirtualCam." After that, click on "Start." Now, the OBS camera should be available as a virtual camera in other applications.
2. Why is OBS virtual camera not showing on Zoom?
It's quite possible that the related plugin is missing from OBS if the OBS virtual camera is not showing on Zoom. That's why users need to ensure they have installed the OBS VirtualCam plugin and that it is enabled in OBS. Also, they need to ensure that they have selected the correct camera source in Zoom's settings.
3. Where is my OBS virtual camera?
Check if the OBS VirtualCam plugin is installed and enabled. Then, look for the virtual camera option in the settings or preferences of the application that users wish to use it. Otherwise, it can be found in the bottom-left section under Control options.
4. How do I get OBS to recognize my external camera?
Connect the camera to the computer using the appropriate cable to make OBS recognize the external camera. Head into to the Sources section OBS and then click the + button. Select the Video Capture Device option after that and pick the external camera from the drop-down menu.
EaseUS RecExperts

One-click to capture anything on screen!
No Time Limit, No watermark
Start Recording