-
![]()
Daisy
Daisy is the Senior editor of the writing team for EaseUS. She has been working in EaseUS for over ten years, starting from a technical writer to a team leader of the content group. As a professional author for over 10 years, she writes a lot to help people overcome their tech troubles.…Read full bio -
Jane is an experienced editor for EaseUS focused on tech blog writing. Familiar with all kinds of video editing and screen recording software on the market, she specializes in composing posts about recording and editing videos. All the topics she chooses …Read full bio
-
![]()
Alin
Alin is an experienced technical blog writing editor. She knows the information about screen recording software on the market, and is also familiar with data cloning and data backup software. She is expert in writing posts about these products, aiming at providing users with effective solutions.…Read full bio -
Jean is recognized as one of the most professional writers in EaseUS. She has kept improving her writing skills over the past 10 years and helped millions of her readers solve their tech problems on PC, Mac, and iOS devices.…Read full bio
-
![]()
Jerry
Jerry is a fan of science and technology, aiming to make readers' tech life easy and enjoyable. He loves exploring new technologies and writing technical how-to tips. All the topics he chooses aim to offer users more instructive information.…Read full bio -
![]()
Rel
Rel has always maintained a strong curiosity about the computer field and is committed to the research of the most efficient and practical computer problem solutions.…Read full bio -
![]()
Gemma
Gemma is member of EaseUS team and has been committed to creating valuable content in fields about file recovery, partition management, and data backup etc. for many years. She loves to help users solve various types of computer related issues.…Read full bio -
![]()
Shelly
"I hope my articles can help solve your technical problems. If you are interested in other articles, you can check the articles at the bottom of this page. Similarly, you can also check my Twitter to get additional help."…Read full bio
Page Table of Contents
Jane Zhou
Updated on Jun 09, 2026
0 Views |
0 min read
While recording a tutorial or an informative video, it's important to capture mouse cursor in recording. Cursor tracking, custom highlight effects, and keyboard inputs in recording makes the footage more immersive and helps the user to understand what's going on on the screen better.
Here in this post, we will introduce 4 powerful screen recorders with mouse click effect and screen recorder follow cursor that can capture and highlight mouse movements and clicks.
|
🛠️Methods |
💡Effectiveness |
🔍Difficulty |
|
High - Mouse cursor tracking, click effects, highlight effects, and custom pointer size |
Easy - No additional setup |
|
|
High - AI-powered cursor tracking with auto zoom, smooth motion effects, and customizable cursor styles for clearer visual focus |
Easy - Automatic processing with minimal manual editing required |
|
|
High - Mouse pointer tracking, cursor spotlight, and screen zoom on click |
Medium - Requires extra edits after recording |
|
|
Medium - Basic mouse click animation and visual feedback |
Medium - Requires PowerToys installation |
1. Use EaseUS FocalFlow [Smart Cursor Tracking & Auto Zoom for Windows]
EaseUS FocalFlow is an AI-powered screen recorder designed to capture mouse cursor movements more clearly and professionally. Instead of just recording the cursor, it automatically zooms into important actions, helping viewers focus on key steps without manual editing.
With built-in smooth animations, cursor customization, and flexible editing tools, FocalFlow, a Screen Studio alternative for Windows is ideal for creating tutorials, training videos, and product demos that require clear visual guidance and polished presentation.
⭐Key Features of EaseUS FocalFlow:
- AI auto zoom to follow cursor clicks and highlight key areas automatically
- Smooth and cinematic animations for both screen and cursor movement
- Customizable cursor styles, size, and visual effects for better clarity
- Built-in editing tools to adjust zoom, trim videos, and refine motion
- Record screen, webcam, and audio simultaneously with flexible options
- Support multiple screen recording modes including full screen, region, and app window.
🚩Here is how to capture and enhance cursor in screen recording:
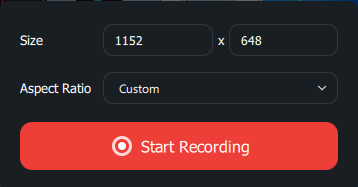
Step 1. Launch EaseUS FocalFlow and Set Up Recording
Open EaseUS FocalFlow and select a recording mode (full screen, custom region, or specific window). Enable webcam, microphone, and system audio if needed. This helps you create more engaging tutorial videos, presentations, or demo recordings with both visuals and sound.

Step 2. Start Screen Recording with Cursor Tracking
Click Start Recording to capture your screen activity. FocalFlow records mouse movements and clicks in real time, ensuring accurate cursor tracking for software tutorials, walkthroughs, and training videos.
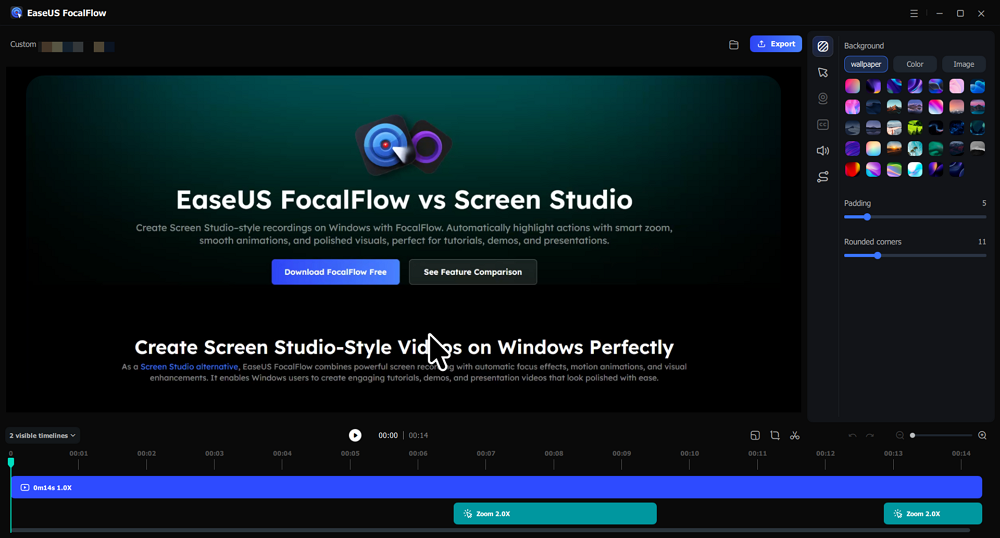
Step 3. Edit and Enhance Your Recording
Use the built-in editor to refine your video and improve visual clarity:
- Change cursor style, size, and movement speed
- Adjust cursor highlight effects for better visibility
- Add or customize video background (wallpaper, solid color, or custom image)
- Modify padding and rounded corners for a cleaner layout
- Change screen animation style for smoother transitions
- Mute or adjust system audio if needed
These editing features help turn basic screen recordings into more professional and visually appealing videos.
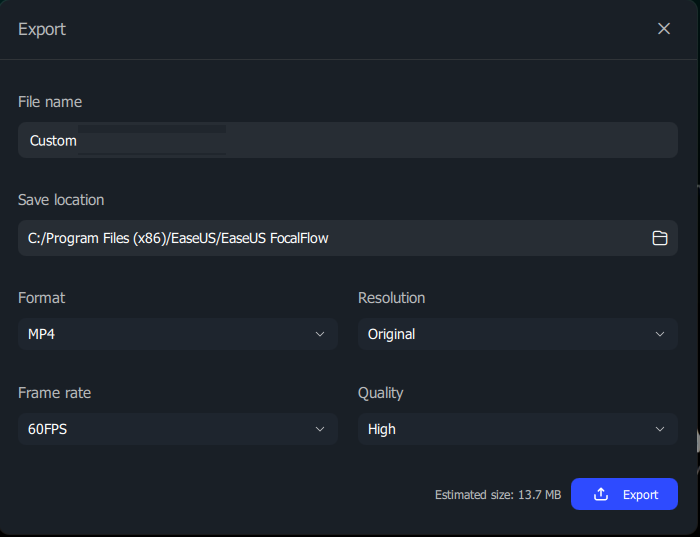
Step 4. Export and Share Your Video
Customize the file name, save location, and output settings. Export your video in optimized formats for platforms like YouTube, online courses, or social media, making it easy to share high-quality tutorial or demo content.
Just hit the below button to get this excellent screen and mouse recorder!
Share this post about screen recorders follow cursor!

2. Use Bandicam
Bandicam is another Windows 10 screen recorder software that allows you to capture and highlight mouse cursor movements. You can record movement, clicks, and sounds and make your cursor more visible. Since it specializes in screen recording, you can record screens, gameplay, external displays with gaming consoles, and many more.
You will get an inbuilt drawing tool to highlight things in real-time, webcam overlay, and mouse effects, and it allows you to change the color and size of the mouse too. With all these excellent features and various recording modes for different needs, Bandicam can be your ideal choice.
🚩Here's how to use Bandicam to add mouse cursor to video:
Step 1. Go to the Bandicam website and download the software. Follow the on-screen instructions to complete the installation of the software.
Step 2. Open Bandicam. Open the toolbar at the top and click the arrow button beside the dotted square. Now, click Around Mouse, and select the size you want the cursor to hover around.
Step 3. To edit the mouse cursor, click Add mouse cursor effects next to the Microphone icon. In the "Recording Settings", go to the Mouse tab.
Here, tick the "Add mouse click effect" and select the color for both right-click and left-click. Also, check the "Add mouse highlight effect" and change its color and size to highlight the mouse effects. Click Ok.

Step 4. Now, select a screen recording mode from the list and click on REC to start recording.
- Editor's Tip:
- Since Bandicam is only available on Windows and has a watermark for its free version, consider using EaseUS FocalFlow to capture mouse clicks on your macOS devices without a watermark.
Share this post about screen recorders follow cursor!
3. Try Screencast-O-Matic/ScreenPal
Another cool screen recording software for capturing mouse cursor effects is Screencast-O-Matic, now known as ScreenPal. You can capture your screen along with a webcam overlay, add captions, draw on the screen, and also trim unwanted portions with this app. Along with all these features, the software has a built-in stock library of photos, clips, and music to enhance the video. You can even hide mouse cursor in screen recording if needed.
🚩Here's how you can capture the mouse cursor with ScreenPal:
Step 1. Download and install ScreenPal from its website.
Step 2. Adjust your recording parameters like recording mode, quality, and fps. Click on the Rec button to start the recording.
Step 3. After completing the recording, click on Done to end it.
Step 4. Navigate to the Options windows and click Edit.

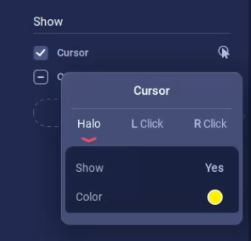
Step 5. Check the Cursor button in the Show section to display the mouse cursor movements. Then, click the upper-right pointer to extend the options. Here, you can customize highlights and effects for Halo, L Click, and R Click.
Step 6. In the end, you can either download or directly upload to YouTube or Social Media.
- Editor's Tip:
- For more information, check out its official video tutorial.
Share this post about screen recorders follow cursor!
4. Try PowerToys with Snipping Tool
Another smart way to capture mouse cursor effects on Windows 11 is by combining the Snipping Tool with Microsoft PowerToys.
While the Snipping Tool doesn't natively record the cursor, PowerToys adds visual mouse effects, such as highlights and crosshairs, that can make your cursor actions stand out in the recording.
This is perfect for tutorials or demos where cursor visibility matters, and you don't want to install a third-party recorder.
🚩Here's how you can record mouse effects using PowerToys and Snipping Tool:
Step 1. Download and install PowerToys from the Microsoft Store or GitHub.
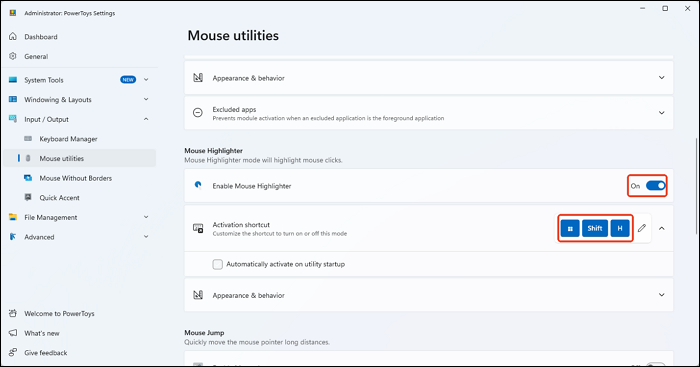
Step 2. Launch PowerToys and go to Mouse Utilities > Open settings.

Step 3. Scroll down to find Mouse Highlighter and turn on Enable Mouse Highlighter. The default shortcut to toggle the highlight is Win + Shift + H.
Step 4. Open the Snipping Tool from the Search bar, switch to the Record tab, and select the area you want to record.
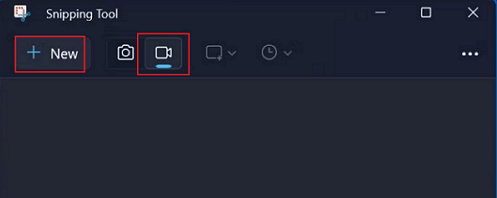
Step 5. Press Start to begin recording. Move and click your mouse to show visual effects powered by PowerToys.
Step 6. Once done, click Stop to end the recording and save the video. The recorded clip will include the visual highlights of your cursor.
Share this post about screen recorders follow cursor!
Final Words
This guide offers four screen recorder follow cursor: EaseUS RceExperts, Bandicam, ScreenPal, and PowerToys with Snipping Tool.
To record screen with mouse clicks and movements:
- EaseUS FocalFlow: Best for beginners and professionals who want an all-in-one screen recorder with built-in mouse cursor effects, click animations, webcam overlay, and no complicated setup.
- Bandicam: Best for PC users looking for a lightweight screen recorder with highly customizable mouse click effects, especially for game recordings or tech walkthroughs.
- ScreenPal (formerly Screencast-O-Matic): Best for educators, course creators, and online trainers who need cursor effects combined with editing features like zoom, captions, and overlays.
- PowerToys + Snipping Tool: Best for casual users or internal teams who need quick, lightweight recordings with visible click highlights without installing heavy software.
Capture Mouse Cursor in Recording FAQs
Here are some of the most frequent FAQs asked on capturing the mouse cursor in a recording. If you have similar queries hope this will help you. I hope it helps.
1. What are the best screen recorder with mouse click effects and follow cursor?
- EaseUS FocalFlow: Ideal for software tutorials, training videos, and business demos that require a clean, professional look with visible mouse interactions.
- Bandicam: Great for YouTubers or instructors who want simple control over cursor color, size, and sound without post-editing.
- ScreenPal (formerly Screencast-O-Matic): Perfect for step-by-step tutorials where highlighting clicks and cursor movement is key to viewer understanding.
- PowerToys + Snipping Tool: Best suited for short explainer clips, bug reporting, or internal documentation where mouse visibility helps but full editing isn't required.
2. How do I show my mouse cursor on screen recording?
While screen recording, the tool captures the mouse cursor. If you want to highlight or make it more visible, you can use an advanced tool like EaseUS FocalFlow to capture and highlight the mouse movements. Additionally, you can also add annotations while recording.
3. How do I show my mouse cursor when recording in OBS?
In order to show the mouse cursor when recording in OBS, the first is to do a screen recording. The second method is to use third-party tools. Lets us see how to show the mouse cursor with screen recording.
- Open OBS Software on your computer.
- Click on the + symbol in the Scenes windows to add a new scene.
- Now, in the Sources windows, Click on the + button and add Display Capture or Window Capture to show the mouse cursor when recording.
4. How do I remove a mouse from a video recording?
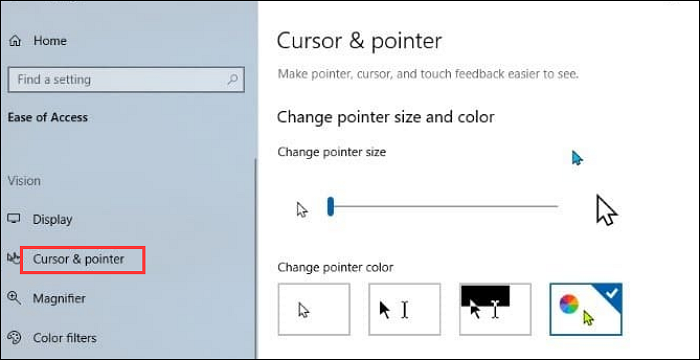
The easiest way to disappear the mouse cursor is to move it to the extreme edges. The next method is to go to your operating system's cursor and mouse settings and remove it if you find an option. The last way is to use a third-party tool like AutoHide Cursor, which hides the mouse.
5. How do I show the cursor on my iPhone screen recording?
Assistive Touch can help you show the touch on iPhone recording. Here's how you can enable it.
- Open Settings on your iPhone.
- Navigate to "General > Accessibility > Touch under Physical and Motor."
- Turn on Assistive Touch.
- Now, if you record on your iPhone, you can see the touch movements.
Share this post about screen recorders follow cursor!