-
![]()
Daisy
Daisy is the Senior editor of the writing team for EaseUS. She has been working in EaseUS for over ten years, starting from a technical writer to a team leader of the content group. As a professional author for over 10 years, she writes a lot to help people overcome their tech troubles.…Read full bio -
Jane is an experienced editor for EaseUS focused on tech blog writing. Familiar with all kinds of video editing and screen recording software on the market, she specializes in composing posts about recording and editing videos. All the topics she chooses …Read full bio
-
![]()
Alin
Alin is an experienced technical blog writing editor. She knows the information about screen recording software on the market, and is also familiar with data cloning and data backup software. She is expert in writing posts about these products, aiming at providing users with effective solutions.…Read full bio -
Jean is recognized as one of the most professional writers in EaseUS. She has kept improving her writing skills over the past 10 years and helped millions of her readers solve their tech problems on PC, Mac, and iOS devices.…Read full bio
-
![]()
Jerry
Jerry is a fan of science and technology, aiming to make readers' tech life easy and enjoyable. He loves exploring new technologies and writing technical how-to tips. All the topics he chooses aim to offer users more instructive information.…Read full bio -
![]()
Rel
Rel has always maintained a strong curiosity about the computer field and is committed to the research of the most efficient and practical computer problem solutions.…Read full bio -
![]()
Gemma
Gemma is member of EaseUS team and has been committed to creating valuable content in fields about file recovery, partition management, and data backup etc. for many years. She loves to help users solve various types of computer related issues.…Read full bio -
![]()
Shelly
"I hope my articles can help solve your technical problems. If you are interested in other articles, you can check the articles at the bottom of this page. Similarly, you can also check my Twitter to get additional help."…Read full bio
Page Table of Contents
Jean
Updated on Jun 09, 2026
0 Views |
0 min read
I often need to record my screen and audio on Windows 11, whether it's for sharing tutorials, saving online meetings, or creating content. So, I started looking for the most reliable and easy-to-use Windows screen recorder with audio. Naturally, I turned to Reddit, where I found plenty of users with the same question and tons of real recommendations.
After testing several of those tools myself, I decided to put together this hands-on guide to show what actually works and what doesn't. Hopefully, it'll save you the time and trial-and-error I went through.
💡My takeaway:
If you record often on Windows 11, OBS Studio is powerful enough to handle anything once you learn it.
For beginners, the Xbox Game Bar and Snipping Tool are the easiest built-in choices.
Meanwhile, NVIDIA ShadowPlay and ShareX are lightweight options that barely use system resources.
Method 1. Screen Record Windows 11 with Xbox Game Bar (Beginner's Choice)
Microsoft introduced Xbox Game Bar recording in Windows 10 and 11, primarily for gamers. Still, over time, people realized it's actually a pretty handy screen recorder for other apps and browser windows too. And honestly, it’s one of the easiest tools to start with.
The easiest way is to use Xbox Game Bar. Just press Win + G, then click the record button. System audio is captured automatically, and you can also turn your mic on if you want to record your voice. It all gets saved in the Videos - Captures folder by default.
I tested the Xbox Game Bar by recording YouTube videos, web pages, and documents. Everything recorded smoothly, and the video quality was quite decent for a built-in tool.
Here's exactly what I did:
Step 1. Open the app or webpage you want to record.
Step 2. Press Win + G to launch Xbox Game Bar.
Step 3. Click the Record button (or use Win + Alt + R) to start capturing.
Step 4. When you're done, press the same shortcut to stop and check your saved MP4 video in See my captures.

- Editor's Insights:
-
1. The biggest advantage of Xbox Game Bar is that it's built-in, fast, and smooth to use. You don't need to install anything extra. However, it can't record your desktop or File Explorer, which is why the record button sometimes appears grayed out.
2. If you notice that only your microphone audio is recorded but not the system sound, go to Game Bar > Settings > More settings > Widgets > Audio to record to select the correct recording mode.
Share this guide if you find it helpful!

Method 2. Use Snipping Tool for Screen Recording with Sound (New Windows 11 Update)
Microsoft upgraded the Snipping Tool in Windows 11 in 2023, adding a built-in screen recording feature—something users had been asking for for years. At first, I thought it was just for screenshots, but I was surprised to see that you can now record short videos directly from it.
You forgot about the snipping tool built into Windows, which is free. You can also use it for recording.
I tried recording browser tabs, app windows, and parts of my desktop. The video quality was smooth, the UI was clean, and it felt super lightweight - no lag or frame drops at all.
Here are the steps I followed:
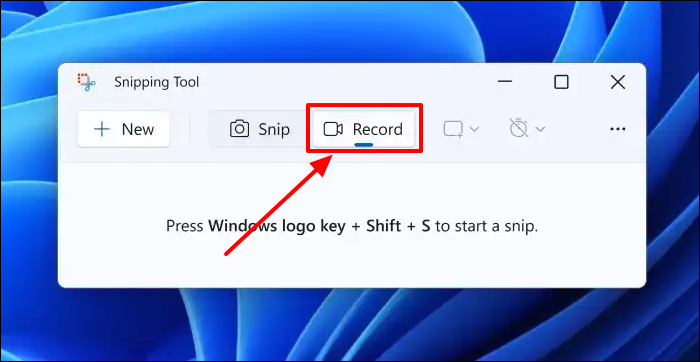
Step 1. Open Snipping Tool from the Start menu.
Step 2. Click the Record icon at the top (next to the screenshot option).
Step 3. Select the area of your screen you want to capture.
Step 4. Hit the Start button to begin recording, and Stop when you're done.
Step 5. Preview your clip right in the Snipping Tool and save it manually.
- Editor's Insights:
-
1. The Snipping Tool is excellent if you need to capture short clips, like showing a quick workflow, documenting a bug, or recording a few UI steps. It lets you record the screen with system audio and microphone sound.
2. However, I wouldn't recommend using it for long sessions (over 30 minutes). In my tests, it started fine, but after about ten minutes, the app suddenly closed on its own, and I lost the entire recording. So if you're planning to capture something longer, it's safer to use a more stable tool.
Share this guide if you find it helpful!
Method 3. OBS Studio Is the Best Windows Screen Recorder with Audio
OBS Studio is one of the most popular free screen recorders no time limit for Windows 11 and for good reason. It's open-source, powerful, and gives you complete control over what you record and how you record it.
For highest quality like professional content creation I would go with OBS which is basically Dxtory and XSplit combined ( the old kings of recording/streaming ), very easy to learn too.
At first, I was a bit overwhelmed by all the buttons and settings, but once I got used to the layout, it became my favorite option for recording screen and audio together. You can capture system sound, microphone input, multiple screens, and even layer overlays for a professional look.
Here's how I set it up:
Step 1. Download and install OBS Studio from the official website.
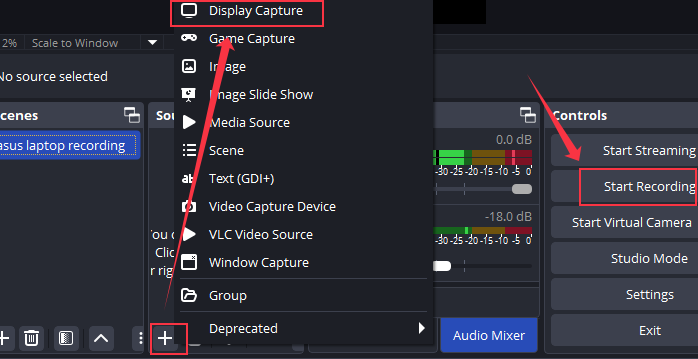
Step 2. Open the app and go to the Sources panel → click + → choose Display Capture to record your screen.
Step 3. To record sound, add another Source: Audio Input Capture (for microphone) and Audio Output Capture (for system sound).
Step 4. Hit Start Recording in the Controls panel.
Step 5. When finished, click Stop Recording. Your file will be saved in the Videos folder by default.
During my test, I recorded a 20-minute gameplay clip and a browser tutorial. The video and audio synced perfectly, and the quality was excellent, with crisp visuals and clean sound. The only issue I ran into at first was a black screen problem, but that was fixed by disabling hardware acceleration in my graphics settings.
- Editor's Insights:
- OBS Studio is a professional-grade recorder that's completely free, but it does take some time to set up properly. Once you get the hang of it, though, it's incredibly reliable and flexible. It's the best choice if you often record long tutorials, gameplay, or streaming sessions with sound.
Share this guide if you find it helpful!
Method 4. Screen Record on Windows 11 with Audio with NVIDIA (GeForce Experience)
If you have an NVIDIA graphics card, you already have a built-in recorder that's surprisingly powerful: it's called NVIDIA ShadowPlay, part of the GeForce Experience app. It's mainly designed for recording gameplay, but I found it works well for other on-screen activities too.
I use Nvidia Overlay for mostly everything also ShareX when I need tiny file size for sharing on apps/platforms with limited allowed data, otherwise it's annoying to upload every small thing on YT or Streamable.
When I tested it on my Windows 11 PC (RTX 4070, 144Hz monitor), the recording was super smooth. The gameplay footage looked crisp, and the audio quality was excellent, no lag or desync issues at all. However, when I tried recording a regular app window (like Chrome or Word), it didn't always work, since ShadowPlay mainly focuses on full-screen games.
Steps I followed:
Step 1. Open GeForce Experience → click the Settings icon.
Step 2. Turn on the In-Game Overlay option.
Step 3. Press Alt + Z to open the overlay and select Record.
Step 4. Hit Start to begin recording (or use Alt + F9 as a shortcut).
Step 5. Press the same shortcut again to stop and find your video under Videos → Desktop (or your custom save folder).

- Editor's Insights:
-
1. ShadowPlay is my go-to recorder for gameplay sessions because it doesn't eat up much CPU or RAM — it uses GPU acceleration, so your game stays smooth while recording. The instant replay feature is also a lifesaver; it can automatically save the last few minutes of gameplay if something cool happens unexpectedly.
2. That said, ShadowPlay isn't ideal if you need to record browser content, meetings, or app tutorials - it sometimes refuses to capture non-game windows.
Share this guide if you find it helpful!
Method 5. ShareX Is Another Free and Lightweight Windows Screen Recorder
ShareX is another excellent open-source screen recorder designed for users who need flexible recording and screenshot tools without paying a dime. Unlike Xbox Game Bar or Snipping Tool, ShareX lets you capture a specific region, full screen, or active window, and even schedule recordings if needed. It also supports screen recording with system audio and microphone, though you'll need to configure FFmpeg before starting.
Steps to Record with ShareX:
Step 1. Download and install ShareX from its official website.
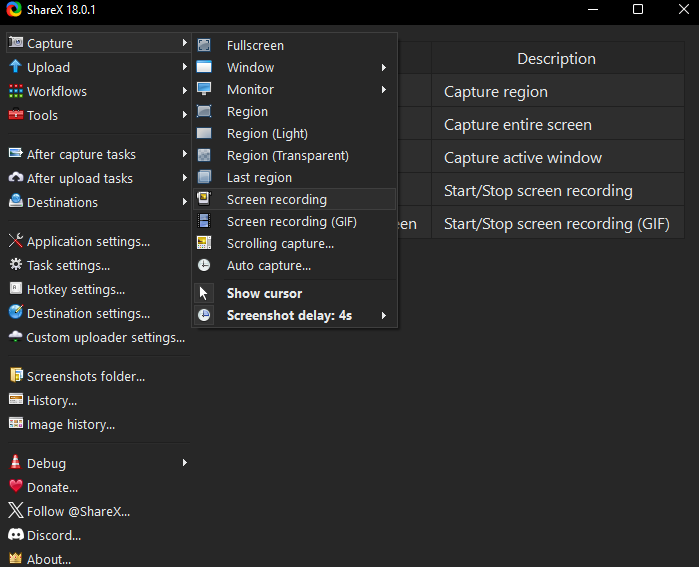
Step 2. Open the app and go to Capture > Screen Recording.
Step 3. Choose the recording area and ensure audio input/output is selected.
Step 4. Click Start Recording, then stop when finished to save your video in the default folder automatically.
- Editor's Insights:
- ShareX is best for those who want a lightweight, no-cost recorder with plenty of customization options. It's great for creating tutorials, capturing quick demos, or recording short gaming clips. However, it lacks a built-in video editor, and the interface may feel intimidating to beginners. I also noticed that ShareX occasionally fails to capture system audio if FFmpeg isn't properly set up, so double-check your audio configuration before recording.
Share this guide if you find it helpful!
My Recommendation: Which One Should You Choose?
If you're still wondering which tool best fits your needs, here's my honest take after testing them all.
- If you need a quick capture or tutorial, Snipping Tool or Xbox Game Bar can get the job done easily without installing anything extra.
- For gamers, NVIDIA ShadowPlay is ideal since it records gameplay with minimal performance impact.
- And if you prefer open-source and customization, OBS Studio or ShareX will give you full control — though they do take some time to learn.
No matter which tool you choose, always test your recording setup first, especially your audio source and storage path, before hitting Record. It'll save you the frustration of having to redo your recording later.
For most users, EaseUS RecExperts remains the most reliable and balanced choice — it records screen and audio smoothly, avoids issues like black screens or missing sound, and supports both system and microphone recording in one click. It‘s also more stable than Snipping Tool or Xbox Game Bar for long recordings.