-
![]()
Daisy
Daisy is the Senior editor of the writing team for EaseUS. She has been working in EaseUS for over ten years, starting from a technical writer to a team leader of the content group. As a professional author for over 10 years, she writes a lot to help people overcome their tech troubles.…Read full bio -
Jane is an experienced editor for EaseUS focused on tech blog writing. Familiar with all kinds of video editing and screen recording software on the market, she specializes in composing posts about recording and editing videos. All the topics she chooses …Read full bio
-
![]()
Alin
Alin is an experienced technical blog writing editor. She knows the information about screen recording software on the market, and is also familiar with data cloning and data backup software. She is expert in writing posts about these products, aiming at providing users with effective solutions.…Read full bio -
Jean is recognized as one of the most professional writers in EaseUS. She has kept improving her writing skills over the past 10 years and helped millions of her readers solve their tech problems on PC, Mac, and iOS devices.…Read full bio
-
![]()
Jerry
Jerry is a fan of science and technology, aiming to make readers' tech life easy and enjoyable. He loves exploring new technologies and writing technical how-to tips. All the topics he chooses aim to offer users more instructive information.…Read full bio -
![]()
Rel
Rel has always maintained a strong curiosity about the computer field and is committed to the research of the most efficient and practical computer problem solutions.…Read full bio -
![]()
Gemma
Gemma is member of EaseUS team and has been committed to creating valuable content in fields about file recovery, partition management, and data backup etc. for many years. She loves to help users solve various types of computer related issues.…Read full bio -
![]()
Shelly
"I hope my articles can help solve your technical problems. If you are interested in other articles, you can check the articles at the bottom of this page. Similarly, you can also check my Twitter to get additional help."…Read full bio
Page Table of Contents
Jean
Updated on Jun 09, 2026
0 Views |
0 min read
I've seen the same question pop up again and again on Reddit, Microsoft Answers, and other forums: how to record video on Windows 11 PC or laptop? Some folks only need something simple - just capture the screen and audio for a quick tutorial or demo. Others want more advanced setup: record a webcam and mic at the same time, record multiple screens or a single window, or tweak quality and frame rates for gameplay.
User 1. I have run into a graphical problem in blender and want to record a video of only the blender window.... How do I record only the one blender window in Windows? ---Superuser
User 2. Can anyone recommend a quality Windows 11 screen recorder good for making video clips? ---Reddit
Through testing the Windows 11 screen recorders by myself, I have come to a general conclusion: If you only need quick, short recordings, the Snipping Tool is built in and surprisingly capable. The Xbox Game Bar works better for gameplay or app-based captures, while OBS Studio is for those who want total control and don't mind a bit of a learning curve. But if you want a professional yet easy-to-use all-in-one solution, EaseUS RecExperts stands out.
I'll walk you through each tool's core features, how to use them step-by-step, and their limitations - so you can pick the one that fits your needs best.
Way 1. How to Screen Record in Windows 11 with Snipping Tool Exclusively
👉Shortcut key: Windows + Shift + S
🚩How to record video in Windows 11 with audio:
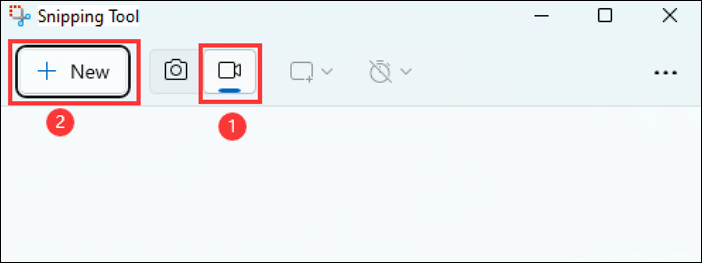
Step 1. Open the Snipping Tool from the Start menu search bar. Click the Record button (camera icon) on the top toolbar, then press New.
Step 2. Drag your cursor to select the screen area you want to record. You can turn on or off the microphone, and system sound as well.
Step 3. Click Start, and you'll see a 3-second countdown before recording begins.

Step 4. When you're done, click Stop. You can copy, share, or save your video. By default, recordings are stored in the Videos folder.
💡See more information about Snipping Tool:
The Snipping Tool is Microsoft's built-in recorder in Windows 11. If you've used Windows 10, you might remember it as Snip & Sketch, which was mainly for screenshots. But in Windows 11, Microsoft quietly upgraded it to include a screen recording feature. Now you can record any part of your screen, including system and microphone audio, and export the result as an MP4 file.
🤵User 1. Snipping tool supports recording and it works well enough. Recording are in mp4 format. --- r/software
🤵User 2. Shift+win+s and select second option from the menu that will pop up on top of screen. --- r/windows11
🤵User 3. Screen recording using the snipping tool is a windows 11 feature. --- r/windows10
Many Reddit and Microsoft forum users recommend it because it's already built in and extremely easy to use. However, there are a few limits you should know about. The Snipping Tool only saves in MP4 format, can't record your webcam, and doesn't support audio-only recording. It's best for short clips, like quick demos or tutorials.
🤵User 1. If you're thinking about recording long sessions - say, 1–2 hours of an online class - it's better to avoid this tool. Some users have reported that the app unexpectedly closes during long recordings, causing unsaved videos to be lost.
🤵User 2. I was recording a 1–2 hour tutorial, and around halfway through, the recording bar suddenly disappeared. I couldn't find the saved file anywhere afterward. Tried searching the default Videos folder, but nothing. ---r/screenrecorders
It's worth mentioning that Microsoft continues to improve the Snipping Tool. Recent Windows updates added GIF recording, and window-only recording is reportedly on the way - something I'm genuinely looking forward to.
Share this guide if you find it helpful!

Way 2. Screen Record Windows 11 with Audio with Xbox Game Bar
👉Shortcut key: Windows + G
🚩How to screen record on laptop and PC:
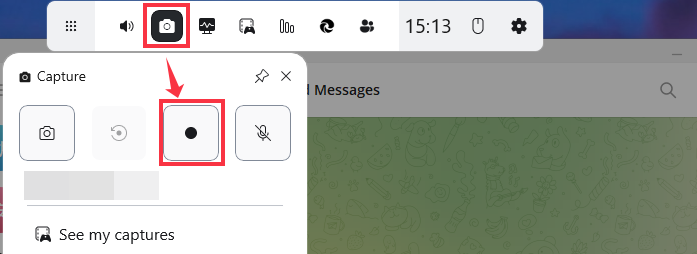
Step 1. To open the Xbox Game Bar, press Windows+G or search for it directly in the Start menu search box.
Step 2. If you're taking a video, you might want to disable your microphone beforehand. Do this by clicking the mic icon.
Step 3. When you're ready to begin recording, click Record (the button with the solid white circle).
Step 4. When you're finished, click Stop (the button with the solid white square located in the same place where the Record button used to be).
Step 5. To review your recording, select See my captures at the bottom of the window.
💡See more information about Xbox Game Bar:
If you're wondering how to screen record on a Windows 11 laptop or desktop, Xbox Game Bar is another built-in option. It originally came with Windows 10 as a tool for gamers, but it also works great for capturing other types of videos.
Compared with the Snipping Tool, the Xbox Game Bar recording is more advanced. It gives you access to game-specific widgets, lets you chat with friends while playing, and includes a dedicated capture widget for recording your screen and audio.
Many Reddit users and forum discussions recommend this tool for its convenience and built-in status - no installation required. However, several users have reported audio capture issues, where only the microphone sound is recorded but not the in-game or app audio. This usually happens because Game Bar is set by default to record game and mic sounds only. If you want to record the audio from a specific app, you'll need to adjust the sound input settings.
🤵User 1. In my experience, the Xbox Game Bar is best suited for recording gameplay or app-based windows. But if you want to include the desktop, File Explorer, or screen switching, it won't capture those - that's one of its biggest limitations.
🤵User 2. That's Xbox Game Bar. It allows you to screen record any games.
🤵User 3. The easiest way it to use Xbox Game Bar. Just press Win + G, then click the record button. System audio is captured automatically, and you can also turn your mic on if you want to record your voice. It all gets saved in the Videos - Captures folder by default.
Share this guide if you find it helpful!
Way 3. How to Record Video on Laptop and PC Windows with OBS Studio
👉Shortcut key: (customizable in Settings → Hotkeys)
🚩How to record screen and audio on Windows 11 with OBS Studio:
Step 1. Download and install OBS Studio from the official website.
Step 2. Open OBS and add a Source: for example, choose Display Capture to record your screen, Window Capture to record one program, or Video Capture Device to include your webcam.

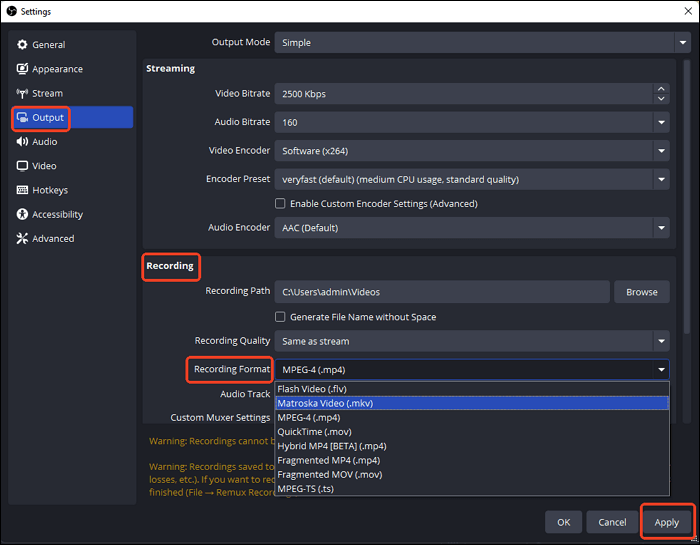
Step 3. Click Settings > Output > Recording to select your preferred format (MP4, MKV, FLV) and location.
Step 4. Press Start Recording in the Controls panel to begin.
Step 5. When finished, click Stop Recording, and your video will be saved automatically.
💡See more information about OBS Studio:
If the Snipping Tool and Xbox Game Bar don't quite meet your needs, you've probably seen one name come up again and again on Reddit or tech forums - OBS Studio. It's the go-to recommendation almost every time someone asks how to record video on Windows 11, and for good reason.
OBS Studio (Open Broadcaster Software) is a free, open-source screen recorder and live streaming program that gives you full control over your recording setup. You can record multiple windows, mix your webcam and microphone, and even add overlays or transitions for professional-looking results.
The biggest advantage of OBS is its flexibility - you can customize nearly everything, from audio inputs and recording regions to bitrate, resolution, and frame rate. However, that same flexibility is what makes it a bit overwhelming for beginners. Many users mention that the interface looks complicated at first and takes some time to get used to.
Still, if you're planning to record tutorials, gameplay, or streaming content and don't mind spending a little time learning, OBS is an excellent choice. There are tons of YouTube tutorials and community guides available to record gameplay with OBS, so you'll never get stuck for long.
🤵User 1. The one built into snipping tool can do mic and desktop audio. But if that’s not good enough the only other one I can confidently recommend is OBS, it’s free and open source but has a steep learning curve but will get you the best possible quality if setup correctly and is personally what I trust most
🤵User 2. Just use OBS. It's pretty much the gold standard for any type of screen recording or live broadcasting, and it's free. You can set a hotkey to start, stop or pause the recording to avoid that scramble, and you can set it to record only a specific window, or a screen region. If you need to visualize clicks, use Microsoft PowerToys to achieve that. Again, it's free.
🤵User 3. OBS Is great if you don't know about that! It's on Steam (If you have a steam account) or you can just download it online.
Share this guide if you find it helpful!
Way 4. How to Record Video and Sound with Professional Windows Screen Recorder
👉Shortcut key: F9 (customizable in Settings → Hotkeys)
🚩How to record video on Windows 11 with EaseUS RecExperts:
Step 1. Launch EaseUS RecExperts and adjust your recording settings.
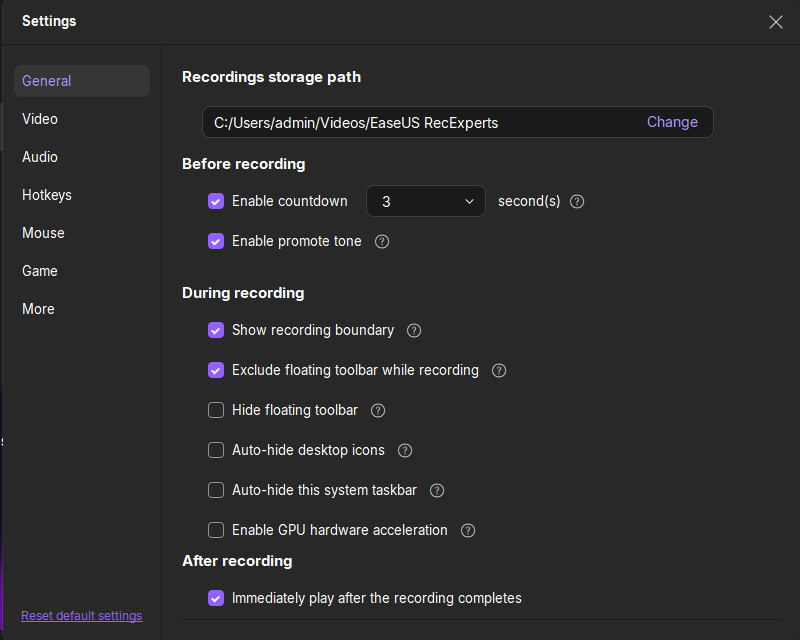
Before you start recording, you can customize your settings by clicking the Menu icon (three horizontal lines) in the top-right corner and selecting Settings. From there, you can change the save location, video format, frame rate, audio format, and other preferences. All changes will be saved automatically.
Step 2. Choose a recording mode based on your needs.
On the main interface, you'll see several recording options: Full Screen, Custom, Window, Game, Audio, and Webcam. Simply click the one that matches what you want to record.

Step 3. Set up your webcam and audio sources.
In the toolbar, you can turn the Webcam, Speaker, and Microphone on or off by clicking their icons. If multiple devices are connected, click the small arrow next to each icon to choose your preferred input source.

Step 4. Start and control the screen recording.
Click the red REC button to begin recording. A floating toolbar will appear on your screen, where you can pause the recording using the pause icon or stop it by clicking the red square icon.
Step 5. Preview, edit, and manage your recordings.
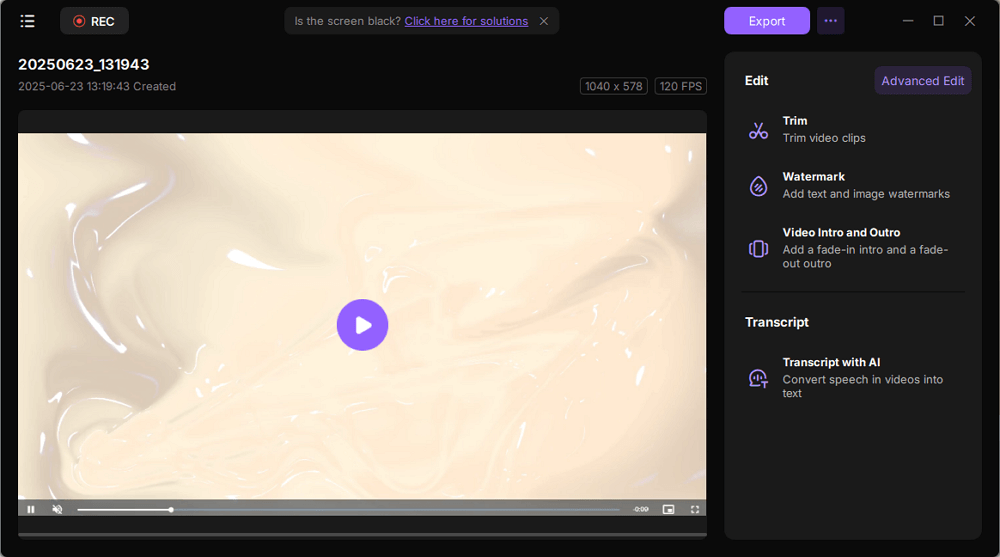
Once you stop recording, you'll be taken to the preview window. Here, you can watch your video, trim it, add watermarks, transcribe audio to text, and organize your recordings. To record again with the same settings, just click the REC button in the top-left corner.
💡See more information about EaseUS RecExperts:
If you're open to trying a third-party screen recorder no watermark, EaseUS RecExperts is worth considering. Compared to the built-in Windows tools or open-source software like OBS, it strikes a great balance — offering more advanced features than Snipping Tool or Xbox Game Bar, while remaining much easier to use than OBS Studio.
With RecExperts, you can:
- Record a single window or multiple windows at once
- Capture screen, webcam, or audio only
- Choose from various output formats (MP4, MOV, MKV, MP3, etc.)
- Even record protected videos without black screen
- Enjoy no watermark and no recording time limit
- Try new AI-powered tools, like auto subtitles and video summaries (coming in updates)
Another benefit is support - if you ever run into a problem, you can reach out directly to EaseUS's support team for one-on-one help, which is something you won't get with open-source software.
That said, this tool isn't completely free. EaseUS RecExperts offers 1 minute of free recording per session with no limit on the number of sessions. This lets you test the features freely and decide whether the full version fits your needs before upgrading.
If you want a professional yet beginner-friendly screen recorder for Windows 11, this is a strong option to consider, especially for teachers, YouTubers, business users, or anyone who records frequently.
Share this guide if you find it helpful!
A Comparison Table of Windows Screen Recorders with Audio
After testing and reading tons of feedback from Reddit, Microsoft communities, and tech forums, I've realized there's no single "perfect" screen recorder for everyone. It really depends on what and how you want to record on your Windows 11 PC.
🚩Here's a quick comparison to help you decide which tool fits you best:
|
Tool |
Type |
Audio Recording |
Webcam Support |
Custom Region |
Window Recording |
Output Format |
Recording Limit |
|
Snipping Tool |
Built-in |
✅ System & Mic |
❌ |
✅ |
❌ (coming soon) |
MP4 |
⚠️ Recommended under 30 min |
|
Xbox Game Bar |
Built-in |
✅ Game & Mic (limited app audio) |
❌ |
❌ |
✅ (game/app only) |
MP4 |
4 hours |
|
OBS Studio |
Open-source |
✅ |
✅ |
✅ |
✅ |
MP4, MKV, FLV |
Unlimited |
|
EaseUS RecExperts |
Third-party |
✅ System & Mic |
✅ |
✅ |
✅ |
MP4, MOV, MKV, MP3, etc. |
Unlimited |