-
![]()
Daisy
Daisy is the Senior editor of the writing team for EaseUS. She has been working in EaseUS for over ten years, starting from a technical writer to a team leader of the content group. As a professional author for over 10 years, she writes a lot to help people overcome their tech troubles.…Read full bio -
Jane is an experienced editor for EaseUS focused on tech blog writing. Familiar with all kinds of video editing and screen recording software on the market, she specializes in composing posts about recording and editing videos. All the topics she chooses …Read full bio
-
![]()
Alin
Alin is an experienced technical blog writing editor. She knows the information about screen recording software on the market, and is also familiar with data cloning and data backup software. She is expert in writing posts about these products, aiming at providing users with effective solutions.…Read full bio -
Jean is recognized as one of the most professional writers in EaseUS. She has kept improving her writing skills over the past 10 years and helped millions of her readers solve their tech problems on PC, Mac, and iOS devices.…Read full bio
-
![]()
Jerry
Jerry is a fan of science and technology, aiming to make readers' tech life easy and enjoyable. He loves exploring new technologies and writing technical how-to tips. All the topics he chooses aim to offer users more instructive information.…Read full bio -
![]()
Rel
Rel has always maintained a strong curiosity about the computer field and is committed to the research of the most efficient and practical computer problem solutions.…Read full bio -
![]()
Gemma
Gemma is member of EaseUS team and has been committed to creating valuable content in fields about file recovery, partition management, and data backup etc. for many years. She loves to help users solve various types of computer related issues.…Read full bio -
![]()
Shelly
"I hope my articles can help solve your technical problems. If you are interested in other articles, you can check the articles at the bottom of this page. Similarly, you can also check my Twitter to get additional help."…Read full bio
Page Table of Contents
0 Views |
0 min read
Page Content:
- Method 1. Trim Voice Recordings on Windows with An Excellent Audio Trimmer
- Method 2. Trim Voice Recording on Windows using Voice Recorder
- Method 3. Cut Video Recording on Windows with Audacity
- Method 4. Trim Voice Recording on Windows with EaseUS Video Editor
- How to Trim Voice Recordings on Windows FAQs
Editing voice recordings is a crucial part of any audio project. Whether you're recording and sharing your podcast, creating professional film sound effects, or even just adding some personal flair to a home movie, trimming voice recordings can make the difference between an amateurish result and one that will impress audiences. However, if you are new to audio trimming tasks, you might have no idea about how to trim voice recording on Windows.
But don't fret; you can get help from this post. Here, we will provide some step-by-step instructions on using some of the most powerful audio trimming software available on Windows 10, enabling you to quickly fine-tune your audio content. Let's get started!
Method 1. Trim Voice Recordings on Windows with An Excellent Audio Trimmer
For those who want to record and trim voice recordings on Windows at the same time, there is an excellent program you cannot miss, and that is EaseUS RecExperts.
It is actually a screen recorder and audio recording software that helps users deal with various recording tasks with no hassle. With its help, you are able to record podcasts, capture streaming audio, or more quickly and easily. However, to improve the user experience, many new features have been added to RecExperts, and the trimming tool is one of them. Its trimming tool enables you to cut and remove unwanted part from video or audio files with simple clicks when you finish your recording. As for trimming videos, it even lets you clip them frame by frame!
Now, let's take a look at how to trim voice recordings with EaseUS RecExperts:
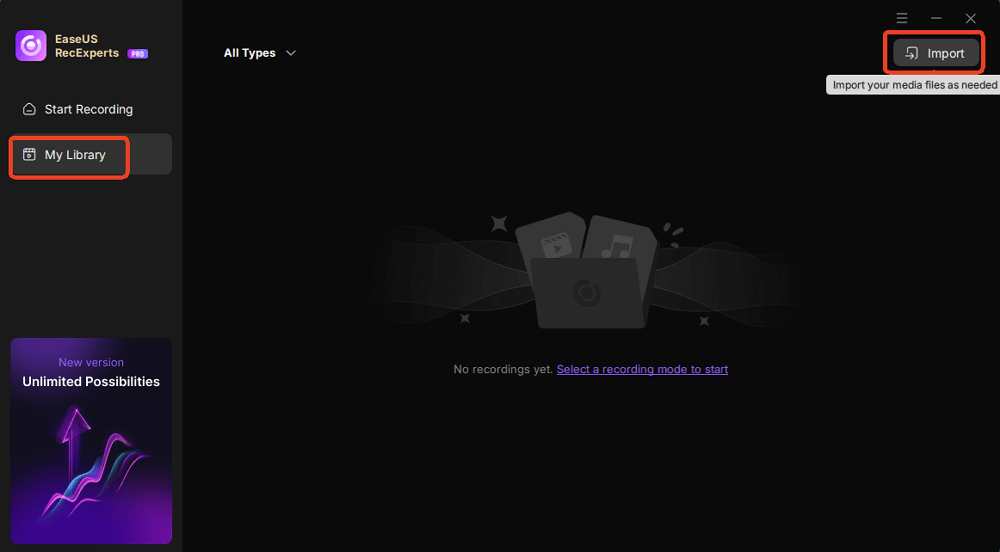
Step 1. Open EaseUS RecExperts, go to My Library, and locate the audio file you want to trim.
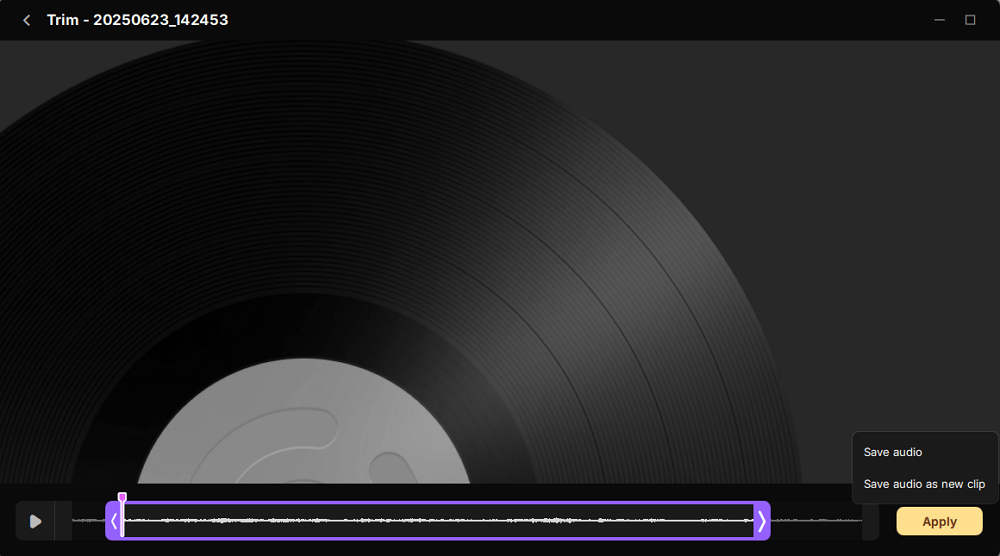
Step 2. In the Preview window, click Trim and drag the start and end sliders to select the portion you want to keep. Then, click Apply to save your trimmed audio.
Method 2. Trim Voice Recording on Windows using Voice Recorder
For most Windows users, the Voice Recorder app is the first choice for recording audio and vocals, as it's free and pre-installed. However, besides being an audio recorder, it is also can act as an audio trimmer that helps you trim your voice recordings effortlessly.
This free and powerful app allows you to easily edit, shorten, or otherwise refine audio recordings before distributing or listening to them. Moreover, it has convenient features like automatic split modes so that users can quickly divide original recordings into smaller clips or adjust the volume or speed of the recording with just a few clicks. Its user-friendly interface makes it easy for anyone at any level of experience to immediately trim their audio recordings.
Here's how to trim voice recordings on Windows by using Voice Recorder:
Step 1. Launch the Voice Recorder app on your PC, then click on Rec to start your voice recording.
Step 2. Once done, you will see your recordings on the left side, then find and click the sound recording file that you want to trim. And play the recording to make sure this is the recording you like to split.
Step 3. Next, click on the "Trim" icon at the bottom to show the two marks, a start marker and an end marker in the timeline.
Step 4. Play the sound recording and click the Pause button when it has reached the point you like to set as the start point, drag the start marker there, then set the endpoint and drag the end marker in the same way.
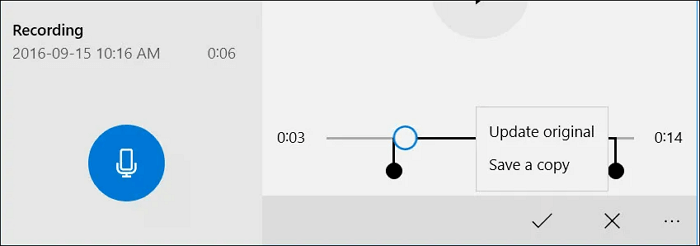
Step 5. Finally, click on Check to confirm the selection.
Method 3. Cut Audio Recording on Windows with Audacity
Audacity is the perfect audio recording software and editing program. It's free, easy to use, and provides a range of features to help create a fantastic sound. Audacity is the answer whether you're a recording artist wanting to remove unneeded sound from a track or someone looking to trim and cut spoken recordings.
With its intuitive user interface, even non-technical users can easily navigate this powerful audio trimmer. Cutting out long pauses or splitting long tracks into several smaller ones is just one click away. There's no need to be intimidated by other sophisticated software; Audacity will meet all your trimming needs in an affordable and efficient way.
Here's the step-by-step guide:
Step 1. Launch Audacity on your Windows PC, then click File > Open to import the voice recording that you want to trim.
Step 2. Next, drag the audio timeline to your preferred start point and click on the Trim icon that looks like a scissor on the top menu bar. Repeat the previous step to set the end time you desire.
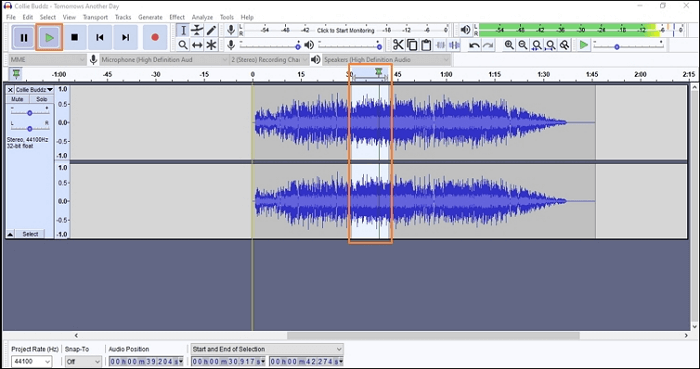
Step 3. Then you can preview the trimmed voice recording. If you are satisfied with it, you can click File > Export > Export as MP3 to save the trimmed audio file on your PC.
Method 4. Trim Voice Recording on Windows with EaseUS Video Editor
EaseUS Video Editor is an amazing software for video and audio editing alike. It can help achieve high-quality video clips, but it's also great for simply trimming audio files. Whether you're looking to shorten a song or lop off certain sections of a larger track, this powerful editor offers an easy-to-use drag & drop interface with advanced tools and features. Use the timeline view to set markers for where you want the trim points to be, then create faster, smoother cuts for your perfect sound clips. There are over 300 effects, such as transitions and titles, so you can also make your audio sound even more professional.
How to use EaseUS Video Editor to trim voice recordings on Windows:
Step 1. Launch EaseUS Video Editor, then click "Import > Import file" to load your files into the app.
Step 2. When your audio files are available in the software, right-click on them and select "Add to Project". They will be added to the timeline so you can then trim them.
Step 3. Place your cursor where you want to cut your audio file and click on the "Split" option in the toolbar. It will split your music file into two parts. Then click on the audio part that you do not wish to keep and select the "Delete" option. It will remove that part from your file.
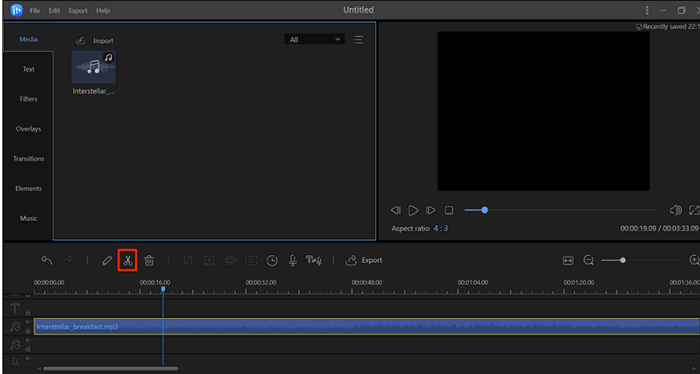
Step 4. Finally, you can save the trimmed file in an audio format on your computer. Click on the "Export" option to save your file.
The Bottom Line
Learning how to trim voice recordings is a valuable skill for anyone who relies on audio files regularly. Whether you're trying to clean up an interview recording or edit out a mistake in a presentation, being able to trim and improve your audio files can save you time and hassle. Luckily, there are some effective methods you can take on this page. And among these programs mentioned, we highly recommend EaseUS RecExperts, as this program offers a user-friendly interface and all the features you need to quickly and easily edit your audio files. Give it a try today!
How to Trim Voice Recordings on Windows FAQs
1. How do I trim an audio recording in Windows?
Actually, you can trim an audio recording in Windows with the built-in program Voice Recorder:
- Choose the recording file that you want to trim on the left side.
- Click on tap the Trim button at the bottom of the window. Then, you will see two pins, and drag them around to select the part of your recording you want to keep.
2. Can you trim an audio file in Windows Media Player?
Of course, yes! To trim an audio file in Windows Media Player, you just need to click on the scissors button to open the trim window. Drag the two blue sliders to define the segment you want to keep
3. How do I trim audio in Windows 11?
For Windows 11 users who want to trim audio, EaseUS RecExperts is an excellent choice:
- Install and launch this software on your Windows PC
- Click Recordings > Import to import the voice recording
- Choose the scissor button to trim your audio file. Once done, click Save to export the trimmed audio file.
EaseUS RecExperts

One-click to capture anything on screen!
No Time Limit, No watermark
Start Recording