-
![]()
Daisy
Daisy is the Senior editor of the writing team for EaseUS. She has been working in EaseUS for over ten years, starting from a technical writer to a team leader of the content group. As a professional author for over 10 years, she writes a lot to help people overcome their tech troubles.…Read full bio -
Jane is an experienced editor for EaseUS focused on tech blog writing. Familiar with all kinds of video editing and screen recording software on the market, she specializes in composing posts about recording and editing videos. All the topics she chooses …Read full bio
-
![]()
Melissa Lee
Melissa Lee is an experienced technical blog writing editor. She knows the information about screen recording software on the market, and is also familiar with data cloning and data backup software. She is expert in writing posts about these products, aiming at providing users with effective solutions.…Read full bio -
Jean is recognized as one of the most professional writers in EaseUS. She has kept improving her writing skills over the past 10 years and helped millions of her readers solve their tech problems on PC, Mac, and iOS devices.…Read full bio
-
![]()
Jerry
Jerry is a fan of science and technology, aiming to make readers' tech life easy and enjoyable. He loves exploring new technologies and writing technical how-to tips. All the topics he chooses aim to offer users more instructive information.…Read full bio -
Larissa has rich experience in writing technical articles. After joining EaseUS, she frantically learned about data recovery, disk partitioning, data backup, screen recorder, disk clone, and other related knowledge. Now she is able to master the relevant content proficiently and write effective step-by-step guides on various computer issues.…Read full bio
-
![]()
Rel
Rel has always maintained a strong curiosity about the computer field and is committed to the research of the most efficient and practical computer problem solutions.…Read full bio -
![]()
Gemma
Gemma is member of EaseUS team and has been committed to creating valuable content in fields about file recovery, partition management, and data backup etc. for many years. She loves to help users solve various types of computer related issues.…Read full bio -
![]()
Shelly
"I hope my articles can help solve your technical problems. If you are interested in other articles, you can check the articles at the bottom of this page. Similarly, you can also check my Twitter to get additional help."…Read full bio
Page Table of Contents
0 Views |
0 min read
CONTENT NAVIGATION:
- Record AVI with a Comprehensive Screen Recorder
- Record AVI Using Bandicam
- Record AVI with Screencast-O-Matic
- Record AVI with Acethinker
- Record AVI FAQs
Standing for Audio Video Interleaved, AVI was a video file format created by Microsoft, providing users with an advanced video-containing function on the Windows operating system. It stores audio and video information digitally for playback. It is supported by all Microsoft's Windows platforms.
To play an AVI file, you will need an AVI player. However, to record the screen as an AVI video, you will need an AVI screen recorder. In this tutorial, we will introduce some screen recorders to help you record AVI with simple steps.
Record AVI with a Comprehensive Screen Recorder
Some people may know that EaseUS RecExperts is a video player with speed control. However, it is still mainly a screen recorder that can be used to record anything on your device. For example, you can use it to record the full or part of the computer screen as you wish.
Moreover, this Mac and Windows screen recorder also allows you to record system sound, the microphone, the webcam, and even gameplay with one click. After recording, you can preview, manage, and make basic editing to the recordings. Check more features below.
Main Features:
- Record full screen on Windows 10 and Mac
- Customize the output audio/video parameters
- Record the screen with or without audio
- Record videos in commonly used formats
- Schedule recording by settings start and end time
Now, click the button below to download EaseUS RecExperts and start recording AVI by following the steps listed.
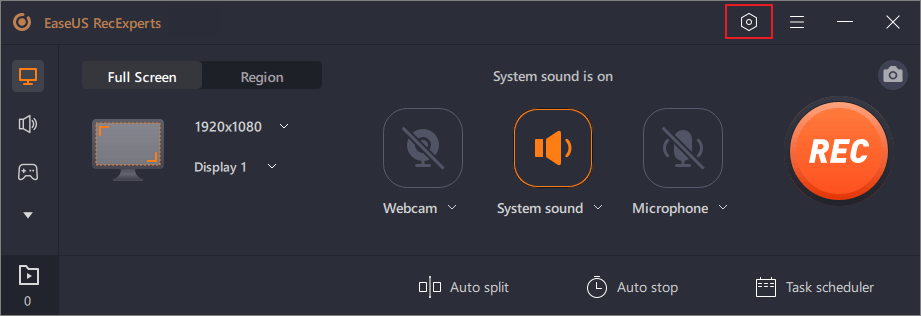
Step 1. Before recording as a specific format, you will need to change the settings. Launch EaseUS RecExperts and click the "Settings" button on the main interface (looks like a screw nut).
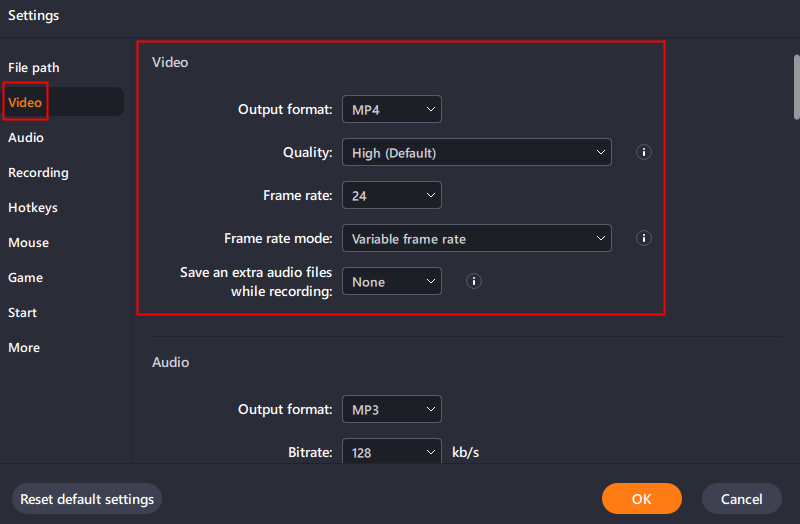
Step 2. If you want to save your recordings as a video file, click on "Video" and choose a format. You can also customize quality, frame rate, frame rate mode, etc. Then, click "OK" to save the settings.
Step 3. After that, choose a recording mode from "Full Screen" and "Region". Then, click on the big red button "REC" to start recording.
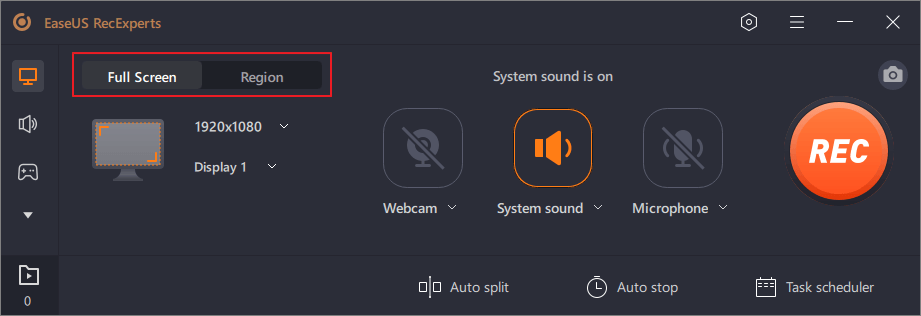
Step 4. Once the recording started, a floating toolbar will appear. Click on the red "Stop" button to stop recording, and the recording list will pop up.
Record AVI Using Bandicam
Bandicam is a screen recorder to capture anything on your computer screen in MP4 or AVI. You can choose the output format as you like. During the recording, you can draw lines, boxes, highlights, etc.
Moreover, Bandicam also lets you record a webcam of yourself along with recording system audio and your voice. Bandicam can also work as one of the best game recorders to record your fantastic game-playing process. Let's see how to use this screen recorder correctly.
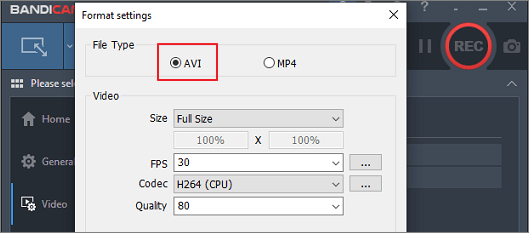
Step 1. Install and launch Bandicam on your PC, and click the "Video" > "Settings" in the "Format" section.
Step 2. Choose "AVI" as the output format.
Step 3. Click the dropdown arrow next to the "Screen Recording Mode" and choose the recording mode you need.
Step 4. Click the "REC" button to start recording. Click the "Stop" button or press "F12" to stop recording.
Record AVI with Screencast-O-Matic
Screencast-O-Matic is another AVI screen recorder you can try. With this tool, you can record a screen and webcam at the same time, helping you record a tutorial or a lesson easily.
Also, you can record audio on PC and record audio from your microphone. After recording, you can edit this video with the built-in video editing features. For instance, you can draw lines, and shapes on the video. Check the steps of recording AVI with Screencast-O-Matic.
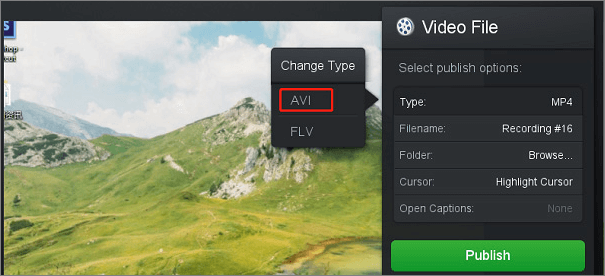
Step 1. Download and install the recorder. Launch it and choose a recording mode.
Step 2. Click "Size" to select the recording area or click "Fullscreen" to record in full-screen.
Step 3. Tap the red "REC" button to start recording. To stop recording, click the blue "Stop" button.
Record AVI with Acethinker
Acethinker is an online free AVI screen recorder that can record screen and audio at the same time. The recorded videos can be saved in many formats like AVI, MP4, WMV, etc.
During the recording, you can edit the video by drawing lines, icons, notes, etc. And after recording, you can save the recording on your computer or share it to YouTube, Vimeo, Google Drive, etc. Follow the steps below to start recording.
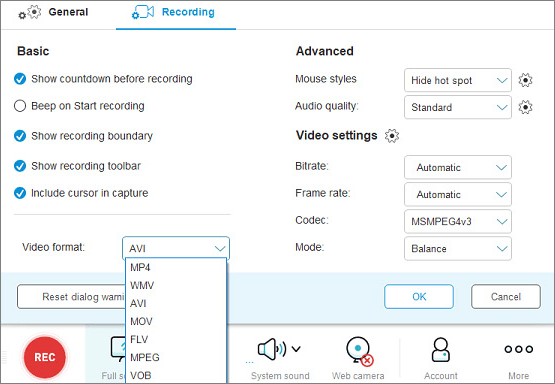
Step 1. Go to its website and click the "Start Recording" button. Then, download and run the Acethinker launcher.
Step 2. Click "More' > "Settings". Go to "Video format" and choose "AVI" from the dropdown list.
Step 3. Choose the "Full screen" mode or the "Region" mode before recording.
Step 4. Tap the "REC" button to start recording. Click the "Stop" icon to stop recording.
Record AVI FAQs
Check the related questions and their answers below to see if they can solve your doubts.
1. Is AVI high quality?
Yes, AVI video has high-quality audio fidelity. You can record and save a video in this format without a hassle.
2. What are the disadvantages of AVI?
There are two main disadvantages. First, it does not support user interactivity; second, the codec to create your movie is usually required to be installed in order to view it.
3. What is an AVI used for?
AVI stands for Audio Video Interleave, and it was mainly designed for synchronized playback of different types of video and audio streams.
Conclusion
From the tutorials and the FAQs part, you have known enough about AVI and how to record AVI videos with easy operations. We hope you got everything expected from this article. To record AVI videos from your screen, we suggest you download and use EaseUS RecExperts from the button below right now!
EaseUS RecExperts

One-click to capture anything on screen!
No Time Limit, No watermark
Start Recording