-
![]()
Daisy
Daisy is the Senior editor of the writing team for EaseUS. She has been working in EaseUS for over ten years, starting from a technical writer to a team leader of the content group. As a professional author for over 10 years, she writes a lot to help people overcome their tech troubles.…Read full bio -
Jane is an experienced editor for EaseUS focused on tech blog writing. Familiar with all kinds of video editing and screen recording software on the market, she specializes in composing posts about recording and editing videos. All the topics she chooses …Read full bio
-
![]()
Alin
Alin is an experienced technical blog writing editor. She knows the information about screen recording software on the market, and is also familiar with data cloning and data backup software. She is expert in writing posts about these products, aiming at providing users with effective solutions.…Read full bio -
Jean is recognized as one of the most professional writers in EaseUS. She has kept improving her writing skills over the past 10 years and helped millions of her readers solve their tech problems on PC, Mac, and iOS devices.…Read full bio
-
![]()
Jerry
Jerry is a fan of science and technology, aiming to make readers' tech life easy and enjoyable. He loves exploring new technologies and writing technical how-to tips. All the topics he chooses aim to offer users more instructive information.…Read full bio -
![]()
Rel
Rel has always maintained a strong curiosity about the computer field and is committed to the research of the most efficient and practical computer problem solutions.…Read full bio -
![]()
Gemma
Gemma is member of EaseUS team and has been committed to creating valuable content in fields about file recovery, partition management, and data backup etc. for many years. She loves to help users solve various types of computer related issues.…Read full bio -
![]()
Shelly
"I hope my articles can help solve your technical problems. If you are interested in other articles, you can check the articles at the bottom of this page. Similarly, you can also check my Twitter to get additional help."…Read full bio
Page Table of Contents
0 Views |
0 min read
PAGE CONTENT:
ShareX is one of the leading screen-recording software and one of the best for capturing audio and webcam video. That's why a lot of users love to use it, as it offers heaps of choices and options. But there are times when this software has issues and causes problems for users.
One such problem is ShareX screen recording not working at all. That means you can try various things, but the Recording won't work. Now this can be triggered by a variation of reasons, and it's vital to understand those.
Then it's also significant to recognize the possible fixes for this problem. So, let's get started and talk about the possible reasons behind the ShareX screen recording not working. EaseUS also provides the solutions that'll help fix this problem.
Why Is ShareX Screen Recording Not Working
There are many reasons behind ShareX screen recording not working on Windows and causing trouble to the user. One of the most common problems behind that is built-up cache or acting up drivers. Sometimes, a simple restart would fix it, and other times a rehaul of video drivers would be needed.
🔎Therefore, there are a few specific reasons why ShareX screen recording is not working:
- An outdated driver preventing ShareX from accessing GPU;
- Wrong microphone configuration—or a broken microphone;
- A build-up of junk files and cache;
- Corrupted ShareX installation;
- Wrong video codec;
- And misconfigured settings in the ShareX software.
That's why it's essential to identify the problems and apply fixes accordingly. Now the best method to do this is by smearing each simple fix one after the other until the problem is gone. So, let's keep going and find out the seven likely techniques to fix this nagging issue.
7 Ways to Fix ShareX Screen Recording Not Working
There are a few techniques that you can try to overcome each of the possible causes. Sometimes the user can fix it by just restarting their PC and forcing the drivers and other services to reboot. Other times they will have to try other measures like reinstalling the driver.
But that doesn't mean they have to go through and try each one at the same time. It's better to try one at a time and settle on the one that fixes the problem for them. Now keeping that in mind, here are the 7 fixes for ShareX screen recording not working:
- Fix 1. Restart PC and the Software
- Fix 2. Check the Microphone
- Fix 3. Update the Graphics Driver
- Fix 4. Reinstall ShareX Screen Recording
- Fix 5. Change the Video Codec
- Fix 6. Change FFmpeg Path
- Fix 7. Install Recorder Devices
Fix 1. Restart PC and the Software
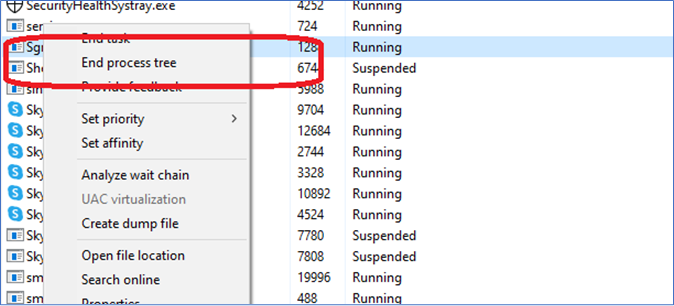
Sometimes all you have to do is end the process tree of software, and it'll start working again.
🧰Here are the steps on how to manage it:
Step 1. End the process of ShareX.
- Head to the Task Manager and find the ShareX process.
- Find and click on the End Process Tree option like this:
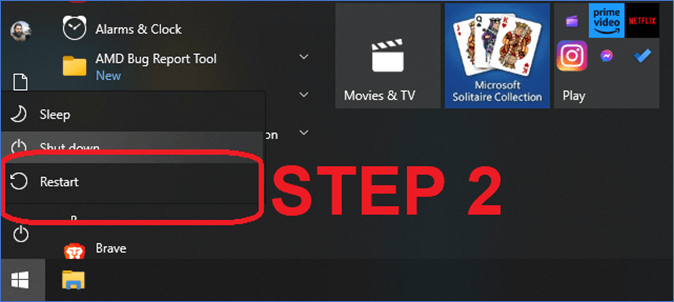
Step 2. Then you have to restart their PC before they start ShareX again.
- Tap on Start Menu or tap the Windows button on the Keyboard.
- Head into Power Menu and then tap Restart.
Step 3. Wait for the PC to restart.
Step 4. Try using ShareX for screen recording again.
This process is known to fix the problem if any plugin or Windows services were getting in the way.
Fix 2. Check the Microphone
Checking the microphone is another viable fix for this issue because ShareX requires proper microphone detection for screen recording. It's easy to check whether the microphone is working or not in the system sound settings.
🧰Here's how a user can ensure their microphone is working:
Step 1. Right-click the speaker/sound option on Taskbar and Open Sound Settings.

Step 2. Scroll to the Input section and select the right microphone.
Step 3. Tap on Troubleshoot button if the microphone is not detecting.

Step 4. Test the microphone before exiting.
This will fix the microphone issues and get it up and running once more. And it'll fix the problem if the microphone was likely the issue behind the ShareX screen recording not working.
Fix 3. Update the Graphics Driver
Updating the Graphics Driver is an essential part of fixing any sort of recording issues. An out-of-date driver is one of the most common and probable causes of ShareX screen recording not working. Now each AMD and Nvidia user will have to try different methods of updating.
👉For AMD Users:
Step 1. Open Adrenalin Software.
Step 2. Tap the Settings cogwheel.
Step 3. Now tap on Check for Updates button.
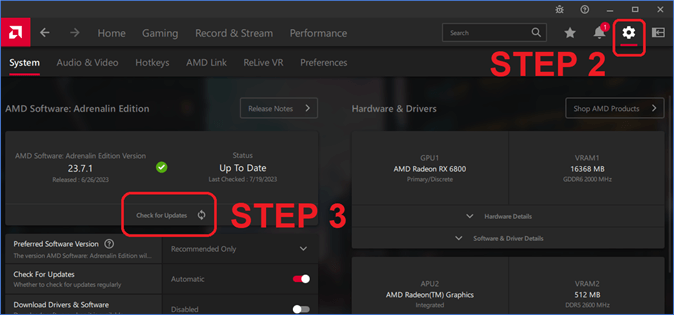
Step 4. Wait for the driver to download and install.
👉For Nvidia Users:
Step 1. Open Nvidia GeForce Experience.
Step 2. Tap on the "Check for Updates" button.
Step 3. Download and install updates.
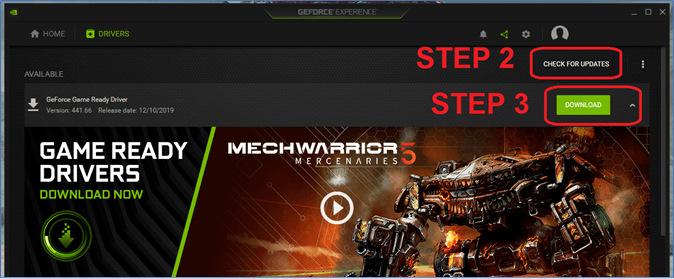
This will update the drivers for both the Nvidia and AMD GPUs.
If you want to know information about Nvidia Screen Recorder, you can read the following post provided by EaseUS:
[Overall Analysis] Nvidia Screen Recorder Overview
If you want to leverage the default Nividia screen recorder of your graphic card, this passage introduces how Nvidia Share operates and the details of its specifications.

Fix 4. Reinstall ShareX Screen Recording
Reinstalling ShareX seems to fix the problem for a lot of users too. This is simply because ShareX itself can be outdated too. So upgrading to the latest ShareX version can fix the problem if any outdated plugins or software elements are causing the problem.
🧰Here are steps for you to follow:
Step 1. Download the latest ShareX version.
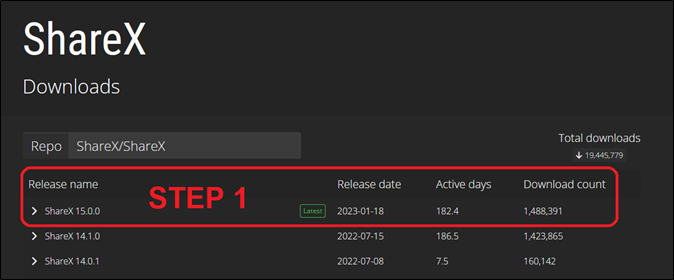
Step 2. Now open Control Panel and head into Programs > Uninstall a program.

Step 3. Find and uninstall ShareX.

Step 4. Wait for uninstallation.
Step 5. Now install the newly downloaded ShareX.
This will reinstall the ShareX software and fix the screen recording issue.
Fix 5. Change the Video Codec
Changing the video codec version in settings can also fix this problem. Now there's no particular codec that can fix the issue of not recording.
🧰Trying various types of codecs can help you find and address this problem quite efficiently, and here's how:
Step 1. Head into Task Settings.
Step 2. Find Capture and then Screen Recorder.
Step 3. Now head into Screen Recording Options.
Step 4. Change the codec under the "Codecs" tab to anything else.

Step 5. Save settings to try the new codec.
Step 6. See if the Recording works again.
Users might have to try various codec types to see which one is working for them.
Fix 6. Change FFmpeg Path
FFmpeg path is where ShareX screen recordings are usually saved. And it might be causing issues if there's not much storage in this specific area. Changing this particular path from the ShareX setting also fixed the problem for users
🧰You can follow the following steps to change the FFmpeg path:
Step 1. Head into Capture, then Screen Recorder settings.
Step 2. Change the FFmpeg path.
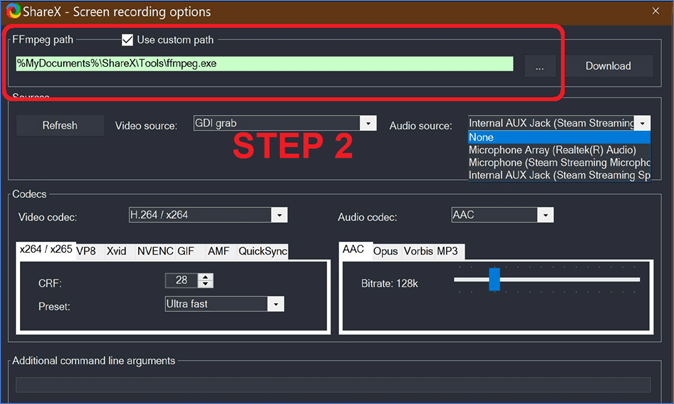
Step 3. Save settings and restart ShareX.
Trying this will fix the issue for a lot of users, but they can try the next method if it doesn't.
Fix 7. Install Recorder Devices
Install Recorder Devices is prompt in ShareX settings that'll install additional plugins required for screen recording. This is usually the reason a lot of users cannot record with ShareX, as they haven't installed the required plugins for it.
🧰Here's what you'll have to do after going into ShareX settings:
Step 1. Head into Screen Recorder options under the Capture tab.
Step 2. Find the Install Recorder Devices option under the Sources section.
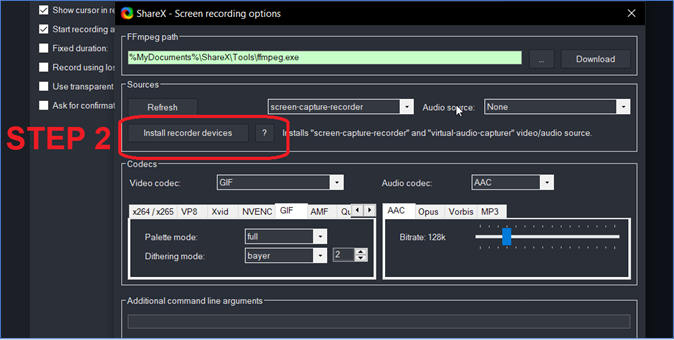
Step 3. Wait for the tool to configure itself.
This will take a few minutes to install the required plugins for ShareX screen recording.
The Best ShareX Screen Recording Alternative Recommended
Now if ShareX isn't working for you, then that doesn't mean you have to rely on it at all times. You can use a better ShareX alternative for screen recording.
Here we must recommend EaseUS RecExperts to you as it is an outstanding screen recorder and a way better alternative to the likes of ShareX. EaseUS RecExperts offers an intruding UI design with simple yet effective features that help users screen record properly and easily.
💡Some of the best features of EaseUS RecExperts include:
- Record part of the screen, including specific windows
- Use AI-based video enhancer to ensure high-quality video recording on PC
- Offer an in-built media player for viewing recorded videos
- Come with an in-built video editor for easy video trimming
🧰That's why it's an outstanding tool for screen recording, and here's how to use it:
Step 1. Launch EaseUS RecExperts. You'll see six recording modes available. Choose Full Screen to capture everything on your display, Custom to record a selected area, Window to record a specific app window, Game for optimized gameplay recording, Audio to capture system or microphone sound only, and Webcam to record your webcam feed.
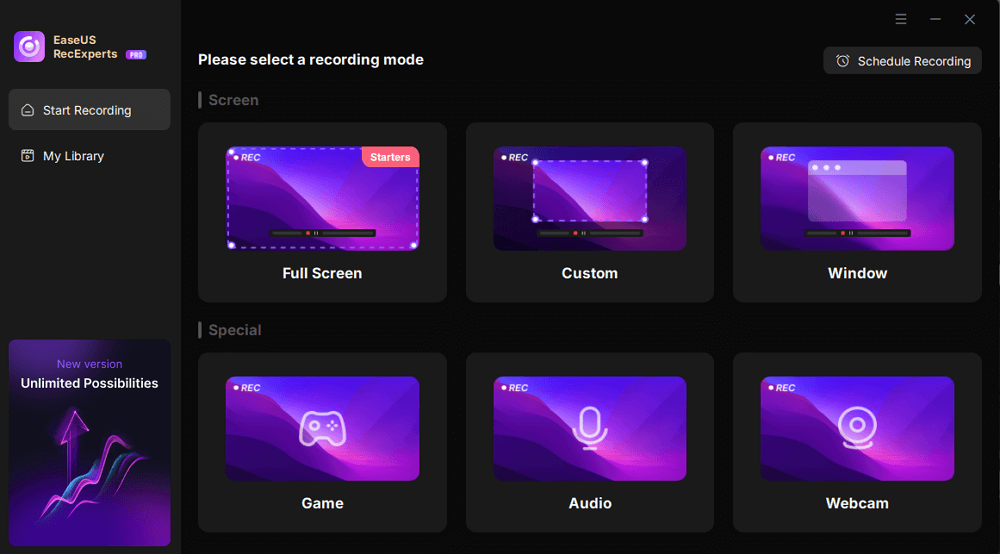
Step 2. Select your input sources. You can freely enable or disable the Webcam, Speaker, or Microphone depending on your needs. If you only want to record a silent screen, simply turn all of them off.

Step 3. Click the red REC button to start recording. A floating control bar will appear on your screen. To pause the recording, click the Pause button (white); to stop it, click the Stop button (red).
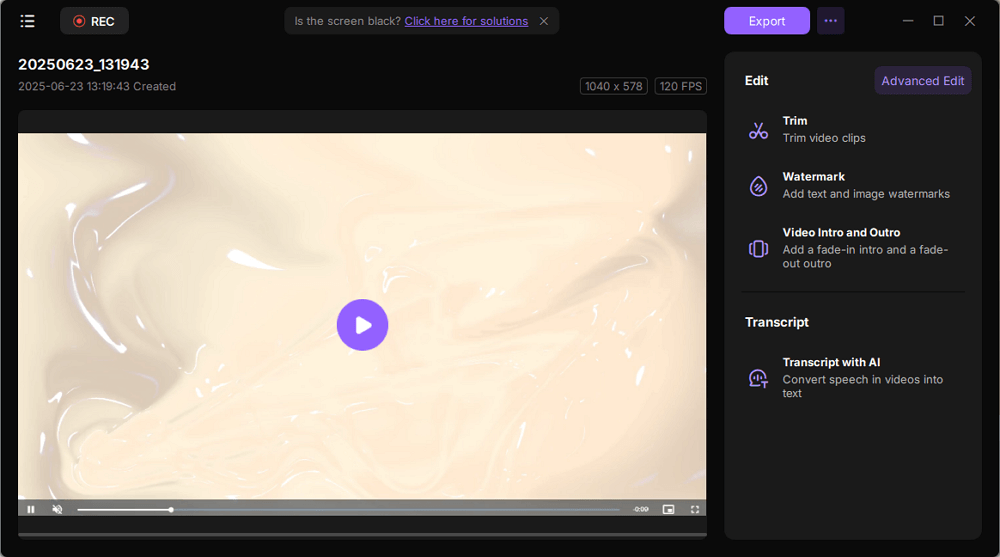
Step 4. After recording, you'll be taken to the preview window, where you can watch, trim, or edit your recording with ease.
Conclusion
These are the best fixes to apply for users who are looking to fix their ShareX screen recorder not working. It's important to understand that these fixes are applicable to specific problems, such as a graphics driver acting up for some users.
But it's better to avoid all the hassle and use a better alternative to ShareX. In this case, it's EaseUS RecExperts, the screen recorder free download, which is an awesome tool for screen recording. Not only is it easy to use but also very easy to configure and record screen with.
FAQs
1. Why doesn't ShareX record audio?
It's likely that the microphone isn't configured properly in System Sound settings. But it's also possible that the default input setting is wrong in ShareX, and to fix that, users will have to go into Settings > Capture> Screen Recording and then select their live microphone.
2. How do I install recorder devices on ShareX?
The install recorder devices option is under Capture settings. Users will have to go to the main Settings in ShareX and then find the Capture tab and then head into Screen Recording to find the Install Recorder Devices button.
EaseUS RecExperts

One-click to capture anything on screen!
No Time Limit, No watermark
Start Recording
