-
![]()
Daisy
Daisy is the Senior editor of the writing team for EaseUS. She has been working in EaseUS for over ten years, starting from a technical writer to a team leader of the content group. As a professional author for over 10 years, she writes a lot to help people overcome their tech troubles.…Read full bio -
Jane is an experienced editor for EaseUS focused on tech blog writing. Familiar with all kinds of video editing and screen recording software on the market, she specializes in composing posts about recording and editing videos. All the topics she chooses …Read full bio
-
![]()
Alin
Alin is an experienced technical blog writing editor. She knows the information about screen recording software on the market, and is also familiar with data cloning and data backup software. She is expert in writing posts about these products, aiming at providing users with effective solutions.…Read full bio -
Jean is recognized as one of the most professional writers in EaseUS. She has kept improving her writing skills over the past 10 years and helped millions of her readers solve their tech problems on PC, Mac, and iOS devices.…Read full bio
-
![]()
Jerry
Jerry is a fan of science and technology, aiming to make readers' tech life easy and enjoyable. He loves exploring new technologies and writing technical how-to tips. All the topics he chooses aim to offer users more instructive information.…Read full bio -
![]()
Rel
Rel has always maintained a strong curiosity about the computer field and is committed to the research of the most efficient and practical computer problem solutions.…Read full bio -
![]()
Gemma
Gemma is member of EaseUS team and has been committed to creating valuable content in fields about file recovery, partition management, and data backup etc. for many years. She loves to help users solve various types of computer related issues.…Read full bio -
![]()
Shelly
"I hope my articles can help solve your technical problems. If you are interested in other articles, you can check the articles at the bottom of this page. Similarly, you can also check my Twitter to get additional help."…Read full bio
Page Table of Contents
Rel
Updated on Jun 09, 2026
0 Views |
0 min read
PAGE CONTENT:
OBS (Open Broadcaster Software) Studio is open-source software for many YouTubers and content creators to live stream their content. Be it the gameplay, videos, or any other medium, the combination of these two powerful tools allows users to churn out a seamless experience. If you want to know how to stream on YouTube with OBS or you find the process clumsy, don't worry. It isn't as difficult as it seems.
Whatever may be the reason you want to live stream, in the post, EaseUS details how to stream on YouTube with OBS with a step-by-step guide, from setup to start streaming with your gameplay, screen, or any videos with ease. Keep reading and find your answers!
Best OBS Settings for Streaming on YouTube PC
Before using OBS Studio for live streaming on YouTube, it is important to customize the settings depending on your requirements to get the best quality out of it. So, let us see what the best OBS YouTube stream settings for PC are.
👇We have classified the settings into three sections. You can jump to the specific part to best set OBS Studio.
OBS Studio Video Settings
OBS Video settings are important since you need to make sure the stream looks smooth and intuitive to the audience. You can set up how your video should appear to your audience using Video and Output settings.
📍Below are steps on how to best set OBS video settings:
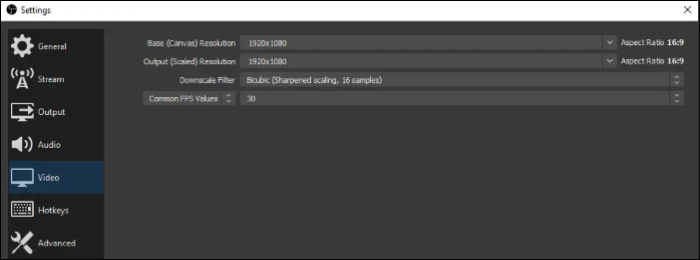
Step 1. Navigate to File > Settings on the OBS app, and click on the Video on the left panel.
Here, you can choose the Video Resolution. If you are using a high-end computer, you can go with the 1080p resolution with 60 fps. If your system is medium range, select 720p with 30 fps.
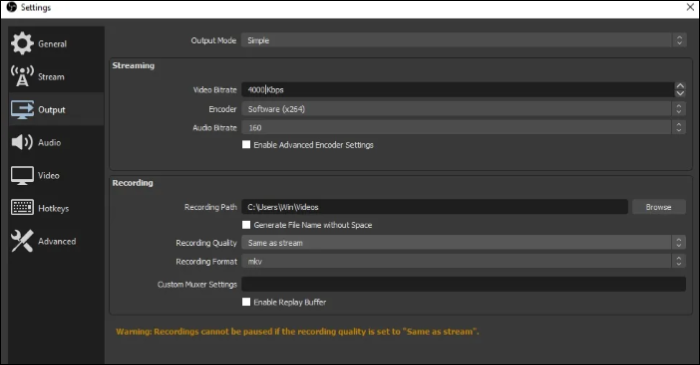
Step 2. Move to the Output section. It contains some additional streaming settings like Bitrate, Encoder, etc. These two are important.
Whatever may be the resolution, make sure your bitrate is between 3000 to 6000 kbps to get good video quality. For the Encoders, the x264 is good and works really well. But one thing to remember, make sure you have the updated or latest graphic cards.
With such high resolution and bitrate, the graphic cards should handle extensive video rendering.
- Pro Tip:
- The video quality depends on the internet speed and your computer specs. So, if you customize your OBS settings with more than what your computer can handle, the video quality falls. And the streaming becomes choppy or lagging. So, consider all those before setting up the video settings.
OBS Studio Audio Settings
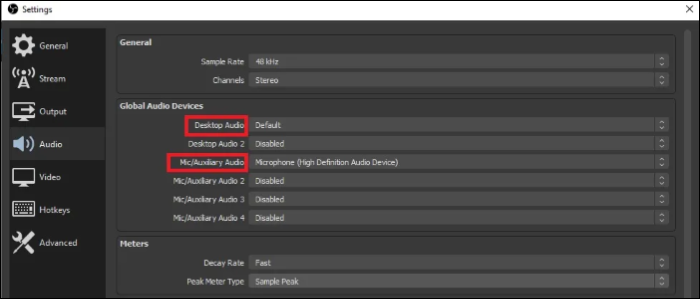
Now, move to the Audio section to customize OBS mic settings for streaming. To sound the best possible way on your stream, the section you need to concentrate on is Global Audio Devices. Since streaming gameplay involves desktop audio and microphone audio, you need to add all input sounds as sources to enable them.
📍Here, each audio represents one sound source. The specific steps are listed:
Step 1. For sound coming out of the desktop, turn on Desktop Audio.
Step 2. To capture what you are speaking, turn on Mic/Auxiliary Audio as well. After doing so, click "Apply and OK".
Add Sources to OBS Studio
The sources are what you want your audience to see and hear on your stream. Here, you can display your game, desktop screen, browser window, game application, and even stream Xbox on discord. Along with them, add your audio and video sources like webcam, microphone, etc.
📍If you don't know how to add sources to OBS studio, you better follow the guide below:
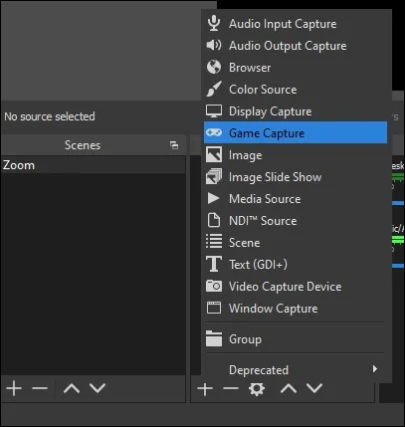
Step 1. Click the + sign next to Sources.
Step 2. Select the source you want to add and name it. You will also get the respective properties of that source if you want to add 3rd party overlays while YouTube gaming.
Step 3. After adding the Game Capture as the source, navigate to its Properties and check it.
How to Stream YouTube with OBS 2023
There are a few simple steps to link YouTube and OBS Studio, and then you have to use them both to start streaming.
📍Follow the guide below to begin your journey of live streaming on YouTube with OBS.
Step 1. Verify your YouTube Account for Streaming.
To live stream using YouTube, you should verify your account first. Create a YouTube account if you do not have one, click on the profile account in the top-right corner, and click on YouTube Studio.

Again on the top-right corner, go to Create > Go Live and click Enable.

Then follow the verification process, where you have to verify your mobile number with a code. You will get the code instantly, but the verification process might take up to a day to get your account verified.
Step 2. Connect OBS and YouTube with the Stream Key.
YouTube generates a 16-char stream key to connect with streaming apps. Now, head back to YouTube Studio to get the key, and later paste it into OBS Studio to connect the two.
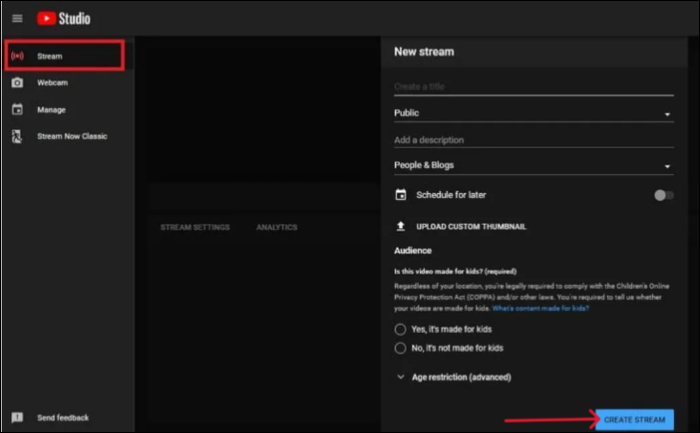
To generate a Stream Key, click on Stream and fill out the necessary data in the form, just like in the picture. It includes a proper SEO title to improve visibility and many more. Now, click on Create Stream tab to go live on your YouTube channel.

This action generates a control panel. Find Stream Settings, and click. You will see your Stream Key. You can copy it or manually write it on OBS to connect the platforms.
🚫In this process, you need to make sure that NO ONE SEES your stream key to protect your YouTube account from being logged in by others.
Step 3. Set up OBS Studio for YouTube Live Streaming (Link OBS Studio and YouTube with Stream Key).
- To set up OBS for live streaming, make sure you download the OBS studio from the official site and run it as administrator before this process.
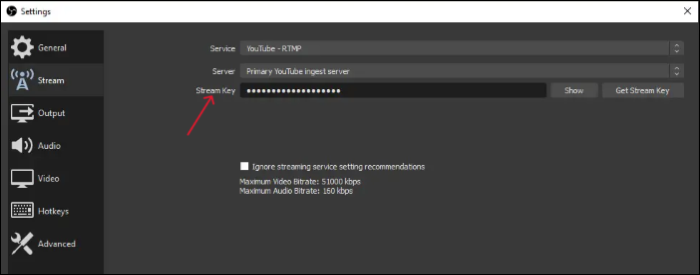
- Go to Settings > Stream. Click on the drop-down beside Service, select YouTube, and leave the server on default.
- Now, Paste or manually type the Stream Key and click Apply. This action links the YouTube and OBS studios for live streaming.
That's it. You are ready to live stream your content on YouTube. Just head back to the YouTube Studio and start streaming. If you want to record your Youtube stream, the passage below will provide
7 Perfect Ways to Record YouTube Live Stream Video Easily
We will also provide 7 YouTube live recorders and the steps about how to record live YouTube on PC, Mac, or mobile devices easily.
Fix OBS Live Stream Is Not Enabled on Selected Youtube Channel
According to the OBS Studio review, there are various situations that OBS live stream is not working. In this part, EaseUS will analyze the main reasons why Live Stream is not enabled on the selected YouTube Channel issue occurs. Let us see some practical fixes to get your streaming back live.
- Live Streaming eligibility: YouTube has certain eligibility standards, like the channel should have at least 1000 subs, be in good standing for live streaming, and string internet. If you lack any of these, you may face issues.
- Reconnect the OBS and YouTube: Go to OBS Stream settings and remove the Stream Key. Now, make the connection again to see if it works.
- Authorization issues: You need to make sure you have proper content and the necessary permissions for OBS to stream from YouTube to resolve the issue.
- Update OBS: The Outdated OBS may result in errors like these, so make sure you are using the latest version to avoid such issues.
Pro Tip: The Best OBS Alternative for Windows/Mac
YouTube live streaming is not always feasible with OBS if it involves creators and audiences, and various factors chime in, which may result in different experiences. But what if you can screen record all your content, remove unnecessary parts, edit the video, and post the best content out there to your audience? Except for this open-source screen recorder, you can download EaseUS RecExperts to have a try, as it can help you do all things above with easy clicks.
EaseUS RecExperts is a screen recording software with various modes and features to capture your screen with the highest quality possible. You can make educational tutorials, record your gameplay and make a video with the best moments, and even record your private Discord streams.
❇️Key Features of EaseUS RecExperts:
- Capture any region of your screen with multiple screen recording modes
- Record screen and webcam simultaneously
- Free built-in video editor and cutters
- Support audio recording with audacity noise reduction
- Capture your screen in 4K/8K resolution of up to 144 fps
📍Here we also provide the full guide to help you operate EaseUS RecExperts. The steps are listed below:
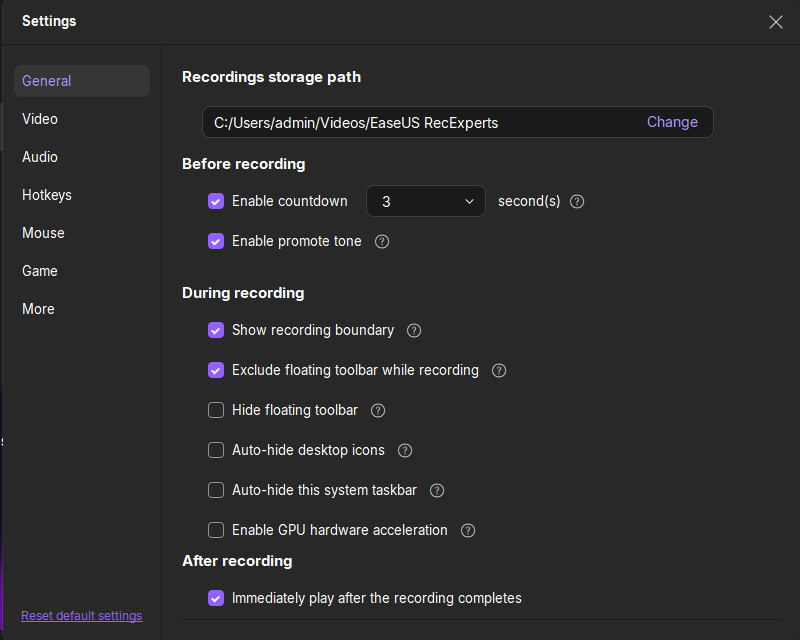
Step 1. Launch EaseUS RecExperts and adjust your recording settings.
Before you start recording, you can customize your settings by clicking the Menu icon (three horizontal lines) in the top-right corner and selecting Settings. From there, you can change the save location, video format, frame rate, audio format, and other preferences. All changes will be saved automatically.
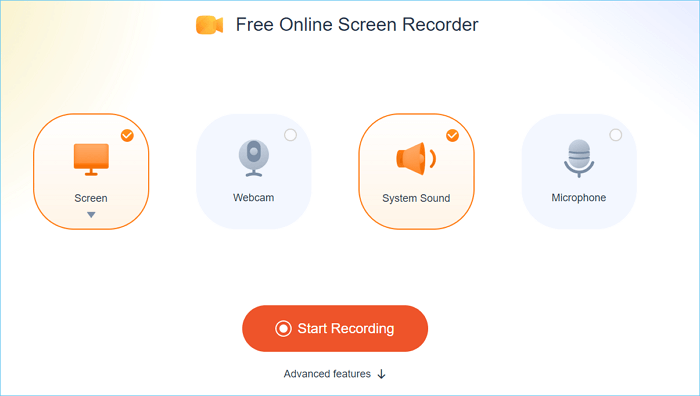
Step 2. Choose a recording mode based on your needs.
On the main interface, you'll see several recording options: Full Screen, Custom, Window, Game, Audio, and Webcam. Simply click the one that matches what you want to record.

Step 3. Set up your webcam and audio sources.
In the toolbar, you can turn the Webcam, Speaker, and Microphone on or off by clicking their icons. If multiple devices are connected, click the small arrow next to each icon to choose your preferred input source.

Step 4. Start and control the screen recording.
Click the red REC button to begin recording. A floating toolbar will appear on your screen, where you can pause the recording using the pause icon or stop it by clicking the red square icon.
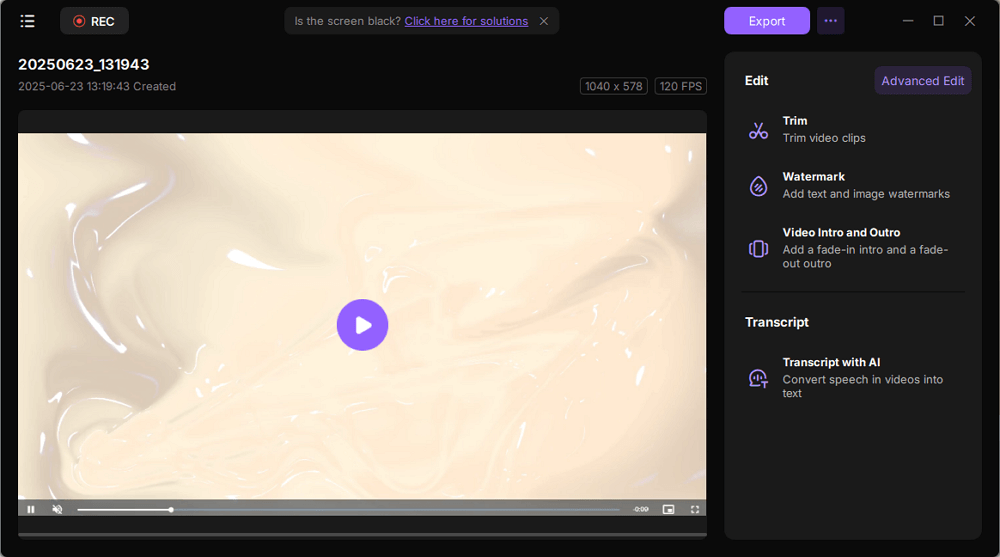
Step 5. Preview, edit, and manage your recordings.
Once you stop recording, you'll be taken to the preview window. Here, you can watch your video, trim it, add watermarks, transcribe audio to text, and organize your recordings. To record again with the same settings, just click the REC button in the top-left corner.
In Conclusion
To conclude, how to stream on YouTube with OBS, the things you need to do are setting up YouTube for live streaming first, customizing the best recording settings for OBS studio, and connecting them both using the YouTube Stream Key. The detailed steps are given above. And if you want to make a perfect stream with exciting content all over, record your screen with EaseUS RecExperts, edit it, and stream it on YouTube.
FAQs
1. How do I stream 1080p on YouTube with OBS?
First, set the resolution to 1080p in the Video section of the OBS settings. Now, an optimal Bitrate will render your video at the highest quality. And the optimal bitrate to stream 1080p on YouTube with OBS is 4000 Kbps. Go to the Output section and set the bitrate to stream at 30fps.
2. What bitrate should I stream on YouTube with OBS?
To get the perfect pixel live streams, most users recommend the Video Bitrate of 4000 to 6000 Kbps. This is the optimal bitrate for live streaming in Full-HD (1080p) at 30fps. And the recommended Audio Bitrate is 320 Kbps.