-
![]()
Daisy
Daisy is the Senior editor of the writing team for EaseUS. She has been working in EaseUS for over ten years, starting from a technical writer to a team leader of the content group. As a professional author for over 10 years, she writes a lot to help people overcome their tech troubles.…Read full bio -
Jane is an experienced editor for EaseUS focused on tech blog writing. Familiar with all kinds of video editing and screen recording software on the market, she specializes in composing posts about recording and editing videos. All the topics she chooses …Read full bio
-
![]()
Alin
Alin is an experienced technical blog writing editor. She knows the information about screen recording software on the market, and is also familiar with data cloning and data backup software. She is expert in writing posts about these products, aiming at providing users with effective solutions.…Read full bio -
Jean is recognized as one of the most professional writers in EaseUS. She has kept improving her writing skills over the past 10 years and helped millions of her readers solve their tech problems on PC, Mac, and iOS devices.…Read full bio
-
![]()
Jerry
Jerry is a fan of science and technology, aiming to make readers' tech life easy and enjoyable. He loves exploring new technologies and writing technical how-to tips. All the topics he chooses aim to offer users more instructive information.…Read full bio -
![]()
Rel
Rel has always maintained a strong curiosity about the computer field and is committed to the research of the most efficient and practical computer problem solutions.…Read full bio -
![]()
Gemma
Gemma is member of EaseUS team and has been committed to creating valuable content in fields about file recovery, partition management, and data backup etc. for many years. She loves to help users solve various types of computer related issues.…Read full bio -
![]()
Shelly
"I hope my articles can help solve your technical problems. If you are interested in other articles, you can check the articles at the bottom of this page. Similarly, you can also check my Twitter to get additional help."…Read full bio
Page Table of Contents
Jane Zhou
Updated on Jun 09, 2026
0 Views |
0 min read
Many people love to play Minecraft and explore in the game, looking for resources and running from creepers. Sometimes, you may want to share your achievements and happiness in the game with your friends. If so, try the Minecraft screen recorders and record Minecraft video for YouTube or other social networks. Using the game recording software mentioned on this page, you can screen record on Minecraft with simple clicks. Follow those tutorials and start your recording.
The Easiest Way to Record Minecraft on PC & Mac
- Supported Versions: Minecraft Java Edition (PC/Mac) & Minecraft Bedrock Edition (PC)
- Recommended For: Beginners, content creators, cross-platform users, and time-lapse enthusiasts
Recording Minecraft gameplay has never been easier or more efficient than with EaseUS RecExperts. Designed for both Windows and macOS, this powerful yet user-friendly software fully supports Minecraft Java Edition, Bedrock Edition, Dungeons, and Legends. Whether you're a beginner just starting out or an experienced content creator, this tool lets you effortlessly capture every moment of your Minecraft adventures in stunning HD, including 1080p and even 4K resolution.
It can record only the Minecraft game window, avoiding unwanted background distractions. Stable and reliable, this Minecraft screen recorder minimizes black screens and lag, ensuring your recordings are smooth and professional every time. It uses GPU encoding to reduce the CPU load, ensuring smooth gameplay even during long, intensive gaming sessions. Clean, one-click interface - start recording Minecraft instantly, no fuss.
Here's how to record in Minecraft:
Step 1. Launch EaseUS game recorder and click the Menu icon to open Settings.
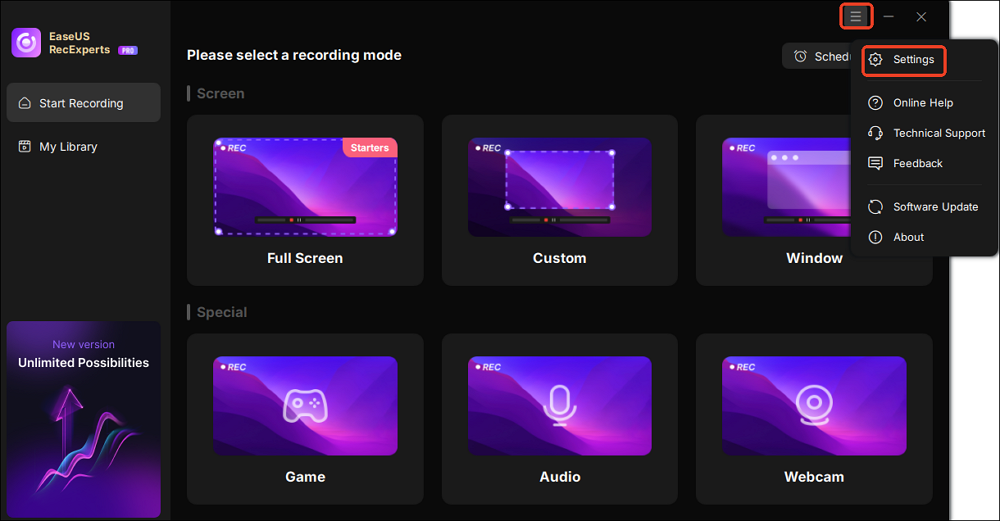
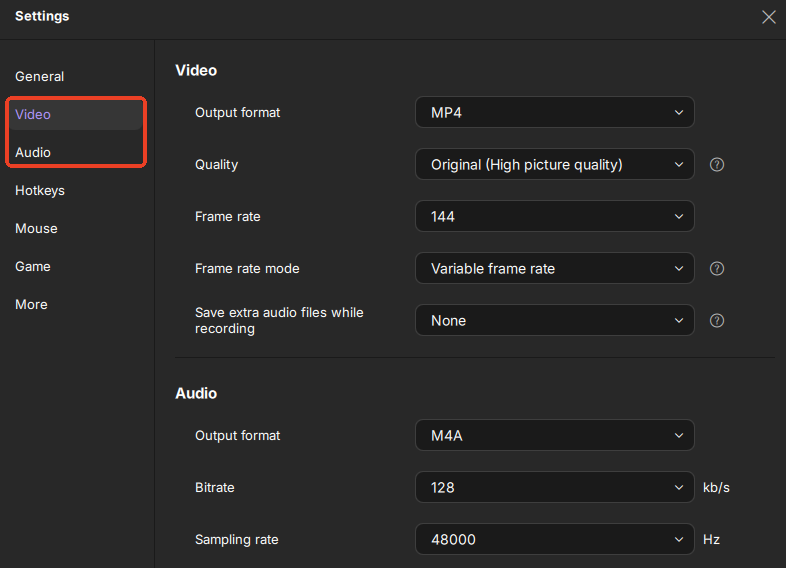
Step 2. Then click on Video and Audio to adjust the frame rate (from 1 to 144), video quality, format, bitrate, etc.
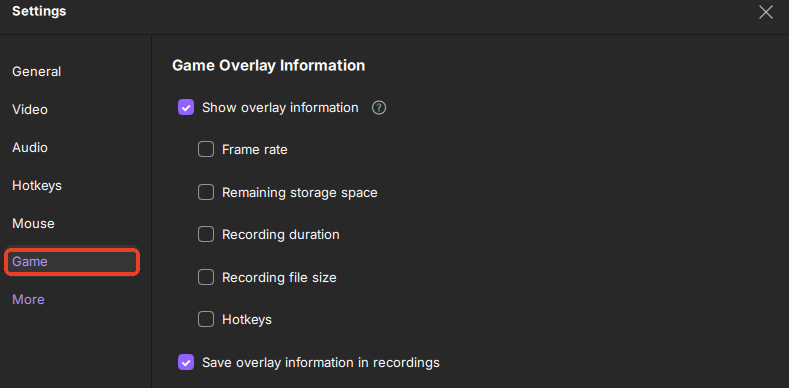
In addition, you can click on the Game tab to change some game overlay options.
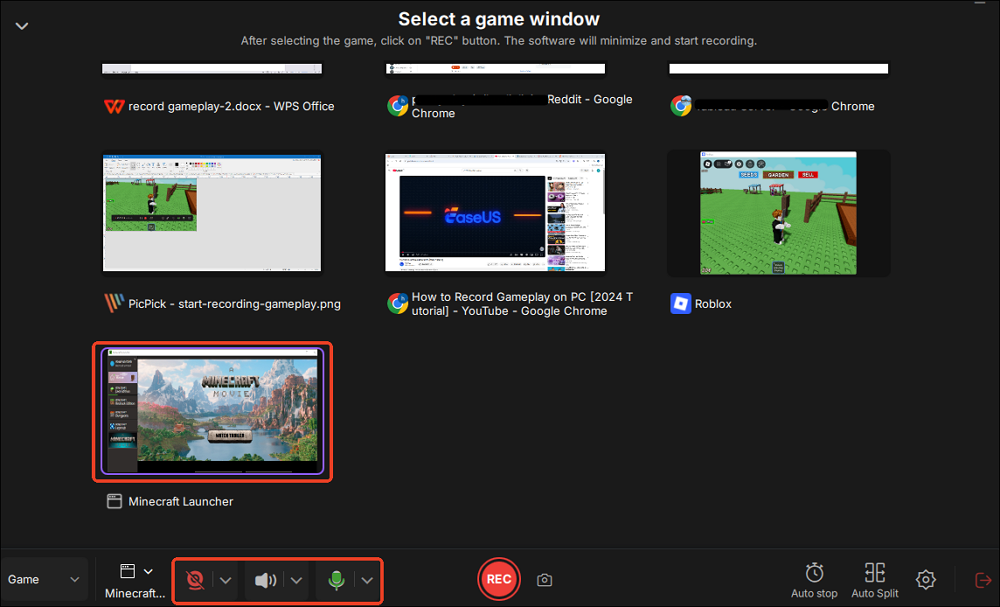
Step 3. Return to the main interface and click the Game mode. Select the game window to capture the desired gameplay, and choose the webcam or audio source if needed. Finally, click REC to begin recording your game.
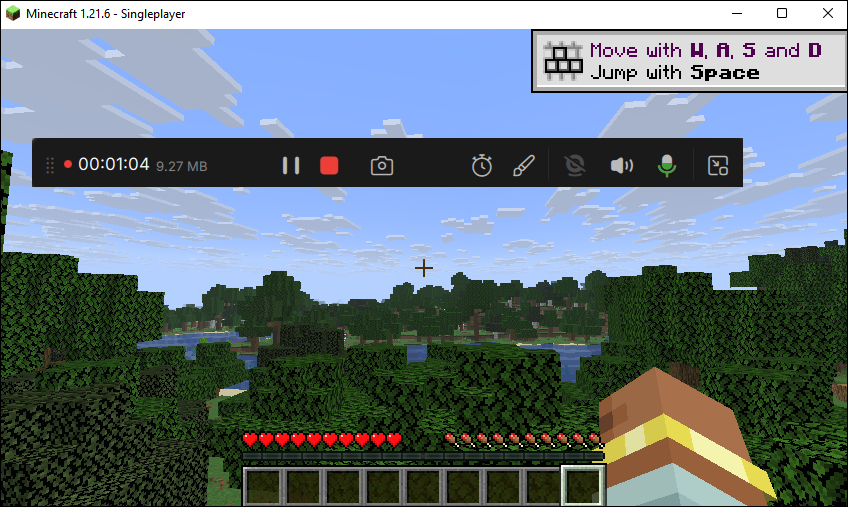
Step 4. A small bar will display the recording time. You can take screenshots during the recording or set a specific stop time by clicking the clock icon on the toolbar.
Step 5. Once complete, you can view and edit the recorded footage using the built-in video player and editor.
Don't forget to share this guide with others in need!

How to Screen Record Minecraft with Xbox Game Bar Free
- Supported Versions: Minecraft Java Edition / Bedrock Edition ( Windows 10/11 PC only)
- Recommended For: Beginners, casual gamers, and Windows users who prefer no-install solutions
If you want to screen record a Minecraft video for free, take a look at Xbox Game Bar, a free and easy-to-use screen recorder that comes pre-installed on Windows 10 and 11. Whether you're playing Minecraft Java Edition or Bedrock Edition, this free game recorder lets you quickly capture your adventures without additional software.
You can simply start recording Minecraft with keyboard shortcuts. It supports high-definition recording with good performance and automatically captures the Minecraft game window, minimizing distractions from other apps or the desktop.
Steps to record Minecraft with Xbox Game Bar for free:
Step 1. Press Windows Key + G to open Xbox Game Bar while running a game or supported app.
Step 2. Click the Record button (circle icon) in the Capture widget.

Step 3. You can stop recording either from Game Bar or by pressing Windows Key + Alt + R again.
Step 4. Windows automatically saves recordings as MP4 files in the Videos > Captures folder. File names may include the game name and timestamp. Or you can click See my captures directly in the interface.

- Tip: Xbox Game Bar also lets you record the last 30 seconds on PC or a longer session. Just press Win + Alt + G.
How to Record Minecraft with OBS
- Supported Versions: Minecraft Java Edition (Windows PC/Mac) & Minecraft Bedrock Edition (Windows 10/11 PC)
- Recommended For: Intermediate to advanced users, streamers, and content creators seeking customizable recording options
Another excellent Minecraft screen recorder is to record Minecraft with OBS Studio. It supports both Minecraft Java and Bedrock Editions on PC, making it a preferred choice for users who want detailed control over recording settings.
By configuring the proper capture mode, typically "Game Capture" for full-screen Minecraft, OBS can efficiently grab the full game screen without including desktop clutter. This ensures smooth, high-quality recordings that maintain your game's native resolution and frame rate.
While its advanced features provide significant advantages, such as scene switching, multi-source mixing, and customizable overlays, new users may face common challenges like black screens or input lag when recording full-screen Minecraft. Proper setup and troubleshooting are essential to avoid these issues.
Tutorial on recording Minecraft with OBS:
Step 1. Go to the OBS official website, install the OBS screen recorder tool on your system, and then launch it.
Step 2. Open OBS and click + in the Scenes box to create a new scene (e.g., Minecraft).

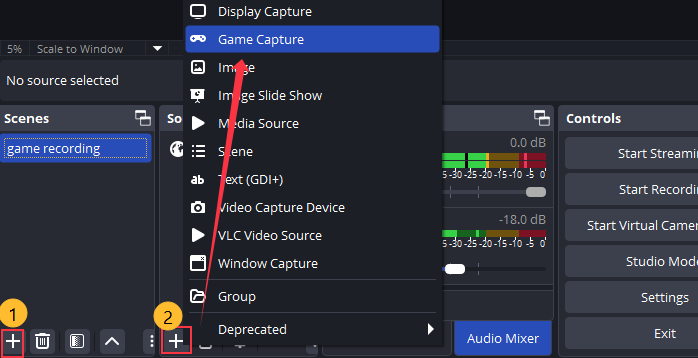
Step 3. In the Sources panel, click + and add:
- Game Capture (recommended for Minecraft gameplay)
- (Optional) Video Capture Device (for webcam)
Step 4. Select Minecraft as the target window (make sure the game is already running in the background if needed).
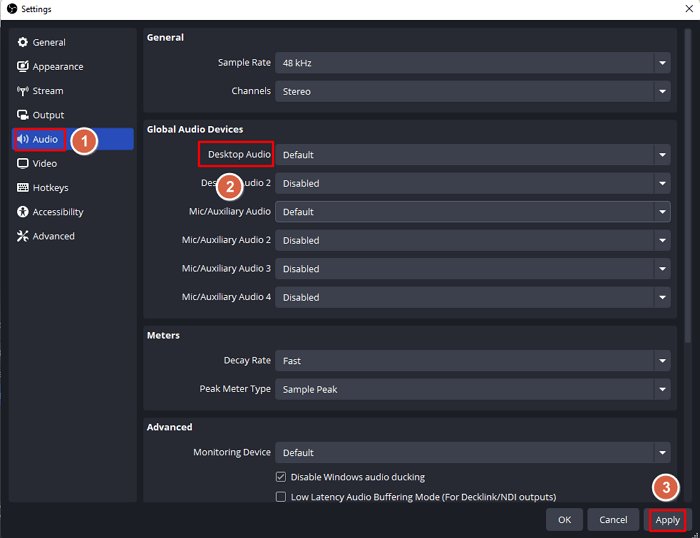
Step 5. Go to Settings → Audio and enable:
- Desktop Audio (game sound)
- Mic/Aux (your voice, optional)
Step 6. Click Start Recording to begin capturing gameplay. Click Stop Recording when finished.

Don't forget to share this guide with others in need!
How to Record Minecraft Bedrock (Android & iOS)
Recommended for: Mobile gamers
Recording Minecraft Bedrock Edition on mobile devices is efficient and accessible, thanks to the built-in screen recording tools on both Android and iOS. These native features ensure smooth gameplay capture without needing third-party apps, making them perfect for quick recordings or sharing gameplay moments.
For Android Devices:
- Swipe down to open Quick Settings, tap "Screen Recorder" (add it if missing).
- Set the audio source.
- Open Minecraft Bedrock and start recording.
- Stop recording via notification when done.
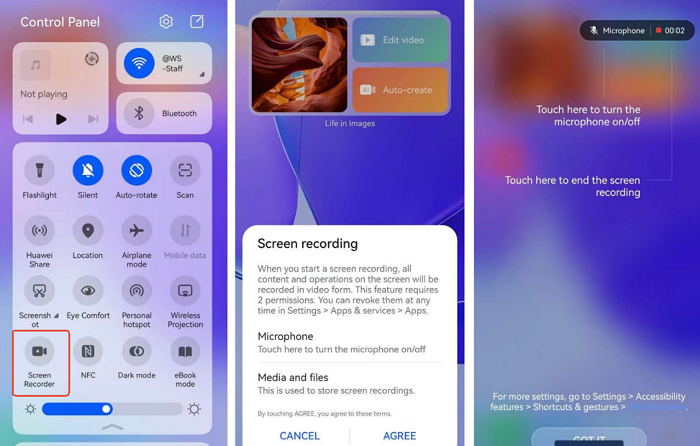
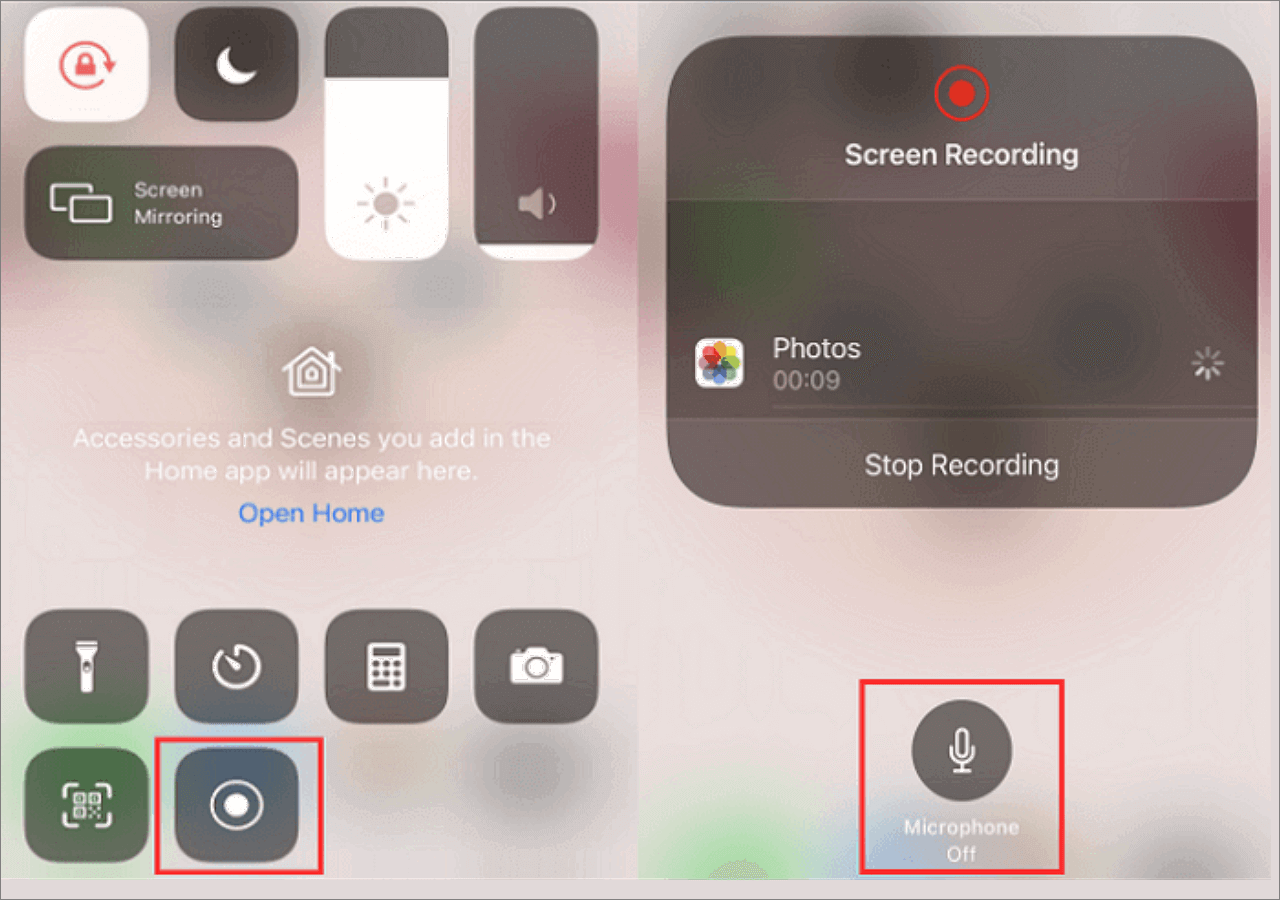
For iOS Devices:
- Open Control Center (swipe down/up).
- Long-press "Screen Recording" and enable the microphone if needed.
- Start recording and launch Minecraft Bedrock.
- Tap the red bar and stop when finished.
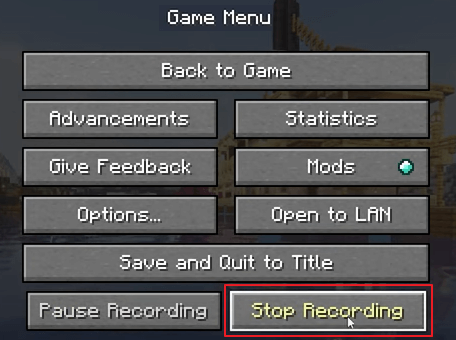
How to Record Minecraft Timelapse
If you play Java, you can record a Minecraft timelapse with Replay Mod. This also helps you record Minecraft in 3rd person. One thing to note is that the ReplayMod for Minecraft 1.14 and above requires installing Fabric, whereas for Minecraft 1.12.2 and below, it requires Minecraft Forge. Moreover, you need to download the latest FFmpeg release from https://www.gyan.dev/ffmpeg/builds/ffmpeg-release-essentials.zip.
How to Record Minecraft Java timelapse:
Step 1. Install whatever you need, Fabric(or Minecraft Forge), and FFmpeg.
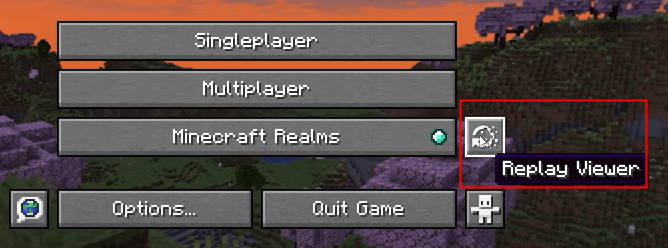
Step 2. After installation, open Minecraft, go to the "Replay Viewer," and click the three-line sign in the top right.
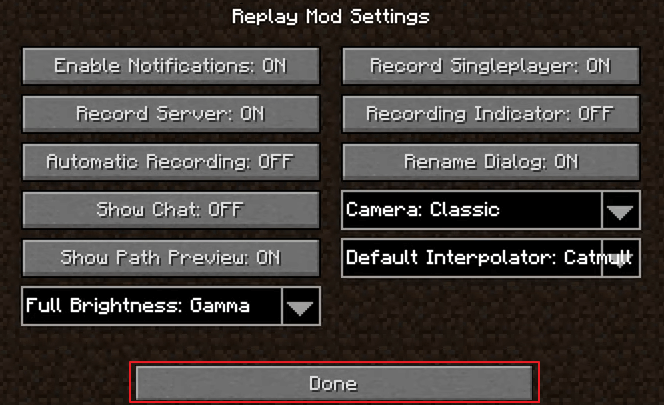
Step 3. Then, you will be led to the "Replay Mode Settings" page. Here, you can turn the "Automatic Recording" option on or off and change other settings as you like. After that, click "Done" to save the settings and go to one of your worlds.
Step 4. After that, hit "Escape" and click "Start Recording" to begin.
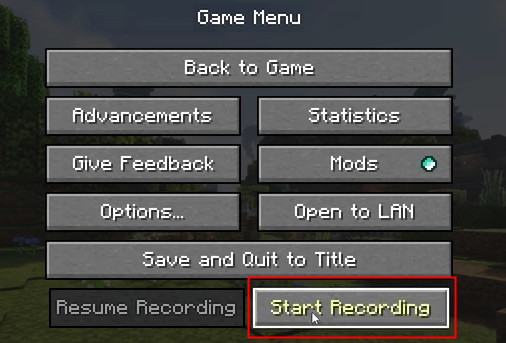
Step 5. When you want to finish, click "Escape" again and choose the "Stop Recording" option. You can see your recordings in the "Replay Viewer".
Don't forget to share this guide with others in need!
Best Free Minecraft Screen Recorder [With How-to Guide]
Apart from the Minecraft screen recorder we mentioned above, there are other effective free Minecraft recording software options. You can choose one recorder to help you film Minecraft.
#1. Record Video in Minecraft using Bandicam
This lightweight Minecraft recording software works perfectly on Windows and delivers high-quality results for all video recordings. You can also make a customized selection to record any particular area on a device's screen. Bandicam supports game recording at a higher compression ratio, and the content quality remains nearly equivalent to the original work.
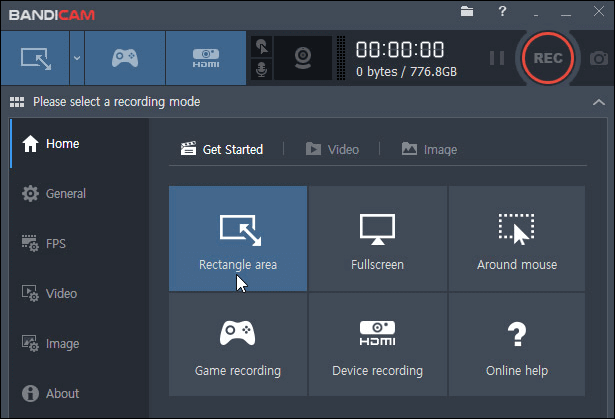
How to Record on Minecraft with Bandicam:
Step 1. Choose the "Game Recording" mode to record in high quality. Then, run Minecraft on your device.
Step 2. Make adjustments to the frame rate using the "FPS" tab displayed on your device screen.
Step 3. Hit the "F12" button on the keyboard or press the "Record" button to initiate the recording process. During recording, the numbers displayed in green will turn red.
Step 4. If you want to stop recording, press the "F12" key on the keyboard again, or click the "Record" button again. The software will save your recorded video on your computer, and you can post it on YouTube.
#2. Screen Record Minecraft using Icecream Screen Recorder
Since game recording is a complex, resource-intensive process, you need a reliable game recorder to help. Icecream Screen Recorder has a standalone Game Capture mode for recording PC gameplay, and using it as game recording software is extremely easy. Follow the steps of recording Minecraft with Icecream Screen Recorder.
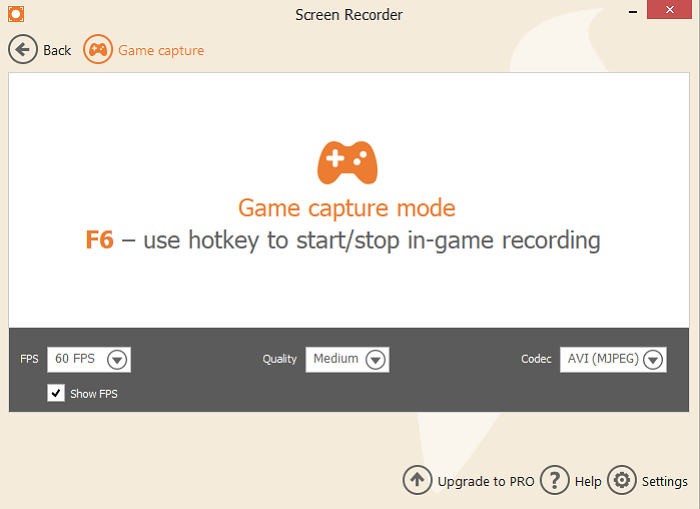
How to Record in Minecraft with Icecream Screen Recorder:
Step 1. Download Icecream Screen Recorder from the official website. Launch it as soon as it is installed.
Step 2. Go to the "Audio" tab in the "Settings" panel of the game recorder and check the "Record audio" option. You can also enable the "Record microphone" option to record your voice.
Step 3. Launch the game you want to record in full screen on your PC and press the "F6" hotkey button to start the recording session. As soon as you are done with the recording, click the "F6" button again to stop the game capture.
Step 4. Click the "Save" button to save the recorded videos on your computer. After that, you may share the video on YouTube or other social media platforms.
Record Minecraft Videos in High-Quality Tips
Follow these steps, and you'll get a sharp, smooth Minecraft video that's ready for YouTube or TikTok without maxing out your CPU.
Step 1: Optimize Minecraft First (Stability Comes Before Recording)
Before opening any recording software, Minecraft itself needs to run smoothly and consistently.
Most recording lag doesn't come from the recorder; it comes from unstable in-game performance. It's essential to stabilize 60+ FPS before recording.
Recommended Minecraft Video Settings
- Display Mode: Fullscreen
- Resolution: Match your monitor (usually 1920×1080)
- Render Distance: 8–10 chunks
- Graphics: Fancy
- Particles: Minimal
- FOV: 90 (more cinematic without distortion)
Step 2: Adjust Performance Settings to Prevent Stuttering
Even with good visuals, poor performance settings can cause frame pacing issues during recording. Unlocked FPS and a higher frame cap prevent frame spikes that can cause stuttering in recordings.
Performance Settings to Use
- VSync: Off
- Max Framerate: 120–144 FPS
- Smooth Lighting: Maximum
Step 3: Prepare Your System (Avoid CPU Overload)
A clean system environment is critical. Background apps silently steal CPU and disk speed, which hurts recording quality.
System Checklist Before Recording
- Update your GPU drivers
- Close unnecessary apps and browser tabs
- Allocate 4–6 GB RAM to Minecraft
- Save recordings to an SSD (not an external HDD)
- Use a wired keyboard and mouse
- Laptop users: Plug in power and enable High Performance mode
Step 4: Optional Visual Upgrades (Only If FPS Is Stable)
If your game still runs above 60 FPS after all previous steps, you can safely improve visual quality. Medium shaders with minimal particle effects deliver cinematic visuals without significant performance loss.
Shader & Texture Pack Suggestions
- Shaders: BSL or Sildur’s Vibrant (Medium preset)
- Texture Packs: 128× resolution
- Shader tweaks:
⭐Particles: Minimal
⭐Disable Motion Blur
⭐Disable Depth of Field
Don't forget to share this guide with others in need!
Conclusion
In a word, if you want to record Minecraft on PC, you need a game recorder. This post shows you how to record Minecraft videos on PC with the best Minecraft video recorder. EaseUS RecExperts is undoubtedly the best recording software for Minecraft on Windows and Mac among all the recorders we mentioned.
How to Record in Minecraft FAQs
There are some frequently asked questions about recording Minecraft videos. If you need to learn more about this topic, those answers may be helpful.
1. How do I fix the black screen problem when recording Minecraft?
This is a common issue caused by incorrect capture settings. Try switching your recording software to "Game Capture" mode (especially in OBS). Also, running Minecraft in windowed or borderless window mode instead of full screen can help.
2. Does Minecraft have a built-in recorder?
Although Minecraft doesn't offer you a built-in gameplay recorder, you can use the Xbox Gamebar to record your Minecraft videos. This built-in tool provided by the Windows system helps you capture the game easily. You only need to search for it in the Windows search box and launch it to use it.
3. Why is my Minecraft recording laggy or choppy?
Lag usually happens if your PC is overloaded. Close other apps, lower Minecraft's graphics settings, and choose a lower resolution or frame rate for recording.
4. How to record a video of Minecraft?
You can record Minecraft videos with a professional game recorder like EaseUS RecExperts. With it, you can easily rip 1080p/4K 60 fps video from Minecraft Java or Bedrock Edition. It supports one-click recording (F9 by default).