-
![]()
Daisy
Daisy is the Senior editor of the writing team for EaseUS. She has been working in EaseUS for over ten years, starting from a technical writer to a team leader of the content group. As a professional author for over 10 years, she writes a lot to help people overcome their tech troubles.…Read full bio -
Jane is an experienced editor for EaseUS focused on tech blog writing. Familiar with all kinds of video editing and screen recording software on the market, she specializes in composing posts about recording and editing videos. All the topics she chooses …Read full bio
-
![]()
Alin
Alin is an experienced technical blog writing editor. She knows the information about screen recording software on the market, and is also familiar with data cloning and data backup software. She is expert in writing posts about these products, aiming at providing users with effective solutions.…Read full bio -
Jean is recognized as one of the most professional writers in EaseUS. She has kept improving her writing skills over the past 10 years and helped millions of her readers solve their tech problems on PC, Mac, and iOS devices.…Read full bio
-
![]()
Jerry
Jerry is a fan of science and technology, aiming to make readers' tech life easy and enjoyable. He loves exploring new technologies and writing technical how-to tips. All the topics he chooses aim to offer users more instructive information.…Read full bio -
![]()
Rel
Rel has always maintained a strong curiosity about the computer field and is committed to the research of the most efficient and practical computer problem solutions.…Read full bio -
![]()
Gemma
Gemma is member of EaseUS team and has been committed to creating valuable content in fields about file recovery, partition management, and data backup etc. for many years. She loves to help users solve various types of computer related issues.…Read full bio -
![]()
Shelly
"I hope my articles can help solve your technical problems. If you are interested in other articles, you can check the articles at the bottom of this page. Similarly, you can also check my Twitter to get additional help."…Read full bio
Page Table of Contents
Jean
Updated on Jun 09, 2026
0 Views |
0 min read
For students, educators, families, and small business owners, the MacBook Neo offers an affordable ($599+) way into the Apple ecosystem. But for those new to macOS, screen recording, especially with internal audio, can be confusing.
Therefore, this article provides two tested ways to help users to screen record on MacBook Neo:
- macOS built-in tools: Command + Shift + 5 and QuickTime Player are two native options which handle screen capture, webcam, and microphone recording, but don't support system audio.
- EaseUS RecExperts: this is a reliable third-party screen recorder that can capture both screen and internal sound without extra setup.
How to Screen Record on MacBook Neo with Built-in Recorder
If you prefer not to install anything, macOS already gives you two built-in options: the Command + Shift + 5 shortcut and QuickTime Player. Both are great for quick Mac screenshot screen recordings, simple tutorials, or capturing webcam and microphone input. Just keep in mind: they don't record internal system audio. For example, recording streaming audio on Mac with this method is infeasible.
How to record the screen on a MacBook Neo:
Step 1. Open the screen recording utility on MacBook Neo.
You have two ways to open the recording interface:
- Option 1: Press Command + Shift + 5 together. This shortcut brings the screen capture overlay automatically.
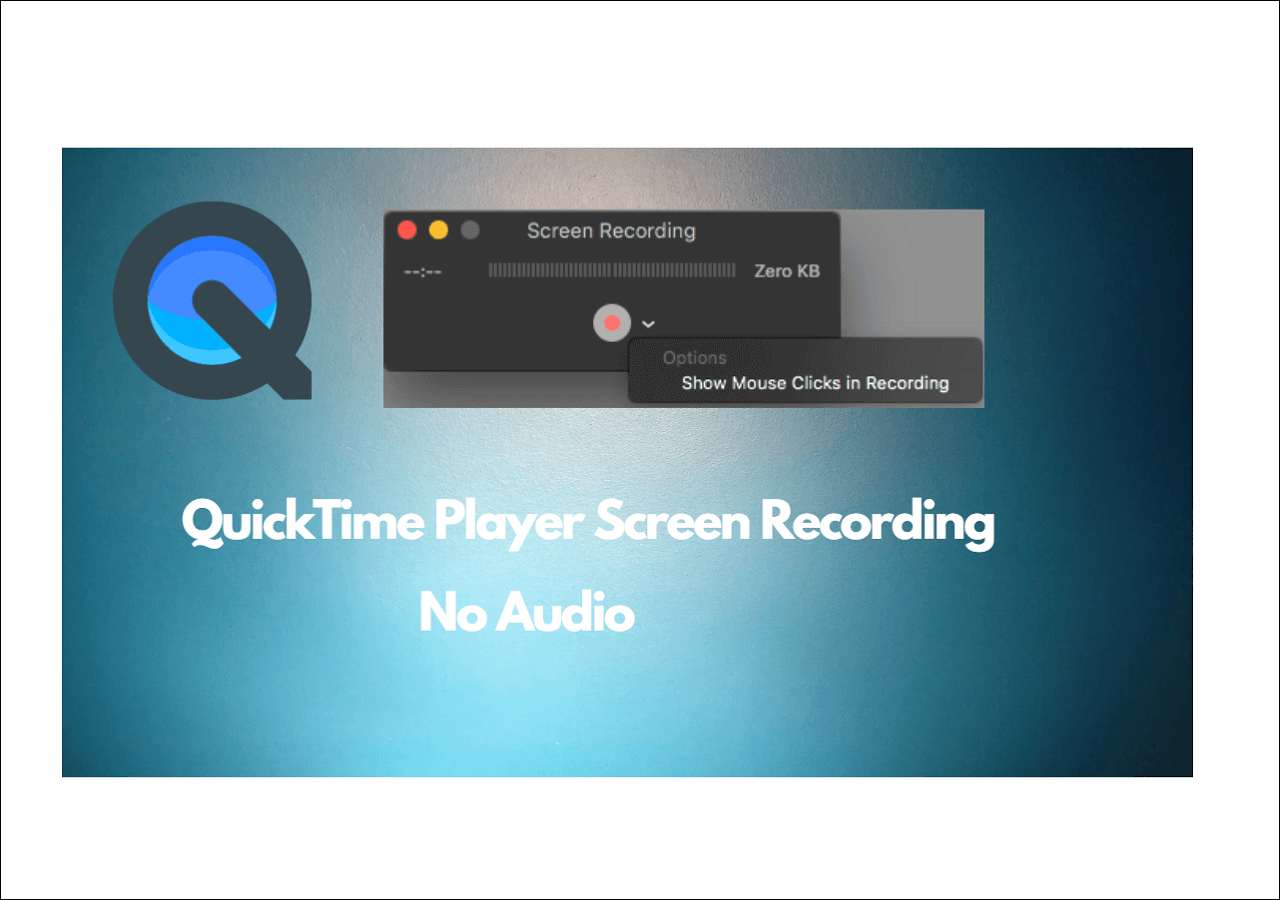
- Option 2: Search for QuickTime Player, open it, and click File > New Screen Recording.
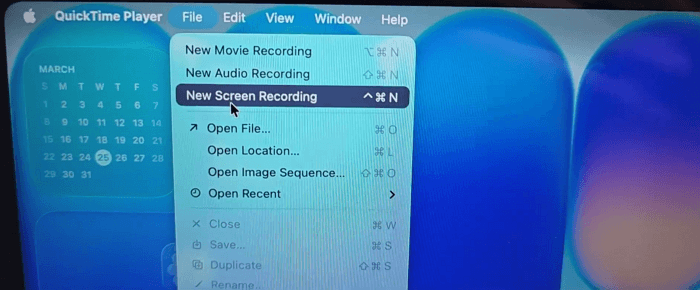
Step 2. Choose a recording mode.
There are three recording modes, and each serves a different purpose:
- Record Entire Screen: it captures the whole screen
- Record Selected Window: it captures a single window
- Record Selected Portion: it captures a selected area of the screen

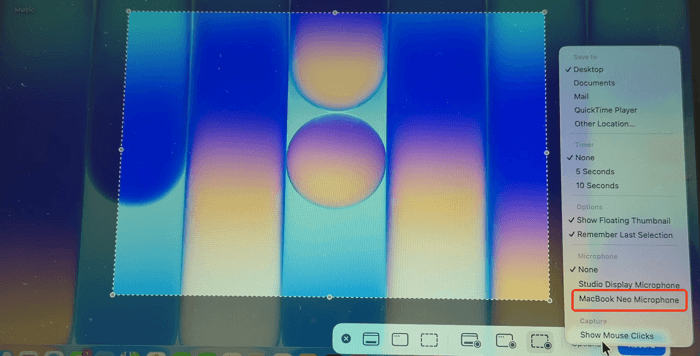
Step 3. Adjust settings before recording.
Click Options, then select the microphone to record audio and choose where to save the file. Your recording will be saved automatically to your desktop by default.
Step 4. Start recording on MacBook Neo.
Hit the recording button to begin.
Step 5. Stop recording.
It's tricky to stop screen recording on Mac with QuickTime. Click the stop icon at the top of the screen to finish.

- Tips & Tricks
-
1. No system audio: Both methods only record your microphone, not internal sound
2. Use shortcuts: Press Command + Control + Esc to stop recording quickly
3. Check mic input: Make sure the correct microphone is selected before recording
4. Trim instantly: After recording, you can quickly trim the video in QuickTime
5. Keep it simple: These tools are best for quick recordings, not advanced setups
Share this post to help more MacBool Neo users!

How to Screen Record on MacBook Neo with Internal Audio
As mentioned above, macOS built-in tools are fine for basic recording, but they fall short when it comes to recording internal audio on Mac. If you've ever tried to record a YouTube video, an online class, or a game and ended up with no sound, you've already run into this limitation.
This is where a more complete solution comes in. Tools like EaseUS RecExperts are designed to fill that exact gap. Instead of relying on system workarounds or extra plugins, it gives you a straightforward way to record both screen and internal audio at the same time, which is what most users actually need.
How to record screen with internal audio on MacBook Neo:
Step 1. Run EaseUS RecExperts on your device and you will see two recording modes. You can choose "Full Screen"to record the whole screen or choose "Region" to select the recording area manually before recording.

Step 2. After that, you can choose to record the webcam, system sound, microphone or record none of them as you like. You can also set auto split, auto recording with various functions on the interface.
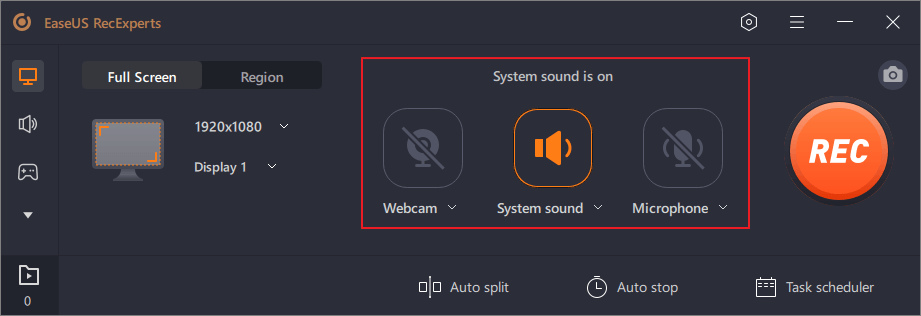
Step 3. Then, you can click the red "REC" button to start recording. Here will be a menu bar on your screen. To pause the recording, click on the white double vertical bar; to end the recording, click on the red square sign.
Step 4. After recording, you will be led to the list interface. Here you can view or edit your recordings. To start a new recording, just click on the "REC" button on the top of the interface.

Conclusion
On MacBook Neo, you basically have two ways to handle screen recording. The built-in options, Command + Shift + 5 and QuickTime Player, are great for quick, simple recordings, especially when you only need the screen and microphone.
But if your work involves system audio, such as online videos, meetings, or gameplay, a third-party tool like EaseUS RecExperts is the more practical choice because it can capture both screen and internal sound without extra setup.
In short: use macOS built-in tools for basic, everyday recording, and switch to a dedicated recorder when audio matters.
Screen Record on MacBook Neo FAQs
1. Can I screen record on MacBook Neo for free?
Yes. macOS already includes free built-in tools like Command + Shift + 5 and QuickTime Player, which let you record your screen without installing anything.
2. Why is there no sound when I screen record on Mac?
By default, macOS only records microphone audio, not internal system sound. That's why videos or apps playing sound won't be captured unless you use a third-party solution.
3. How do I record screen with internal audio on MacBook Neo?
To record system sound, you'll need a tool that supports internal audio capture, such as EaseUS RecExperts. It allows you to record both screen and system audio together without complicated setup.
4. What is the easiest way to start screen recording on Mac?
The fastest method is pressing Command + Shift + 5, then selecting either full screen or a portion of your screen and clicking record.
5. Is QuickTime Player good for screen recording?
Yes, QuickTime Player is useful for basic recording and gives slightly more control than the shortcut tool, but it still does not support internal system audio.