-
![]()
Daisy
Daisy is the Senior editor of the writing team for EaseUS. She has been working in EaseUS for over ten years, starting from a technical writer to a team leader of the content group. As a professional author for over 10 years, she writes a lot to help people overcome their tech troubles.…Read full bio -
Jane is an experienced editor for EaseUS focused on tech blog writing. Familiar with all kinds of video editing and screen recording software on the market, she specializes in composing posts about recording and editing videos. All the topics she chooses …Read full bio
-
![]()
Alin
Alin is an experienced technical blog writing editor. She knows the information about screen recording software on the market, and is also familiar with data cloning and data backup software. She is expert in writing posts about these products, aiming at providing users with effective solutions.…Read full bio -
Jean is recognized as one of the most professional writers in EaseUS. She has kept improving her writing skills over the past 10 years and helped millions of her readers solve their tech problems on PC, Mac, and iOS devices.…Read full bio
-
![]()
Jerry
Jerry is a fan of science and technology, aiming to make readers' tech life easy and enjoyable. He loves exploring new technologies and writing technical how-to tips. All the topics he chooses aim to offer users more instructive information.…Read full bio -
![]()
Rel
Rel has always maintained a strong curiosity about the computer field and is committed to the research of the most efficient and practical computer problem solutions.…Read full bio -
![]()
Gemma
Gemma is member of EaseUS team and has been committed to creating valuable content in fields about file recovery, partition management, and data backup etc. for many years. She loves to help users solve various types of computer related issues.…Read full bio -
![]()
Shelly
"I hope my articles can help solve your technical problems. If you are interested in other articles, you can check the articles at the bottom of this page. Similarly, you can also check my Twitter to get additional help."…Read full bio
Page Table of Contents
Jane Zhou
Updated on Jun 09, 2026
0 Views |
0 min read
With YouTube growing as a major platform for music, podcasts, and educational content, many users wonder how to save music from YouTube for offline use, especially on Mac. While macOS makes it tricky due to system audio restrictions, there are reliable ways to get the job done.
In this guide, we'll show you how to record audio on Mac from YouTube, with or without third-party tools. Whether you're looking to save songs, rip podcast audio, or just enjoy your favorite YouTube soundtracks offline, we've got you covered.
|
Tool |
Direct System Audio Recording |
Audio Quality |
Ease of Use |
|
✅ |
High-quality, lossless options |
Very easy, intuitive |
|
|
❌ need BlackHole setup |
High, clean audio |
Moderate, setup virtual device required |
|
|
❌ need virtual audio device |
High, supports editing |
Moderate, needs routing setup |
|
|
✅ |
Very high |
Moderate to complex, geared for streaming |
Method 1. Record Audio from YouTube on Mac Directly with EaseUS RecExperts
👍Best for: Anyone looking for a beginner-friendly, one-click solution to record YouTube audio on Mac without messing with drivers or settings.
Generally speaking, macOS restricts direct access to internal audio due to privacy and security features. This means Mac apps can't natively screen record Mac with internal audio (like YouTube) unless you use specialized software or a virtual audio driver like BlackHole.
Luckily, EaseUS RecExperts for Mac is an all-in-one screen and audio recording software that directly and effortlessly captures system sound, including YouTube audio. Unlike traditional tools like QuickTime or Audacity, which require additional setup to capture internal audio, EaseUS RecExperts handles it natively.
⭐Key Features:
- Directly records internal Mac audio (YouTube, Spotify, etc.)
- Support MP3, AAC, WAV, and more
- Schedule YouTube audio recording
- Built-in trimming and editing tools
- Record audio + screen simultaneously or separately
🚩How to record audio on Mac from YouTube with EaseUS audio recorder:
Step 1. Launch EaseUS RecExperts on your computer, and click "Audio" (looks like a speaker) on the left side of the main interface.
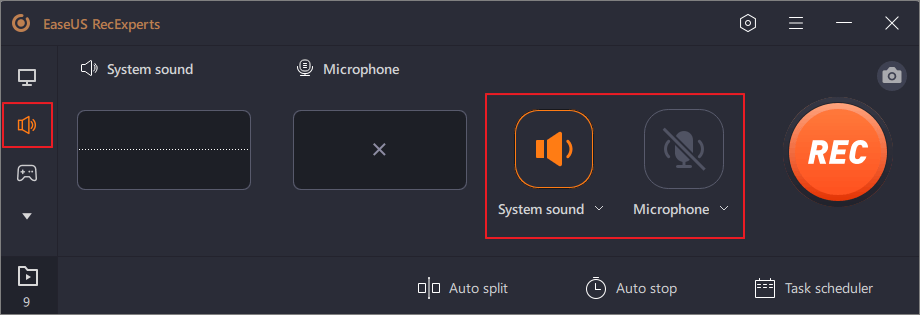
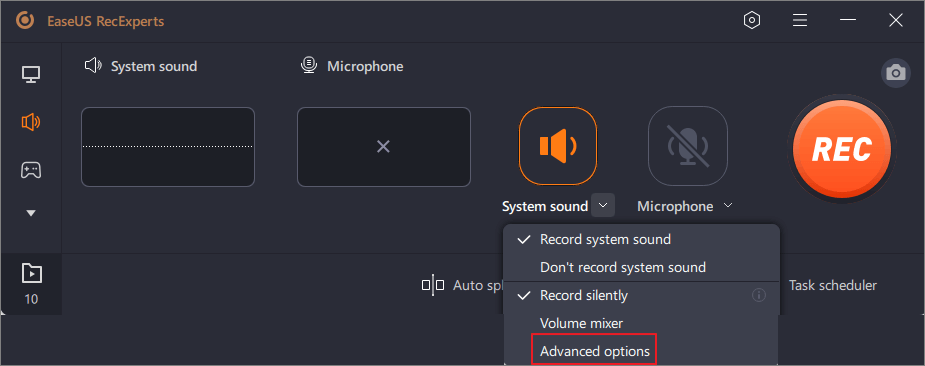
Step 2. To record the internal audio, you need to select the "System sound" option on the next window. You can adjust the volume by clicking on "System sound" > "Advanced options".
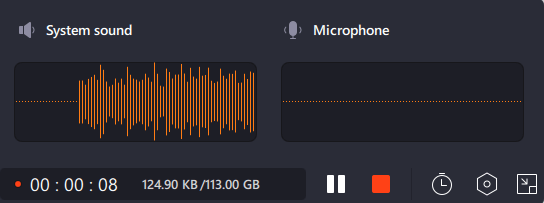
Step 3. Next, click on the red "REC" button to begin your recording. While recording, you can pause or stop the recording by clicking on the according buttons.
Step 4. Once done, you can find the recordings in the pop-up recording list window.

🚩Watch a video tutorial on how to record sound from YouTube on Mac.
Share this post about how to record audio from YouTube Mac!

Method 2. Capture Internal Sound on Mac with QuickTime and BlackHole
👍Best for: Users who prefer free built-in Mac tools and don't mind installing a virtual audio driver.
QuickTime Player, pre-installed on every Mac, is a basic but reliable tool for audio recording. However, it can't record internal system sound on its own.
To capture YouTube audio playing on your Mac, you need to pair QuickTime with BlackHole screen recording, a virtual audio driver that routes system sound to QuickTime's input.
🚩How to record audio on Mac from YouTube with QuickTime Player:
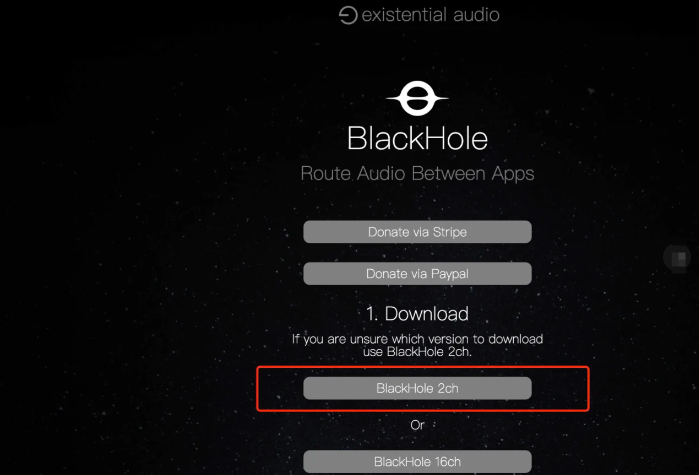
Step 1. Download and install BlackHole from Existential Audio. The BlackHole 2ch version is a universal choice.
Step 2. Configure BlackHole in the Audio MIDI Setup on your Mac: Finder > Applications > Utilities > Audio MIDI Setup.
Step 3. Create a device to let Mac record audio from system or microphone if needed.
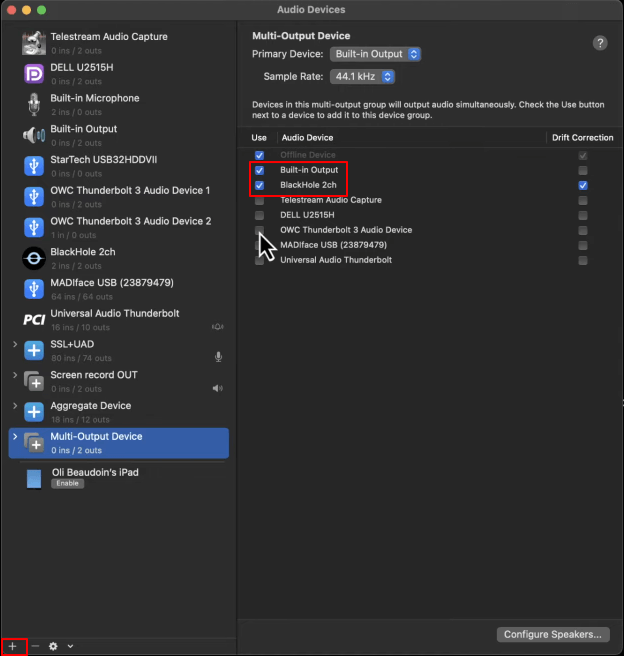
- For system audio capture: Click + at the bottom left > select Multi-Output Device > check Built-in Output (or Mac Speakers) and BlackHole 2ch.
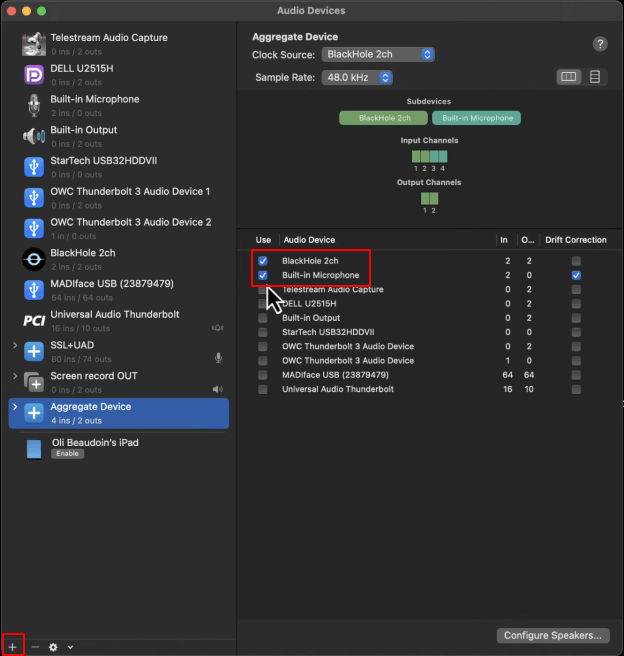
- For mic sound capture: Click + at the bottom left > select Create Aggregate Device > check Built-in Microphone and BlackHole 2ch.
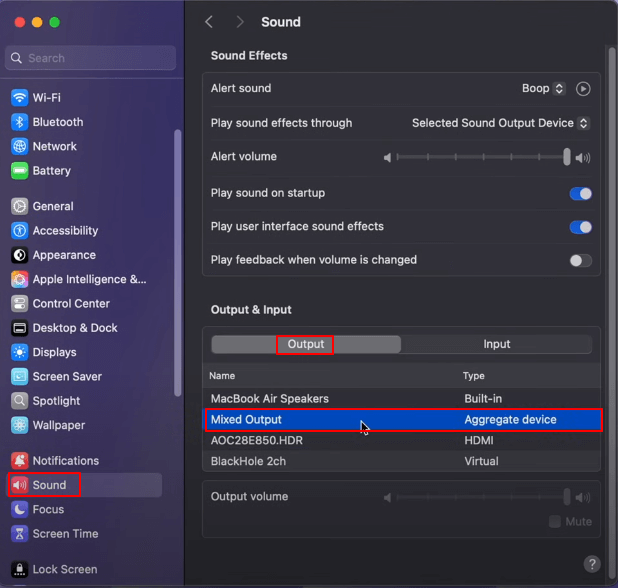
Step 4. Navigate to System Preferences > Sound > Output, and select the Multi-Output Device.
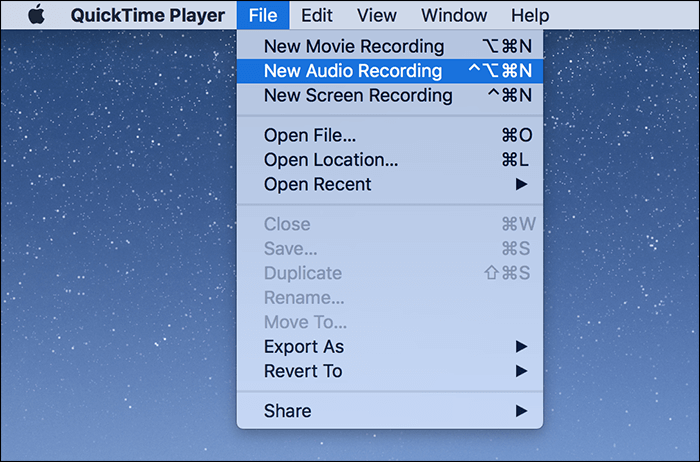
Step 5. Open QuickTime Player, then click File > New Audio Recording.
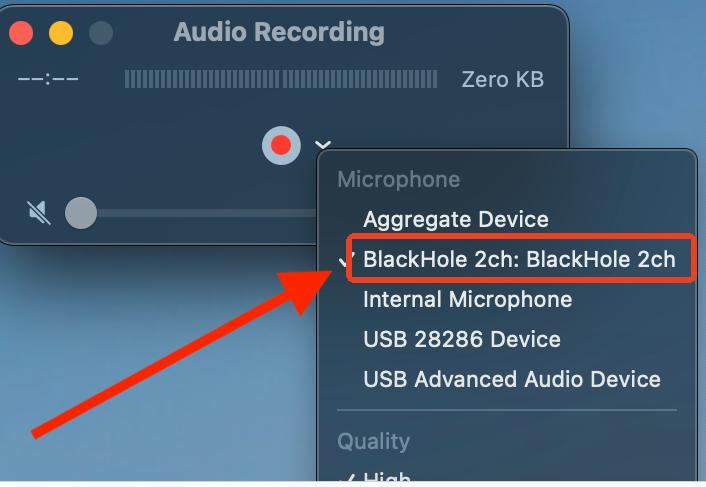
Step 6. When the recording panel appears, hit the down arrow to the right of the record button, and choose BlackHole (2ch) as your audio source.
Step 7. Play the YouTube music or video you want to rip audio from and click the Record button to trigger your YouTube audio recording.
✅ Pros
- Completely free solution
- No additional software (except BlackHole)
- Clean and lightweight
- No watermark or time limit
❌ Cons
- Requires complex setup in Audio MIDI settings
- No editing or advanced audio controls
- Can't record both mic and system sound easily
Share this post about how to record audio from YouTube Mac!
Method 3. How to Record Audio from YouTube on Mac in High Quality with Audacity
👍Best for: Power users who want full control over recording and editing.
As an open-source audio recorder, Audacity is one of the most powerful free audio tools available, popular for its editing capabilities.
On macOS, however, Audacity cannot record internal audio unless you pair it with BlackHole, Soundflower, or other virtual audio drivers. Then, you can unlock the ability to capture YouTube audio playing on your Mac.
Tutorial - Recording Computer Playback on Mac --- Audaicty Forum
🚩How to save YouTube audio to Mac using Audacity:
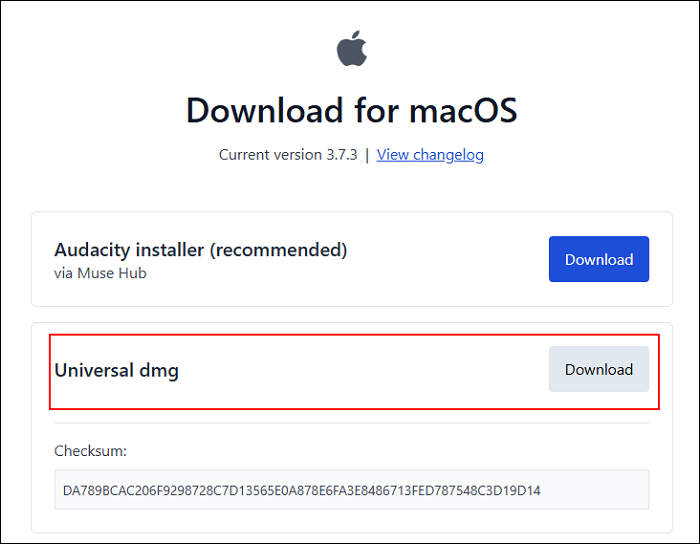
Step 1. Download Audacity Mac version from audacityteam.org. You can download the Universal dmg. Once downloaded, follow the in-screen instructions to drag Audacity into your Mac's Applications folder.
Step 2. Download BlackHole or Soundflower audio loopback driver on your Mac.
Step 3. Go to Audio MIDI Setup and create a Multi-Output Device (Built-in Output or Mac Speakers + BlackHole) for system audio capture.
- Tip: If needed, create an Aggreagate Device (Built-in Microphone and BlackHole 2ch) for mic sound capture.
Step 4. Go to System Preferences > Sound > Output, and set Multi-Output Device as your output.
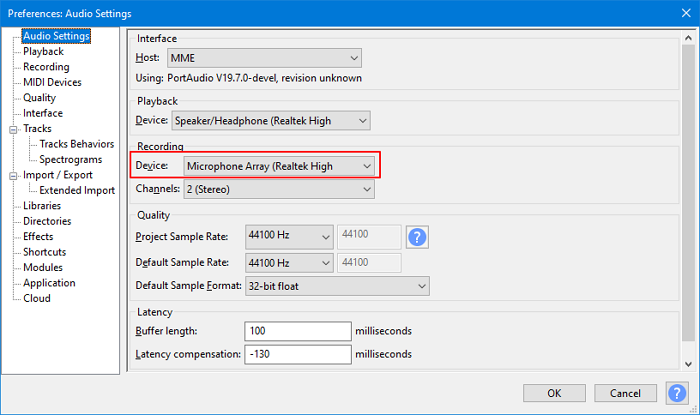
Step 5. Open Audacity > Preferences > Devices > set Recording to BlackHole 2ch.
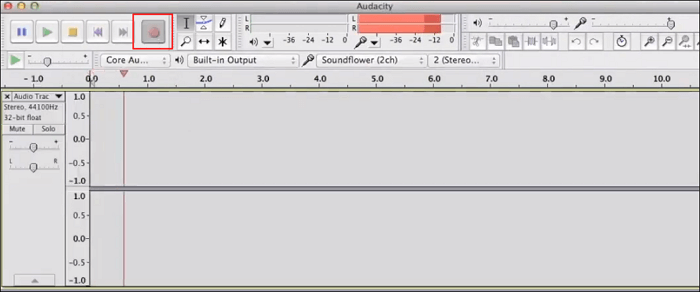
Step 6. Play the YouTube video and hit Record (red dot) in Audacity.
Step 7. Click Stop when done. Edit and export your audio.
✅ Pros
- 100% free and open source
- Advanced editing features
- High-quality audio export
- Great for post-processing YouTube sound
❌ Cons
- Can't record internal audio natively
- Requires initial setup with BlackHole, Soundflower, or other plugins
- Interface is complex for beginners
Share this post about how to record audio from YouTube Mac!
Method 4. How to Record YouTube Audio Only on Mac with OBS Studio
👍Best for: Tech-savvy users who want complete control over audio sources or need to capture high-quality system sound from YouTube.
Many people know OBS Studio as an open source screen recorder and streaming tool, but it can also record only desktop or application audio. When set up this way, the screen remains black, yet the audio is captured and saved in MOV format, making it a powerful option for recording YouTube audio on Mac.
🚩Here is how to record internal audio on Mac using OBS:
Step 1. Download and install the latest version of OBS Studio for Mac.
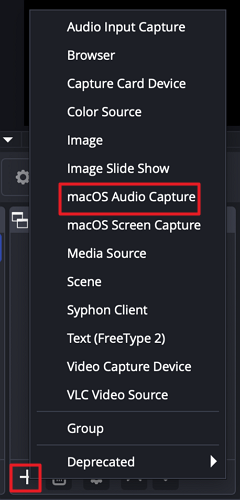
Step 2. Open OBS, click the + under Sources, and select macOS Audio Capture.
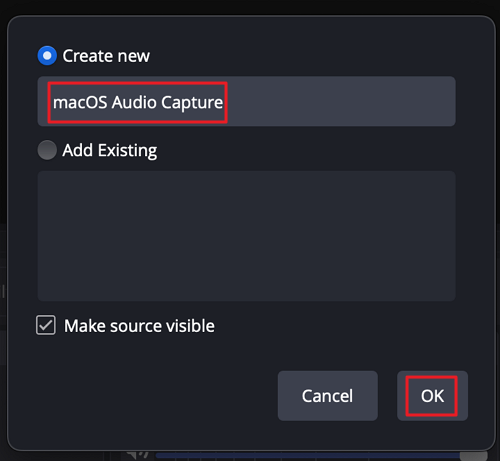
Step 3. Click Create New > OK.
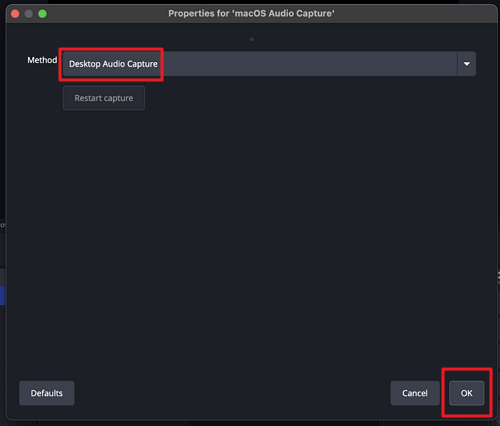
Step 4. Choose the audio device you want to record (e.g., Desktop Audio Capture) and click OK.
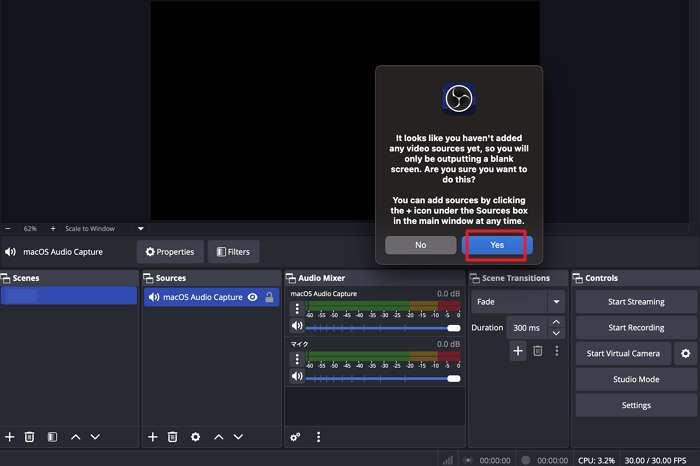
Step 5. Click Yes to confirm. If you need to capture the screen, also add a Source of macOS Screen Capture.
Step 6. Click Start Recording and play your YouTube audio.
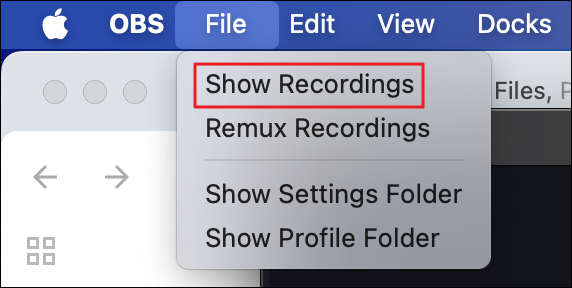
Step 7. When finished, click Stop Recording. Then, click File > Show Recordings to preview the MOV file.
Share this post about how to record audio from YouTube Mac!
Further Reading: Is It Legal to Record YouTube Audio on Mac?
Is recording YouTube audio legal? Short answer: It depends.
Recording YouTube content for personal use (like offline listening or education) often falls into a gray area and may be tolerated. But downloading, sharing, or monetizing copyrighted audio without permission violates YouTube's Terms of Service and can lead to legal consequences.
Recording responsibly respects creators' rights and keeps you legally protected.
👉To stay safe:
- Only record royalty-free or Creative Commons content
- Get permission from the original creator
- Avoid re-uploading or monetizing recorded material
Share this post about how to record audio from YouTube Mac!
Final Thought
As you can, it's possible and easy to record YouTube audio on Mac with the right tools.
If you have a low budget and don't mind taking the trouble to install other plugins, you can use QuickTime Player or Audacity to save YouTube music on your Mac.
But if you want an easy and one-to-stop solution, EaseUS RecExperts is your destination. This program lets you capture any audio coming from your Mac in high quality with a few simple clicks!
Record YouTube Audio on Mac FAQs
1. Can I record streaming audio on my Mac?
Yes, you can record streaming audio on your Mac, as long as you have the right streaming audio recorders, like EaseUS RecExperts, Movavi screen recorder, and more. Get one of them, and follow the on-screen instruction to use it.
2. How do I record YouTube videos on my Mac for free?
You can use the built-in Mac screen recorder - QuickTime Player to finish the task:
- Launch QuickTime Player
- Click File > New Screen Recording, then choose the recording region
- Click Record button
3. How to record YouTube audio on Mac with GarageBand?
GarageBand supports capturing audio from your microphone or other instruments connected to your Mac directly. As for recording YouTube audio, it actually cannot get the task done directly.
If you want to use GarageBand, you can first download the YouTube videos on your Mac locally, then extract the audio track from the YouTube video. That's it.
4. How to extract audio from YouTube video on iPhone?
You can use a file manager app like Documents by Readdle. Paste the video URL in its browser, use an online converter, and save the audio. Reminder: Only use for personal, non-commercial purposes.
5. How to record audio on Mac from internet?
Yes. Apps like EaseUS RecExperts can record internal system sound, whether it's from YouTube, Spotify, online radio, or streaming content without needing extra drivers.
Share this post about how to record audio from YouTube Mac!