-
![]()
Daisy
Daisy is the Senior editor of the writing team for EaseUS. She has been working in EaseUS for over ten years, starting from a technical writer to a team leader of the content group. As a professional author for over 10 years, she writes a lot to help people overcome their tech troubles.…Read full bio -
Jane is an experienced editor for EaseUS focused on tech blog writing. Familiar with all kinds of video editing and screen recording software on the market, she specializes in composing posts about recording and editing videos. All the topics she chooses …Read full bio
-
![]()
Alin
Alin is an experienced technical blog writing editor. She knows the information about screen recording software on the market, and is also familiar with data cloning and data backup software. She is expert in writing posts about these products, aiming at providing users with effective solutions.…Read full bio -
Jean is recognized as one of the most professional writers in EaseUS. She has kept improving her writing skills over the past 10 years and helped millions of her readers solve their tech problems on PC, Mac, and iOS devices.…Read full bio
-
![]()
Jerry
Jerry is a fan of science and technology, aiming to make readers' tech life easy and enjoyable. He loves exploring new technologies and writing technical how-to tips. All the topics he chooses aim to offer users more instructive information.…Read full bio -
![]()
Rel
Rel has always maintained a strong curiosity about the computer field and is committed to the research of the most efficient and practical computer problem solutions.…Read full bio -
![]()
Gemma
Gemma is member of EaseUS team and has been committed to creating valuable content in fields about file recovery, partition management, and data backup etc. for many years. She loves to help users solve various types of computer related issues.…Read full bio -
![]()
Shelly
"I hope my articles can help solve your technical problems. If you are interested in other articles, you can check the articles at the bottom of this page. Similarly, you can also check my Twitter to get additional help."…Read full bio
Page Table of Contents
Jean
Updated on Jun 09, 2026
0 Views |
0 min read
PAGE CONTENT:
- How to Add Screen Recording Button on iPhone
- How to Screen Record on iPhone 14
- Bonus Tip: Record Screen on Mac & Windows With EaseUS RecExperts
- How to Screen Record on iPhone 14 FAQs
The capability to capture and easily share activities occurring on our smartphone displays has evolved into an essential feature. Whether you're a tech-savvy enthusiast or a devoted gamer, mastering how to screen record on iPhone 14 is a valuable skill. With the most recent version of Apple's renowned smartphone, the iPhone 14, individuals can effortlessly record full screen. It takes the user experience to unparalleled heights.
Within this comprehensive, detailed guide, we will lead you through every step of the process. From enabling screen recording to mastering details like being able to record video with a virtual background, everything is included.
How to Add Screen Recording Button on iPhone
Before commencing the journey to record YouTube videos on your iPhone 14, you must first incorporate the screen recording button into your Control Center. Rest assured, this is a simple procedure. Given below are detailed steps on how to screen record on iPhone 14:
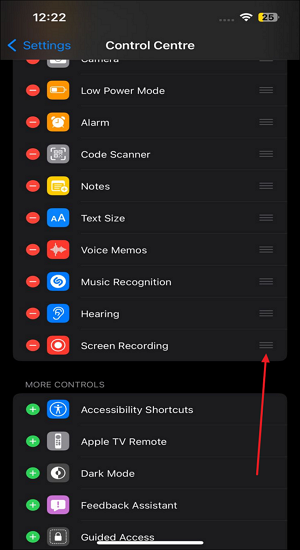
Step 1. First, initiate the process by opening the Settings menu on your iPhone 14 and scroll down until you locate the "Control Center" option. Once you've found it, tap it, and you'll see two distinct sections on the following screen: "Included Controls" and "More Controls."

Step 2. To be able to record audio from YouTube, move to "More Controls" and find "Screen Recording." Tap the green-colored "+" sign to add it to the "Included Controls."
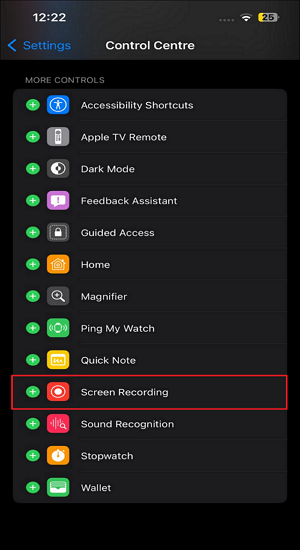
Step 3. Once added to the "Included Controls" section, use the three horizontal lines to move its location. You can move up and down to assign it any position.
Or you can choose to watch this YouTube Shorts video to learn how to fix this question.
You've now successfully added the screen recording button to your iPhone 14's Control Center. In the next part of our guide, we'll explore how to use this newly added feature to record your screen effectively and customize it using an internal audio recorder.
People Also Read:
How to Screen Record on iPhone 14
Now that you have the screen recording button in your Control Center let's delve into the process of actually using it to capture what's happening on your iPhone 14 screen. It's a straightforward process, and below are detailed steps on how to screen record on iPhone 14:
Step 1. To begin, your initial step is to access the Control Center. Achieve this by performing a downward swipe starting from the upper right corner of your iPhone 14. Once there, pinpoint the "Screen Recording" button you previously added in the last section.
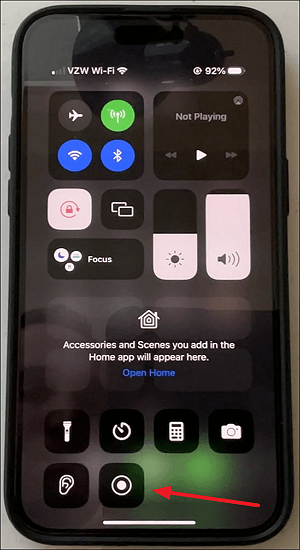
Step 2. Press this button to start recording your screen. After tapping, you'll see a three-second countdown to prepare your screen recording.
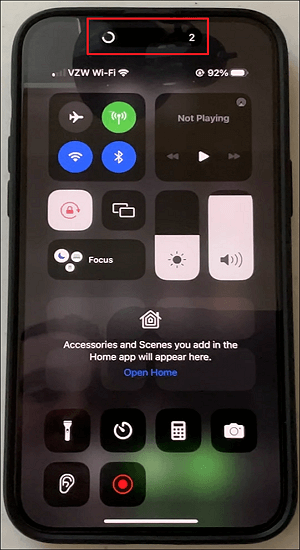
Step 3. After the countdown reaches zero, your iPhone 14 will initiate screen recording, capturing everything displayed on the screen. A conspicuous "Red" dot will be prominently displayed on the dynamic island, indicating the ongoing recording process. This status bar remains visible across all applications, ensuring you know when recording is underway.
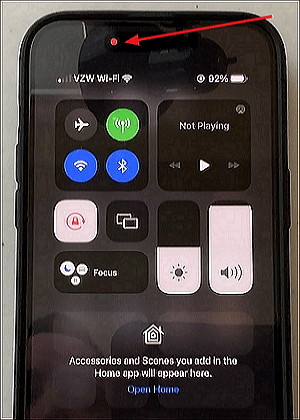
Step 4. When you're finished recording, tap on the "Red" indicator and select "Stop." Your screen recording will be saved to your Photos app automatically.

After mastering the art of screen recording on your iPhone 14, you now possess a potent capability to capture exactly what you desire. In the following section, we'll acquaint you with a robust screen recording solution for both PC and Mac platforms. With its help, you will be able to record anything on your computer, like record Steam game videos.
If you have any problems in the above steps, you can watch the video tutorial from YouTube.
Bonus Tip: Record Screen on Mac & Windows With EaseUS RecExperts
Before we conclude our guide on screen recording, here's a bonus tip that will elevate your screen recording capabilities to the next level. Want to know about the best free screen recorder? EaseUS RecExperts is a versatile screen recording software available for both Mac and Windows platforms. It has garnered acclaim from renowned tech evaluation websites like TechRadar and G2. You can also consider using an online screen recorder to help you record some videos.
EaseUS RecExperts is a feature-rich screen recording software that offers a seamless and user-friendly experience for capturing your screen activities. With its remarkable functionality and ease of use, it has earned a stellar reputation among users and tech experts alike for being an unlimited screen recorder.
Download EaseUS Screen Recorder
Download EaseUS Screen Recorder
Trustpilot Rating 4.7
- Review:
- "It is a very good screen recorder. It can record all kinds of videos, such as YouTube, Netflix, and other streaming media." – Kunal D.
🔖Key Features of EaseUS RecExperts
1. Highly Rated: EaseUS RecExperts boasts an impressive rating on various evaluation websites. TechRadar lauds its user-friendly interface, excellent recording quality, and diverse export options, giving it a high rating for its performance and versatility. Meanwhile, G2 users appreciate its robust feature set, ease of use, and reliable customer support.
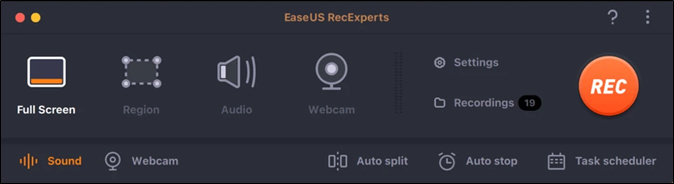
2. Versatility: EaseUS RecExperts goes beyond basic screen recording. It allows you to capture full-screen, specific windows, or custom regions. You can also record screen and webcam footage, system audio, and microphone input simultaneously.
3. Editing Tools: Following the recording process, you have the option to employ its integrated editing features. These are for tasks such as trimming, cutting, and enhancing your videos.
4. Export Options: This software provides numerous export choices, enabling you to store your recordings in various formats, such as MP4, AVI, and others. Additionally, it offers seamless integration for uploading your recordings directly to popular platforms like YouTube.
Ready to take your screen recording skills to the next level? Consider downloading EaseUS RecExperts today and experience its powerful features and intuitive interface for yourself. Known for its outstanding quality and intuitive design, it's the perfect partner for fulfilling all your screen recording requirements.
Thanks for your reading. You can share this post with others to let more people know about this excellent screen recorder!
Conclusion
In this comprehensive guide, we've covered the essential steps to help you master the art of how to screen record on iPhone 14. From adding the screen recording button to your Control Center to capturing and customizing your recordings, you're now equipped with the knowledge to record your digital experiences effortlessly.
Additionally, we introduced you to the powerful screen recording software EaseUS RecExperts, renowned for its versatility and user-friendly interface. When you choose to record on your computer, EaseUS RecExperts offers a seamless solution to enhance your screen recording endeavors. Now, let's download this software to have a try!
Download EaseUS Screen Recorder
Download EaseUS Screen Recorder
Trustpilot Rating 4.7
How to Screen Record on iPhone 14 FAQs
If you have more questions about how to screen record on iPhone 14, below are answers to some frequently asked questions to address common concerns.
1. Why can't I screen record on my new iPhone?
If you're having trouble initiating screen recording on your iPhone 14, ensure the screen recording feature is enabled in your Control Center. Additionally, if your device storage is nearly full, this might hinder screen recording. Clear some space on your iPhone to resolve this issue.
2. What are the best video recording settings for iPhone 14?
To get the perfect video, you need to define a few settings, which include switching to 4K resolution. Also, you should shoot at 24fps, turn off HDR settings, enable grid, and enable stabilization settings to record the finest quality video.
3. How do you screen record on an iPhone with sound?
To make use of your iPhone's screen and audio recorder capabilities, adhere to these instructions:
Step 1. Start by swiping downward from the top-right corner of your device to open the Control Center. Once you've done that, press and hold the recording button.
Step 2. A window will appear. From this window, select "Photos" and activate the microphone by tapping it. Now, tap "Start Recording" to commence screen recording with audio.