-
![]()
Daisy
Daisy is the Senior editor of the writing team for EaseUS. She has been working in EaseUS for over ten years, starting from a technical writer to a team leader of the content group. As a professional author for over 10 years, she writes a lot to help people overcome their tech troubles.…Read full bio -
Jane is an experienced editor for EaseUS focused on tech blog writing. Familiar with all kinds of video editing and screen recording software on the market, she specializes in composing posts about recording and editing videos. All the topics she chooses …Read full bio
-
![]()
Alin
Alin is an experienced technical blog writing editor. She knows the information about screen recording software on the market, and is also familiar with data cloning and data backup software. She is expert in writing posts about these products, aiming at providing users with effective solutions.…Read full bio -
Jean is recognized as one of the most professional writers in EaseUS. She has kept improving her writing skills over the past 10 years and helped millions of her readers solve their tech problems on PC, Mac, and iOS devices.…Read full bio
-
![]()
Jerry
Jerry is a fan of science and technology, aiming to make readers' tech life easy and enjoyable. He loves exploring new technologies and writing technical how-to tips. All the topics he chooses aim to offer users more instructive information.…Read full bio -
![]()
Rel
Rel has always maintained a strong curiosity about the computer field and is committed to the research of the most efficient and practical computer problem solutions.…Read full bio -
![]()
Gemma
Gemma is member of EaseUS team and has been committed to creating valuable content in fields about file recovery, partition management, and data backup etc. for many years. She loves to help users solve various types of computer related issues.…Read full bio -
![]()
Shelly
"I hope my articles can help solve your technical problems. If you are interested in other articles, you can check the articles at the bottom of this page. Similarly, you can also check my Twitter to get additional help."…Read full bio
Page Table of Contents
0 Views |
0 min read
Do you know where the game clips and screenshots go when you use the Xbox Game Bar recording on Windows 10 or 11 PC? Do you want to move this game footage to another location? This article explains everything about Xbox Game Bar file location so you can quickly find out.
Where Does Xbox Game Bar Save Videos?
As a free and built-in Windows screen recorder, the Xbox Game Bar is frequently used to record gameplay and other apps. However, many users don't know where Xbox game files are stored.
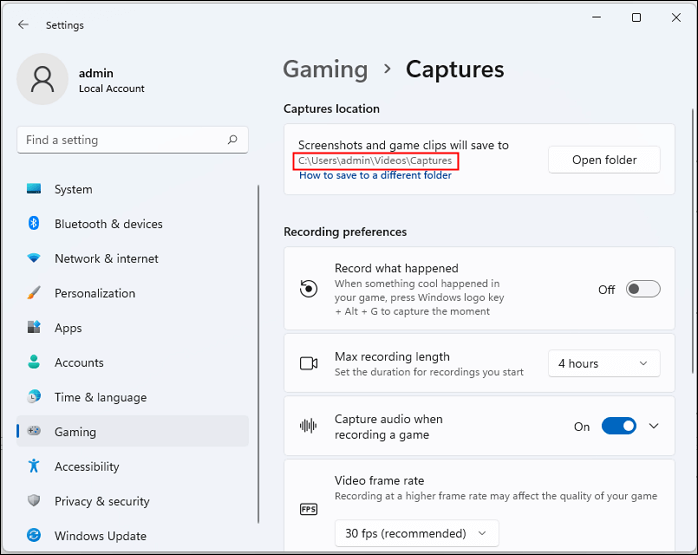
Actually, if you have not changed the file location, when you record gameplay on Xbox Series X, S, One, and others, all the Xbox recording videos and screenshots will be saved on C:\Users\username\Videos\Captures by default.
Go to Start > Settings > Gaming > Captures, and you will see the specific file location under Captures Location. You can click Open folder to see Xbox captures on pc.
- Tips
- If you record Xbox gameplay using Xbox One, you will see Game DVR instead of Captures.
- Specific steps may vary between different devices and versions.
Share this article on your social media to help more users!
How to Change File Location on Xbox Game Bar
Since all Xbox gaming clips are stored on the C drive, the longer you use Xbox to record videos or take screenshots, the larger the file folder size is. If this goes on, the memory on the C drive is used less and less, and it will slow down your computer.
To tackle the storage problem, the best solution is to move these Windows clips to another drive. However, you may find that you cannot change the storage location directly from the Xbox gaming console.
So, how to change the Xbox Game Bar file location? Use File Explorer to relocate the Captures/DVR folder anywhere on your computer. To do so:
Step 1. Go to This PC > Videos > Captures.

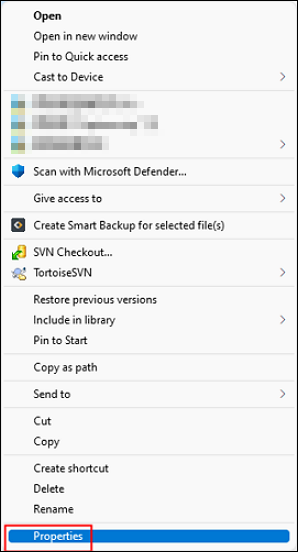
Step 2. Right-click on the Captures folder and click Properties.
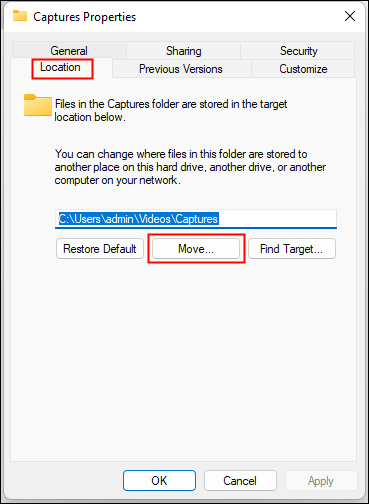
Step 3. Switch the tab to Location and click Move….
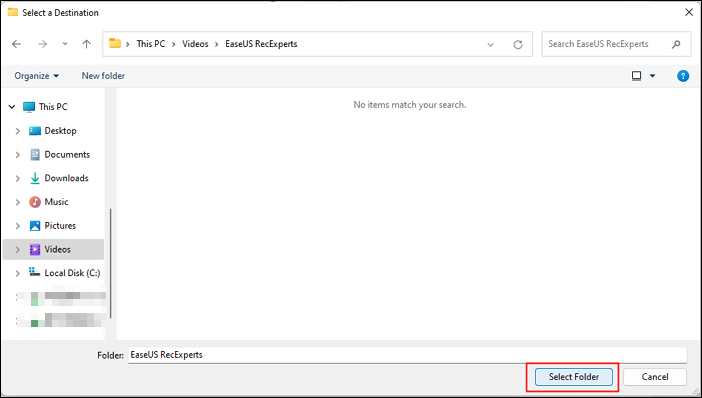
Step 4. Select a destination path and click Select Folder.
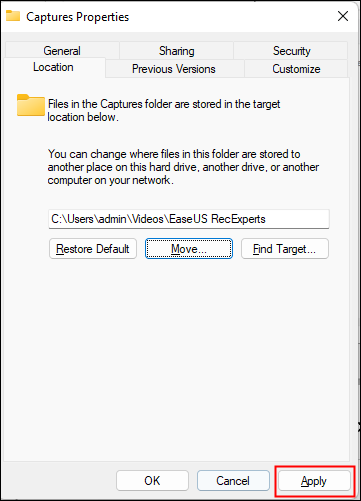
Step 5. You will come back to the Captures Properties window. In the window, click Apply.
Step 6. In the Move Folder popup, click Yes to confirm the change.
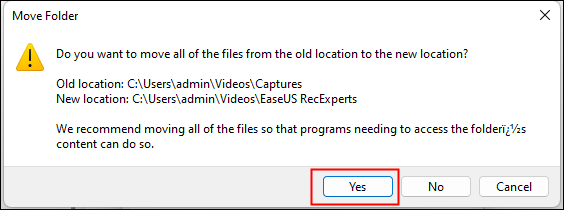
Game clips and screenshots will be saved automatically in the selected path, no matter where you place them.
Share this article on your social media to help more users!
The Best Screen Recording Alternative to Xbox Game Bar
However, after changing the Xbox Game Bar file location, some users report that all Xbox clips go to C:\Users\username\AppData\Local\Temp, and sometimes, the Xbox game bar not working.
You can use a Microsoft game bar alternative, EaseUS RecExperts. It also lets you clip on Xbox Series X, S, One, and 360 easily. You can change the Xbox capture location in the app directly and save Xbox clips wherever you want.
This versatile screen recording software has a Game Mode, which enables you to record game chat on Xbox, capture gameplay for unlimited hours, and even record yourself playing video games.
Download, install, and launch EaseUS RecExperts. Let's see how to record an Xbox screen with voice.
- ⭐Notice: In step 2, you can change the Xbox Game Bar file location from the File path.
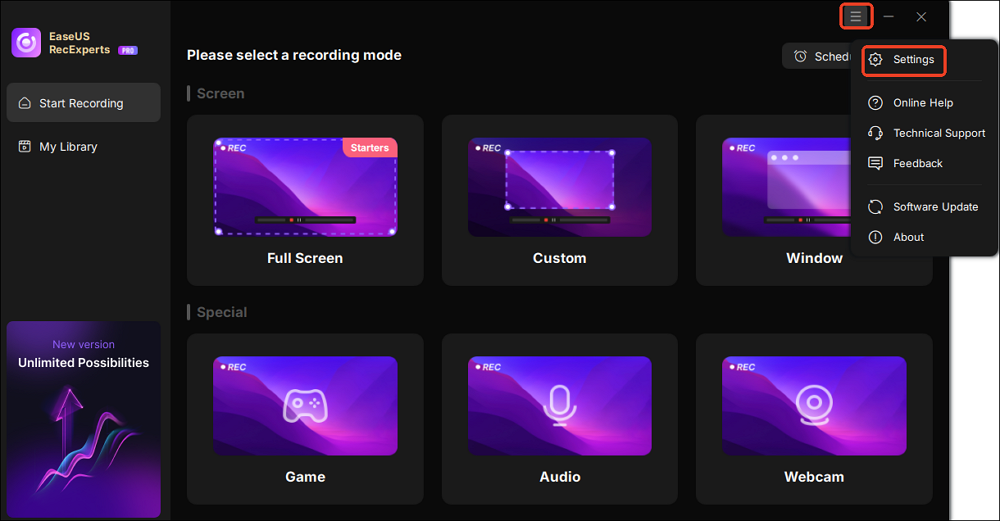
Step 1. Launch EaseUS game recorder and click the Menu icon to open Settings.
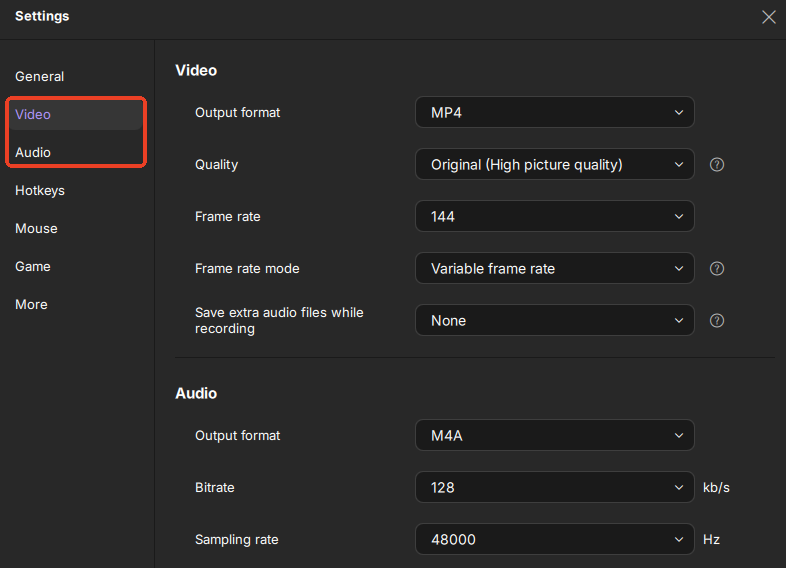
Step 2. Then click on Video and Audio to adjust the frame rate (from 1 to 144), video quality, format, bitrate, etc.
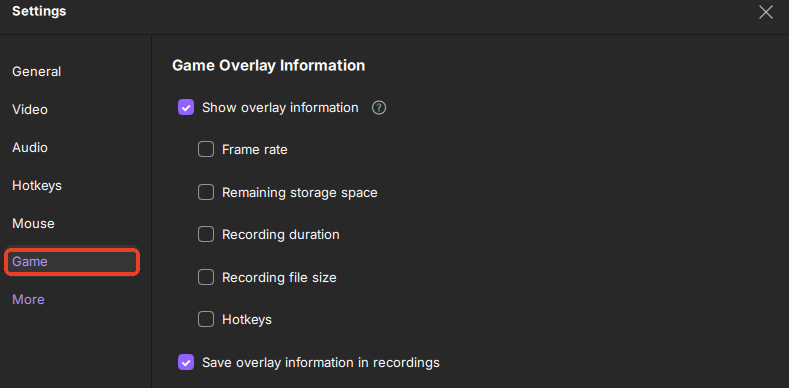
In addition, you can click on the Game tab to change some game overlay options.
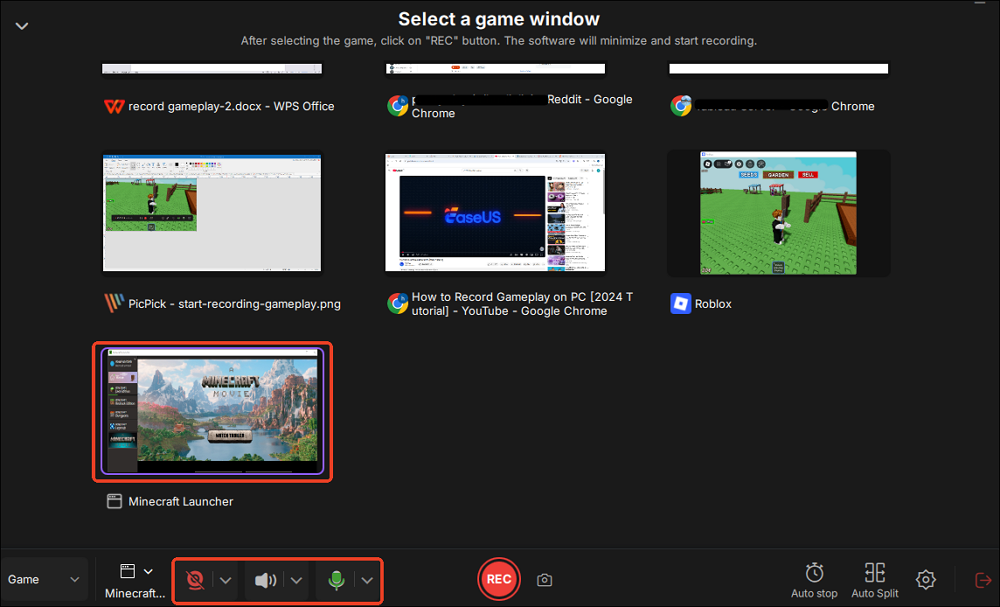
Step 3. Return to the main interface and click the Game mode. Select the game window to capture the desired gameplay, and choose the webcam or audio source if needed. Finally, click REC to begin recording your game.
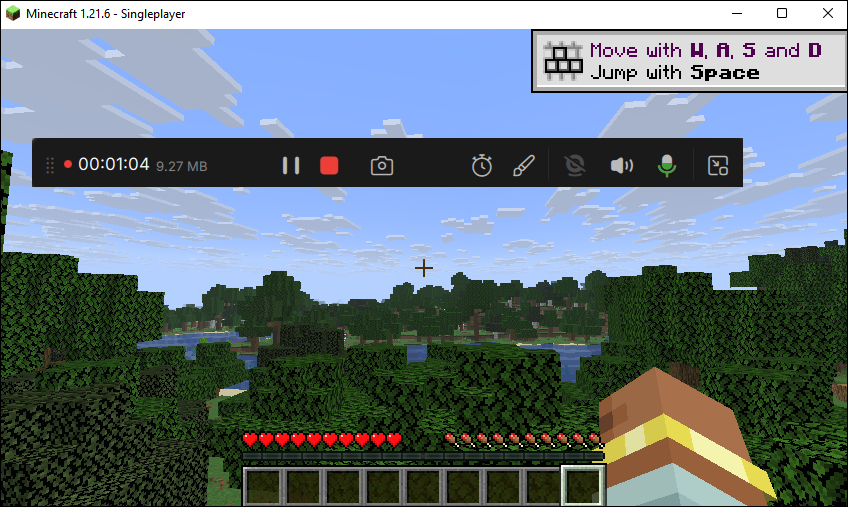
Step 4. A small bar will display the recording time. You can take screenshots during the recording or set a specific stop time by clicking the clock icon on the toolbar.
Step 5. Once complete, you can view and edit the recorded footage using the built-in video player and editor.
Conclusion
After reading this ultimate on Xbox Game Bar file location, I hope you get the answer you want.
Although Xbox Game Bar is a useful game recording tool for Windows 11 and 10, you may want an easier-to-use alternative. If you are willing to install a third-party game recording tool, please give EaseUS RecExperts a shot.
This robust screen recorder supports both high-end and low-end PCs. Download it to your computer, and you will have a smooth recording experience on Windows 11, 10, 8, or 7.
Xbox Game Bar Recording File Location FAQs
Learn more frequently asked questions on the Xbox Game Bar video file location in this part.
1. Where are the Xbox game bar settings?
Press the Windows button, then click Settings > Gaming > Captures. Here, you can customize your recording preferences, such as the Record what happened shortcut, max recording length, audio capture settings, video frame rate, video quality, and so on.
2. How to get rid of Xbox Game Bar in Windows 11?
To get rid of the Xbox Game Bar in Windows 11, you need to uninstall the game bar from Windows PowerShell. To do so,
Step 1. Click the Windows button, type powershell, and then choose Run as Administrator.
Step 2. Run the command "Get-AppxPackage Microsoft.XboxGamingOverlay | Remove-AppxPackage". Press Enter.
Step 3. Wait for the progress meter to finish, then check to see if the Xbox bar is disabled and shut the PowerShell window.
3. Should I delete the Xbox game Bar?
There are some dimensions to help you decide whether to delete the Xbox Game Bar.
- Consider how frequently you use the Game Bar and whether it enhances your gaming experience.
- Monitor how it affects your system's performance while gaming.
- Consider whether you have other recording alternatives (like EaseUS RecExperts) that can perform the same functions as the Game Bar.
If you have decided to disable the Xbox Game Bar, you can turn it off from the Gaming settings. To do so:
Step 1. Press the Windows + I keys together to access Windows Settings.
Step 2. Navigate to Gaming > Game Mode. Toggle off Game Mode.
Step 3. Close Settings.
4. How do I stop the Xbox game bar from running in the background?
To stop the Xbox Game Bar from running in the background on your Windows PC, you can disable it by following these steps:
Step 1. Click on the Start menu (Windows icon) and select the Settings gear icon.
Step 2. In the Settings window, select Gaming.
Step 3. Click on the Xbox Game Bar from the left sidebar.
Step 4. Toggle off the "Record game clips, screenshots, and broadcast using Xbox Game Bar" option.
Share this article on your social media to help more users!
EaseUS RecExperts

One-click to capture anything on screen!
No Time Limit, No watermark
Start Recording